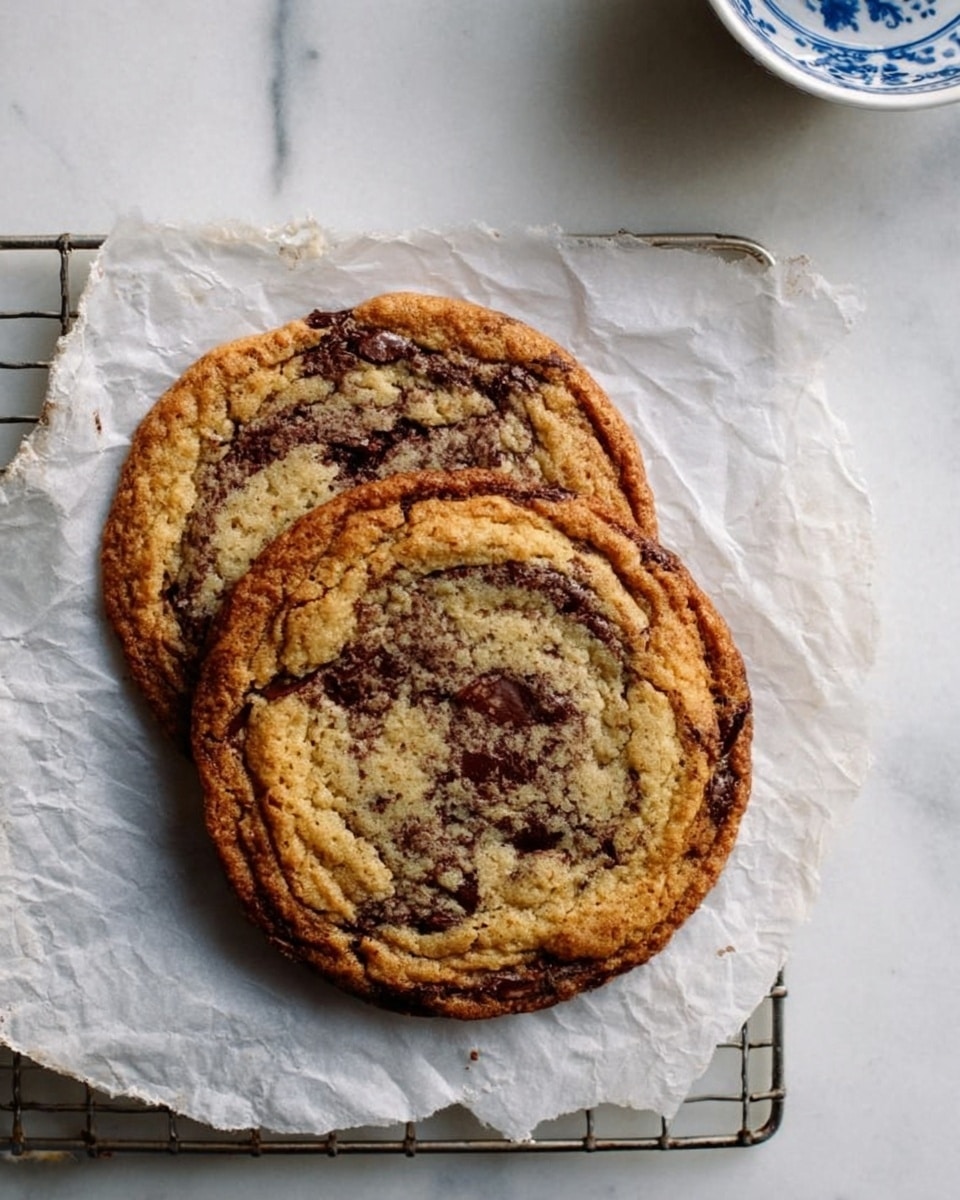
If you’ve ever dreamed of chocolate chip cookies that are delightfully chewy with crinkly, wrinkly tops, then this Wrinkly Chocolate Chip Cookies Recipe is exactly what you need. I absolutely love how these cookies turn out—with a perfect balance of gooey centers and textured, wrinkled surfaces that make each bite feel gourmet. Whether you’re baking for a cozy afternoon snack or impressing guests, these cookies never fail to charm.
When I first tried this recipe, I was surprised by the fun technique of “pan-banging” to create those signature wrinkles. You’ll find that this little trick makes the difference between ordinary cookies and ones that have a bakery-worthy look and texture. Plus, the rich bittersweet chocolate chunks mix with flaky salt on top for a melt-in-your-mouth experience that you’ll want to make again and again.
Why You’ll Love This Recipe
- Unique Texture: The signature wrinkly top adds a fun, bakery-style look and irresistible chewiness.
- Chocolate Diversity: Using both chunks and shards of bittersweet chocolate creates delightful pockets of texture and flavor.
- Simple Technique: The pan-banging method is a clever hack that anyone can master for perfect cookies every time.
- Flavor Boost: A sprinkle of flaky salt on top elevates the sweetness and balances the chocolate perfectly.

Ingredients You’ll Need
Each ingredient in this Wrinkly Chocolate Chip Cookies Recipe plays a crucial role—from butter providing richness to the combo of sugars creating a perfect caramel note. I always recommend using fresh, quality ingredients to bring out the best in every bite.
- Unsalted butter: Make sure it’s at room temperature for easy creaming and that lovely creamy texture in the batter.
- Granulated sugar: Adds crispness around the edges and balances moisture.
- Light or dark brown sugar: Provides that deep, molasses flavor that keeps the cookies chewy and flavorful.
- Kosher salt: A pinch enhances all the flavors and complements the chocolate.
- Egg: Binds the dough, and adds tenderness.
- Water: A little secret I discovered to keep cookies moist without weighing them down.
- Pure vanilla extract: Classic flavor boost that makes everything taste richer.
- Baking soda: Helps the cookies spread just right and encourages browning.
- All-purpose flour: Provides the sturdy base—don’t overmix or your cookies will be tough.
- Bittersweet chocolate: Chopped into various sizes so you get melty chunks and crispy shards in every bite.
- Flaky salt (optional): Sprinkled on top, it’s the final flourish that makes your taste buds dance.
Variations
I love how versatile this Wrinkly Chocolate Chip Cookies Recipe can be. You can easily switch up the types of chocolate or add in mix-ins that suit your mood or season. Here are some ways I’ve made it my own over the years—you should definitely experiment, too!
- Add nuts: Toasted walnuts or pecans bring great crunch and complement the bittersweet chocolate wonderfully; my family goes crazy every time I throw some in.
- Swap the chocolate: Try milk chocolate for a sweeter twist, or even white chocolate chips for a different flavor profile.
- Make them vegan: Substitute plant-based butter and use flax eggs—just keep an eye on the baking time as they might need a touch longer in the oven.
- Scent variations: A hint of espresso powder or orange zest amps up the chocolate flavor and adds a sophisticated note.
How to Make Wrinkly Chocolate Chip Cookies Recipe
Step 1: Prep your baking tools and dough
Start by setting your oven rack in the middle position for even baking. Line two baking sheets with your preferred liner—parchment paper works wonderfully, or silicone mats for an eco-friendly choice. Then, in your stand mixer with the paddle attachment, beat the room-temp butter until creamy. This makes for a smooth base that helps your cookies spread perfectly.
Step 2: Mix sugars, egg, and dry ingredients
Add in both sugars and the salt, then whip it until the mixture is light and fluffy—about 2 to 3 minutes. I like to scrape down the bowl a couple of times to make sure everything is well combined. Then add the egg, vanilla, and water, mixing on low just until combined. Next, add the baking soda and flour, mixing until almost combined—overmixing can make cookies tough, so stop once you see no more large flour patches.
Step 3: Fold in the chocolate and chill
Now comes my favorite part: folding in the bittersweet chocolate pieces. Mixing chunks with shards gives the cookies those glorious pockets of molten chocolate and crispy edges. Once mixed, you can refrigerate the dough for several hours or even overnight—this break really improves flavor and texture.
Step 4: Shape, salt, and freeze dough balls
Preheat your oven to 350°F. Scoop the dough into generous 100-gram balls—you’ll want these to be a bit heaping, about a third of a cup each. Place them on a plate, sprinkle with flaky salt, and freeze for 15 minutes before baking; this little chill helps the cookies hold their shape and develop that wrinkly top we’re after.
Step 5: Bake with the signature pan-banging technique
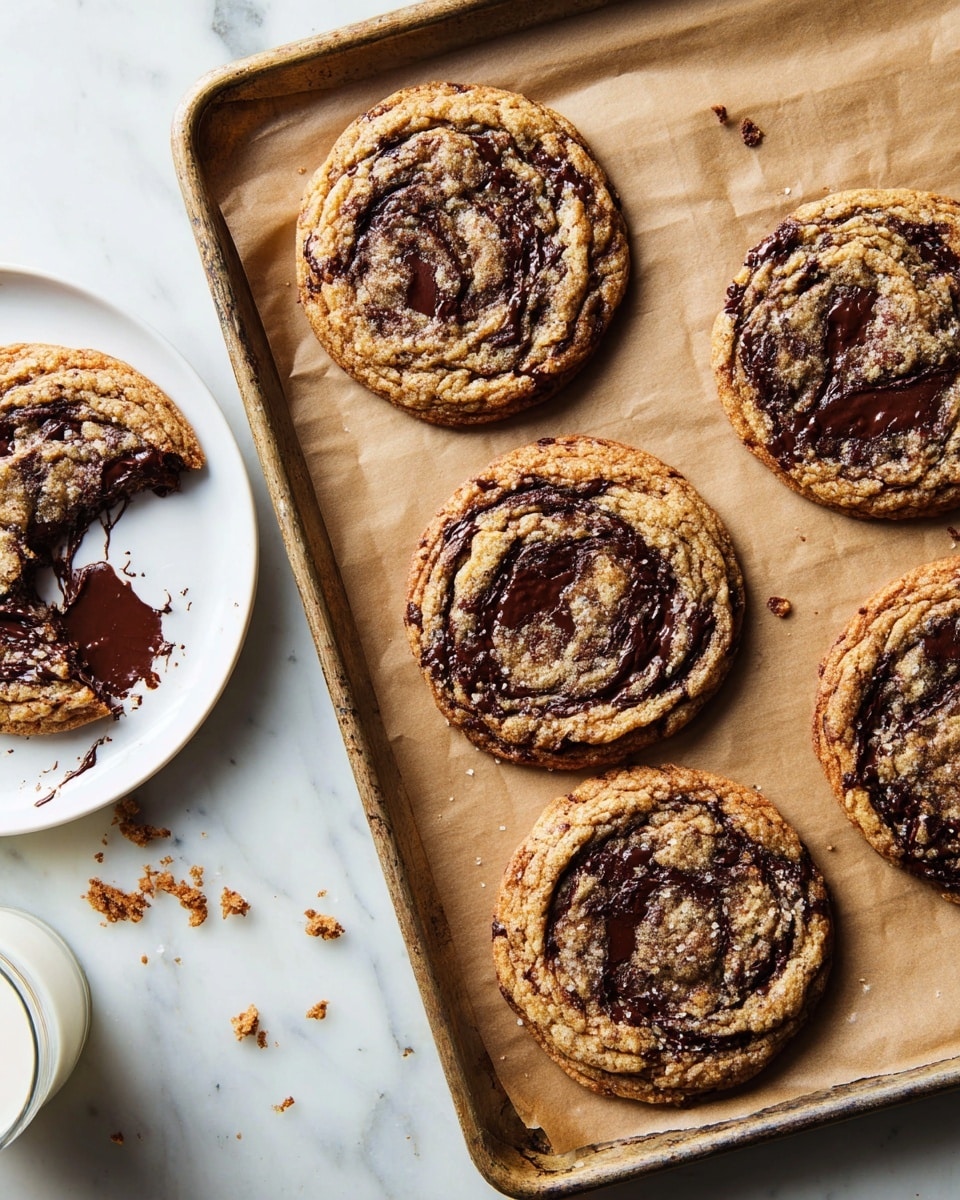
Arrange four dough balls spaced evenly on a prepared sheet pan. Bake for 10 minutes until the centers are slightly puffy. Here’s where the fun begins—lift the pan and drop it firmly onto the oven rack. This jolts the cookies, causing the centers to deflate and edges to set, making those iconic wrinkles. After 3 minutes, the cookies puff back up, so lift and drop the pan again—repeat one or two more times until you see lots of beautifully formed wrinkles. Finish baking for a total of 16–18 minutes until the edges are golden but the centers remain gooey.
Step 6: Cool and enjoy
Let the cookies cool on the sheet pan for about 10 minutes before transferring them to a wire rack to cool completely. This resting period lets them set up perfectly without losing any of the chewiness. Repeat the baking process with the remaining dough, and you’ll have a batch ready to impress!
Pro Tips for Making Wrinkly Chocolate Chip Cookies Recipe
- Don’t Skip the Pan-Banging: It may seem strange, but this technique is essential for the signature wrinkly tops—don’t be shy about giving the pan a good thump!
- Chill Your Dough: Refrigerating the dough helps develop flavors and makes the dough easier to handle and shape.
- Mix Chocolate Sizes: Combining chunks with shards gives you varied texture and melty spots you’ll love.
- Watch Your Bake Time: Remove cookies when edges are golden but centers still look soft—that gooey texture makes all the difference.
How to Serve Wrinkly Chocolate Chip Cookies Recipe
Garnishes
I’m a huge fan of the flaky salt sprinkle on these cookies—it cuts through the sweetness and pumps up the chocolate flavor. Sometimes, I add a tiny dusting of powdered sugar for a festive touch, especially for holiday treats. If you’re serving guests, a small smear of buttercream between two cookies is a fun, indulgent presentation twist.
Side Dishes
These cookies pair wonderfully with a cold glass of milk, but for a grown-up twist, I like to serve them alongside a steaming mug of espresso or chai tea. For a dessert board, add fresh berries and a scoop of vanilla ice cream to balance the rich chocolate.
Creative Ways to Present
When hosting bake sales or parties, I’ve arranged these cookies stacked with parchment paper in between on pretty platters for an irresistible buffet. For gifts, wrapping a few cookies in cellophane tied with twine (and a sprinkle of extra flaky salt) makes a thoughtful, homemade present that friends truly appreciate.
Make Ahead and Storage
Storing Leftovers
I store leftover cookies in an airtight container at room temperature for up to four days. I add a slice of bread to the container—this little trick keeps the cookies soft and chewy by maintaining moisture balance. It’s a game changer for keeping them fresh!
Freezing
I often freeze the cookie dough balls after shaping but before salting and baking. Frozen dough can be popped straight into the oven with just a few extra minutes added to baking time. This method saves so much time and is great for spontaneous cookie cravings!
Reheating
To revive leftover cookies, a quick 8–10 seconds in the microwave softens them wonderfully, or pop them in a warm oven at 300°F for 5 minutes to bring back that just-baked aroma and texture. Just be careful not to overheat, or they’ll dry out.
FAQs
-
What makes these cookies “wrinkly”?
The wrinkly texture is achieved by gently dropping the cookie sheet onto the oven rack multiple times during baking. This causes the centers to deflate and the edges to set, creating those characteristic wrinkles on top.
-
Can I use regular chocolate chips instead of chopped bittersweet chocolate?
Yes, you can, but using chopped bittersweet chocolate with varied sizes really enhances the texture and flavor by providing melty pockets and crispy shards that chocolate chips alone might not offer.
-
Is it necessary to freeze the dough balls before baking?
Freezing the dough balls for 15 minutes helps them maintain shape in the oven and improves the final texture, but if you’re short on time, you can bake immediately—you might just get slightly flatter cookies.
-
How long will these cookies stay fresh?
Stored in an airtight container with a slice of bread, the cookies will stay chewy and delicious for up to four days at room temperature.
Final Thoughts
This Wrinkly Chocolate Chip Cookies Recipe has become a staple in my kitchen because it’s both reliable and fun. I adore that rustic, textured look paired with soft, molten chocolate pockets—it feels special without being complicated. If you’re looking to up your cookie game or just want a sweet treat that’ll please any crowd, I really think you’ll enjoy making these as much as I do. So grab your ingredients, and let’s get wrinkling!
Print
Wrinkly Chocolate Chip Cookies Recipe
- Prep Time: 40 Minutes
- Cook Time: 36 Minutes
- Total Time: 1 Hour 16 Minutes
- Yield: About 10 cookies
- Category: Dessert
- Method: Baking
- Cuisine: American
Description
These Wrinkly Chocolate Chip Cookies are delectably soft and gooey in the center with beautifully wrinkled edges achieved by a unique baking and pan-banging technique. Made with bittersweet chocolate chunks and a subtle sprinkle of flaky salt, these cookies offer a perfect balance of rich chocolate and buttery sweetness.
Ingredients
Cookie Dough
- 1/2 pound (2 sticks, 227 grams) unsalted butter, at room temperature
- 1 cup (200 grams) granulated sugar
- 3/4 cup (160 grams) packed light or dark brown sugar
- 3/4 teaspoon kosher salt
- 1 large egg
- 1 tablespoon water
- 1 1/2 teaspoon pure vanilla extract
- 1/2 teaspoon baking soda
- 2 cup (256 grams) all-purpose flour
- 8 ounce (227 grams) bittersweet chocolate, chopped (some chunks, some shards)
Topping
- Flaky salt, to sprinkle on top (optional)
Instructions
- Prepare Oven and Pans: Adjust an oven rack to the middle position and line two sheet pans with aluminum foil (dull side up), parchment paper, or silicone mats to ensure even baking and easy cleanup.
- Make the Dough: In a stand mixer bowl fitted with a paddle attachment, beat the butter on medium speed until creamy. Scrape down the sides. Add granulated sugar, brown sugar, and kosher salt, then beat on medium until light and fluffy, about 2 to 3 minutes. Incorporate the egg, vanilla extract, and water by mixing on low speed until combined. Add baking soda and mix briefly. Gradually add flour and mix until nearly combined. Fold in chopped bittersweet chocolate pieces until evenly distributed. The dough can be refrigerated for several hours or overnight for enhanced flavor and texture.
- Preheat Oven and Shape Cookies: Heat oven to 350°F (175°C). Scoop dough into 100-gram balls (approximately a heaping 1/3 cup each). Sprinkle each ball with flaky salt if desired. Place dough balls on a plate and freeze for 15 minutes to help maintain shape during baking.
- Arrange and Bake: Space 4 cookie dough balls evenly on one prepared sheet pan. Bake for 10 minutes until the cookies puff slightly in the center. Remove the sheet pan and sharply lift it before dropping it against the oven rack to help set edges and create wrinkled texture in the centers. After 3 minutes, when cookies puff again, repeat the lift-and-drop pan-banging one or two more times. Continue baking for a total of 16 to 18 minutes until cookies are spread out, edges are golden brown, and centers remain gooey.
- Cool and Finish: Let cookies cool on the baking sheet for about 10 minutes to firm up. Transfer them to a wire rack to cool completely. Repeat the baking process with the remaining dough.
Notes
- Freezing the dough balls before baking helps cookies maintain their shape and promotes an even bake.
- The unique pan-banging technique creates the characteristic wrinkled top by allowing the centers to deflate and puff repeatedly.
- Using bittersweet chocolate adds a rich depth of flavor; you can adjust the chocolate type based on your preference.
- Sprinkling flaky salt enhances the chocolate flavor and balances sweetness but is optional.
- Refrigeration of dough before baking is recommended but not mandatory.
- For best results, use a kitchen scale to measure dough portions accurately.
Nutrition
- Serving Size: 1 cookie (approximately 100 grams)
- Calories: 450 kcal
- Sugar: 28 g
- Sodium: 180 mg
- Fat: 25 g
- Saturated Fat: 15 g
- Unsaturated Fat: 9 g
- Trans Fat: 0.2 g
- Carbohydrates: 54 g
- Fiber: 3 g
- Protein: 5 g
- Cholesterol: 55 mg


