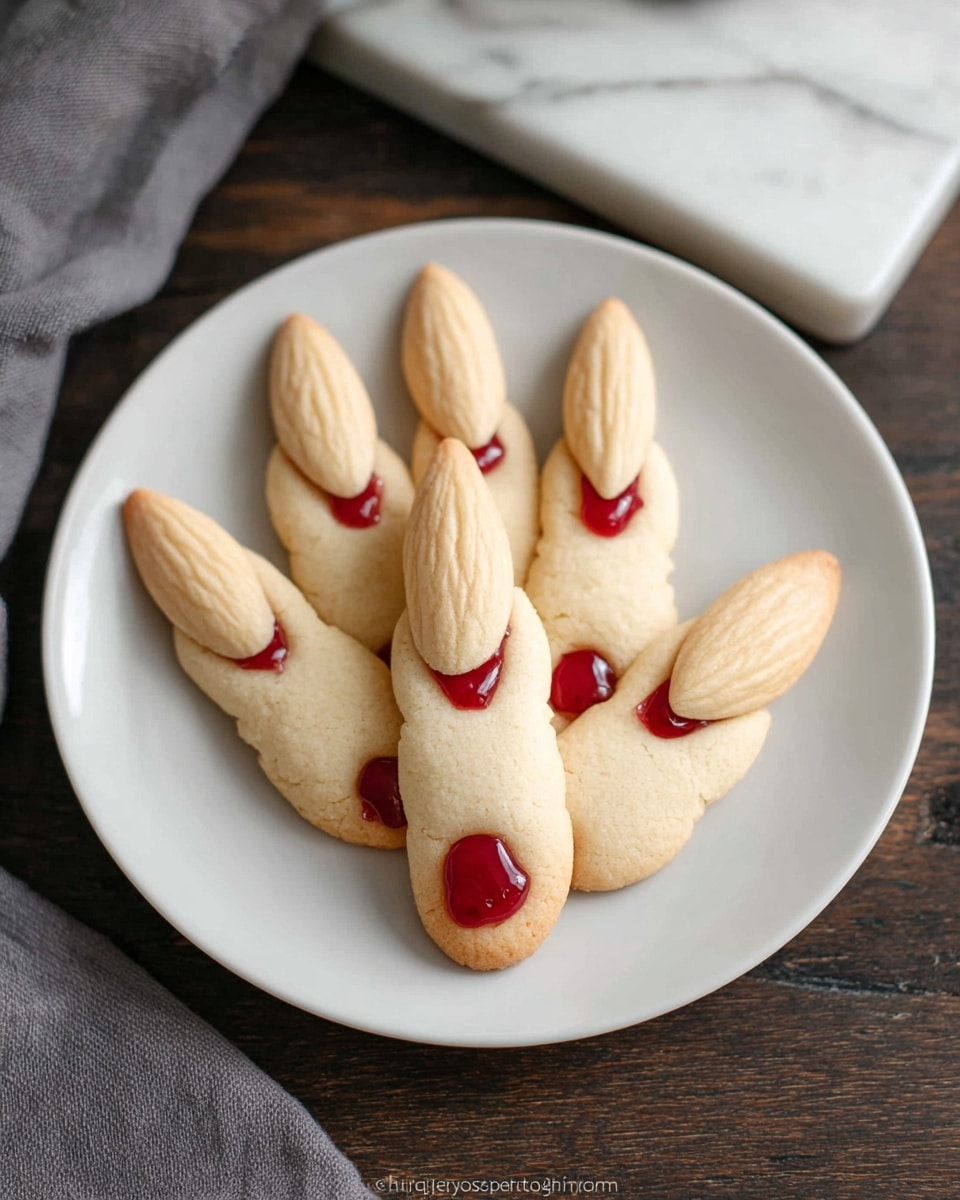
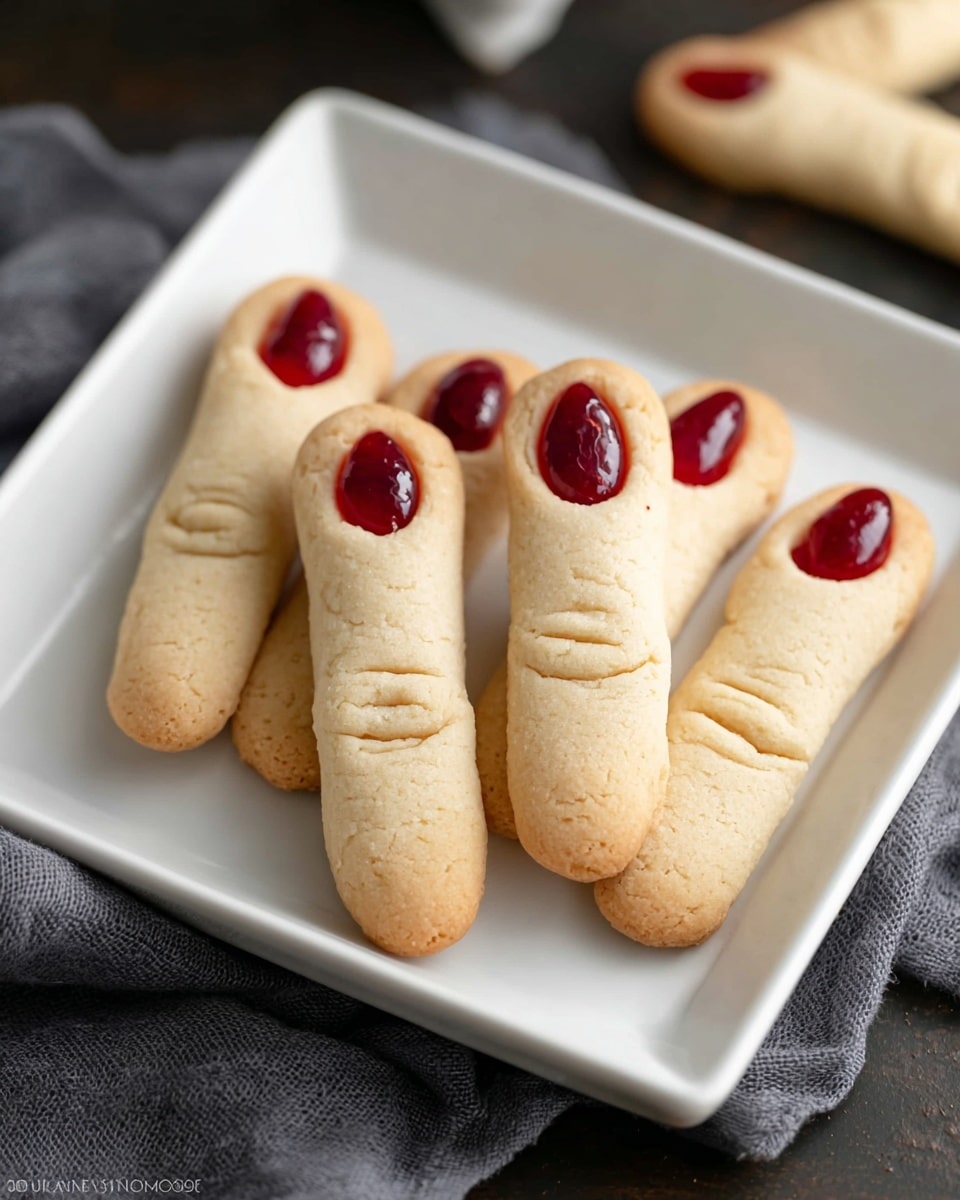
If you’re looking for a spooky treat that’s as fun to make as it is to eat, look no further than this Witches Fingers Cookies Recipe. I absolutely love how these creepy-cool cookies turn out—the perfect blend of buttery sweetness with that eerie almond “nail” detail. When I first tried this recipe, my family went crazy for how delightfully gnarly these cookies look, especially around Halloween. Stick with me, because not only will you get the full rundown on making them perfectly, but I’ll share tips and tricks I’ve learned along the way so your batch turns out fang-tastically every single time!
Why You’ll Love This Recipe
- Easy to Make: The dough comes together quickly and can be shaped with just your hands and a knife—no fancy tools needed.
- Spooky Presentation: Those little almond “nails” and knuckle details make these cookies a standout centerpiece for any Halloween party.
- Perfect Texture: The cookies are tender with a slight crisp around the edges—you’ll find that balance oh-so-satisfying.
- Family Favorite: Every year, my kids beg me to make these, and your family will too once they try them!

Ingredients You’ll Need
This Witches Fingers Cookies Recipe calls for simple ingredients you probably have on hand, but each plays a key role in getting the right flavor and texture. Using both vanilla and almond extract adds amazing depth, and those whole blanched almonds? They’re the star nails! Here’s a little about each ingredient and what makes it special.
- Butter: Make sure it’s softened at room temperature so it creams nicely with the sugar for a smooth dough.
- Powdered sugar: I prefer powdered sugar for a delicate sweetness and to keep the texture soft and tender.
- Egg: Adds moisture and helps bind the dough together perfectly.
- Vanilla extract: Grounds the flavor and adds warmth that balances the almond extract.
- Almond extract: The secret ingredient that gives these cookies that eerie, nutty aroma that’s perfect for the witchy theme.
- Flour: The base that gives structure. I use regular all-purpose flour for the best results.
- Baking powder: Just enough to give a subtle lift without making the cookies too puffy.
- Salt: Enhances all those sweet and nutty flavors—don’t skip it.
- Red gel frosting or jam: For the creepy “blood” effect on the nailbed. Red gel works best because it holds its shape and color.
- Blanched almonds: These are the “fingernails.” Whole almonds look the most realistic, but sliced almonds can work in a pinch.
Variations
I love encouraging people to make this Witches Fingers Cookies Recipe their own. Over time, I’ve tried a few tweaks depending on the holiday vibe or dietary preferences, and it’s great fun to customize!
- Gluten-Free Version: I swapped out the flour for a gluten-free all-purpose blend once, and while the texture changed slightly, the flavor held strong. Just make sure your blend contains xanthan gum for structure.
- Vegan Adaptation: Using vegan butter and a flax egg works surprisingly well, though the dough is a bit more fragile—handle gently when shaping your fingers.
- Alternative “Blood” Options: Instead of red gel frosting, I’ve used raspberry jam for a fruity twist that’s still festive and delicious.
- Spicy Upgrade: Adding a pinch of cinnamon or pumpkin spice to the dough adds a nice seasonal warmth that pairs beautifully with the almond flavor.
How to Make Witches Fingers Cookies Recipe
Step 1: Cream Butter and Sugar Until Fluffy
Start by using a handheld mixer to cream together your softened butter and powdered sugar in a large bowl. I’ve learned that beating until the mixture is light and fluffy really helps the cookies have that tender crumb we all love. Don’t rush this part! It usually takes about 2-3 minutes to get that perfect texture.
Step 2: Beat in the Egg and Extracts
Next, add your egg along with the vanilla and almond extracts, and beat until everything is well combined. The almond extract is what gives these Witches Fingers Cookies their signature spooky flavor—don’t skip it!
Step 3: Combine Dry Ingredients and Add to Wet
In a separate bowl, whisk together your flour, baking powder, and salt to evenly distribute the leavening and seasoning. Then, slowly add this to your wet mixture, mixing just until everything comes together. Overmixing can make the cookies tough, so stop once you don’t see streaks of flour.
Step 4: Chill the Dough Before Shaping
To make shaping those witchy fingers easier, wrap your dough in plastic wrap and pat it into a disk. Chill it in the fridge for at least 30 minutes. When I first started making this recipe, I used to skip chilling and it was much harder to roll and shape the dough without it sticking to my hands.
Step 5: Shape the Fingers and Add Knuckle Details
Preheat your oven to 325°F and line baking sheets with parchment paper. Then, scoop out dough pieces and roll into 1-inch balls, then elongate them into 3-inch “fingers.” Position them about two inches apart on the baking sheet. Using the dull side of a knife, gently press in three parallel lines in the middle of each finger to mimic knuckles, and pinch above and below for a more realistic shape. Finally, press down at the top with your index finger to create a nailbed. I discovered this trick after my fingers looked like sausages the first time—this step makes all the difference!
Step 6: Chill Before Baking
Pop the baking sheet with the shaped fingers into the freezer for a few minutes before baking. This helps maintain the details so your cookies don’t spread too much. Meanwhile, shape your next batch. This pause is golden—don’t skip it!
Step 7: Bake and Decorate
Bake the chilled cookies for about 15 minutes or until the bottoms just turn golden. Let them cool slightly before squeezing a dab of your red gel frosting or jam on the nailbed, then press an almond on top to create that creepy nail. Wait until the frosting sets so the almonds don’t slide off.
Pro Tips for Making Witches Fingers Cookies Recipe
- Soft Butter is Key: Make sure your butter is truly at room temp to achieve a creamy mix with powdered sugar. Too cold and the dough won’t come together smoothly.
- Don’t Overwork the Dough: Mix just until the flour disappears. Overmixing can make the cookies dense and tough instead of tender.
- Use Parchment or Silicone Mats: This prevents sticking and makes cleanup a breeze—plus, the cookies bake more evenly.
- Freeze Before Baking: Chilling the shaped fingers prevents spreading, preserving the knuckle and nail details that give these cookies their spooky charm.
How to Serve Witches Fingers Cookies Recipe
Garnishes
I usually stick with the classic red gel frosting and almond nails because that crisp pop of red against the pale cookie looks wickedly cool. However, sometimes I add a tiny sprinkle of edible glitter for a magical touch or dust the cookies lightly with cinnamon sugar for extra flavor and sparkle. These little details really amp up the presentation, and your guests will appreciate the extra effort.
Side Dishes
These cookies pair wonderfully with a warm mug of cinnamon-spiced hot cider or a rich cup of hot chocolate topped with marshmallows. For a party, I like serving them alongside a platter of fresh fruits and cheeses to balance the sweetness and keep things festive.
Creative Ways to Present
For a Halloween bash, I’ve arranged these fingers poking out of a “bloody” red jam-filled cauldron bowl or scattered across a platter dusted with cocoa powder as “dirt.” Another time, I stood mine upright in styrofoam under a layer of edible cotton candy “cobwebs” for a creepy, fun effect. Play around—the more thematic, the more conversation your guests will have about your Witches Fingers Cookies!
Make Ahead and Storage
Storing Leftovers
I store leftover cookies in an airtight container at room temperature, layering parchment paper between them to prevent the nails from breaking or sticking. They usually stay fresh and tasty for up to a week, which is perfect because they rarely stick around that long in my house!
Freezing
If you want to prep ahead, these cookies freeze beautifully before baking. Shape the fingers and place them on a tray to freeze individually, then transfer them to a freezer bag. When you’re ready, bake straight from frozen, adding a couple minutes to the baking time.
Reheating
To bring back that fresh-baked feel, pop a few cookies in a preheated oven at 300°F for about 5 minutes. This refreshes their crisp edges while keeping them soft inside—just don’t overdo it or the nuttiness of the almond nails may dry out.
FAQs
-
Can I use regular sugar instead of powdered sugar in this Witches Fingers Cookies Recipe?
While you technically can, powdered sugar is best for this recipe because it dissolves easily into the butter creating a smooth dough and tender cookie texture. Using granulated sugar might result in a coarser dough and rougher texture, which isn’t what you want for these delicate “fingers.”
-
What’s the best way to shape the knuckles on the Witches Fingers Cookies?
Using the dull side of a butter knife to gently press three parallel lines works wonders. Then, pinching the dough slightly above and below the marks adds a realistic knuckle bump. This technique gives your cookies that authentic creepy finger look that makes them so fun and eerie.
-
Can I prepare the dough ahead of time?
Absolutely! You can make the dough and chill it wrapped in plastic wrap for up to 24 hours before shaping and baking. This actually helps develop flavor and makes shaping easier since the dough firms up.
-
What if I don’t have blanched almonds?
Blanched almonds are ideal because they don’t have the brown skin, which makes for a cleaner, spookier “nail.” However, you can use regular almonds if you peel them, or even sliced almonds pressed in to resemble nails. It might be a bit less striking visually, but still delicious.
-
How do I make sure the almond “nails” stick well?
Apply a small dab of sticky red gel frosting or jam onto the nailbed area while the cookie is still warm, then press the almond firmly into place. Let the cookies cool completely before moving them to ensure the almonds adhere strong with no slipping.
Final Thoughts
Making this Witches Fingers Cookies Recipe has become one of my favorite seasonal rituals. There’s something so satisfying about transforming simple cookie dough into a spooky, fun treat that kids and adults alike can enjoy. Plus, the process is straightforward, and the results are impressively eerie without being too complicated. Whether it’s for a Halloween party, a classroom treat, or just a fun weekend baking project, I can’t recommend these enough. Give this recipe a try soon—you’ll love the way these gnarly little fingers disappear off your plate!
Print
Witches Fingers Cookies Recipe
- Prep Time: 20 minutes
- Cook Time: 15 minutes
- Total Time: 35 minutes
- Yield: 30 cookies
- Category: Dessert
- Method: Baking
- Cuisine: American
Description
These Witches Fingers Cookies are a spooky and fun treat perfect for Halloween. With a buttery, almond-scented dough shaped into eerie finger shapes and topped with red gel frosting and almond ‘nails,’ they offer a deliciously festive way to celebrate the season. Crisp on the outside and tender inside, these cookies are sure to delight kids and adults alike.
Ingredients
Wet Ingredients
- 1 cup butter, at room temperature
- 1 cup powdered sugar
- 1 egg
- 1 teaspoon vanilla extract
- 1 teaspoon almond extract
Dry Ingredients
- 2 ¾ cups all-purpose flour
- 1 teaspoon baking powder
- ½ teaspoon salt
Toppings
- Red gel frosting or red jam or jelly, for decorating nailbeds
- 60 whole blanched almonds or sliced almonds (one for each cookie)
Instructions
- Cream butter and sugar: Using a handheld mixer, cream together the room temperature butter and powdered sugar in a large bowl until smooth and fluffy.
- Add eggs and extracts: Beat in the egg, vanilla extract, and almond extract until fully incorporated.
- Combine dry ingredients: In a separate bowl, whisk together the flour, baking powder, and salt.
- Mix dry into wet: Slowly add the dry mixture to the butter mixture, mixing until a dough forms.
- Chill dough: Wrap the dough in plastic wrap, pat it into a disk, and chill in the refrigerator for at least 30 minutes to firm up.
- Prepare baking sheets and oven: Line baking sheets with parchment paper. Preheat the oven to 325°F (163°C).
- Shape fingers: Scoop out dough and roll into 1-inch diameter balls. Then roll each ball into a 3-inch long finger shape. Place the shaped fingers on the baking sheets about 2 inches apart.
- Create knuckles and nailbeds: Using the dull side of a knife, make 3 parallel marks midway down each finger to form knuckles. Pinch the dough above and below the knuckle indentations to accentuate shape. Press your index finger down at the top of each finger to form the nailbed.
- Freeze before baking: Place the baking sheet in the freezer for a few minutes; this helps the cookies hold their shape during baking.
- Bake fingers: Bake the chilled fingers for about 15 minutes or until golden around the edges.
- Decorate with nails: Remove cookies from the oven and let them cool for a few minutes. Apply a small amount of red gel frosting or red jam to the nailbed and press an almond into each to create a creepy fingernail effect.
- Cool completely: Allow the cookies to cool completely on a wire rack so the almonds adhere firmly.
Notes
- For best results, use cold dough when shaping the fingers; it helps keep the shape during baking.
- Red gel frosting works best for the ‘blood’ effect on the nails, but jam or jelly can be substituted.
- Sliced almonds create a flatter nail, while whole blanched almonds form a more realistic finger nail shape.
- Store the cookies in an airtight container at room temperature for up to three days.
- These spooky cookies make a fun activity for kids to assemble and decorate during Halloween parties.
Nutrition
- Serving Size: 2 cookies
- Calories: 156
- Sugar: 5g
- Sodium: 119mg
- Fat: 10g
- Saturated Fat: 4g
- Unsaturated Fat: 5g
- Trans Fat: 0g
- Carbohydrates: 16g
- Fiber: 1g
- Protein: 3g
- Cholesterol: 22mg
