
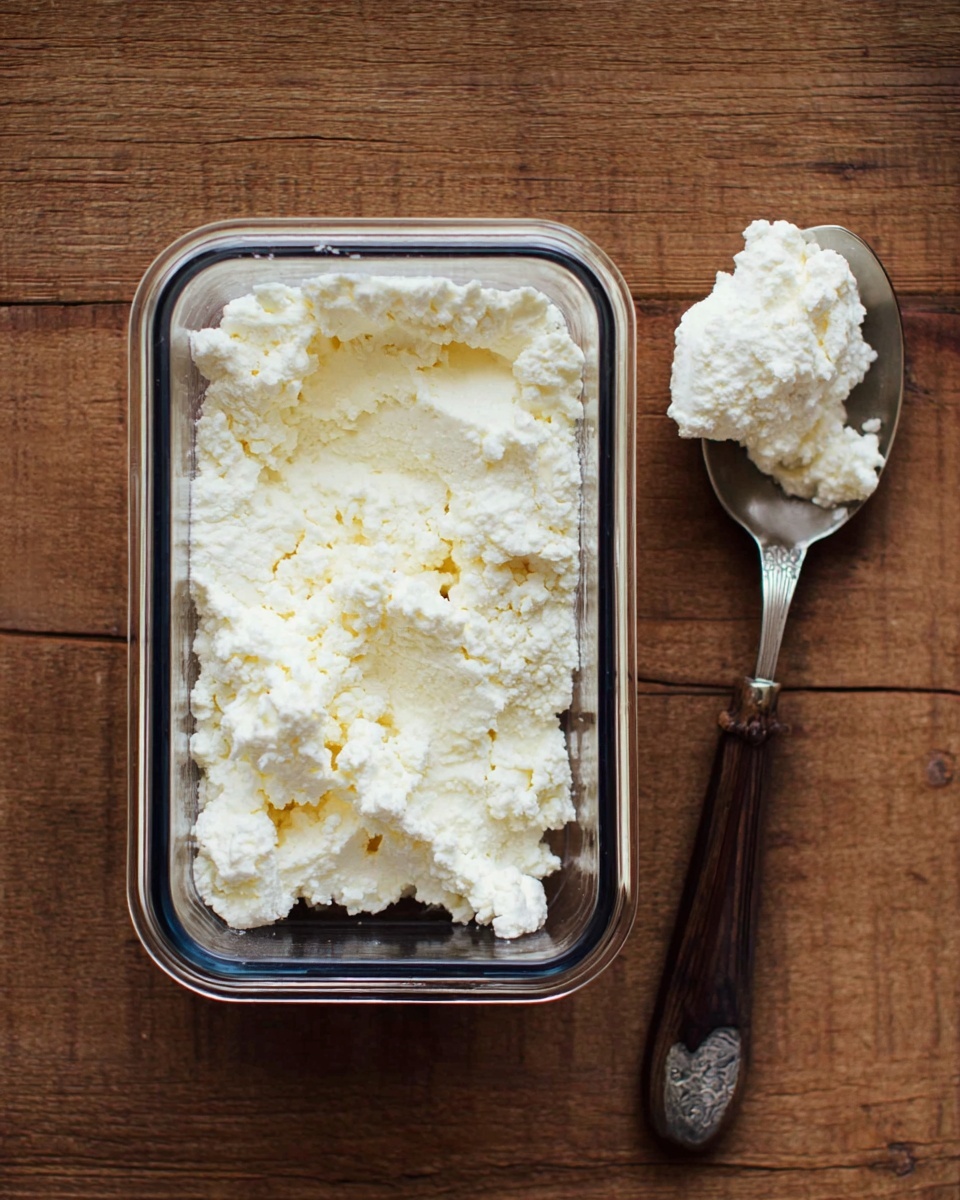
If you’ve ever wanted to impress your friends with fresh cheese but felt intimidated by the process, I’ve got just the thing for you. This Ultra-Creamy Fresh Homemade Ricotta Recipe is my go-to for creamy, dreamy ricotta that tastes like it came straight from an Italian farmhouse. I absolutely love how it turns out every single time—rich, luscious, and way better than store-bought. And the best part? It’s surprisingly simple to make, even if you’re a total beginner in the kitchen. Stick with me here, because by the end, you’ll want to make this your new kitchen staple.
Why You’ll Love This Recipe
- Ultra-Creamy Texture: You’ll get a silky, rich ricotta that melts in your mouth, perfect for any dish.
- Simple Ingredients: With just four basics—milk, cream, lemon juice, and salt—you can make it anytime.
- Quick & Fresh: Ready in under an hour, this recipe lets you skip the store-bought and have fresh cheese on demand.
- Perfect For Beginners: Step-by-step instructions keep things easy, so you won’t feel overwhelmed.

Ingredients You’ll Need
This recipe is all about letting quality dairy shine through, so choosing the right milk and cream really makes a difference. You’ll want fresh, whole milk that’s not ultra-pasteurized—trust me, I learned this the hard way when my ricotta didn’t curdle properly! Using fresh lemon juice adds that perfect tang and helps the curdling process along beautifully.
- Whole Milk: Make sure it’s NOT ultra-pasteurized—freshness here is key for curdling and flavor.
- Cream: Ultra-pasteurized cream is fine and adds the luscious richness that makes this ricotta ultra-creamy.
- Fine Sea Salt: A pinch balances the flavor without overpowering the delicate taste of the cheese.
- Fresh Lemon Juice: Freshly squeezed and strained for the perfect tang and clean curds (you can substitute vinegar if necessary).
Variations
I love using this Ultra-Creamy Fresh Homemade Ricotta Recipe as a starting point and then tweaking it slightly to suit whatever mood or meal I’m preparing. You can really play around with texture and flavor!
- Herbed Ricotta: Stir in fresh herbs like basil, thyme, or chives to give the ricotta a fragrant, fresh twist—my family goes crazy for this version on crostini.
- Dairy-Free Alternative: While not traditional, experimenting with cashew cream instead of dairy yields a vegan-friendly ricotta that’s great for those with dietary restrictions.
- Vinegar Substitute: If you run out of lemons, white or red vinegar also works as the acid, and I’ve found it creates just as nice curds.
How to Make Ultra-Creamy Fresh Homemade Ricotta Recipe
Step 1: Preparing Your Strainer
First things first: line a fine mesh strainer with a double layer of cheesecloth. This is crucial for catching all those delicate curds while allowing the whey to drain off. Set the strainer over a large, deep bowl so you can collect the liquid easily. Pro tip: make sure your bowl is deep enough—your draining ricotta will be a little messy otherwise!
Step 2: Heating the Dairy
Pour your whole milk, cream, and sea salt into a heavy-bottomed pot and bring the heat to medium-high. Stir gently but frequently with a wooden spoon using a figure-8 motion to prevent the milk from scorching on the bottom. You’ll notice frothy bubbles forming on the edges with bigger bubbles popping in the center—that’s when you know it’s almost reached the ideal 200–206°F (93–97°C). Trust me, using a digital thermometer here is a game changer to hit that perfect temperature without overcooking.
Step 3: Curds in Action
Right when your mixture hits that temp, remove the pot from heat and immediately add the fresh lemon juice. Stir only once or twice—resist the urge to keep stirring because the magic happens when it sits still. Let it rest, untouched, for about 10 minutes on the warm burner. You’ll see little curds start to form and float—both small and big. It’s like watching a gentle, cheesy snowfall.
Step 4: Draining Your Ricotta
Using a slotted spoon, gently transfer the curds into your lined strainer. Let them drain at room temperature for about 10–15 minutes if you want light, fluffy ricotta. For a firmer texture, just leave it a little longer. Remember, it will firm up more in the fridge, so factor that in if you want to use it right away for things like ravioli or desserts.
Step 5: Storing and Enjoying
Spoon your fresh ricotta into an airtight container and pop it in the fridge. It keeps beautifully for up to 4 days—though I warn you, it tends to disappear much faster in my house! And voila, you have your own ultra-creamy homemade ricotta ready to elevate any meal.
Pro Tips for Making Ultra-Creamy Fresh Homemade Ricotta Recipe
- Use Fresh Milk: My first batch failed because I used ultra-pasteurized milk—fresh whole milk is non-negotiable for curds to form properly.
- Don’t Rush Cooling: Letting the curds set for the full 10 minutes without stirring ensures beautifully fluffy ricotta.
- Avoid Scorching: Stirring with a wooden spoon in a figure-8 motion prevents bitter flavors from scorched milk.
- Drain Time Matters: Experiment with straining time to get your perfect texture—shorter for creamier, longer for firmer.
How to Serve Ultra-Creamy Fresh Homemade Ricotta Recipe
Garnishes
I like to keep it simple—a drizzle of good quality olive oil, a sprinkle of flaky sea salt, and a twist of freshly ground black pepper really lets the ricotta shine. Sometimes, I add fresh herbs like basil or thyme, which gives it a lovely aroma and makes it feel a little fancy even if you’re just enjoying it for breakfast.
Side Dishes
Ricotta pairs beautifully with warm toasted bread, roasted vegetables, or fresh summer tomatoes. I often serve it alongside a simple green salad tossed in lemon vinaigrette or use it as a creamy side for grilled chicken or fish. It’s a versatile kitchen MVP!
Creative Ways to Present
Hosting a dinner? Spoon ricotta into small bowls topped with a drizzle of honey and a sprinkle of toasted pine nuts for a stunning appetizer. Or use it as a filling for fresh ravioli or stuffed shells to wow your guests. I even use this ricotta in desserts like cheesecakes and cannoli—trust me, the ultra-creamy quality makes a noticeable difference.
Make Ahead and Storage
Storing Leftovers
I always store my homemade ricotta in an airtight container in the fridge. Because it’s fresh and preservative-free, I aim to use it up within 4 days for the best texture and flavor. If you notice any watery liquid on top, just give it a gentle stir before using—totally normal and doesn’t affect the taste.
Freezing
Freezing fresh ricotta isn’t my favorite because the texture changes a bit once thawed—it can become crumbly. But if you must, freeze in a sealed container and thaw overnight in the fridge. It’s still great for cooking but probably less ideal for spreading fresh on toast.
Reheating
If you want to warm your ricotta, do it gently on low heat or in the microwave in short bursts. Stirring frequently helps maintain that creamy texture. I often warm it just enough to dollop over pasta or steamed veggies—it’s heavenly!
FAQs
-
Can I use low-fat or skim milk for this recipe?
Low-fat or skim milk will produce less creamy and much less rich ricotta. I definitely recommend using whole milk and cream to get that ultra-creamy texture that makes this recipe special.
-
Why can’t I use ultra-pasteurized milk?
Ultra-pasteurized milk is heated to a higher temperature during processing, which prevents it from curdling properly. This means your ricotta won’t form the lovely curds you need, and the texture will be off.
-
Can I substitute vinegar for lemon juice?
Yes! White or red vinegar works well as the acid to curdle the milk. Lemon juice just adds a little natural brightness that I love, but vinegar is a fine substitute if you don’t have lemons on hand.
-
How long will homemade ricotta last in the fridge?
It keeps for about 4 days in an airtight container in the fridge. Fresh ricotta is best enjoyed sooner rather than later, as its delicate freshness starts to fade after a few days.
-
Can I double this recipe?
Absolutely, but be aware that draining will take longer and you’ll need a larger strainer or work in batches since a 7- or 8-inch strainer can’t hold double the curds neatly. Patience is key here!
Final Thoughts
Making this Ultra-Creamy Fresh Homemade Ricotta Recipe has honestly changed how I cook and entertain. There’s something so satisfying about pulling something fresh and simple together yourself, especially when it transforms everyday dishes into something special. I really hope you give this a try and enjoy the creamy, fresh flavor as much as my family and I do. Trust me, once you start making your own ricotta, you might never go back to the store-bought kind!
Print
Ultra-Creamy Fresh Homemade Ricotta Recipe
- Prep Time: 25 minutes
- Cook Time: 10 minutes
- Total Time: 35 minutes
- Yield: 1 heaping cup (about 265 grams)
- Category: Cheese / Dairy
- Method: Stovetop
- Cuisine: Italian
- Diet: Vegetarian
Description
This ultra-creamy homemade ricotta recipe uses just four simple ingredients—whole milk, cream, fresh lemon juice, and sea salt—to create a rich and fresh cheese perfect for cooking and baking. Made entirely from scratch, this ricotta is delicate, fluffy, and ready in less than an hour, making it an ideal addition to dishes like ravioli, desserts, or toast toppings.
Ingredients
Dairy
- 3 cups whole milk (DO NOT USE ultra pasteurized milk)
- 1 cup cream (ultra pasteurized is fine)
Other Ingredients
- 1/4 tsp fine sea salt
- 2 tbsp fresh lemon juice, strained
Instructions
- Prepare the Strainer: Line a fine mesh strainer with a double layer of cheesecloth and set it over a large, deep bowl to catch the draining whey.
- Heat the Dairy: In a heavy-bottomed pot, combine the whole milk, cream, and sea salt. Heat the mixture over medium-high heat while stirring frequently with a wooden spoon in a figure-eight motion to prevent scorching. Bring the mixture to a gentle rolling boil, around 200-206°F (93-97°C), indicated by frothy bubbles along the edges and larger bubbles in the center.
- Add the Acid: Once boiling, immediately add the strained fresh lemon juice. Stir just once or twice to distribute the juice evenly. Then, turn off the heat and avoid stirring further to allow the mixture to curdle properly. Let it sit undisturbed on the warm burner for 10 minutes, during which curds will form and float to the surface.
- Drain the Curds: Using a slotted spoon, gently transfer the curds into the prepared cheesecloth-lined strainer. Let the ricotta drain at room temperature for 10-15 minutes if you prefer a light and fluffy texture. For drier ricotta, extend the draining time accordingly. Keep in mind the ricotta will firm up further when chilled.
- Store and Serve: Transfer the ricotta to an airtight container and store it in the refrigerator. Consume within 4 days for the best freshness and texture.
Notes
- This recipe yields about 1 heaping cup (265 grams) of fresh ricotta, ideal for small batch cooking without waste.
- Do not use ultra-pasteurized milk as it will not curdle properly.
- If doubling the recipe, strain in batches or use two strainers, as a standard 7-8 inch strainer won’t hold the volume.
- White or red vinegar can be substituted for lemon juice if needed.
- Straining time adjusts texture—the longer the drain, the firmer the ricotta.
- The ricotta becomes firmer after refrigeration, so factor this into your recipe planning.
- Use a digital thermometer to monitor the temperature for precise results.
Nutrition
- Serving Size: 1/4 cup (about 65 grams)
- Calories: 120
- Sugar: 2 grams
- Sodium: 90 mg
- Fat: 10 grams
- Saturated Fat: 6 grams
- Unsaturated Fat: 3 grams
- Trans Fat: 0 grams
- Carbohydrates: 2 grams
- Fiber: 0 grams
- Protein: 5 grams
- Cholesterol: 40 mg


