
If you’re a fan of the classic Twix bar but want to enjoy it in a fun, bite-sized treat, you’re in for a real delight with this Twix Cookie Cups Recipe. I’ve tested and tweaked this recipe until it became a family favorite, and trust me, you’re going to fall in love with how perfectly chewy, gooey, and chocolatey these cookie cups turn out. Whether you’re baking for a party or just craving a sweet treat, these little cups are a total game-changer.
Why You’ll Love This Recipe
- Easy to Make: With simple ingredients and straightforward steps, it’s fun and approachable even if you’re not a baking pro.
- Burst of Deliciousness: These cookie cups capture the perfect balance of buttery cookie, gooey caramel, and rich chocolate—just like your favorite Twix bar!
- Perfect for Sharing: They’re cute, portable, and a great hit at parties or casual get-togethers.
- Customizable: You can easily swap chocolate types or add nuts to fit your flavor preferences.

Ingredients You’ll Need
The magic of this Twix Cookie Cups Recipe lies in the simplicity and quality of the ingredients. Each one complements the others perfectly to give you that nostalgic Twix flavor without any fuss.

- Salted butter: I always recommend using real butter, not margarine—salted adds just the right touch to enhance sweetness.
- Granulated sugar: This helps create a tender cookie texture with a bit of chewiness.
- Vanilla extract: It’s amazing how a teaspoon brightens up everything, trust me, don’t skip it.
- Egg white: Just the white here helps bind the dough without making it cakey.
- All-purpose flour: The base that holds everything together, so be sure to measure carefully.
- Baking powder: Gives the cookie cups a lovely puff without being too airy.
- Caramels (unwrapped): Soft caramels are essential for that gooey filling that’s just like the Twix caramel layer.
- Milk (for caramel): This smooths out the caramel when melted — I use whole milk but any will do.
- Milk chocolate chips: You can substitute with dark or white chocolate chips if you want to mix it up, but milk chocolate perfectly mimics the Twix coating.
Variations
I like to play around with this Twix Cookie Cups Recipe depending on the occasion. Don’t be shy about making it your own—there are lots of ways to add your twist!
- Use dark chocolate: If you love a less sweet finish, swapping the milk chocolate chips for dark chocolate adds depth and pairs beautifully with the caramel.
- Add nuts: Chopped pecans or walnuts mixed into the dough bring a nice crunch and a little nuttiness that my family goes crazy for.
- Salted caramel: Try sprinkling a tiny pinch of flaky sea salt on top of each caramel layer before adding chocolate to balance the sweetness.
- Vegan option: Use dairy-free butter, vegan caramel candies, and dairy-free chocolate chips to make these cookie cups vegan-friendly.
How to Make Twix Cookie Cups Recipe
Step 1: Cream the Butter and Sugar
To start, preheat your oven to 350°F (175°C)—always good to get that going early. Then, in a mixing bowl, cream together the salted butter and granulated sugar. This step is key because it creates the light, tender texture we want. Use a hand mixer or stand mixer on medium speed until the mixture is fluffy and well combined, usually about 2-3 minutes. I’ve learned that not creaming long enough can make the cookie cups dense, so don’t rush this part!
Step 2: Add Egg White and Vanilla
Next up, add the egg white and vanilla extract to your creamed butter and sugar. Beat these together until everything is fully incorporated. The egg white keeps the dough neat and chewy without making these cakey or heavy—it’s a subtle difference but important. I used to add the whole egg here but found it changed the texture too much, so stick with just the white.
Step 3: Mix in Dry Ingredients
Whisk together the flour and baking powder separately, then gradually add them into your wet mixture. Stir or mix slowly to avoid overworking the dough, which can make cookies tough. I like using a rubber spatula here and mixing gently until no streaks of flour remain—it usually takes about 30 seconds.
Step 4: Roll and Cut the Dough
Lightly flour a clean surface and roll out your cookie dough to about ¼ to ½ inch thickness. Then, use a round cookie cutter (about 2 to 2.5 inches diameter works great) to cut out circles. Transfer each circle to an ungreased baking sheet, spaced slightly apart. This part is where you can decide just how big or small you want your cookie cups — I usually stick to medium size to get about 24 pieces.
Step 5: Bake the Cookies
Bake your cookies at 350°F for 6 to 8 minutes. You want to pull them out when the cookies look puffy and the surface isn’t glossy anymore. Don’t worry if they feel soft—that’s perfect because they’ll firm up as they cool. I’ve found baking longer than 8 minutes dries them out, so watch carefully.
Step 6: Prepare the Caramel Layer
While your cookies cool completely on a wire rack, melt the unwrapped caramels with milk in the microwave. Heat in 30-second bursts, stirring halfway through to avoid burning. The goal is smooth, creamy caramel. If it feels too thick, just add a splash more milk. This caramel is the star, so don’t rush it or use low-quality caramels—your taste buds will thank you!
Step 7: Add Caramel and Chill
Carefully spoon a few teaspoons of the caramel onto each cooled cookie, spreading it almost to the edges but not quite. Place the tray in the fridge for 10 to 15 minutes until the caramel sets up and cools fully. This step is what lets the caramel layer firm enough so it won’t ooze out when you add the chocolate.
Step 8: Melt Chocolate and Finish
Lastly, melt your milk chocolate chips in 30-second intervals in the microwave, stirring between each round until smooth. Spread a thin layer of melted chocolate over each caramel-topped cookie cup. Let these set completely, which usually takes about 20 minutes at room temperature or 10 minutes in the fridge. And that’s it—you’re ready to enjoy!
Pro Tips for Making Twix Cookie Cups Recipe
- Don’t Overbake: Pull the cookies out as soon as they’re puffy and not glossy—overbaking makes them dry and will ruin the chewy texture you want.
- Chill Before Chocolate: Refrigerating the caramel layer helps prevent the chocolate from mixing into the caramel and keeps those layers distinct.
- Use Quality Caramel: I’ve learned that cheaper caramels don’t melt smoothly, so invest in good-quality caramels for that perfect consistency.
- Gentle Mixing: Mix the flour in slowly and avoid overworking your dough to keep your cookie cups tender and soft.
How to Serve Twix Cookie Cups Recipe

Garnishes
I often sprinkle a pinch of sea salt or finely chopped peanuts on top of the chocolate before it sets—it adds a lovely contrast that amps up those Twix flavors. Sometimes a dusting of cocoa powder or edible gold flakes makes these cookie cups party-ready and extra special.
Side Dishes
These cookie cups are rich enough to be served on their own, but if you want to pair them, try a scoop of vanilla ice cream or a handful of fresh berries. A small cup of coffee or hot chocolate works beautifully for an indulgent dessert setup.
Creative Ways to Present
For birthday parties or holidays, I place each cookie cup in mini cupcake liners or decorative wrappers. I’ve also arranged them on tiered cake stands for a stunning sweet table display. Wrapping a few in cellophane with a ribbon makes for a lovely homemade gift, too.
Make Ahead and Storage
Storing Leftovers
Store your Twix Cookie Cups in an airtight container at room temperature or in the fridge if your kitchen is warm (above 75°F). They’ll stay fresh for up to 3 days. I like to layer them between parchment paper to prevent sticking and keep that perfect caramel and chocolate texture intact.
Freezing
I’ve frozen these cookie cups successfully by placing them on a baking sheet to freeze solid, then transferring to a freezer-safe container layered with parchment paper. They last about a month and thaw beautifully overnight in the fridge without losing texture.
Reheating
If you want to enjoy them warm, pop the cookie cups in a microwave for 10-15 seconds to soften the caramel and chocolate just a little. Be careful not to overheat — you want gooey, not melted mess! This trick really brings out the rich flavors and feels like a freshly baked treat.
FAQs
-
Can I use salted caramels or should they be unsalted?
You can definitely use salted caramels if you like a slightly salty-sweet flavor, which actually pairs nicely with the chocolate. If you prefer a sweeter, classic taste, stick with plain caramels. Either works well in this recipe!
-
What size cookie cutter works best for Twix Cookie Cups?
I recommend a 2 to 2.5-inch round cookie cutter for perfectly sized cups—big enough to hold a generous caramel and chocolate layer but still bite-sized for easy snacking.
-
Can I prepare the cookie cups completely ahead of time?
Yes! You can bake and assemble the cookie cups a day or two ahead, storing them covered in the fridge to maintain freshness. Just bring to room temperature before serving to enjoy the best flavor and texture.
-
Is there a gluten-free version of this recipe?
Absolutely! Swap the all-purpose flour for a 1-to-1 gluten-free baking blend. Make sure your baking powder is gluten-free, too. The texture might be slightly different but still delicious.
-
Why do you use only the egg white in this recipe?
The egg white helps bind the dough without adding too much moisture or leavening, which keeps the cookie cups tender and chewy instead of cakey—key for that Twix texture.
Final Thoughts
This Twix Cookie Cups Recipe has quickly become a staple in my kitchen and a crowd-pleaser whenever I bring them out. The combination of buttery cookie, luscious caramel, and creamy chocolate hits all the right notes that remind me of those classic candy bars we all love. I really hope you try these soon—they’re a joy to bake and even better to eat. Trust me, once you make a batch, you’ll find yourself coming back to it again and again. Happy baking, friend!
Print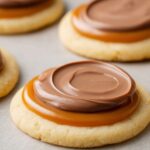
Twix Cookie Cups Recipe
- Prep Time: 10 minutes
- Cook Time: 8 minutes
- Total Time: 40 minutes
- Yield: 24 cookie cups
- Category: Dessert
- Method: Baking
- Cuisine: American
Description
Delight in these Twix Cookie Cups featuring a buttery cookie base topped with creamy caramel and a smooth milk chocolate finish. Perfectly bite-sized, these treats combine the classic flavors of the Twix candy bar into a homemade cookie cup that’s crispy, chewy, and irresistibly sweet.
Ingredients
Cookie Dough
- 1/2 cup (111g) salted butter
- 1/2 cup (115g) granulated sugar
- 1 tsp vanilla extract
- 1 egg white
- 1 1/2 cups (228g) all-purpose flour
- 1 tsp baking powder
Creamy Caramel
- 20 caramels, unwrapped
- 1 tbsp milk
Chocolate Topping
- 2 cups (400g) milk chocolate chips
Instructions
- Preheat and Prepare Dough: Preheat your oven to 350°F (175°C). In a mixing bowl, cream together the salted butter and granulated sugar until light and fluffy.
- Add Wet Ingredients: Mix in the egg white and vanilla extract until well combined and smooth.
- Incorporate Dry Ingredients: Add the all-purpose flour and baking powder to the wet mixture. Stir thoroughly until a soft dough forms.
- Shape Cookie Bases: Roll the dough out on a flat surface to about 1/4 to 1/2 inch thickness. Use a round cookie cutter to cut out circles and transfer them onto an ungreased baking sheet.
- Bake the Cookies: Bake at 350°F for 6-8 minutes until the cookies puff slightly and lose their glossy sheen. Remove from oven and transfer to a wire rack to cool completely.
- Prepare Caramel Layer: While cookies cool, combine unwrapped caramels and milk in a microwave-safe bowl. Microwave in 30-second intervals, stirring between each, until smooth and creamy.
- Assemble Caramel Cups: Spoon a few teaspoons of the caramel onto each cooled cookie, spreading until nearly covered. Chill the cookie cups in the fridge for 10-15 minutes until caramel is firm and cold.
- Melt Chocolate: Melt the milk chocolate chips in the microwave in 30-second bursts, stirring after each until fully melted and smooth.
- Finish Cookies: Spread a thin layer of melted chocolate over the caramel on each cookie. Allow the chocolate to cool and set before serving.
Notes
- Ensure cookies are completely cool before adding caramel to prevent melting.
- Use a silicone baking mat or parchment paper for easy cookie removal.
- For a firmer chocolate topping, refrigerate the cookie cups after spreading chocolate.
- Storage: Keep cookie cups refrigerated in an airtight container for up to one week.
- Can substitute milk chocolate with dark or white chocolate based on preference.
Nutrition
- Serving Size: 1 cookie cup
- Calories: 150 kcal
- Sugar: 15 g
- Sodium: 75 mg
- Fat: 8 g
- Saturated Fat: 5 g
- Unsaturated Fat: 2.5 g
- Trans Fat: 0 g
- Carbohydrates: 19 g
- Fiber: 0.5 g
- Protein: 2 g
- Cholesterol: 15 mg


