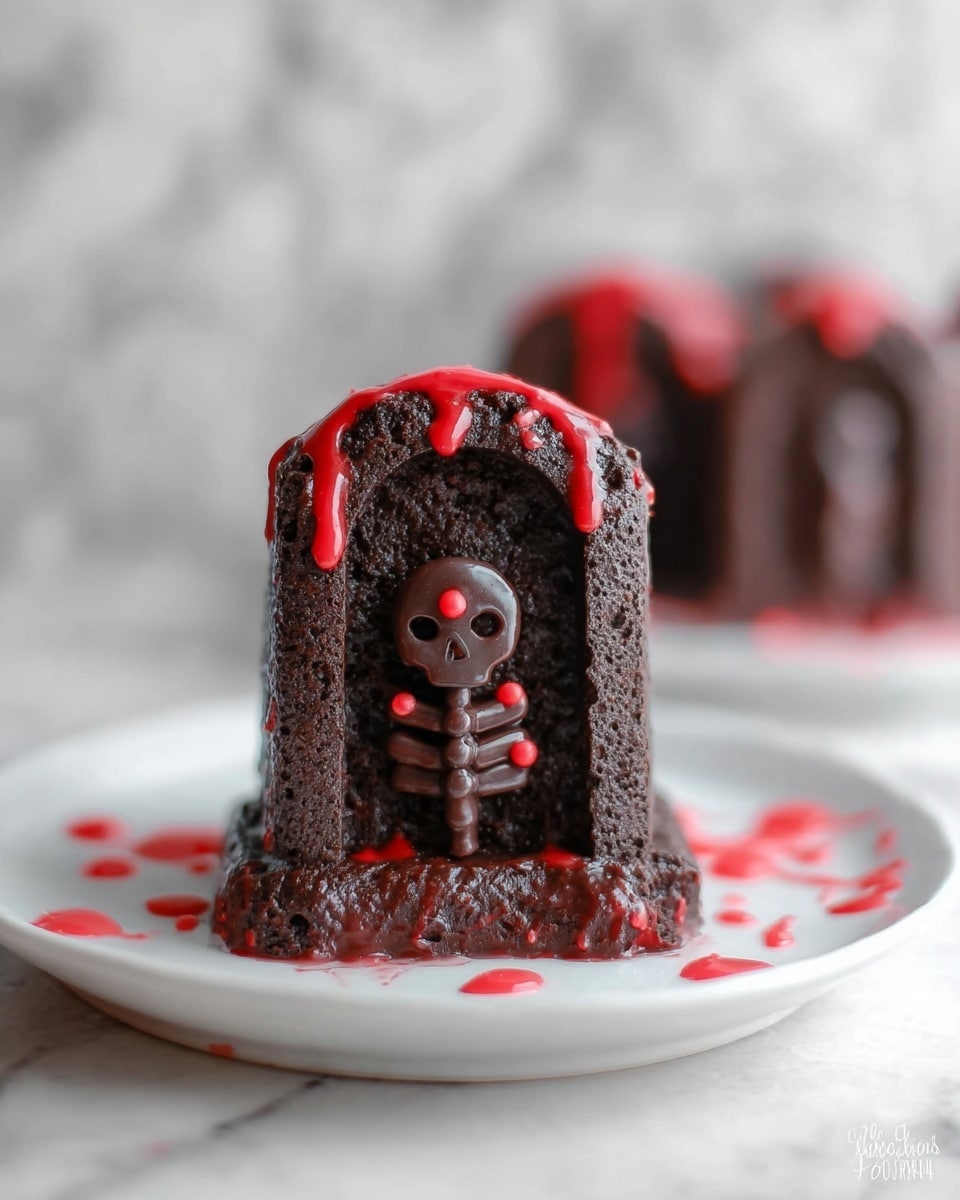
If you’re on the hunt for a Halloween treat that’s both spooky and irresistibly delicious, you’re going to want to try my Tombstone Chocolate Snack Cakes Recipe. I absolutely love how these little cakes combine rich chocolate flavor with a fluffy marshmallow creme filling—plus the red-tinted glaze gives them that hauntingly perfect look. Whether you’re baking for a party or just want a festive dessert to impress your family, these snack cakes bring that wow factor without the fuss. Stick with me, and I’ll share everything you need to nail this recipe perfectly in your own kitchen.
Why You’ll Love This Recipe
- Rich Chocolate Flavor: The blend of cocoa and cinnamon gives a deep, warm taste that’s not overly sweet.
- Foolproof Filling: The marshmallow creme filling is silky, light, and just the right amount of sweet without overpowering the cake.
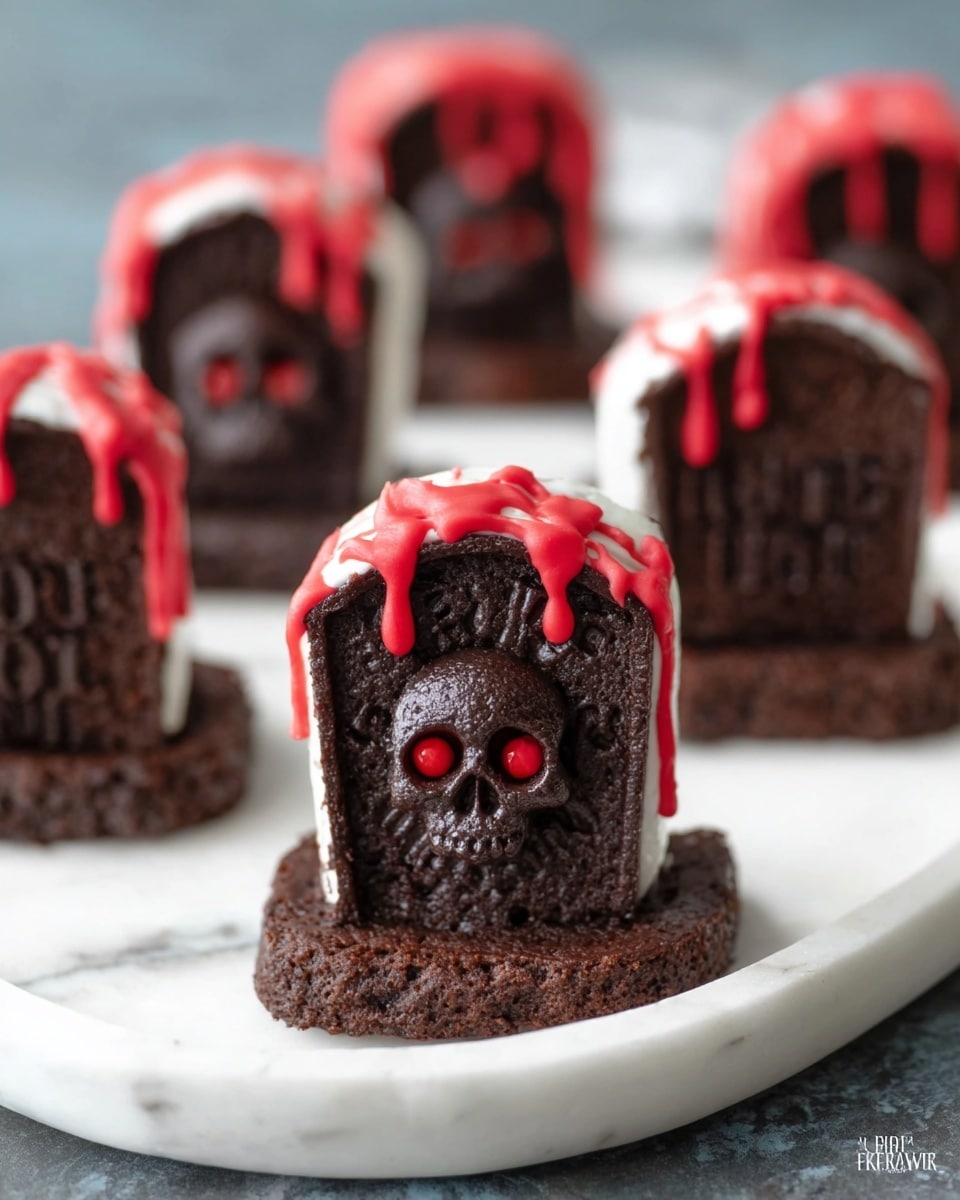
- Perfectly Spooky Presentation: The red-dyed glaze and tombstone shape make them an instant Halloween favorite that’s fun to serve and eat.
- Easy to Make: Despite their fancy look, these cakes come together quickly with straightforward steps anyone can follow.

Ingredients You’ll Need
For this Tombstone Chocolate Snack Cakes Recipe, the ingredients are simple but carefully chosen to create the perfect texture and flavor. I always recommend using quality butter and fresh eggs—they really do make a difference!
- All-purpose flour: The base of the cake — be sure to measure it correctly to keep the texture just right.
- Unsweetened cocoa powder: Adds that deep chocolate essence without extra sweetness.
- Baking soda: Helps the cakes rise nicely while staying tender.
- Cinnamon: A hint of warmth to balance the chocolate flavor beautifully.
- Unsalted butter: Softened butter creams up perfectly with sugar for a light cake batter.
- Sugar: Just enough to sweeten without overwhelming the chocolate.
- Eggs: Important for structure and moisture—room temperature works best!
- Buttermilk: Keeps the cake moist and tender with a slight tang.
- Marshmallow creme: The secret to the luscious, fluffy filling inside each tombstone.
- Confectioners’ sugar: Used in both the filling and glaze for smooth sweetness.
- Vanilla extract: Enhances all the flavors and adds depth.
- Red food dye: For that eerie, bloody effect on the filling and glaze.
- Milk: Used to thin the glaze to the perfect consistency.
- Pinch of salt: Balances the sweetness and highlights the chocolate.
Variations
While I love the original Tombstone Chocolate Snack Cakes Recipe as is, I often tweak things depending on the occasion or who I’m baking for. Feel free to personalize it—you might find a new favorite twist along the way!
- Chocolate lovers’ dream: Swap out the cinnamon for a teaspoon of espresso powder to deepen the chocolate flavor—it’s incredible!
- Vegetarian or allergy-friendly: Use a non-dairy butter substitute and plant-based milk; the texture stays surprisingly good.
- Seasonal mix-ins: Add mini chocolate chips or chopped nuts into the batter for extra texture.
- Alternative fillings: Try using cream cheese frosting instead of marshmallow creme for a tangier finish.
How to Make Tombstone Chocolate Snack Cakes Recipe
Step 1: Prep and Mix Dry Ingredients
Start by preheating your oven to 350°F and prepping your baking molds. I like to spray them with baking spray and dust lightly with cocoa powder—this helps the cakes release easily but also adds subtle chocolate flavor on the outside. In a medium bowl, whisk together the flour, cocoa powder, baking soda, and cinnamon until everything is evenly combined. This step is key to making sure the cake has a nice even texture without clumps of cocoa powder or baking soda.
Step 2: Cream Butter and Sugar
Using a mixer, beat the softened butter and sugar together for about 3 to 5 minutes until the mixture is light and fluffy. I discovered this trick: cream them long enough, and your cakes come out tender and moist instead of dense. Don’t rush this step—good creaming is the foundation of a great crumb.
Step 3: Add Eggs and Alternate Dry and Wet Ingredients
Add the eggs one at a time, beating well after each addition. I like to scrape down the sides of the bowl here to keep everything smooth. Then, add your dry flour mixture to the butter mix in three parts, alternating with buttermilk. This helps keep the batter balanced—if you add it all at once, the cake tends toward toughness or uneven texture.
Step 4: Bake Your Tombstone Snack Cakes
Fill your mold cavities about 60% full so the cakes have room to rise but don’t overflow. Bake for 13 to 15 minutes, testing doneness with a toothpick inserted near the center—it should come out mostly clean, with a few moist crumbs. Cool the cakes on a wire rack for about 5 minutes before carefully removing them from the mold. I usually use a serrated knife to gently trim the domed top off, creating that classic “tombstone” flat shape. This step is totally optional, but it makes assembly easier and looks so cool!
Step 5: Make the Marshmallow Creme Filling
In a mixing bowl, beat together marshmallow creme and softened butter on medium-high speed until smooth. Then add confectioners’ sugar, cocoa powder, vanilla, salt, and red food dye. Mix until the filling is light, fluffy, and has a lovely pink-red tint. This filling is the star of the show, so take your time blending it well to get that perfect texture for piping.
Step 6: Prepare the Glaze and Assemble
Whisk together confectioners’ sugar, milk, and vanilla until smooth to create the glaze. You want it pourable but thick enough to coat the cakes without running off. Use a large wood skewer to carefully poke a tunnel through each cake from bottom to top—wiggle it gently to make room, then pipe the marshmallow filling right inside. After filling, brush the glaze all over each cake, which gives them a shiny, spooky finish. Don’t forget to wipe away any excess filling or glaze for neat edges.
Pro Tips for Making Tombstone Chocolate Snack Cakes Recipe
- Room Temperature Ingredients: Make sure your butter and eggs are at room temp for the best creaming and batter consistency.
- Don’t Overfill the Molds: Filling only about 60% allows for rising without messy spills and a perfect tombstone shape.
- Use a Serrated Knife to Level: I always trim the dome carefully to make stacking and decorating much easier.
- Gentle Tunneling: Wiggle the skewer lightly to create room for filling but avoid breaking through the bottom of the cake.
How to Serve Tombstone Chocolate Snack Cakes Recipe
Garnishes
I love using any leftover red marshmallow creme to pipe creepy “bloody” drips and small decorative details along the cakes’ edges—it’s so fun and festive! You can also sprinkle on some edible glitter or black sanding sugar for extra sparkle just before serving.
Side Dishes
These snack cakes pair perfectly with simple sides like a scoop of vanilla ice cream or fresh berries, which balance the richness. For a party, I like serving them alongside spiced hot apple cider or a fun pumpkin latte.
Creative Ways to Present
For Halloween gatherings, I’ve arranged these tombstones standing up in a shallow tray filled with crushed chocolate cookies to mimic “graveyard dirt.” It’s a total hit with kids and adults alike. Adding some plastic spiders or tiny tombstone picks amps up the theme without extra work.
Make Ahead and Storage
Storing Leftovers
I store leftover Tombstone Chocolate Snack Cakes in an airtight container at room temperature if I plan to eat them within 2 days. This keeps the cakes moist and the marshmallow filling soft. Refrigeration tends to dry the cake out, so I avoid it unless the weather is very warm.
Freezing
If you want to freeze these snack cakes, I like to wrap each individually in plastic wrap and then place them in a freezer bag. They freeze well for up to a month. Thaw overnight in the fridge before glazing and filling to keep everything fresh and perfect.
Reheating
When reheating leftovers, I gently warm them for about 10-15 seconds in the microwave to soften the marshmallow filling without melting the glaze. This little trick revives that fresh-baked feel and makes them taste just like the first day you baked them.
FAQs
-
Can I make Tombstone Chocolate Snack Cakes Recipe without buttermilk?
Absolutely! If you don’t have buttermilk, you can make a quick substitute by adding 1 tablespoon of lemon juice or white vinegar to 1 cup of milk and letting it sit for 5 minutes before using. It adds the necessary acidity to help tenderize the cake.
-
How do I keep the red food dye from bleeding?
Mix the red food dye thoroughly into the marshmallow filling and glaze until fully incorporated to avoid streaking or bleeding. Using gel-based food coloring also helps keep colors vibrant without running.
-
Can I prepare these cakes a day ahead?
Yes! You can bake and cool the cakes the day before, store them airtight, and then fill and glaze them just before serving for the freshest look and taste.
-
Do these cakes freeze well after assembly?
It’s best to freeze the cakes before filling and glazing for optimal texture. Once filled and glazed, freezing can affect the marshmallow’s texture and the glaze’s appearance.
Final Thoughts
This Tombstone Chocolate Snack Cakes Recipe has become a favorite in my house every October. I love how easy it is to make something that looks so impressive and tastes even better. The balance of chocolate and marshmallow is truly a crowd-pleaser, and it’s always fun to see the messy delight on everyone’s faces when they take a bite. I know you’ll enjoy making (and eating!) these as much as I do—so grab your ingredients, and let’s get spooky in the kitchen!
Print
Tombstone Chocolate Snack Cakes Recipe
- Prep Time: 20 minutes
- Cook Time: 15 minutes
- Total Time: 35 minutes
- Yield: 12 snack cakes
- Category: Dessert
- Method: Baking
- Cuisine: American
Description
Tombstone Chocolate Snack Cakes are a spooky and festive Halloween dessert featuring moist cocoa-infused cakes filled with a light and fluffy red-tinted marshmallow creme. Coated with a smooth confectioners’ sugar glaze, these treat-sized cakes are perfect for parties or seasonal celebrations.
Ingredients
Cake
- 1 1/2 cups all-purpose flour
- 1/2 cup unsweetened cocoa powder
- 1/2 teaspoon baking soda
- 1 teaspoon cinnamon
- 1/2 cup unsalted butter, softened
- 1 cup sugar
- 4 eggs
- 1 cup buttermilk
Marshmallow Creme Filling
- 1 1/2 cups marshmallow creme
- 4 tablespoons unsalted butter, softened
- 1/2 cup confectioners’ sugar
- 1/2 teaspoon unsweetened cocoa powder
- 1/2 teaspoon vanilla extract
- Pinch of salt
- 2-3 teaspoons red food dye
Confectioners’ Sugar Glaze
- 1 1/2 cups confectioners’ sugar
- 4 tablespoons milk
- 1/2 teaspoon vanilla extract
Instructions
- Preheat and Prepare Molds: Begin by preheating your oven to 350 degrees F (175 degrees C). Spray your baking mold with baking spray and lightly dust with cocoa powder to prevent sticking. Set aside.
- Mix Dry Ingredients: In a medium bowl, whisk together the all-purpose flour, unsweetened cocoa powder, baking soda, and cinnamon until well combined. Set aside.
- Cream Butter and Sugar: Using a mixer, beat the softened butter and sugar for 3-5 minutes or until the mixture is light and fluffy. This aerates the batter ensuring light cakes.
- Add Eggs: Add the eggs one at a time to the butter mixture, beating well after each addition to incorporate fully. Scrape down the sides of the bowl as necessary to ensure even mixing.
- Combine Wet and Dry Ingredients: Alternately add the flour mixture and buttermilk to the butter mixture, beginning and ending with flour. Mix gently to combine without overmixing for tender cakes.
- Fill and Bake: Fill the prepared molds about 60% full with batter. Bake in the preheated oven for 13-15 minutes or until a toothpick inserted near the center comes out with a few moist crumbs but no raw batter.
- Cool Cakes: Remove cakes from the oven and cool on a wire rack for 5 minutes. Carefully remove them from the molds and allow them to cool completely. If desired, trim the domed backs with a serrated knife for a flat top.
- Prepare Marshmallow Creme Filling: In a mixing bowl, beat together marshmallow creme and softened butter on medium-high speed until smooth. Add confectioners’ sugar, cocoa powder, vanilla extract, salt, and red food dye. Continue mixing until the filling is light, fluffy, and evenly colored. Transfer to a piping bag fitted with a small round tip.
- Make Confectioners’ Sugar Glaze: Whisk together the confectioners’ sugar, milk, and vanilla extract in a bowl until smooth. Adjust the consistency by adding a bit more milk for a thinner glaze if desired. Set aside.
- Assemble Cakes: Use a large wood skewer to create a tunnel from the bottom to the top of each cooled cake by wiggling it to make space for the filling. Pipe the marshmallow creme filling into each tunnel, filling generously but not overflowing. Wipe away any excess filling from the cakes.
- Glaze the Cakes: Using a pastry brush, apply the confectioners’ sugar glaze evenly over all sides of the filled cakes.
- Serve and Store: Serve the tombstone cakes immediately. Alternatively, store in an airtight container until ready to serve. Before serving, decorate the outside with any leftover red marshmallow filling to enhance the spooky effect.
Notes
- These filled Tombstone Chocolate Snack Cakes are both delicious and a little spooky making them the perfect Halloween dessert recipe!
- Ensure cakes are completely cool before filling to prevent melting the marshmallow creme.
- For a more intense red color, add additional red food dye as preferred.
- Store cakes in an airtight container at room temperature for up to 2 days or refrigerate for up to 4 days.
- Use a serrated knife for cleanly trimming the cake tops if desired.
Nutrition
- Serving Size: 1 snack cake
- Calories: 280
- Sugar: 28g
- Sodium: 110mg
- Fat: 14g
- Saturated Fat: 8g
- Unsaturated Fat: 5g
- Trans Fat: 0g
- Carbohydrates: 36g
- Fiber: 2g
- Protein: 3g
- Cholesterol: 60mg


