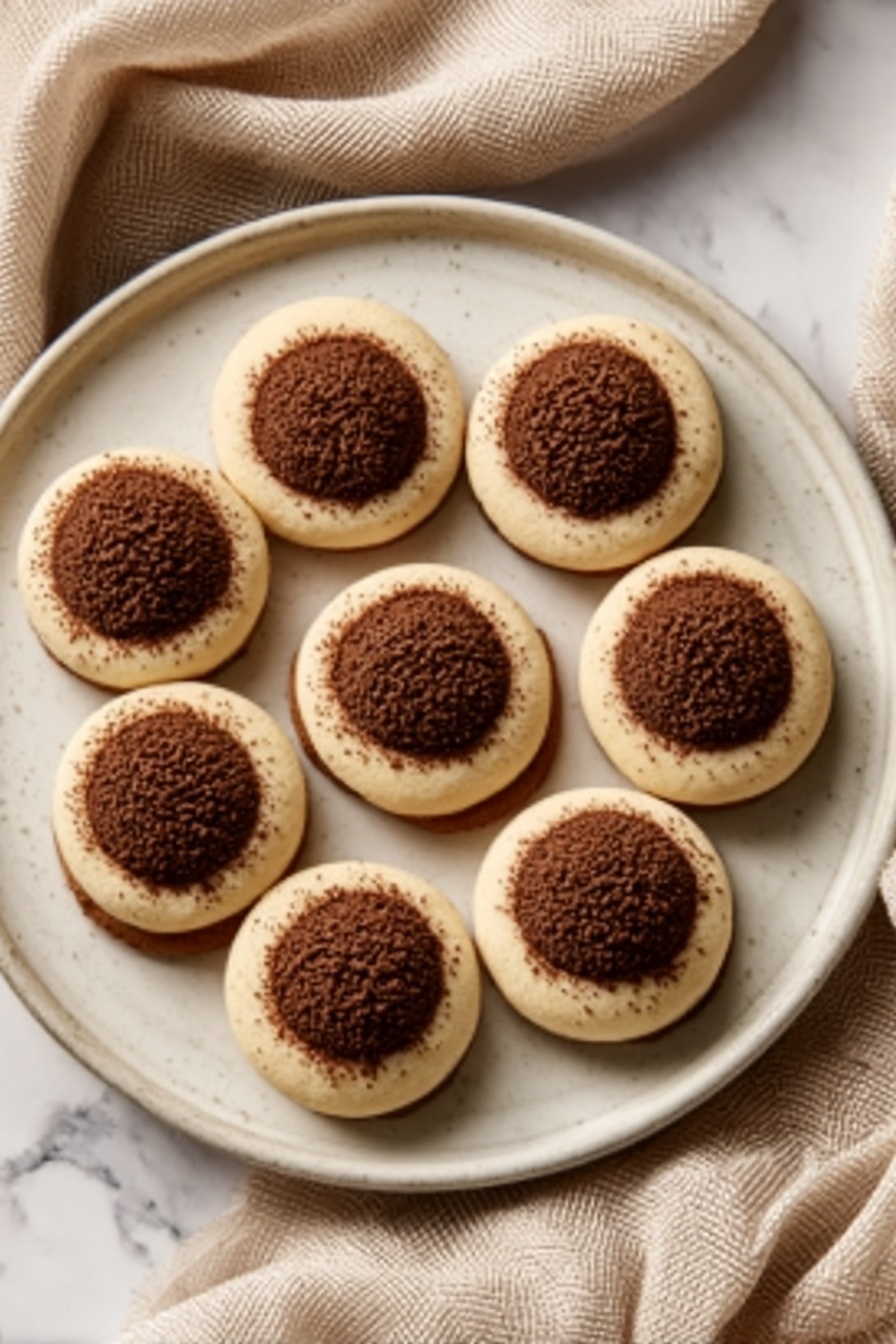
If you’re looking for a fun twist on classic tiramisu that’s bite-sized and oh-so-delicious, I’ve got just the thing for you—my Tiramisu Cookie Cups Recipe. These little cups are packed with layers of rich coffee-chocolate goodness and creamy mascarpone that you’ll want to dive into again and again. Trust me, once you make these, they’ll become your go-to dessert for gatherings or even just because you deserve a sweet treat!
Why You’ll Love This Recipe
- Bite-sized Convenience: These cookie cups are perfect for portion control and easy sharing at any party.
- Layered Flavors: The rich coffee and chocolate layers paired with smooth mascarpone make every bite indulgent.
- Make-Ahead Friendly: You can prepare them a day in advance for stress-free entertaining.
- No-Bake Magic: Aside from a quick cookie crust bake, these come together mainly in the fridge—perfect for warm days.

Ingredients You’ll Need
These ingredients work beautifully together to capture the classic tiramisu flavor in a convenient cup. I always recommend using good quality mascarpone and fresh espresso for that authentic taste, but don’t sweat it if you don’t have espresso handy—you can use strong brewed coffee instead.
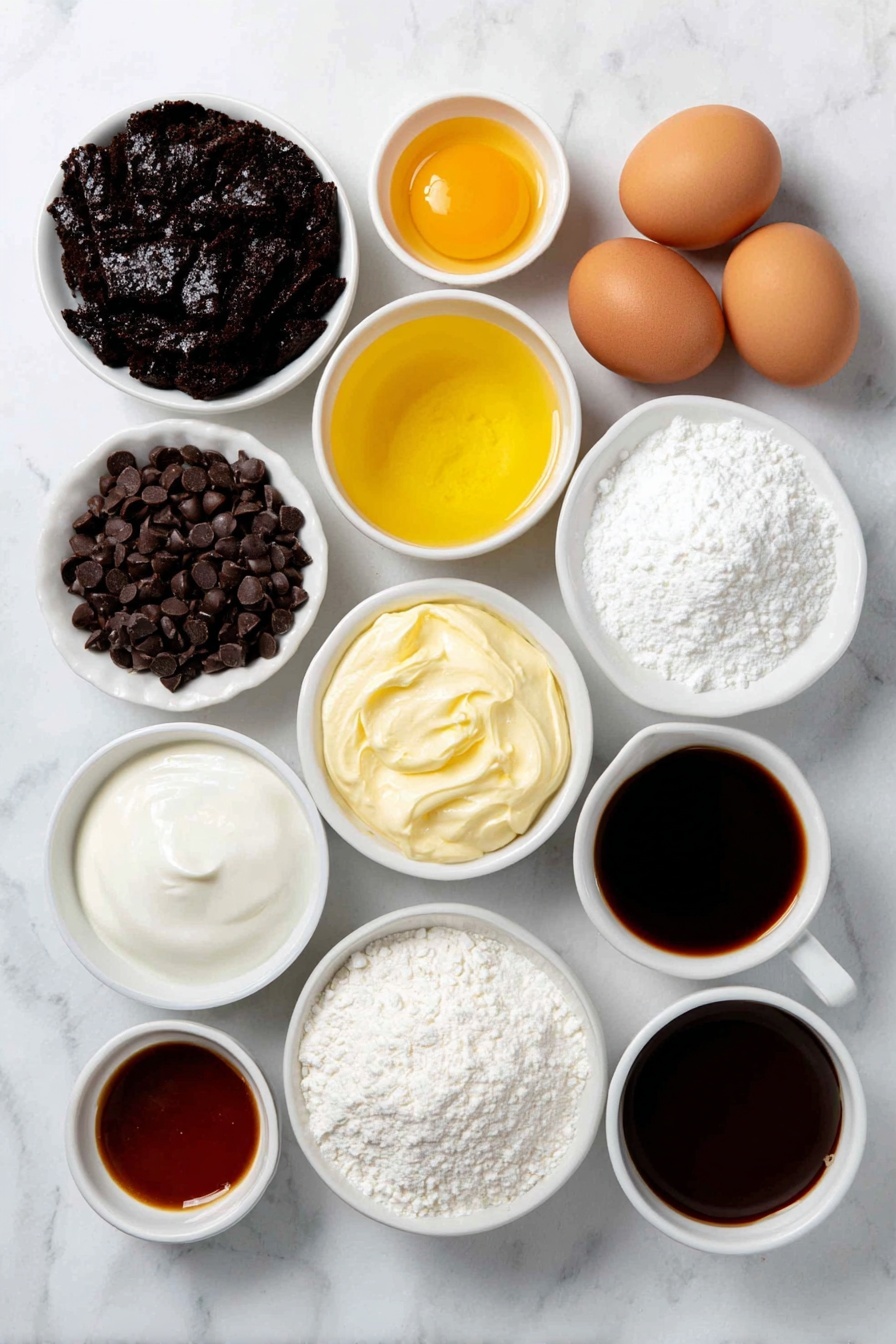
- Chocolate cookies: I love using crushed Oreos here—they give a sturdy, flavorful base to your cups.
- Unsalted butter: Melted butter binds the cookie crumbs perfectly for that compact crust.
- Espresso: The stronger, the better to cut through the sweetness and enhance that coffee kick.
- Coffee liqueur: Totally optional but adds a lovely boozy depth if you’re feeling fancy.
- Semi-sweet chocolate chips: They melt smoothly into the coffee layer, balancing sweetness with rich cocoa notes.
- Heavy cream: Used both in the chocolate layer and whipped with mascarpone for creamy texture.
- Cornstarch: Thickens the coffee-chocolate mix without making it gummy.
- Mascarpone cheese: The star of tiramisu—make sure it’s fresh and at room temperature for silky blending.
- Powdered sugar: Adds gentle sweetness without grit.
- Vanilla extract: Brings warmth and rounds out the flavors.
- Unsweetened cocoa powder: A dusting on top adds the final authentic touch.
- Chocolate shavings or mini chocolate chips (optional): I use these for a little extra flair and texture.
Variations
This Tiramisu Cookie Cups Recipe is super forgiving and fun to tweak. I love swapping things up to suit my mood or what I have on hand—feel free to experiment!
- Non-alcoholic version: I usually skip the coffee liqueur and amp up the espresso for a punchier coffee flavor without any booze.
- Different cookie bases: Swap chocolate cookies for ladyfingers for a mood that’s more classic tiramisu, or try biscotti for crunch.
- Flavored mascarpone: Adding a little orange zest or a pinch of cinnamon to the mascarpone cream gives a fresh twist I adore around holidays.
- Mini fruit topping: I sometimes add a few fresh raspberries on top to balance the rich flavors with a bright pop.
How to Make Tiramisu Cookie Cups Recipe
Step 1: Bake a Perfect Cookie Base
Start by preheating your oven to 350°F (175°C) and lining a muffin tin with cupcake liners. Mix the crushed chocolate cookies with melted butter until it resembles wet sand—that’s the texture that will pack tightly and hold the cups together nicely. Press this mixture firmly into the bottom of each liner and bake for about 5 minutes. This sets the base and keeps it from crumbling when you scoop the creamy layers on top. After baking, be sure to let the bases cool completely; warm bases and creamy fillings don’t mix well!
Step 2: Create the Luscious Coffee-Chocolate Layer
In a small saucepan, gently combine your cooled espresso, coffee liqueur (if using), chocolate chips, and butter over low heat. Stir often until everything melts together into a silky mix. Don’t rush it—low heat prevents burning and grainy chocolate. In a separate bowl, whisk the heavy cream with cornstarch very well until smooth. Slowly stir this into your chocolate mixture and keep it over medium heat until it thickens into a pudding-like consistency. This layering adds a dreamy texture that balances the mascarpone cream perfectly, so patience here pays off. Let this cool fully before assembling.
Step 3: Whip Up the Mascarpone Cream
Beat room temperature mascarpone with powdered sugar and vanilla until smooth and luscious—no lumps, please! In a separate bowl, whip cold heavy cream to stiff peaks and fold gently into the mascarpone mixture. This light approach keeps the cream airy and luxurious, just like the classic tiramisu filling. I learned that folding gently makes all the difference to avoid losing volume here.
Step 4: Layer Like a Pro for Stunning Cups
Time to assemble! Start by spooning 1-2 tablespoons of either the mascarpone cream or coffee-chocolate layer onto your cookie base. Smooth it out gently, then add a layer of the opposite filling. Alternate until the liners are almost full—usually 3-4 layers total. Here’s a trick I discovered: chilling the cups for 10 minutes between each layer helps keep them stable and the layers defined instead of mixing together. It makes your final presentation look professional, but it’s easy enough for home cooks.
Step 5: Finish with Cocoa and Chill
Once layered, dust the tops generously with unsweetened cocoa powder—the traditional finishing touch. If you want to jazz it up, sprinkle some chocolate shavings or mini chocolate chips for extra flair. Then pop the cups into the fridge for at least 4 hours or overnight. This chilling time lets the layers set and the flavors meld beautifully, resulting in a dessert that feels like a hug after a long day.
Pro Tips for Making Tiramisu Cookie Cups Recipe
- Press Cookie Crust Firmly: Applying firm pressure when pressing the cookie base helps prevent crumbling when scooping the filling.
- Cool Ingredients Completely: Ensure the coffee-chocolate layer is fully cooled before assembling to avoid melting the mascarpone cream.
- Chill Between Layers: A quick chill between layers keeps your cup layers sharp and prevents them from blending together.
- Avoid Over-whipping: Whip the cream just to stiff peaks—overwhipping masks the cream’s silkiness and can cause separation.
How to Serve Tiramisu Cookie Cups Recipe

Garnishes
I keep it simple with a generous dusting of unsweetened cocoa powder—it really brings out that authentic tiramisu vibe. Sometimes, I sprinkle delicate chocolate shavings or tiny mini chocolate chips on top for texture contrast and to impress guests with a little pizzazz. Fresh mint leaves or a raspberry on top also add a nice pop of color if you want to get fancy!
Side Dishes
These cups are a dessert all on their own, but if you’re hosting, they pair wonderfully with a light fruit salad or a scoop of vanilla gelato. For coffee lovers, serving alongside an espresso shot or cappuccino elevates the experience even more.
Creative Ways to Present
I’ve brought these to brunches and layered them in pretty glass cups instead of liners for a more elegant look. Another fun idea is to serve them in mini mason jars with a little spoon tied on the side—such a crowd-pleaser for parties! You can also create a tiramisu-themed dessert platter by scattering these cups alongside biscotti and fresh berries.
Make Ahead and Storage
Storing Leftovers
I keep any leftover tiramisu cookie cups covered tightly in the fridge—they hold up well for about 3 days. The flavors actually deepen after a day, so if you can wait, they taste even better the next day! Just remember to keep them cold and covered to prevent the cookie crust from getting soggy.
Freezing
I’ve frozen these cups by wrapping them individually in plastic wrap and sealing them in a freezer-safe bag. When you’re ready, thaw in the fridge overnight. The texture changes a bit (mascarpone can get slightly grainy after freezing), but the flavor remains delightful—great for when you need make-ahead desserts.
Reheating
Since these are best enjoyed chilled, I don’t recommend reheating. If you want to take the chill off, just let them sit at room temperature for 10 minutes before serving. That way, the flavors open up nicely without melting the creamy layers.
FAQs
-
Can I make the Tiramisu Cookie Cups Recipe without espresso?
Absolutely! If you don’t have espresso handy, strong brewed coffee works just fine. Just make sure it’s cooled before using so it doesn’t melt your chocolate or cream layers.
-
Can I use store-bought frosting instead of mascarpone cream?
I wouldn’t recommend it because mascarpone has a unique creamy texture and subtle tang that’s essential for tiramisu. You might miss the light and luxurious mouthfeel that makes these cups special.
-
How long do Tiramisu Cookie Cups last in the fridge?
When stored properly covered, they last about 3 days in the fridge. For best taste and texture, try to eat them within that window.
-
Can I make these cups gluten-free?
Yes! Use gluten-free chocolate cookies for the base, and verify all other ingredients are gluten-free. The rest of the recipe naturally doesn’t contain gluten.
Final Thoughts
I absolutely love how this Tiramisu Cookie Cups Recipe comes together—it’s a dreamy balance of coffee, chocolate, and rich cream that’s easy to share and fun to make. When I first tried these cups, I couldn’t believe how simple it was to get that classic tiramisu flavor in such a neat, portable form. Whether you’re celebrating a special occasion or just craving something sweet after dinner, these cookie cups won’t let you down. Give them a go—you’ll score major brownie points (or should I say cookie points?) with your friends and family!
Print
Tiramisu Cookie Cups Recipe
- Prep Time: 25 minutes
- Cook Time: 5 minutes
- Total Time: 30 minutes
- Yield: 18 cookie cups
- Category: Dessert
- Method: Baking
- Cuisine: Italian
Description
This Tiramisu Cookie Cups recipe is a delightful twist on the classic Italian dessert, combining a crunchy chocolate cookie base with luscious layers of coffee-infused chocolate and creamy mascarpone. Perfectly portioned as individual servings, these cups blend rich espresso, smooth mascarpone, and a hint of chocolate into a harmonious and elegant treat. Ideal for entertaining or a special indulgence, this no-fuss recipe offers a deliciously refreshing way to enjoy tiramisu in bite-sized form.
Ingredients
For the Cookie Base:
- 1 ½ cups crushed chocolate cookies (such as Oreos)
- 4 tbsp unsalted butter, melted
For the Coffee-Chocolate Layer:
- ⅓ cup strong brewed espresso, cooled
- 1 tbsp coffee liqueur (optional)
- ⅓ cup semi-sweet chocolate chips
- 2 tbsp unsalted butter
- ½ cup heavy cream
- 1 tbsp cornstarch
For the Mascarpone Cream Layer:
- 1 cup mascarpone cheese, room temperature
- ½ cup heavy cream, cold
- ⅓ cup powdered sugar
- 1 tsp vanilla extract
For the Topping:
- Unsweetened cocoa powder, for dusting
- Optional: chocolate shavings or mini chocolate chips
Instructions
- Make the Cookie Base: Preheat the oven to 350°F (175°C) and line a muffin tin with cupcake liners. Combine the crushed chocolate cookies and melted butter in a bowl, mixing until the texture resembles wet sand. Press the mixture firmly into the bottom of each liner to create a compact base. Bake for 5 minutes, then allow to cool completely.
- Prepare the Coffee-Chocolate Layer: In a small saucepan, combine the cooled espresso, coffee liqueur (if using), semi-sweet chocolate chips, and butter. Melt over low heat, stirring until smooth. In a separate bowl, whisk together heavy cream and cornstarch until lump-free. Gradually add this cream mixture to the saucepan, stirring constantly over medium heat until it thickens to a pudding-like consistency. Remove from heat and let cool to room temperature.
- Whip the Mascarpone Cream: In a mixing bowl, beat the mascarpone cheese, powdered sugar, and vanilla extract until smooth and creamy. In a separate chilled bowl, whip the cold heavy cream until stiff peaks form. Gently fold the whipped cream into the mascarpone mixture until fully combined and airy.
- Assemble the Tiramisu Cups: Starting with the cookie base, add 1-2 tablespoons of either the mascarpone cream or the coffee-chocolate layer on top. Smooth the layer evenly, then add an alternate layer of the opposite filling. Repeat layering until the cupcake liners are nearly full, chilling the cups in the refrigerator for 10 minutes between layers to set and maintain distinct layers.
- Finish with Cocoa Powder: Once assembled, sift a generous dusting of unsweetened cocoa powder on top of each cup. Optionally, garnish with chocolate shavings or mini chocolate chips. Refrigerate the cups for at least 4 hours or ideally overnight to allow the layers to fully set and the flavors to meld beautifully.
Notes
- For a non-alcoholic version, simply omit the coffee liqueur without affecting the overall flavor.
- Adjust the espresso strength based on your preference for a milder or more intense coffee flavor.
Nutrition
- Serving Size: 1 cup
- Calories: 220 kcal
- Sugar: 15 g
- Sodium: 60 mg
- Fat: 14 g
- Saturated Fat: 8 g
- Unsaturated Fat: 5 g
- Trans Fat: 0 g
- Carbohydrates: 20 g
- Fiber: 2 g
- Protein: 3 g
- Cholesterol: 45 mg

