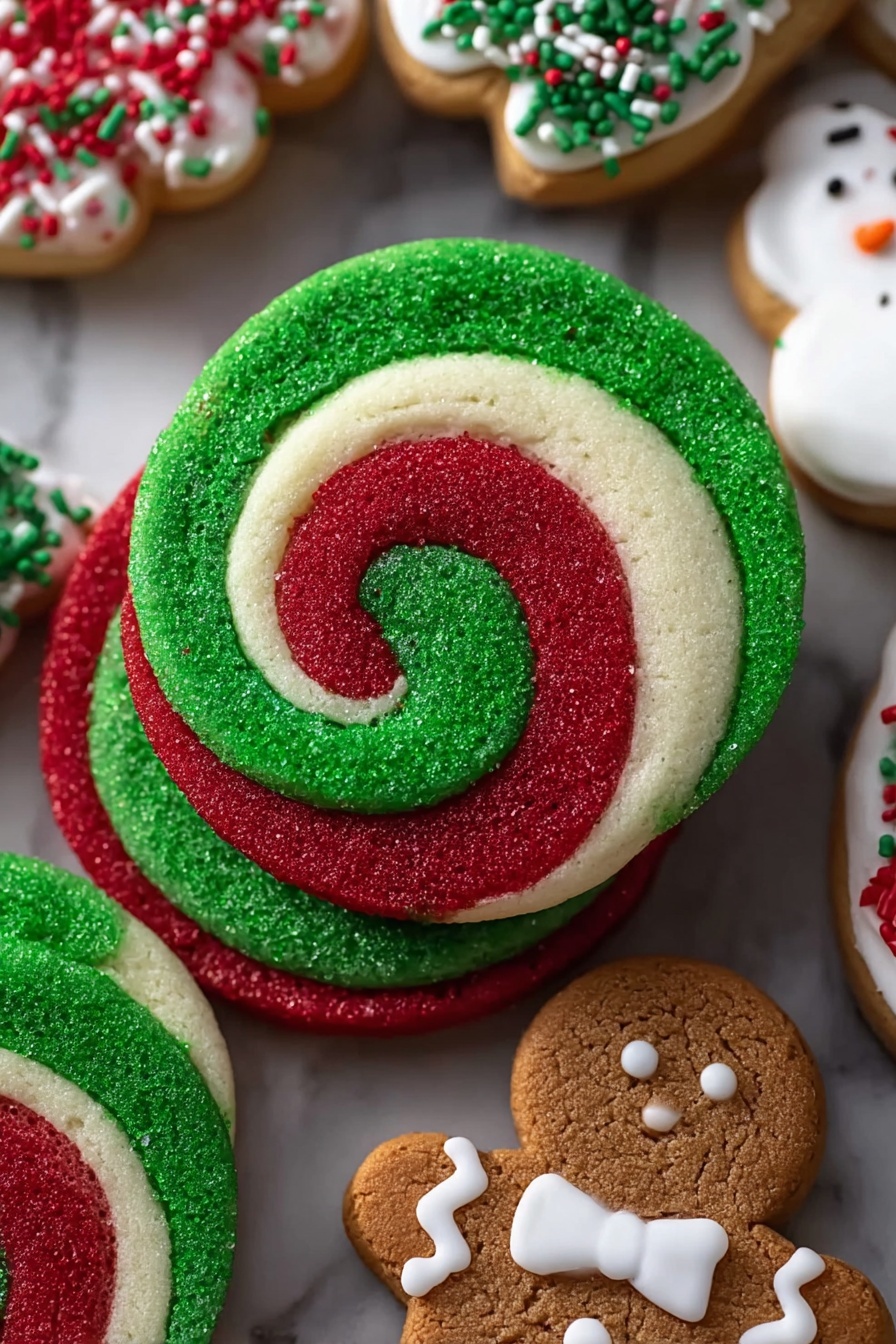
If you’re looking to wow your friends and family this holiday season with something truly delightful, you’ve got to try this Swirled Christmas Cookie Recipe. I absolutely love how these cookies turn out—soft, buttery, and with that beautiful festive swirl that instantly makes you smile. There’s something magical about mixing the classic flavors of almond and vanilla with those vibrant red and green swirls. Whether you’re a seasoned baker or just dipping your toes into holiday cookie making, you’re going to find this recipe easy to follow and incredibly satisfying.
Why You’ll Love This Recipe
- Beautiful Presentation: The red and green swirled dough creates festive cookies that are almost too pretty to eat (almost!).
- Tender, Soft Texture: Thanks to careful creaming and chilling, these cookies stay soft yet hold their shape perfectly.
- Delicious Flavor Combo: The almond extract with vanilla gives a nostalgic, comforting holiday aroma and taste.
- Fun and Easy to Make: The step-by-step process ensures you’ll have consistent results—even if you’re making this for the first time.

Ingredients You’ll Need
This recipe brings together classic baking staples with a few festive twists, like gel food coloring and sprinkles, to get you those iconic Christmas swirls. Choosing the right butter and extracts can really make the difference, so I’ll walk you through those details.

- Unsalted Butter: Room temperature butter creams beautifully with sugar and acts as the base for a tender cookie.
- Granulated Sugar: Gives sweetness and helps with the soft texture when beaten with butter.
- Large Egg: Adds moisture and binds the dough together, so be sure it’s room temperature!
- Almond Extract: Gives those warm, nutty holiday vibes—don’t skip it.
- Vanilla Extract or Vanilla Bean Paste: Deepens the flavor profile with smooth sweetness.
- All-Purpose Flour: The structure of your cookies relies on the gluten here, so stick with all-purpose.
- Cornstarch: Adds a lovely softness by lightening the flour’s texture.
- Baking Powder: Just a touch to help the cookies hold a slight rise without spreading too much.
- Fine Salt: Balances sweetness and enhances all the flavors.
- Christmas Sprinkles: I love nonpareils because they add crunch and extra festive color once baked.
- Red and Green Gel Food Coloring: They concentrate color without adding extra liquid, so your dough doesn’t get soggy.
Variations
One of my favorite things about this Swirled Christmas Cookie Recipe is how customizable it is. I’ve tried a few tweaks over the years, and they always bring a new twist to the classic.
- Flavor Swaps: I once swapped almond extract for peppermint extract—totally festive and fresh!
- Color Themes: For a New Year twist, try blue and silver sprinkles instead of the classic red and green.
- Gluten-Free Version: I’ve successfully used a 1:1 gluten-free baking flour blend with great results when carefully chilling the dough.
- Extra Texture: Adding finely chopped nuts into the dough before chilling adds a lovely crunch.
How to Make Swirled Christmas Cookie Recipe
Step 1: Creaming the Butter and Sugar
This is where the magic begins. Beat the room temperature butter and sugar on medium-high speed for a couple of minutes until the mixture lightens in color. This air incorporation is what helps give your cookies that tender crumb. Don’t rush it! Scrape the bowl well to catch every bit.
Step 2: Adding Eggs and Extracts
Next, mix in the egg, almond extract, and vanilla. This combo brings fragrance and flavor to your dough. Keep the mixer at medium speed and incorporate fully. Here’s a tip: Scrape the sides again as you go to make sure you don’t end up with patches of unblended dough.
Step 3: Incorporating Dry Ingredients
Slowly add the flour, cornstarch, baking powder, and salt while mixing at low speed. You want to just combine everything here—overmixing can make your cookies tough. When it looks just combined, stop and scrape around to catch any stragglers. Your dough should be thick and a bit dense, perfect for shaping.
Step 4: Coloring the Dough
Divide the dough into three even portions. Leave one plain (white), color one red, and one green using gel food coloring. I like to flatten each into a rectangle to chill—it makes rolling out a breeze later. Be consistent with the portions so your swirl is balanced.
Step 5: Chilling the Dough
Chill the wrapped dough for at least 30 minutes or up to overnight. If chilling overnight, let the dough warm up for 5 minutes before rolling—it’ll soften just enough to avoid cracking but still be firm enough to roll evenly.
Step 6: Rolling and Stacking the Dough
Roll each dough portion out on plastic wrap to about 7×12 inches. Stack them on parchment—green on bottom, white in the middle, red on top. A gentle roll with a rolling pin helps the layers stick without mixing the colors. Trim the edges for neatness, then slice one long edge at an angle—this slight asymmetry creates a more defined spiral once rolled.
Step 7: Rolling Into a Log and Adding Sprinkles
Using the parchment paper as your helper, carefully roll the dough into a tight spiral log, starting from the angled edge. Seal the seam gently with your finger using some of the green dough to keep it together. Then, roll the log in Christmas sprinkles until fully coated. This step adds fun texture and festive color all around.
Step 8: Slicing and Baking
Cut slices about 1/3 inch thick with a sharp knife. If the log feels too soft or squishy as you cut, chill it for another 15-30 minutes. Space the cookies an inch apart on prepared baking sheets and bake one sheet at a time at 350°F (175°C) for 12-14 minutes. Rotate the pan halfway for even baking and watch closely—the edges shouldn’t brown. Undercooking slightly helps keep the cookies soft and chewy.
Step 9: Cooling and Storing
Let the cookies cool on the baking sheet for 15 minutes, then transfer to a wire rack until fully cooled. They keep well in an airtight container for up to five days, though I guarantee they won’t last that long!
Pro Tips for Making Swirled Christmas Cookie Recipe
- Cream Thoroughly: Be patient when creaming butter and sugar—it makes your cookies lighter and softer.
- Use Gel Food Coloring: Avoid liquid colors that thin out the dough; gels give vibrant hues without affecting texture.
- Chill, Chill, Chill: The chilling step is non-negotiable for preventing spreading and achieving defined swirls.
- Watch Baking Time: Taking cookies out before edges brown ensures soft, tender bites every time.
How to Serve Swirled Christmas Cookie Recipe

Garnishes
I actually love serving these cookies just as they are decorated—with the sprinkle-coated edges shining bright. But if you want to step it up, a light dusting of powdered sugar or a drizzle of white chocolate looks gorgeous and adds a subtle sweetness.
Side Dishes
Pair these with a glass of cold milk for the ultimate nostalgic experience. They also go perfectly with holiday hot chocolate or a cup of spiced chai if you want a grown-up twist.
Creative Ways to Present
For holiday parties, I love arranging these cookies in spiral shapes on platters to echo the swirl design. Wrapping a few in cellophane tied with a festive ribbon makes an easy, charming gift that everyone loves.
Make Ahead and Storage
Storing Leftovers
I keep leftover cookies in an airtight tin at room temperature. They stay soft for several days, but I always add a slice of bread inside the container to maintain moisture—it’s a classic, simple trick that really works.
Freezing
If you want to prep ahead, these cookies freeze beautifully. I freeze baked cookies individually on a tray, then transfer to a freezer-safe bag. They defrost quickly at room temperature without losing their texture.
Reheating
To refresh slightly stale cookies, pop them in a warm oven (about 300°F) for 5 minutes. You’ll bring back that fresh-baked softness and shine.
FAQs
-
Can I make the dough ahead of time for this Swirled Christmas Cookie Recipe?
Absolutely! The dough can be made and chilled up to 24 hours ahead. This actually helps the flavors meld and the dough to firm up, making rolling and cutting easier. Just let it sit for about 5 minutes at room temp before rolling if it’s too stiff.
-
Why use gel food coloring instead of liquid?
Gel food coloring won’t add extra liquid to your dough, which keeps the consistency perfect for rolling and prevents spreading during baking. It also delivers a more vibrant color that really pops in your swirled design.
-
How thick should I cut the cookies?
I recommend cutting them about 1/3 inch thick. This thickness ensures even baking and helps the cookies maintain their beautiful swirl and soft texture without becoming too fragile.
-
What if my cookies spread too much when baking?
Make sure you’ve chilled the dough well before baking; that’s key to preventing spreading. Also, avoid overbaking—pull them out just before edges brown. Finally, use gel colors instead of liquid so the dough isn’t too loose.
-
Can I substitute almond extract if I don’t like the flavor?
Yes! You can swap almond extract for extra vanilla or a touch of peppermint extract for a different holiday vibe. Just keep the quantity the same so your cookies don’t get too strong in flavor.
Final Thoughts
This Swirled Christmas Cookie Recipe has become a holiday tradition for me, and I love sharing it with friends who want to bring a little extra joy (and color!) to their cookie trays. It’s a recipe that feels festive but is easy to pull together, even on a busy schedule. Trust me, once you try it, you’ll find yourself reaching for it every year. So roll up those sleeves, gather your sprinkles, and bake something that makes this season just a little sweeter.
Print
Swirled Christmas Cookie Recipe
- Prep Time: 20 minutes
- Cook Time: 12 minutes
- Total Time: 2 hours 2 minutes
- Yield: 20 cookies
- Category: Dessert
- Method: Baking
- Cuisine: American
Description
These Swirled Christmas Cookies are festive, soft, and tender cookies featuring beautiful red, green, and white swirls with a crunch of Christmas sprinkles on the outside. Perfect for holiday celebrations, these cookies combine the flavors of almond and vanilla with a fun, colorful presentation that delights both the eyes and the palate.
Ingredients
Cookie Dough
- 1 cup (2 sticks) unsalted butter, room temperature (226g)
- 1 1/4 cups granulated sugar (250g)
- 1 large egg, room temperature (56g)
- 2 tsp almond extract (10g)
- 1 tsp vanilla extract or vanilla bean paste (5g)
- 3 cups all-purpose flour (390g)
- 1 tsp cornstarch (3g)
- 1 tsp baking powder (4g)
- 1 tsp fine salt (6g)
Decoration
- 1 cup Christmas sprinkles (nonpareils recommended)
- Red gel food coloring
- Green gel food coloring
Instructions
- Cream Butter and Sugar: In a large bowl or stand mixer, beat the unsalted butter and granulated sugar on medium-high speed for 2 minutes until the mixture lightens in color and becomes fluffy.
- Add Egg and Extracts: Mix in the egg, almond extract, and vanilla extract or vanilla bean paste on medium speed until fully incorporated, scraping the bowl sides and bottom as needed.
- Mix Dry Ingredients: Add flour, cornstarch, baking powder, and salt to the butter mixture. Mix on low speed just until combined, scraping the bowl to ensure thorough mixing without overworking.
- Divide and Color Dough: Divide the dough into three equal portions (~10 oz or 305g each). Leave one plain, color one with red gel food coloring, and color the last with green gel food coloring. Flatten each dough portion into 1/3 inch thick rectangles and wrap in plastic wrap.
- Chill Dough: Refrigerate dough for at least 30 minutes (or 10 minutes in freezer, or overnight in fridge). If chilled overnight, let it sit 5 minutes at room temperature before rolling.
- Prepare Oven and Baking Sheets: Preheat oven to 350°F (175°C) about 30 minutes before baking. Line two large baking sheets with silicone mats or parchment paper.
- Roll Out Dough: Remove dough from plastic wrap. On plastic wrap, roll each portion to about 7×12 inches. On parchment paper, stack dough layers green on bottom, plain in the middle, red on top. Use a rolling pin to gently press layers together.
- Shape Dough Log: Trim edges uneven parts. Cut one long side at an angle to have less red than green on that edge for a sharper swirl. Starting at this angled edge, roll dough tightly into a long log using the parchment paper to help. Seal seam by gently pressing dough over it.
- Coat with Sprinkles: Pour Christmas sprinkles onto a rimmed baking sheet. Roll the dough log in sprinkles until fully coated.
- Slice Cookies: Use a sharp knife to cut the log into 1/3 inch thick slices. If the log is too soft or misshapen, chill for 15-30 minutes to firm up. Place cookies about 1 inch apart on prepared baking sheets.
- Bake Cookies: Bake one sheet at a time on the middle oven rack for 12-14 minutes, rotating halfway through. Remove before edges brown; they continue firming on the pan as they cool.
- Cool Cookies: Let cookies cool on the baking sheet for 15 minutes before transferring to a wire rack to cool completely.
- Store and Serve: Store cooled cookies in an airtight container at room temperature for up to 5 days and enjoy!
Notes
- This recipe yields about 20 cookies; size and thickness cut will affect yield and bake time.
- The recipe can easily be doubled to increase yield.
- Creaming butter and sugar well incorporates air for tender, soft cookies.
- Use gel food coloring for vivid dough colors; liquid coloring can alter dough consistency.
- Cut cookies consistently at 1/3 inch thickness for even baking.
- Chilling dough prevents spreading and promotes soft texture.
- Avoid overbaking; underbake slightly as cookies firm up after removal from oven.
Nutrition
- Serving Size: 1 cookie
- Calories: 150
- Sugar: 10g
- Sodium: 80mg
- Fat: 8g
- Saturated Fat: 5g
- Unsaturated Fat: 3g
- Trans Fat: 0g
- Carbohydrates: 18g
- Fiber: 0.5g
- Protein: 2g
- Cholesterol: 30mg

