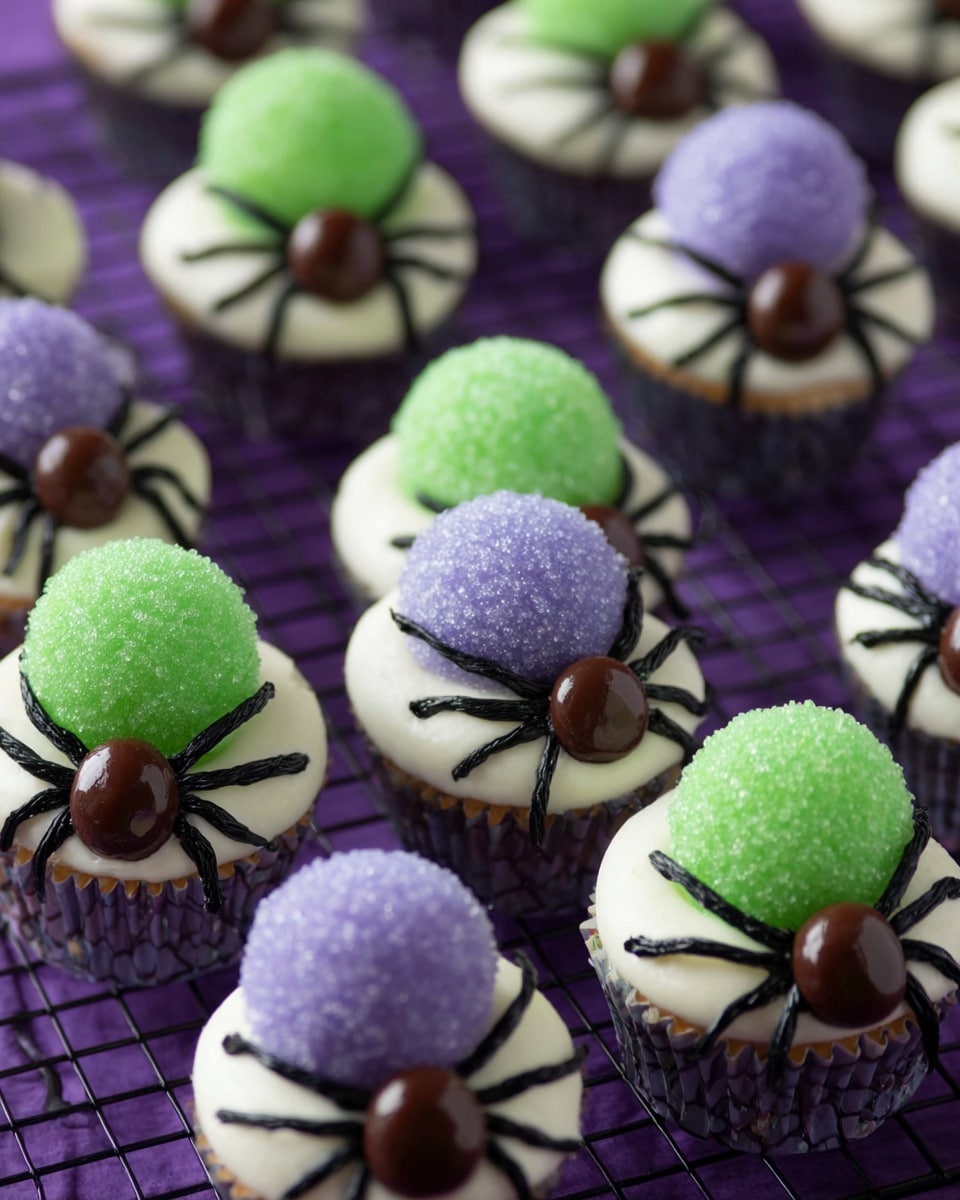
If you’re on the hunt for a Halloween treat that’s both adorable and deliciously fun, I’ve got you covered with this fan-freaking-tastic Spider Bites Mini Cupcakes Recipe. These tiny cupcakes look like creepy little spiders resting on your plate, but trust me, every bite is pure vanilla-chocolate bliss. I love this recipe because it combines a moist chocolate cupcake with creamy, colorful buttercream, all topped with a cute candy spider that’s surprisingly easy to make. Stick around—I’ll guide you step-by-step so your Spider Bites come out perfect every time!
Why You’ll Love This Recipe
- Fun and Festive: These mini cupcakes double as Halloween decor and dessert, making parties extra special.
- Perfect Mini Size: Bite-sized treats are great for snacking without overindulging.
- Simple Ingredients: You probably have most of these pantry staples already, which makes it an easy bake.
- Creative Decoration: Playing with colors and piping techniques to make the spiders is incredibly satisfying.

Ingredients You’ll Need
To nail this Spider Bites Mini Cupcakes Recipe, it’s all about balancing rich chocolate with smooth vanilla buttercream and playful candy decorations. Each component is chosen to give you that moist, flavorful cupcake and a frosting that holds its shape perfectly for piping those spidery details.
- Vanilla candy coating: This melts smoothly for dipping cupcake tops and works as “glue” for the decorations.
- White sanding sugar: Adds a sparkly texture when shaping the spider bodies.
- Purple or green gel icing color: I like these vibrant hues for a festive Halloween vibe.
- Dark chocolate covered espresso beans: These are perfect for the spider heads — crunchy and chocolatey.
- Butter (room temperature): Softened butter whips up mess-free and smooth for the buttercream.
- Confectioners’ sugar: Gives the frosting sweetness and structure.
- Vanilla extract: A must for that warm vanilla undertone in the frosting and cupcakes.
- Milk: Adjusts buttercream consistency for piping spider legs and bodies.
- All purpose flour: The base for your light but sturdy cupcake crumb.
- Natural unsweetened cocoa: Adds that deep chocolate flavor without overpowering.
- Granulated sugar: Sweetens and tenderizes the cupcake crumb.
- Baking powder & baking soda: Needed for that perfect rise and texture.
- Salt: Enhances the overall flavors.
- Egg: Binds and builds structure in the cupcakes.
- Buttermilk: Makes cupcakes tender and adds subtle tanginess.
- Vegetable oil: Keeps cupcakes moist and adds to a soft crumb.
- Hot water: Helps blend ingredients evenly and intensifies cocoa flavor.
Variations
One of my favorite things about this Spider Bites Mini Cupcakes Recipe is how easy it is to personalize. Whether it’s swapping colors or tweaking flavors, you can make these spiders uniquely yours.
- Flavor Swap: I once made these using a mint gel color and peppermint extract instead of vanilla for a spooky mint-chocolate twist that my family adored.
- Dairy-Free Version: Try using dairy-free butter and milk alternatives to make this recipe friendly for friends with dietary restrictions without compromising texture.
- Gluten-Free Cupcakes: Swapping all-purpose flour for a gluten-free blend works perfectly here with a few minutes extra baking time.
- Different Candy Heads: If you’re not an espresso bean fan, small chocolate chips or mini marshmallows lend themselves well as spider heads.
How to Make Spider Bites Mini Cupcakes Recipe
Step 1: Mix up the Cupcake Batter
Preheat your oven to 350°F and line a mini cupcake pan with 24 miniature baking cups. This recipe fills exactly 24, so no worries about leftovers or extra batter. Sift together all the dry ingredients—flour, cocoa, granulated sugar, baking powder, baking soda, and salt—in your stand mixer bowl. This ensures even distribution and prevents lumps.
Next, add the egg, mixing just until combined before gradually pouring in buttermilk, vegetable oil, and vanilla. Then here’s the trick I learned: add the hot water slowly while mixing to lighten the batter and make sure it’s silky smooth. Use a small scoop to fill each liner about two-thirds full. Bake for 10 to 12 minutes; keep an eye on them to avoid overbaking — you want a toothpick to come out clean but not dry. Let cupcakes cool completely before decorating.
Step 2: Whip Up That Dreamy Buttercream
This buttercream is the heart of the spider decoration—so you want it whipped, creamy, and pipe-friendly. Beat your room temperature butter on medium-high for 3 to 4 minutes. Adding the confectioners’ sugar one cup at a time helps prevent a powdery cloud everywhere and ensures smooth incorporation.
Once all sugar is in, mix in vanilla extract. Then add milk tablespoon by tablespoon until you hit your perfect frosting consistency. I find it needs to be thick enough to hold firm dollops, especially for the spider bodies. But when piping the legs, a slightly looser texture works better to form those thin, delicate lines. Keep tasting as you go—that’s the fun part!
Step 3: Create the Spider Bodies and Legs
Start by dipping the tops of your cooled cupcakes into melted vanilla candy coating. This shiny layer not only looks awesome but gives your buttercream something to stick to. Let it dry completely.
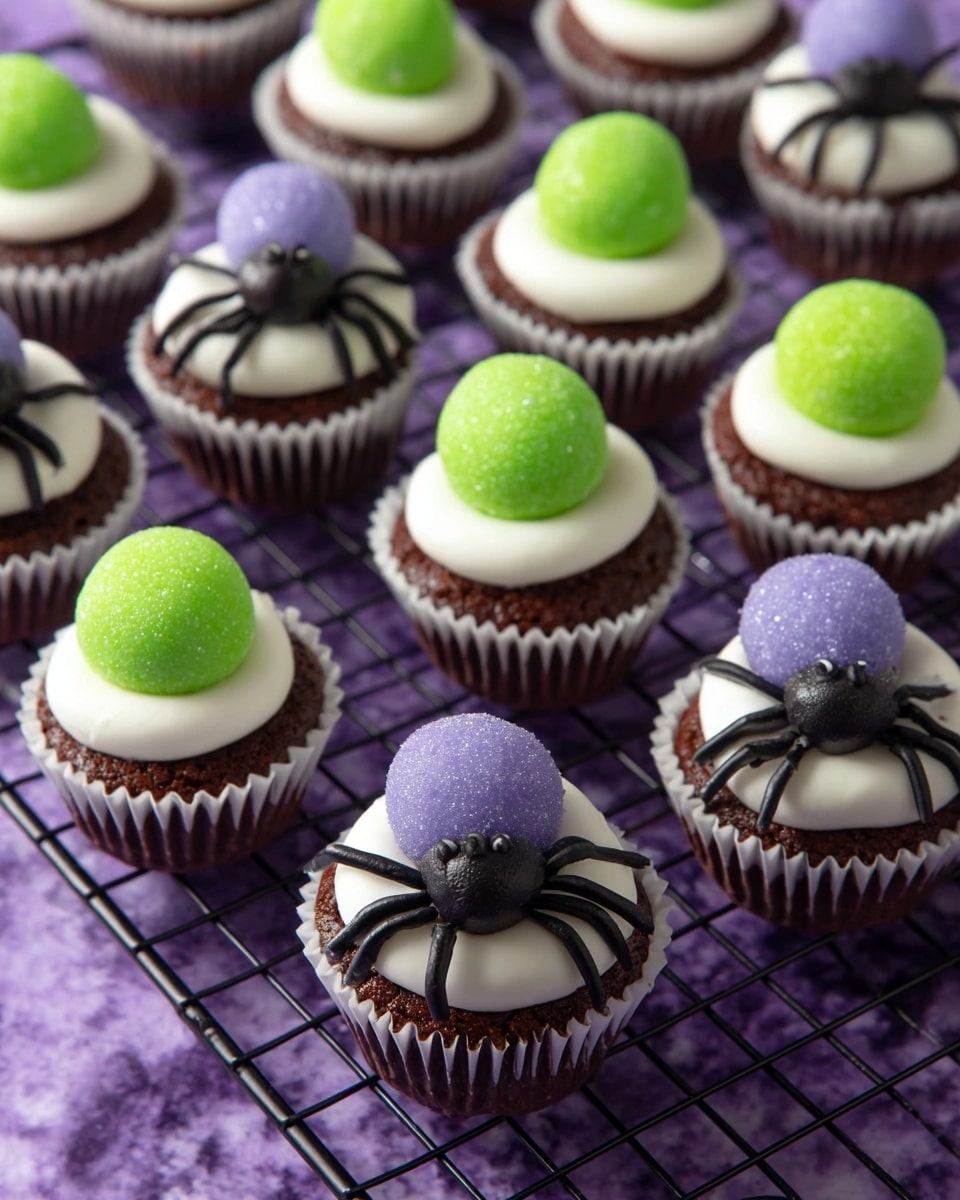
Then tint most of your buttercream using your chosen gel icing color—purple and green make my Spiders pop. Using an Ateco #808 tip, pipe large dollops on top and the side of each cupcake to create a rounded shape for the spider body.
Here’s a neat trick: gently dip the piped buttercream into white sanding sugar to form a textured, fuzzy ball—it’s the secret to that spider-like look I love.
Attach a dark chocolate covered espresso bean to the front as the spider’s head using a dab of melted candy coating for glue.
Lastly, tint the remaining buttercream black and switch to a Wilton #2 tip for piping those spindly spider legs around the body. Take your time here; I like to pipe four legs per side for maximum creep factor!
Pro Tips for Making Spider Bites Mini Cupcakes Recipe
- Use Room Temperature Ingredients: I used to rush and bake with cold butter, but soft butter whips the smoothest and gives you perfect frosting every time.
- Don’t Skip Sifting: Sifting dry ingredients prevents lumps and makes your cupcake batter silkier—this little trick always impresses guests.
- Adjust Buttercream Consistency: When piping legs, if the frosting is too stiff, add a bit more milk to avoid breaking your delicate spider legs.
- Cool Completely Before Decorating: I learned the hard way that warm cupcakes melt frosting fast, so patience pays off for neat spider designs.
How to Serve Spider Bites Mini Cupcakes Recipe
Garnishes
I love adding little edible touches that make these spiders pop even more. A light sprinkle of extra white sanding sugar enhances the fuzzy spider body effect. You can also add tiny candy eyes on the espresso beans for a cute-yet-spooky look. Sometimes I swap the candy coating for colored melts to match themed parties.
Side Dishes
These mini cupcakes pair beautifully with a hot cup of pumpkin spice latte or spiced cider. For parties, I like serving them alongside fresh fruit or a sharp, salty cheese board—mixing sweet and savory keeps things interesting.
Creative Ways to Present
For Halloween gatherings, set your Spider Bites on a dark serving tray surrounded by faux spider webs and plastic creepy critters for a fun thematic display. I’ve also presented them in mini cupcake stands with small name tags shaped like tombstones—that little touch always gets compliments and keeps the vibe festive.
Make Ahead and Storage
Storing Leftovers
Once decorated, I store these cupcakes in an airtight container in the fridge. They keep well for up to 3 days, but honestly, they never last that long at my house! Bring them back to room temperature before serving for optimal flavor and texture.
Freezing
I haven’t frozen fully decorated Spider Bites much because I love how fresh they taste, but you can freeze the un-iced mini cupcakes. Wrap them tightly and freeze for up to 3 months. Thaw completely before frosting and decorating for best results.
Reheating
If you have leftover cupcakes without frosting, warming them gently in the microwave for 10-15 seconds brings back that just-baked softness. For decorated cupcakes, just leave them out at room temperature for a bit—no reheating required!
FAQs
-
Can I make the Spider Bites Mini Cupcakes Recipe ahead of time?
Absolutely! You can bake the mini cupcakes a day or two in advance and keep them stored airtight in the fridge. Prepare the buttercream and decorations the day you plan to serve for the best texture and freshness.
-
What if I don’t have a stand mixer?
No worries at all! You can mix these by hand using a whisk and sturdy spoon—just take a bit more time to ensure everything is smoothly combined, especially the buttercream, which benefits from thorough whipping.
-
Can I use other candies for the spider heads?
Yes! The espresso beans give a nice crunch and chocolate flavor, but alternatives like chocolate chips, small gummies, or mini marshmallows work well too—just find what fits your taste and aesthetic.
-
How do I avoid spider legs breaking?
Ensuring your black buttercream is a bit fluid (adding a teaspoon of milk if needed) before piping helps keep those thin legs from cracking. Also, pipe straight onto cooled cupcakes and chill briefly for set legs before serving.
-
What’s the best way to color the buttercream?
Gel icing colors are best because they don’t thin your buttercream like liquid food colors do. Start with a little color and add more gradually to get the perfect shade.
Final Thoughts
I absolutely love how this Spider Bites Mini Cupcakes Recipe turns little ordinary cupcakes into a Halloween hit that’s as fun to make as it is to eat. The first time I tried this, I was amazed at how simple piping and a few candy touches transformed them into adorable creepy critters that got rave reviews from kids and adults alike. If you want to wow your guests with a treat that’s playful, tasty, and just the right size for a bite, this recipe is your new go-to. So grab your piping bag, get creative, and have a blast making your own Spider Bites—it’s seriously worth it!
Print
Spider Bites Mini Cupcakes Recipe
- Prep Time: 15 minutes
- Cook Time: 10-12 minutes
- Total Time: 2 hours 25 minutes
- Yield: 24 mini cupcakes
- Category: Dessert
- Method: Baking
- Cuisine: American
- Diet: Vegetarian
Description
Spider Bites Mini Cupcakes are delightful miniature treats perfect for Halloween or any spooky occasion. These moist chocolate cupcakes are topped with a rich, creamy colored buttercream shaped like playful spider bodies, coated with vanilla candy melts, and decorated with charming espresso bean heads and piped chocolate legs for a fun and festive look.
Ingredients
Cupcake Ingredients
- 1 cup all purpose flour
- 1/4 cup natural unsweetened cocoa
- 1/2 cup granulated sugar
- 1/2 teaspoon baking powder
- 1/4 teaspoon baking soda
- 1/4 teaspoon salt
- 1 egg
- 1/3 cup buttermilk
- 3 Tablespoons vegetable oil
- 1/2 teaspoon vanilla extract
- 3 Tablespoons hot water
Buttercream Ingredients
- 1 cup (two sticks) butter, room temperature
- 1 lb. confectioners’ sugar
- 1 teaspoon vanilla extract
- 1-3 Tablespoons milk
Decoration Ingredients
- Vanilla candy coating
- White sanding sugar
- Purple or green gel icing color
- Dark chocolate covered espresso beans
Instructions
- Preheat Oven and Prepare Pan: Preheat your oven to 350°F (175°C) and line a mini cupcake pan with 24 miniature baking cups to ensure easy cupcake removal and even baking.
- Mix Dry Ingredients: Sift together all-purpose flour, unsweetened cocoa powder, granulated sugar, baking powder, baking soda, and salt in the bowl of a stand mixer to combine and aerate the dry components.
- Add Wet Ingredients: Add the egg to the dry mixture and mix until just combined. Then pour in buttermilk, vegetable oil, and vanilla extract, blending until the batter is smooth and uniform.
- Incorporate Hot Water: Slowly add the hot water to the batter while mixing, which helps to create a lighter cupcake texture. Ensure all ingredients are thoroughly combined.
- Fill and Bake Cupcakes: Using a small scoop, fill each cupcake liner about two-thirds full with the batter. Bake in the preheated oven for 10-12 minutes or until a toothpick inserted into the center comes out clean. Remove from oven and let cool completely.
- Prepare Buttercream Frosting: Beat the room temperature butter in a large bowl for 3-4 minutes until light and creamy. Gradually add the confectioners’ sugar, one cup at a time, starting on low speed, then increasing until fully incorporated and smooth.
- Add Flavor and Adjust Consistency: Stir in the vanilla extract. Add milk one tablespoon at a time, mixing well after each addition, until the buttercream reaches a thick consistency suitable for piping firm shapes. Note that you may add more milk later for piping finer details like legs.
- Melt Vanilla Candy Coating: Melt the vanilla candy coating until fluid, suitable for dipping the cupcake tops. This will form a smooth, glossy surface for decorating.
- Dip Cupcake Tops: Dip the tops of the cooled cupcakes into the melted vanilla candy coating and allow the coating to dry completely, creating a firm base for decoration.
- Tint Buttercream and Pipe Spider Bodies: Color most of the buttercream with purple or green gel icing color to create the spider bodies. Using an Ateco #808 decorating tip, pipe large dollops of the tinted buttercream on the top and side of each cupcake to form the spider’s body shape.
- Coat Buttercream with Sugar: Gently dip the piped buttercream spider bodies into white sanding sugar to give texture and help shape them into a round ball resembling a spider’s body.
- Attach Spider Heads: Use a small amount of melted vanilla candy coating as glue to attach dark chocolate covered espresso beans at the front of each buttercream spider body, forming the spider’s head.
- Tint Remaining Buttercream and Pipe Legs: Tint the remaining buttercream black and, using a Wilton #2 decorating tip, pipe spider legs onto each cupcake, extending from the spider’s body to complete the look.
- Serve and Enjoy: Allow all decorations to set and then indulge in these festive, adorable Spider Bites Mini Cupcakes.
Notes
- Ensure cupcakes are completely cooled before dipping them in the melted candy coating to prevent melting or damage.
- Adjust the amount of milk in the buttercream frosting to get the right consistency for piping different details.
- If you do not have gel food coloring, use concentrated liquid food coloring but add sparingly to avoid thinning the buttercream.
- Dark chocolate covered espresso beans add a subtle coffee flavor and a lovely glossy finish for the spider heads.
- These mini cupcakes can be stored in an airtight container at room temperature for up to 2 days or refrigerated for up to 4 days; bring to room temperature before serving.
Nutrition
- Serving Size: 1 mini cupcake
- Calories: 160
- Sugar: 18g
- Sodium: 75mg
- Fat: 8g
- Saturated Fat: 4.5g
- Unsaturated Fat: 2g
- Trans Fat: 0g
- Carbohydrates: 22g
- Fiber: 1g
- Protein: 1.5g
- Cholesterol: 30mg


