If you’re looking for a breakfast that’s as charming as it is delicious, you’re going to adore this Snowman Pancakes Recipe. I absolutely love how these fluffy, cinnamon-spiced pancakes bring a smile to everyone’s face, especially on chilly mornings when you want something cozy and fun. Trust me, once you try these snowman-shaped beauties, you’ll want to make them again and again—plus, they’re a perfect project to do with kids or just treat yourself to a whimsical start to your day!
Why You’ll Love This Recipe
- Adorable Presentation: These pancakes form a cute snowman shape that makes breakfast feel extra special.
- Simple Ingredients: Made with everyday pantry staples, so you won’t have to hunt down anything obscure.
- Fun for All Ages: Kids love helping decorate and assemble these snowman pancakes, turning breakfast into bonding time.
- Flexible & Flavorful: The warm cinnamon and hint of sweetness are perfect for winter mornings or holiday brunches.

Ingredients You’ll Need
The ingredients here come together beautifully for fluffy, lightly sweet pancakes with a gently spiced undertone. I like that this recipe balances whole wheat and all-purpose flour to give a hearty texture without losing that tender bite you want in a pancake. Plus, the cinnamon adds a cozy note that really makes these snowmen feel like winter magic on a plate.
- Whole wheat flour: Adds nuttiness and a bit more fiber, giving your pancakes extra heartiness.
- Unbleached all-purpose flour: Keeps the texture light and fluffy alongside the whole wheat.
- Sugar: Just enough sweetness to balance the cinnamon without overpowering.
- Ground cinnamon: Brings warm flavor perfect for snowy mornings.
- Baking powder & baking soda: For that perfect rise and light texture.
- Sea salt: A pinch to enhance all the flavors.
- Whole milk: Using whole milk keeps the batter rich and the pancakes tender.
- Eggs: Help bind ingredients and add a subtle richness.
- Vegetable oil: Keeps pancakes moist and adds non-stick for cooking.
- Powdered sugar: For that beautiful snow dusting on top.
- Mini chocolate chips, black cookie icing, mini M&M’s: Perfect for decorating eyes, buttons, and facial features.
- Fresh shredded carrots: The cutest little noses for your snowmen.
- Twizzlers & pretzel sticks: Use these for scarves and arms to add fun texture.
- Strawberries and blueberries: Fresh fruit options to make your snowmen colorful and healthy.
- Whipped cream: For snowy fluff around your creation.
Variations
I love personalizing this Snowman Pancakes Recipe depending on the occasion or dietary needs. Whether you want them gluten-free, dairy-free, or just want to jazz up the decoration game, there are plenty of fun tweaks you can make!
- Gluten-Free Version: I once swapped out the flours for a gluten-free blend, and the snowmen still held their shape perfectly—just make sure your baking powder is gluten-free!
- Dairy-Free Substitute: Using almond or oat milk instead of whole milk works well, though I recommend adding a splash of vanilla for extra flavor.
- Seasonal Decorations: Instead of the usual carrot nose and candy scarf, try cranberry buttons and a raspberry scarf for a festive touch.
How to Make Snowman Pancakes Recipe
Step 1: Combine the Dry Ingredients Like a Pro
Start by measuring all your dry ingredients—whole wheat flour, all-purpose flour, sugar, cinnamon, baking powder, baking soda, and sea salt—and whisk them together in a medium bowl. This ensures that everything is evenly mixed, which is the key to avoiding any clumps. Trust me, I learned this the hard way the first time I skipped this step and got odd lumps in my batter. Once whisked, set it aside and get ready for the wet ingredients.
Step 2: Blend the Wet Ingredients Until Silky Smooth
Pour your milk, eggs, and vegetable oil into a blender and pulse for about 20-30 seconds on medium speed. I love this part because it makes the batter super smooth very quickly, and I’ve found that blending the wet ingredients first really helps everything come together better once you add the dry stuff. It’s a neat little trick I picked up that consistently gives me perfect batter every time.
Step 3: Mix and Finish Your Batter Gently
Slowly pour your dry ingredients into the blender with the wet mix. If you have a powerful blender like a Vitamix, you can add it all at once. Otherwise, adding half at a time and blending ensures your batter mixes through evenly. Blend on low to high speed for 20-30 seconds, and if you notice any pockets on the sides, a quick scrape with a rubber spatula helps incorporate everything nicely. The result should be a lump-free, smooth batter that’s silky and ready for the skillet.
Step 4: Heat Your Skillet and Prep for Pancake Magic
Heat a medium skillet on medium heat and pour in about ½ tablespoon of vegetable oil. Use a spatula to spread a thin, even layer as it heats. On my electric stove, I use setting 3—it’s just hot enough to cook the batter evenly without burning. This setup lets the pancakes bubble gently when you pour the batter, which is what you’re aiming for to get the perfect golden-brown finish without overcooking.
Step 5: Form the Snowman’s Body — Fun and Easy with a Frosting Bulb
If you haven’t tried making pancakes with a frosting bulb before, you’re in for a real treat! Fill the bulb with pancake batter and use the round tip to draw your snowman’s shape right on the skillet. Start by squeezing out a 2-inch circle for the head near the top, then immediately form the connected body circle just a bit bigger, followed by the third circle for the base. The batter spreads nicely on its own, so don’t stress about perfect circles.
Here’s a pro tip I discovered: don’t rush the batter’s first contact with the pan—if the skillet is just the right temperature, you’ll see gentle bubbles forming but no loud sizzle. That balance means your snowman will cook evenly and flip easily.
Step 6: Add the Hat for That Classic Snowman Look
Just above the head, pipe a horizontal line for the hat’s brim that connects right to the head’s edge. Then draw a small square outline just above that line and fill it in to create the top of the hat. This playful detail makes the snowman extra charming and fun to decorate—as if it’s waving hello from your plate!
Step 7: Flip and Finish Cooking
Wait 2-3 minutes or until you see bubbles pop on the snowman’s body, then gently flip it over and cook for another 1-2 minutes. The pancakes will turn a beautiful light golden brown. Don’t worry if the first couple don’t flip perfectly; it gets easier as you go. Let the cooked snowmen cool slightly on a large plate or parchment-lined rack so they’re ready for decorating.
Step 8: Repeat and Create a Winter Breakfast Wonderland
Remember to add that thin layer of oil before each batch for easy flipping and to prevent sticking. You’ll get about 3 snowmen per frosting bulb fill, with enough batter to make 12-15 pancakes total. Got some batter left? Try making snowflakes by piping asterisks (*)—they’re adorable and a fun way to fill extra space on the serving platter.
Step 9: Time for the Magic—Decorate Your Snowmen!
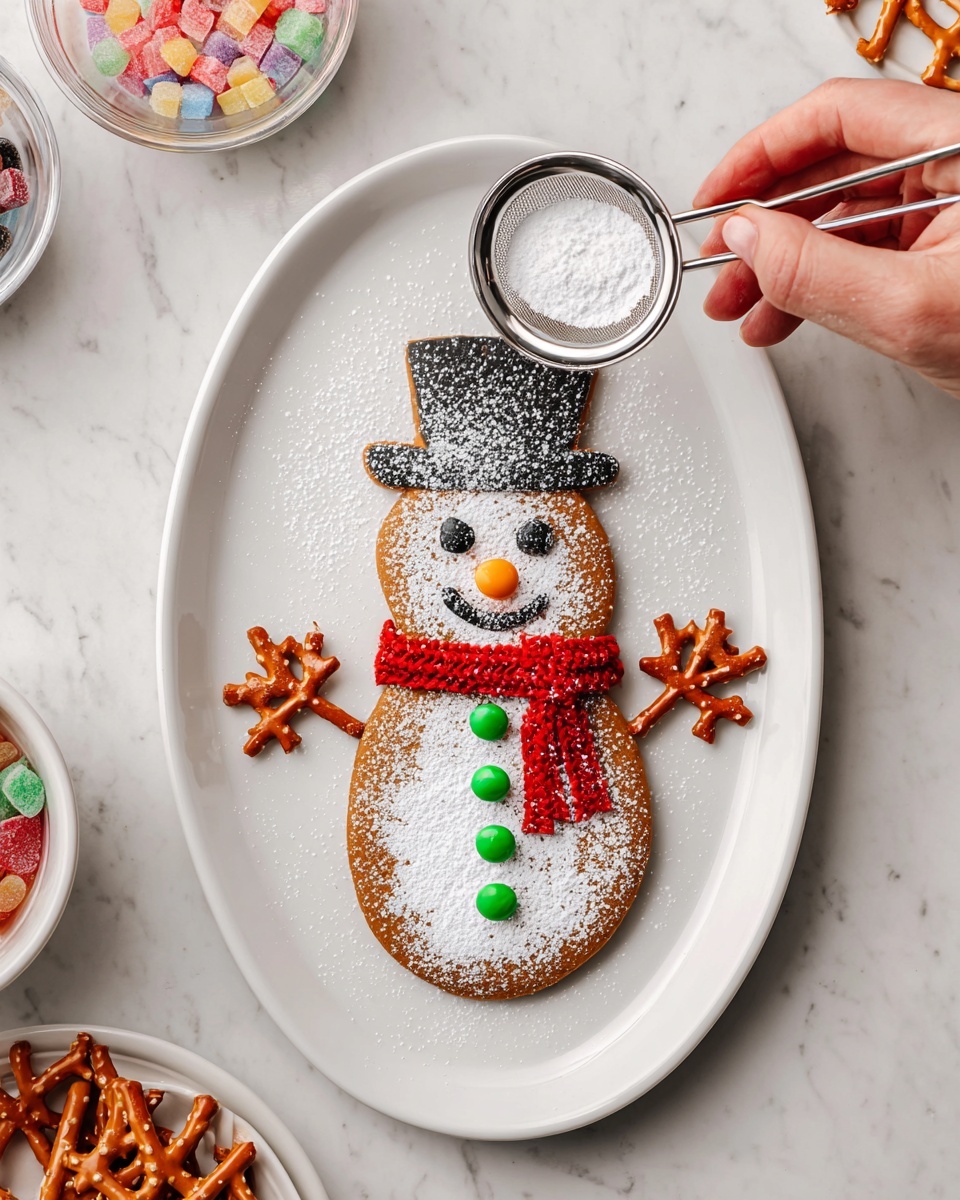
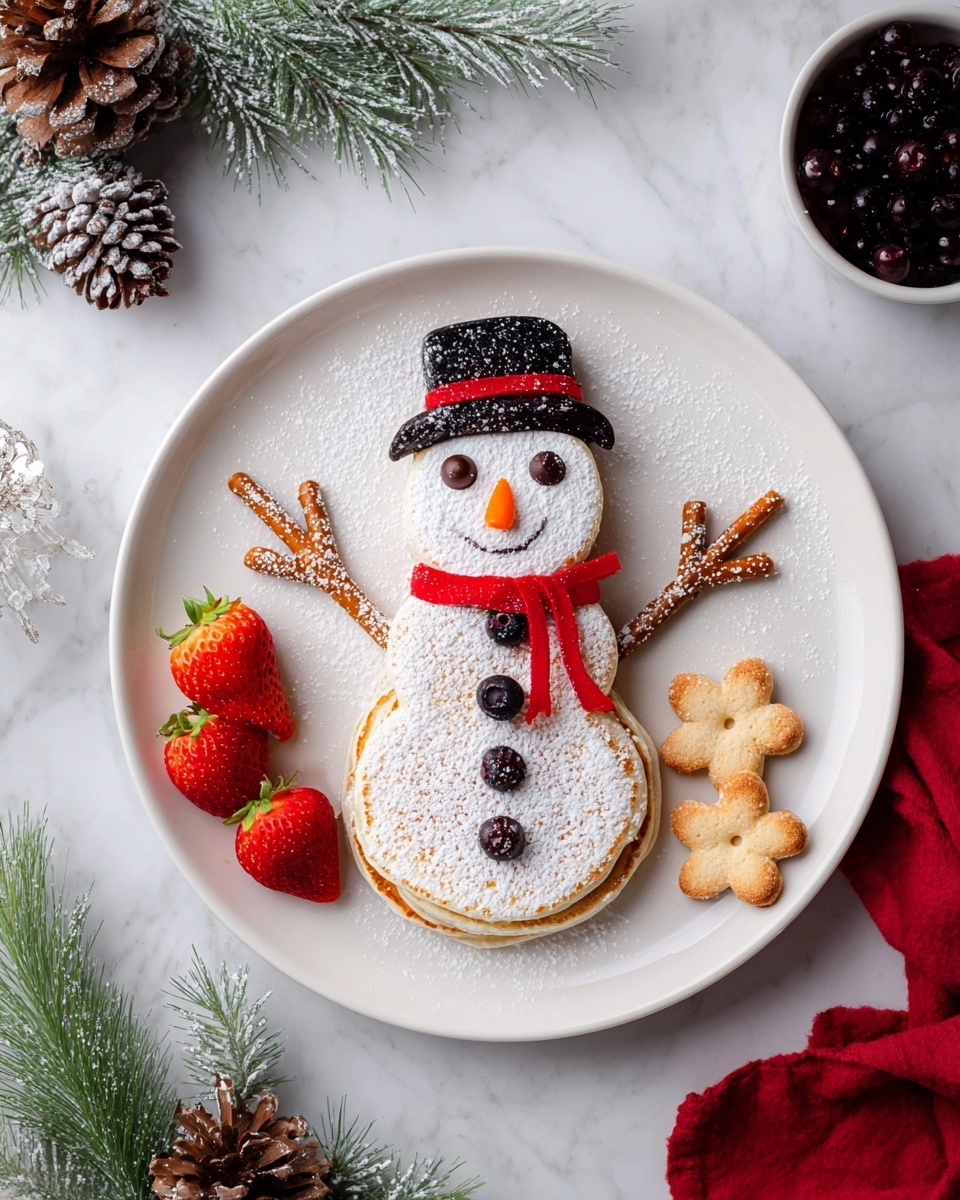
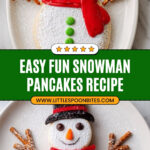
Dust each snowman with powdered sugar for a fresh snow effect. Use mini chocolate chips or black cookie icing for eyes and buttons, pinch fresh shredded carrot pieces for cute noses, and scribble the hat with cookie icing for that finishing touch. Twizzlers make perfect scarves, pretzel sticks become little arms, and whipped cream adds snowy fluff around your creation. When you want a fresher twist, swap in blueberries and strawberries for buttons and scarves—it makes them look so vibrant and healthy, too!
Pro Tips for Making Snowman Pancakes Recipe
- Frosting Bulb Magic: Investing in a frosting bulb with a round tip seriously changed the game for me—it makes forming connected shapes like snowmen a breeze.
- Heat Control: Medium heat with a consistently oiled pan helps prevent sticking and ensures even cooking without burning your pancake snowmen.
- Patience Pays Off: Waiting for bubbles to form and pop before flipping is key to keep your snowman intact and perfectly golden.
- Decoration Helps Keep Kids Engaged: I always involve my kids in decorating, which makes breakfast feel like a fun activity rather than a chore.
How to Serve Snowman Pancakes Recipe
Garnishes
I usually dust the pancakes with powdered sugar for that fresh snow look, and then add mini chocolate chip eyes and buttons. Shredded carrot noses add a cute pop of color, with Twizzler scarves and pretzel arms giving a playful texture. Fresh strawberries and blueberries are my go-to when I want to make it a bit healthier and colorful—they’re pretty and taste amazing!
Side Dishes
Snowman pancakes go great with a side of fresh fruit salad or some crispy bacon for that salty contrast. Sometimes I serve them with a dollop of whipped cream and a drizzle of maple syrup for extra indulgence. Hot chocolate or a simple glass of cold milk completes this cozy snowman breakfast perfectly.
Creative Ways to Present
For special occasions, I arrange the snowman pancakes on a large platter with extra “snowflakes” made from the leftover batter piped into asterisk shapes. Adding a light dusting of coconut flakes around the plate makes it look like a fresh winter scene. My kids love helping me turn our breakfast table into a winter wonderland that tastes as good as it looks!
Make Ahead and Storage
Storing Leftovers
Any leftover snowman pancakes keep well in an airtight container in the fridge for up to 2 days. I like to lay them flat with a sheet of parchment paper between layers to prevent sticking. When you’re ready to enjoy them, they’re just as tasty reheated.
Freezing
I’ve frozen these pancakes individually wrapped in plastic wrap, then placed them in a zip-top freezer bag. They freeze beautifully, so if you want to make a big batch ahead of time, you absolutely can. Just thaw them overnight in the fridge or pop them straight into the toaster or microwave when you need a quick breakfast.
Reheating
To reheat, I like to use a toaster oven or regular oven at a low temperature to warm them gently without drying them out. If you’re in a rush, a 20-30 second zap in the microwave wrapped with a damp paper towel does the trick and keeps them moist.
FAQs
-
Can I make the snowman pancakes without a frosting bulb?
Absolutely! While the frosting bulb makes piping the snowman shapes easier, you can use a squeeze bottle, a piping bag, or even spoon the batter onto the skillet and gently shape it with the back of the spoon. It might take a little practice, but you’ll get the hang of making your snowmen just fine.
-
What’s the best way to prevent the pancakes from sticking?
Keeping a thin, even layer of vegetable oil spread over the skillet and heating it to medium temperature is key. Also, letting the pancake cook until bubbles appear and pop before flipping helps ensure the pancake is firm enough to move freely without sticking.
-
Can I customize decorations to be allergy-friendly?
Definitely! Use allergy-safe items like fresh fruit, raisins, or safe food decorating gels for features. Avoid nuts or certain candies if you’re concerned about allergies. The snowman shape is so fun it works with almost any decoration!
-
How long does it take to make these pancakes from start to finish?
Including batter prep and cooking time, plan for about 35-40 minutes. It’s a bit more involved than regular pancakes but totally worth it for the joy they bring.
-
Can I prepare the batter the night before?
You can prepare the dry ingredients the night before and store them covered. I don’t recommend mixing the wet and dry ingredients too far ahead because the baking powder and soda start reacting once wet, which might reduce fluffiness over time. Mix and cook fresh for best results.
Final Thoughts
I still remember the first time I made these snowman pancakes with my kids — their excitement while decorating was priceless, and it turned breakfast into a delightful adventure. This Snowman Pancakes Recipe is one of those special dishes that’s as joyful to make as it is to eat. Whether you’re trying to brighten up a winter morning, delight kids during a holiday break, or just feel like adding a little whimsy to your breakfast table, these pancakes will bring warmth and smiles. So go ahead, give it a try—and maybe keep extra frosting bulbs handy, because you’ll want to make this again soon!
Print
Snowman Pancakes Recipe
- Prep Time: 15 minutes
- Cook Time: 20 minutes
- Total Time: 35 minutes
- Yield: 12-15 snowman pancakes
- Category: Breakfast
- Method: Stovetop
- Cuisine: American
Description
These delightful Snowman Pancakes are a festive and fun breakfast treat, perfect for kids and adults alike during the winter season. Made with a blend of whole wheat and all-purpose flour flavored with cinnamon, these pancakes are piped into adorable snowman shapes and decorated with candies, fresh fruit, and whipped cream to create a joyful, edible winter scene.
Ingredients
Dry Ingredients
- 1 cup whole wheat flour
- 1 cup unbleached all-purpose flour
- 3 tablespoons sugar
- 2 teaspoons ground cinnamon
- 2 teaspoons baking powder
- 1 teaspoon baking soda
- 1 teaspoon sea salt
Wet Ingredients
- 1 ½ cups whole milk
- 2 large eggs
- 4 tablespoons vegetable oil (+ extra for cooking)
For Decoration
- Powdered sugar
- Mini chocolate chips
- Fresh shredded carrots
- Black cookie icing
- Twizzlers
- Mini M&M’s
- Pretzel sticks
- Strawberries
- Blueberries
- Whipped cream
Instructions
- Combine dry ingredients: Measure the whole wheat flour, all-purpose flour, sugar, cinnamon, baking powder, baking soda, and sea salt into a medium bowl. Whisk these ingredients together until well combined, and set aside to be added later.
- Blend wet ingredients: Pour the whole milk, eggs, and vegetable oil into a blender. Blend on medium speed for 20-30 seconds until fully combined and smooth.
- Add dry ingredients to blender: Slowly pour the dry ingredient mixture into the blender with the wet ingredients. Blend on low speed, gradually increasing to high, for 20-30 seconds. Scrape down the sides as necessary and blend again until the batter is lump-free and fully incorporated.
- Prepare the skillet: Heat a medium skillet over medium heat (setting 3 on electric stove). Add about ½ tablespoon of vegetable oil, spreading evenly to prevent sticking, and let the skillet get hot before cooking pancakes.
- Form the snowman’s head: Fill a frosting bulb with pancake batter and attach a round tip. Squeeze batter onto the skillet to create a 2-inch diameter circle near the top of the skillet for the snowman’s head. The batter should bubble lightly upon contact without sizzling loudly.
- Form the snowman’s body: Directly below the head, squeeze out a slightly larger circle connected to the head to form the body of the snowman.
- Form the third circle: Below the body, create a third circle, slightly larger than the previous two, connected to form the snowman’s lower body.
- Create the snowman’s top hat: On top of the head circle, pipe a thin horizontal line connected to the head for the hat’s brim. Above this line, pipe a small filled square as the hat itself.
- Cook first side: Let the pancake cook until bubbles form and pop on the surface of the snowman’s body, about 2-3 minutes.
- Flip and cook second side: Carefully flip the pancake and cook for 1-2 minutes on the opposite side until golden brown. Remove from skillet and place on a plate or parchment-lined cooling rack to cool slightly. Maintain an even layer of oil on the skillet for subsequent pancakes.
- Repeat forming and cooking: Continue the same process until all batter is used, making about 12-15 snowman pancakes. Refill the frosting bulb as needed. Extra batter can be used to create snowflake shapes by piping asterisks.
- Decorate the snowmen: Use a sifter to dust powdered sugar over each snowman. Decorate with mini chocolate chips or candy eyes, shredded carrot noses, black cookie icing for hat details, Twizzler scarves, pretzel stick arms, and add fresh fruit such as blueberries and strawberries for buttons and scarves. Finish with dollops of whipped cream for snow effect.
Notes
- These snowman pancakes are a delightful and creative breakfast idea, especially perfect for winter and holiday mornings.
- The frosting bulb with a round tip makes shaping the snowman much easier and more precise, especially for children helping in the kitchen.
- Keeping the skillet evenly oiled prevents sticking and helps achieve perfect golden pancakes that flip easily.
- Involve kids in decorating for a fun, interactive family activity.
- Fresh fruit can be used as a healthier decoration alternative to candy.
- Extra batter can be used to make snowflake shapes, enhancing the festive look.
Nutrition
- Serving Size: 1 snowman pancake
- Calories: 154 kcal
- Sugar: 5 g
- Sodium: 378 mg
- Fat: 7 g
- Saturated Fat: 2 g
- Unsaturated Fat: 5 g
- Trans Fat: 0.03 g
- Carbohydrates: 20 g
- Fiber: 2 g
- Protein: 4 g
- Cholesterol: 31 mg