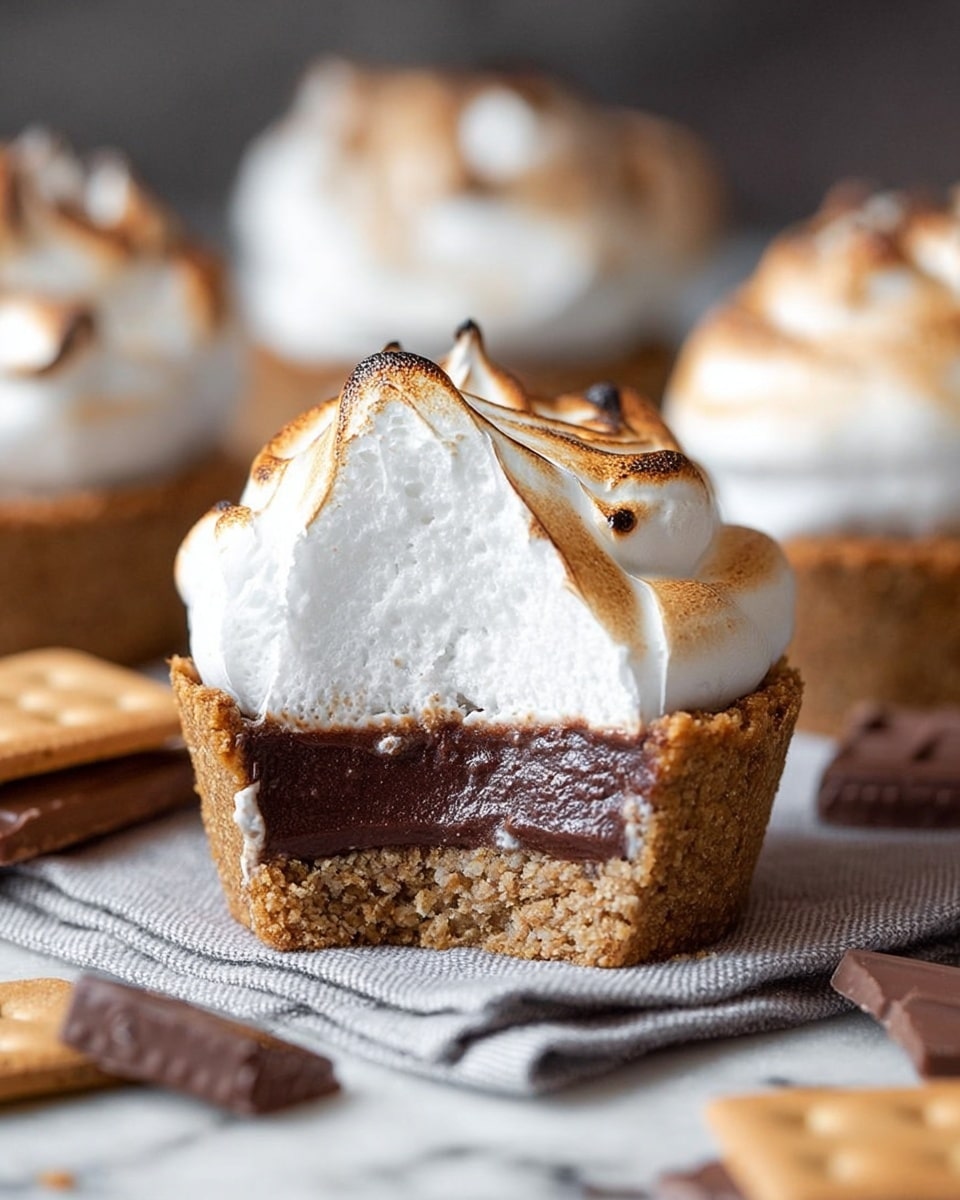
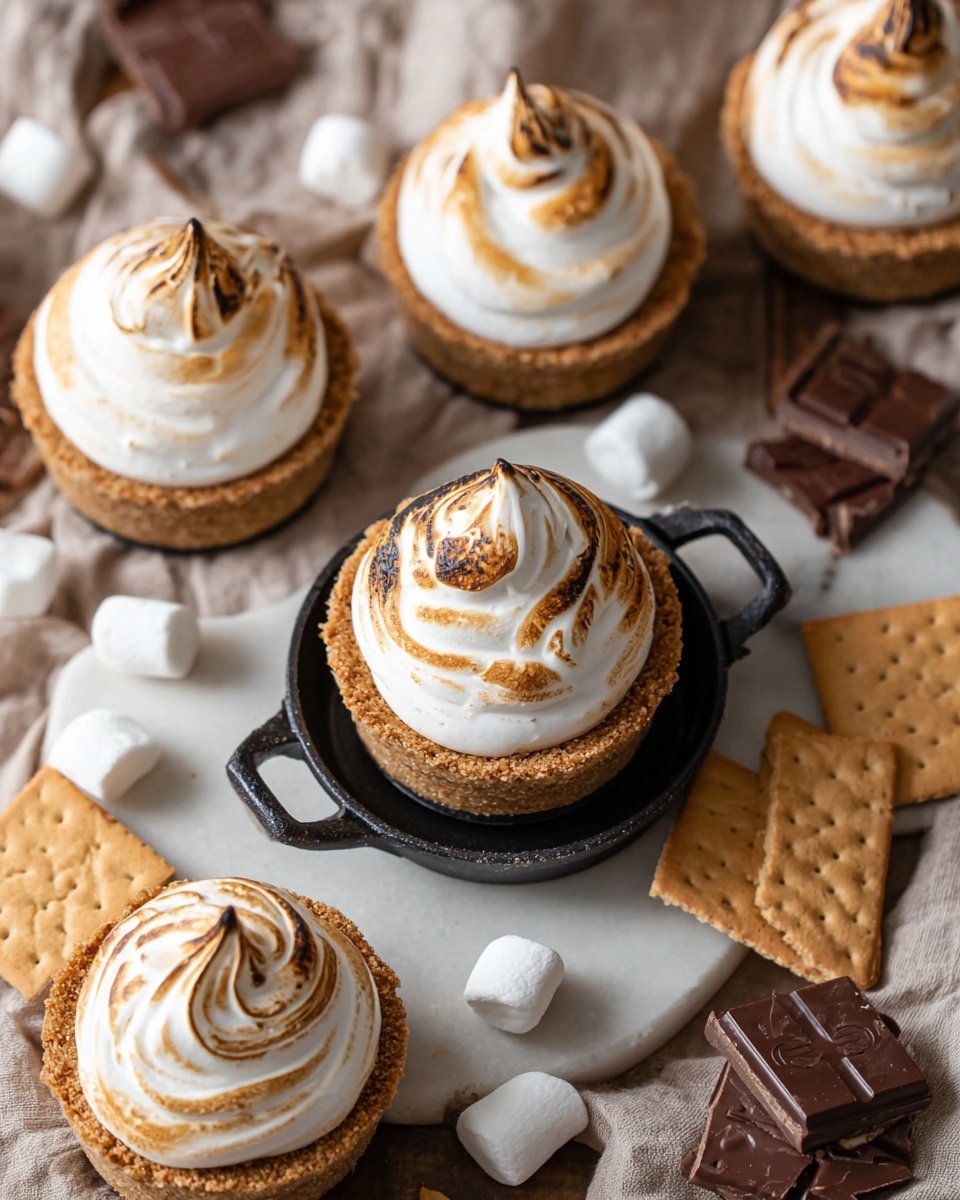
If you’re anything like me and adore everything s’mores, you’re about to fall in love with this S’mores Cookie Cups Recipe. It takes all the fun of classic s’mores and turns it into this irresistible, bite-sized dessert that’s perfect for any day of the week. I promise once you make these, you’ll never want to go back to the campfire version—plus, no fire required!
Why You’ll Love This Recipe
- No Campfire Needed: Enjoy classic s’mores flavors without the hassle or smoke.
- Perfectly Portable: These cookie cups are great for parties or just a sweet treat anytime.
- Made from Scratch: I love how fresh this recipe tastes compared to store-bought mixes.
- Fun to Make: It’s the kind of recipe that’s rewarding and a joy to share with people you love.

Ingredients You’ll Need
What’s amazing about the ingredients in this S’mores Cookie Cups Recipe is how simple and real they are—nothing overly processed, just good-for-you basics that work together to give you those classic s’mores vibes in dessert form.
- Unsalted butter: Room temperature is key here so it creams properly and creates a tender cookie cup.
- Granulated sugar: Helps give the cookie cups just the right touch of sweetness and crispness.
- Light-brown sugar: Adds that lovely caramel depth that pairs perfectly with graham crackers.
- All-purpose flour: Use fresh flour to get a great texture for your cookie cups.
- Graham cracker crumbs: The soul of the recipe—makes these cookie cups truly s’mores special.
- Baking soda: Provides a gentle rise so the cups hold their shape but stay soft inside.
- Sea salt: Balances sweetness and boosts all those cozy flavors.
- Vanilla extract: I always use clear vanilla for the meringue and classic vanilla for the dough—it’s little details like these that make a difference!
- Large egg: At room temperature, it helps everything bind seamlessly.
- Hershey’s milk chocolate: Chopped for the decadent chocolate ganache filling (feel free to swap for milk or semi-sweet if you prefer!).
- Heavy whipping cream: For that silky smooth chocolate ganache that melts in your mouth.
- Water, granulated sugar, and corn syrup or honey: These come together to create the perfect homemade marshmallow fluff topping.
- Egg whites and cream of tartar: Essential for that glossy, stable meringue that toasts beautifully.
Variations
One of the things I love most about this S’mores Cookie Cups Recipe is how flexible it is to your tastes—don’t hesitate to make it your own by switching up fillings or toppings. It’s a treat that feels personal every time.
- Chocolate Varieties: I once swapped in dark chocolate chunks for a richer, slightly bitter contrast that my family couldn’t get enough of.
- Fluff Toppings: Try flavored marshmallow fluff—like raspberry or mocha—for a fun twist that surprises your guests.
- Nutty Add-ins: Toss in some toasted pecans or almonds into the cookie dough for added crunch and nuttiness.
- Gluten-Free Option: Use a gluten-free flour blend and gluten-free graham cracker crumbs to enjoy these without any tummy troubles.
How to Make S’mores Cookie Cups Recipe
Step 1: Prepare the Graham Cracker Cookie Dough
Start by creaming the room-temperature unsalted butter with both sugars until you get a light and fluffy texture—this usually takes about 2-3 minutes using a handheld mixer. Then mix in the egg and vanilla extract until everything looks well combined. In a separate bowl, whisk together your flour, graham cracker crumbs, baking soda, and sea salt so the leavening is evenly distributed. Gradually add the dry ingredients to the wet until just combined—you don’t want to overmix here or your cookie cups could end up tough. The dough should be soft but hold together well, perfect for pressing into muffin tins.
Step 2: Form and Bake the Cookie Cups
Grease your muffin tin lightly (I find a silicone brush or nonstick spray works well), then press about a tablespoon of dough into each cup, shaping it up the sides to form little bowls. This is where the magic happens—take your time so the edges are nice and even. Bake these at 350°F (175°C) for 12-15 minutes until the edges are golden but the centers are still a bit soft. Remove from the oven and allow them to cool slightly—not completely though, or they won’t be easy to fill.
Step 3: Make the Chocolate Ganache Filling
While your cookie cups are cooling, chop the Hershey’s milk chocolate into small pieces—consistency is key to melting them evenly. Heat your heavy cream in a small saucepan just until it begins to simmer (don’t let it boil). Pour the hot cream over the chocolate and let it sit undisturbed for about 2 minutes to melt the chocolate. Then stir gently until smooth and glossy. Spoon this heavenly ganache into each cookie cup while they’re still warm enough to slightly soften them—this way, the filling seeps in just a little, keeping every bite decadent.
Step 4: Whip Up the Marshmallow Fluff and Toast
This step is my personal favorite because the homemade marshmallow fluff is way better than anything store-bought. Combine water, granulated sugar, and corn syrup (or honey) in a pot and bring to a boil without stirring—using a candy thermometer helps to reach the perfect 240°F (115°C) soft-ball stage. Meanwhile, whip your egg whites with cream of tartar until they form soft peaks. Once the syrup is ready, slowly pour it into the egg whites while whipping at high speed. Add the clear vanilla extract, then continue to whip until the mixture is thick, glossy, and cooled to room temperature. Spoon or pipe this fluffy cloud onto each cookie cup, then use a kitchen torch to toast the tops to a perfect golden brown. If you don’t have a torch, a quick few minutes under the broiler works too—just watch closely!
Pro Tips for Making S’mores Cookie Cups Recipe
- Room Temperature Ingredients: I learned that having your eggs and butter at room temp makes dough much easier to work with and improves texture.
- Don’t Skip the Graham Cracker Crumbs: They add authentic flavor and help the cookie cups hold shape without being dense.
- Watch Your Meringue Temperature: Using a candy thermometer ensures your sugar syrup is just right for fluffy marshmallow fluff every time.
- Toasting Safety: Use a kitchen torch with a steady hand or watch the broiler closely to avoid burning your marshmallow tops.
How to Serve S’mores Cookie Cups Recipe
Garnishes
I tend to keep garnishes simple because the cookie cups themselves are packed with flavor—but a sprinkle of crushed graham crackers or a mini chocolate kiss on top adds a cute finishing touch. Sometimes I add a little flaky sea salt to contrast the sweetness, which my family surprisingly loves.
Side Dishes
Since these are pretty indulgent, I often pair them with fresh berries or a tangy berry compote to balance the richness. A cold glass of milk (or almond milk) is a classic for a reason—it really rounds out the experience beautifully.
Creative Ways to Present
For parties, I love arranging these cookie cups on a wooden board surrounded by extra graham crackers and chocolate pieces—makes it feel like a fun s’mores charcuterie! You can get playful with different types of chocolates or drizzle some caramel or peanut butter on top for a crazy delicious upgrade.
Make Ahead and Storage
Storing Leftovers
I’ve found the best way to store these is in an airtight container in the fridge for up to 3 days. The cookie cups hold up nicely, but the marshmallow fluff can get a bit sticky if left out at room temperature too long.
Freezing
Freezing works if you want to prep ahead! Freeze unfilled cookie cups separately, then thaw before filling them with ganache and fluff. This keeps the texture fresh and avoids sogginess.
Reheating
If you want to enjoy these warm, just pop them in a low oven (about 300°F) for 5 minutes, or microwave briefly—though I avoid microwaving as it melts the marshmallow too much.
FAQs
-
Can I make the marshmallow fluff ahead of time?
Yes! You can prepare the marshmallow fluff a day ahead and store it covered in the fridge. Before using, give it a quick whip with a mixer to bring back its fluffy texture.
-
What can I use if I don’t have a kitchen torch?
A broiler in your oven works well—just place the cookie cups on the top rack, watch them carefully, and remove as soon as the marshmallow starts turning golden.
-
Can I use a different chocolate for the ganache?
Absolutely! Milk chocolate is classic, but semi-sweet, dark, or even white chocolate all work fine depending on your preference.
-
Are these cookie cups gluten-free?
Not as written, because they contain all-purpose flour and traditional graham cracker crumbs. However, you can substitute gluten-free flour and gluten-free graham crackers to make a safe version.
-
How do I prevent the cookie cups from shrinking?
Make sure to press the dough firmly into the muffin tin and chill the dough before baking if you find they shrink. Also, avoid overbaking, which can dry them out and cause shrinking.
Final Thoughts
I absolutely love how this S’mores Cookie Cups Recipe brings the nostalgic flavors of a campfire treat indoors and onto your dessert plate. It’s one of those recipes that feels special yet is totally doable—perfect for impressing friends or just indulging yourself after a long day. Give it a try and I’m sure it’ll find a happy spot in your dessert rotation like it did in mine. Happy baking and toasting!
Print
S’mores Cookie Cups Recipe
- Prep Time: 40 min
- Cook Time: 25 min
- Total Time: 65 min
- Yield: 10 cookie cups
- Category: Dessert
- Method: Baking
- Cuisine: American
Description
Deliciously nostalgic S’mores Cookie Cups featuring a crispy graham cracker cookie base filled with rich Hershey’s milk chocolate ganache and topped with a fluffy, toasted homemade marshmallow fluff. These handheld treats capture the classic campfire s’mores experience without the need for a campfire, perfect for any occasion or dessert craving.
Ingredients
For the Graham Cracker Cookie Cups
- 1/2 cup unsalted butter (room temperature)
- 1/4 cup granulated sugar
- 1/2 cup light brown sugar (packed)
- 1/2 cup + 2 Tbsp all-purpose flour
- 1/2 cup graham cracker crumbs
- 1/4 tsp baking soda
- 1/2 tsp sea salt
- 1 tsp vanilla extract
- 1 large egg (room temperature)
For the Chocolate Ganache
- 200 g Hershey’s milk chocolate (chopped)
- 100 ml heavy whipping cream
For the Marshmallow Fluff
- 1/3 cup water
- 3/4 cup granulated sugar
- 3/4 cup corn syrup or honey
- 3 large egg whites (room temperature)
- 1/2 tsp cream of tartar
- 1 tsp clear vanilla extract
Instructions
- Prepare the Graham Cracker Cookie Dough: In a mixing bowl, cream together the unsalted butter, granulated sugar, and light brown sugar until light and fluffy. Add the egg and vanilla extract, mixing well. In a separate bowl, whisk together the flour, graham cracker crumbs, baking soda, and sea salt. Gradually blend the dry ingredients into the wet mixture until just combined to form a cookie dough.
- Shape and Bake the Cookie Cups: Preheat your oven to 350°F (175°C). Press the cookie dough evenly into the cups of a greased muffin tin, shaping to form small cups. Bake for about 15-18 minutes or until golden and firm. Remove from the oven and allow to cool completely before removing from the tin.
- Make the Chocolate Ganache: Heat the heavy whipping cream in a small saucepan over medium heat until it just begins to simmer. Remove from heat and pour over the chopped Hershey’s milk chocolate. Let sit for a few minutes, then stir until smooth and glossy. Fill each cooled cookie cup with the ganache. Place in the refrigerator to set while preparing the marshmallow fluff.
- Prepare the Marshmallow Fluff: In a saucepan, combine water, granulated sugar, and corn syrup or honey. Bring the mixture to a boil and continue boiling until it reaches 240°F (soft-ball stage) on a candy thermometer. Meanwhile, in a clean bowl, beat the egg whites with cream of tartar to soft peaks. With the mixer running, slowly pour the hot sugar syrup into the egg whites, then beat at high speed until the mixture is thick, glossy, and cool. Beat in the clear vanilla extract.
- Top and Toast the Marshmallow Fluff: Pipe or spoon the marshmallow fluff generously atop each chocolate-filled cookie cup. Using a kitchen torch, carefully toast the marshmallow topping until golden brown and slightly caramelized. If a torch is unavailable, place under a broiler for 1-2 minutes, watching closely to prevent burning.
- Serve and Enjoy: Allow the s’mores cookie cups to set for a few minutes to firm up before serving. Enjoy this decadent dessert that perfectly mimics campfire s’mores in a deliciously creative way.
Notes
- No campfire needed for these S’mores Cookie Cups!
- Use room temperature eggs and butter for best mixing results.
- A kitchen torch yields perfect toasted marshmallow fluff but broiling works as an alternative.
- Ensure the sugar syrup reaches the correct temperature for stable marshmallow fluff.
- Store leftovers in an airtight container at room temperature up to 2 days or refrigerate for longer freshness.
Nutrition
- Serving Size: 1 cup
- Calories: 457 kcal
- Sugar: 62 g
- Sodium: 240 mg
- Fat: 19 g
- Saturated Fat: 11 g
- Unsaturated Fat: 8 g
- Trans Fat: 0 g
- Carbohydrates: 70 g
- Fiber: 2 g
- Protein: 4 g
- Cholesterol: 61 mg

