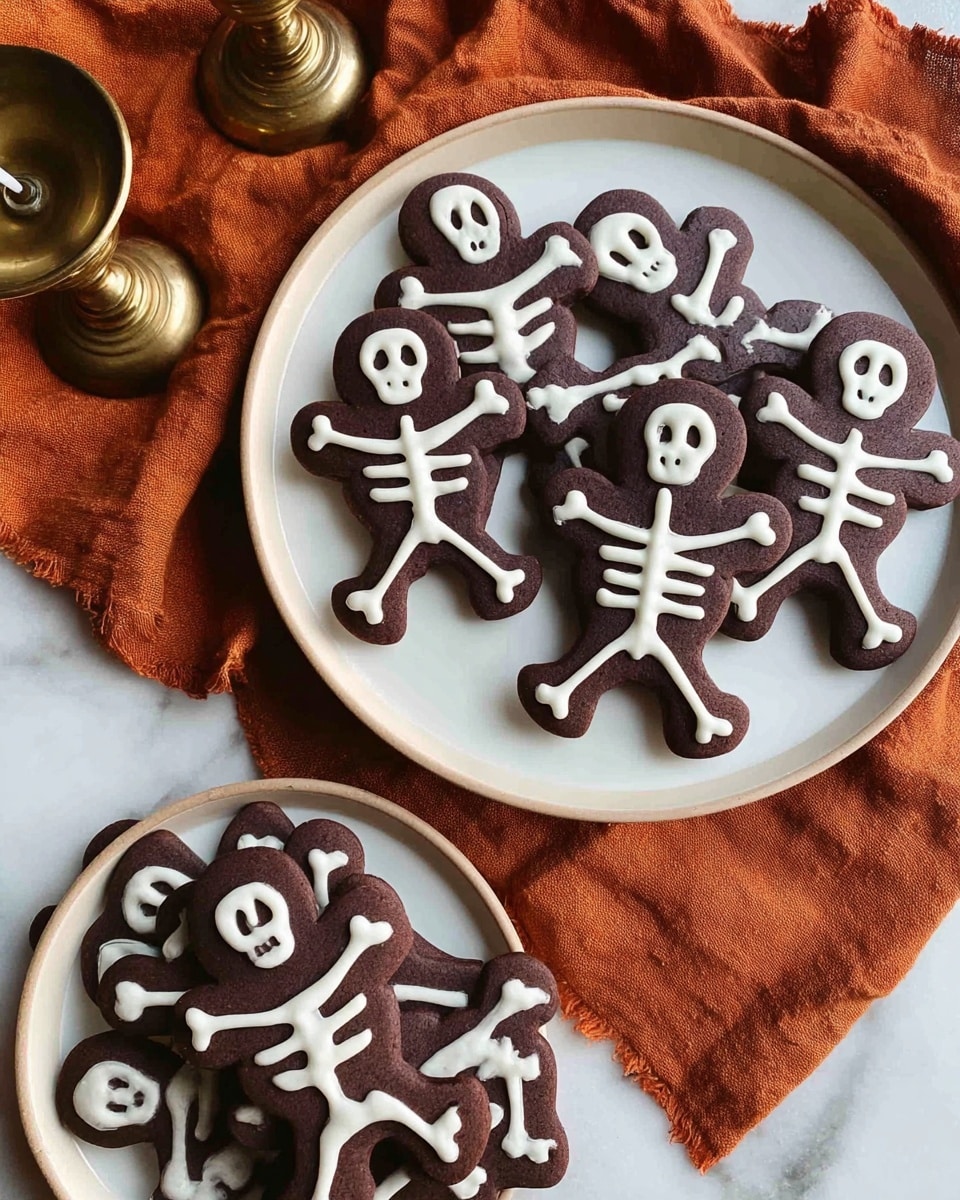
If you’re looking to wow your friends and family with a Halloween treat that’s as fun to make as it is to eat, this Skeleton Cookies with White Chocolate Skeleton Decorations Recipe is where it’s at. These chocolatey shortbread cookies with delicate white chocolate skeleton designs not only taste heavenly but also bring that perfect spooky charm to any gathering. I absolutely love how these turn out every time — crisp edges, tender crumb, and just the right balance of chocolate and sweetness. Stick with me, and by the end, you’ll have a batch of cookies that everyone will rave about!
Why You’ll Love This Recipe
- Deliciously Chocolatey: The blend of cocoa and butter in the cookies makes them rich yet delicate—a match made in heaven.
- Fun and Festive: Decorating with white chocolate skeletons adds that spooky vibe without fuss, perfect for Halloween celebrations.
- Simple Ingredients: I love that you probably already have everything in your pantry, making it super convenient to whip up.
- Kid-Friendly Activity: My family goes crazy for decorating time—it turns baking into a creative, hands-on celebration.

Ingredients You’ll Need
The ingredients here are straightforward, but each plays a key role in giving these skeleton cookies their signature tender yet sturdy texture and decadent flavor. I always recommend using good quality white chocolate because it really makes those skeleton decorations pop.
- Salted butter: Softened for easy creaming, butter adds richness and crisp edges to your cookies.
- Icing sugar: Helps achieve that melt-in-your-mouth texture.
- Cornflour: Key to giving the cookies a soft, shortbread-like crumb.
- Cocoa powder: Choose unsweetened for that deep chocolate flavor without added sugar.
- Plain flour: The base of the dough, providing structure.
- White chocolate: I prefer bars you can melt down smoothly for piping decorations.
Variations
I like to tinker with these Skeleton Cookies with White Chocolate Skeleton Decorations Recipe depending on the occasion. Feel free to personalize it to your taste or dietary needs—I promise they’ll still turn out fantastic.
- Gluten-Free Option: I once substituted plain flour with a 1:1 gluten-free baking blend, and the cookies held together beautifully with just a slight change in texture.
- Dark Chocolate Skeletons: For a richer, more intense contrast, you can use melted dark chocolate instead of white—gives a mature twist!
- Spiced Version: Adding a pinch of cinnamon or chili powder to the dough adds a warm undertone that’s surprisingly addictive.
- Mini Cookies: Cut smaller skeleton shapes for bite-sized treats perfect for parties or kid-friendly snacks.
How to Make Skeleton Cookies with White Chocolate Skeleton Decorations Recipe
Step 1: Cream the Butter and Sugar Until Fluffy
Start by cutting your softened butter into cubes and adding it to the bowl of your mixer. Beat it together with the icing sugar for a few minutes until it’s pale and beautifully fluffy. This aerates your butter, which really helps give the cookies that light, tender texture. I’ve learned that rushing this step results in denser cookies, so be patient!
Step 2: Incorporate the Dry Ingredients Gently
Sift together the cornflour, cocoa, and plain flour to avoid lumps and add it slowly to your butter mixture on low speed. It’ll start to come together into a dough that looks a bit crumbly at first—that’s totally normal. If it feels too dry when you roll it out, gently press the edges together as you go to keep it intact.
Step 3: Chill the Dough for Perfect Workability
Roll the dough into a ball, wrap it tightly with cling film, and pop it in the fridge for at least 30 minutes. This resting time firms it up so it’s easier to handle and helps those cookies hold their shape beautifully while baking. I always do this and rarely skip it because it makes a huge difference!
Step 4: Roll and Cut Your Skeleton Shapes
On a lightly floured surface, roll the dough to about 1cm thickness. Use your people-shaped cookie cutters (large or small) to cut out skeletons—big ones for snack-time and little ones for a mini bite. If the dough cracks at the edges, don’t fret; just gently press the edges back together. Carefully transfer your cut-outs to lined baking trays.
Step 5: Bake to Golden Perfection
Bake in a preheated 160°C fan oven for about 15 minutes. You want the edges to start browning slightly while the centers stay soft—that’s the sweet spot for these cookies. Once done, transfer them to a wire rack to cool completely before decorating.
Step 6: Melt and Pipe Your White Chocolate Skeletons
While the cookies cool, gently melt your white chocolate until smooth but not too runny. Pour it into a snap lock bag, cut off a tiny corner, and carefully pipe out the skeleton shapes onto each cookie. If you’re detail-oriented like me, this step is so fun. Allow the chocolate to firm up at room temperature or pop them gently in the fridge to speed things along.
Pro Tips for Making Skeleton Cookies with White Chocolate Skeleton Decorations Recipe
- Use Cold Hands for Rolling: I noticed the dough warms quickly, so I sometimes chill my hands with cold water before rolling to keep the dough firm.
- Thin Piping Edge: For cleaner skeleton lines, cut a very small hole in your piping bag corner and practice on parchment first.
- Room Temperature Chocolate: Don’t overheat your white chocolate; overheated chocolate can seize or get grainy—slow and gentle is my mantra.
- Even Thickness: Rolling the dough evenly avoids uneven baking, ensuring all cookies are done at the same time.
How to Serve Skeleton Cookies with White Chocolate Skeleton Decorations Recipe

Garnishes
I love sprinkling a tiny pinch of edible glitter or a dusting of cocoa powder around the plate when serving these cookies. It gives a magical, eerie vibe that elevates the presentation, especially for Halloween parties. You could also add a couple of mini candy eyeballs for extra fun on some cookies!
Side Dishes
These skeleton cookies pair amazingly well with warm drinks like spiced apple cider or a rich hot chocolate. For a crowd, I’ve served them alongside a platter of fresh berries and whipped cream to balance the richness and add some freshness.
Creative Ways to Present
One year, I laid these cookies out on a big black platter with cobweb doilies underneath and surrounded them with flickering LED tealights. Guests kept coming back just to say how cool the setup was! You could also stack them like a spooky cookie tower or arrange them on a skeleton-themed cake stand for a wow factor.
Make Ahead and Storage
Storing Leftovers
Once fully decorated and the chocolate has set, I store the cookies in an airtight container in a cool, dry place. They stay fresh for up to a week, though honestly, they rarely last that long in my house!
Freezing
I’ve frozen both the plain baked cookies and the decorated ones. For plain cookies, freeze them wrapped well in foil and stored in a freezer bag. Decorated cookies freeze best in single layers separated by parchment to protect the chocolate. Just thaw at room temperature before serving.
Reheating
For plain cookies, a quick 5-minute warm-up in the oven at 150°C can refresh their texture nicely. Avoid reheating decorated cookies to keep that crisp white chocolate skeleton intact—just bring them to room temp and enjoy!
FAQs
-
Can I make these Skeleton Cookies without a mixer?
Absolutely! You can cream the butter and icing sugar by hand using a wooden spoon or spatula—just take your time to get that pale, fluffy consistency. The key is ensuring the butter is really soft and room temperature to make this easier.
-
What if my white chocolate hardens too quickly while piping skeleton designs?
If your white chocolate starts to firm up before you finish decorating, you can gently rewarm it in short bursts in the microwave (15 seconds at a time), stirring after each, until it’s smooth again but not too hot.
-
Can I use milk chocolate or dark chocolate instead of white chocolate?
Yes, you can! Just keep in mind that white chocolate creates the best skeleton contrast against the dark cookie base. If you use milk or dark chocolate, the skeleton lines will be less visible but will taste delicious all the same.
-
How do I keep my cookies from spreading too much during baking?
Make sure your dough is well chilled before cutting and baking, and avoid rolling it too thin—1cm thickness is ideal. Also, use good quality butter and measure your flour accurately to get the correct dough consistency.
Final Thoughts
Honestly, this Skeleton Cookies with White Chocolate Skeleton Decorations Recipe has become my go-to for any spooky occasion or when I just want a fun baking project with a bit of flair. The combination of the buttery cocoa cookies with delicate white chocolate skeletons is strangely addictive, and I love seeing how creative everyone gets with the decorations. Give this recipe a try—you won’t regret it, and I bet it’ll become a seasonal favorite in your household just like it did in mine!
Print
Skeleton Cookies with White Chocolate Skeleton Decorations Recipe
- Prep Time: 45 minutes
- Cook Time: 15 minutes
- Total Time: 1 hour 30 minutes
- Yield: 15 cookies
- Category: Dessert
- Method: Baking
- Cuisine: Western
Description
Delightfully rich and festive Skeleton Cookies made from chocolate-flavored shortbread dough and decorated with melted white chocolate skeleton designs. Perfect for Halloween celebrations or any spooky occasion, these cookies combine a tender, crumbly texture with a fun and creative decoration.
Ingredients
Cookie Dough
- 160g salted butter, softened
- ½ cup icing sugar
- ½ cup cornflour
- ½ cup cocoa powder
- 1 cup plain flour
Decoration
- 100g white chocolate
Instructions
- Preheat Oven: Preheat your oven to 160°C fan bake to ensure an even and gentle baking temperature for the cookies.
- Prepare Dough Base: Cut the softened butter into cubes and place them in the bowl of a mixer. Add the icing sugar and beat for several minutes until the mixture is pale and fluffy, which helps create a light texture in the cookies.
- Incorporate Dry Ingredients: Sift the cornflour, cocoa powder, and plain flour into the butter mixture. Mix on low speed until the dough begins to come together and a cohesive ball forms.
- Chill Dough: Roll the dough into a ball, wrap it well with cling film, and refrigerate for 30 minutes. This resting period firms the dough for easier rolling and helps prevent spreading during baking.
- Roll and Cut: On a lightly floured surface, roll the chilled dough out to about 1cm thickness. If the edges look crumbly, gently press them together to smooth out. Use large or small people-shaped cookie cutters to cut out shapes from the dough.
- Bake Cookies: Carefully transfer the shaped dough onto lined baking trays. Bake in the preheated oven for 15 minutes, or until the edges start to brown but the centers remain soft to the touch.
- Cool Cookies: Move the baked cookies onto a wire rack to cool completely, which prevents the melted decoration chocolate from sliding off.
- Melt White Chocolate: While the cookies cool, melt the white chocolate carefully, ensuring it is smooth but not too runny for piping.
- Decorate: Place the melted chocolate into a snap lock bag and snip a small corner off. Pipe skeleton designs onto the cooled cookies with steady pressure to create fine details.
- Set and Store: Allow the chocolate skeletons to firm up fully before serving. Store finished cookies in an airtight container to maintain freshness.
Notes
- Chocolate-flavored shortbread cookies decorated with melted white chocolate skeletons make for a whimsical and seasonal treat.
- Ensure the cookies are fully cooled before piping to prevent melting or smudging the decoration.
- Use cookie cutters of varying sizes to create an assortment of skeleton shapes.
- Store in a cool, dry place in an airtight container for up to one week.
Nutrition
- Serving Size: 1 cookie
- Calories: 168
- Sugar: 8g
- Sodium: 75mg
- Fat: 11g
- Saturated Fat: 7g
- Unsaturated Fat: 3g
- Trans Fat: 0g
- Carbohydrates: 16g
- Fiber: 1g
- Protein: 2g
- Cholesterol: 24mg


