If you’re looking for a Halloween appetizer that’s equal parts spooky and delicious, you have to try my Skeleton Charcuterie Board for a Halloween Scare-Cuterie Surprise Recipe. This isn’t your typical cheese platter—it’s a playful, eye-catching spread that turns your favorite cheeses, meats, and snacks into a charming skeleton. I absolutely love how this turns out and my guests always get a kick out of the creative bones-and-skulls theme. Stick with me here, because I’ll walk you through how to make this Halloween centerpiece step-by-step, and share my tips so it looks just right on your party table!
Why You’ll Love This Recipe
- Visual Impact: It’s a total showstopper that adds personality to your Halloween spread without being complicated.
- Simple Assembly: You don’t need fancy culinary skills, just a bit of patience and some creative arranging.
- Flavor Variety: The combination of creamy brie, tangy jams, savory meats, and fruity grapes keeps everyone nibbling happily.
- Perfect for Any Skill Level: Whether you’re a seasoned charcuterie pro or a first timer, you’ll be proud of how this turns out.

Ingredients You’ll Need
Choosing the right ingredients is key for this Skeleton Charcuterie Board for a Halloween Scare-Cuterie Surprise Recipe. I like to balance soft and sharp cheeses with flavorful cured meats and sweet accents, which keeps your board tasting fresh and interesting.
- Brie wheel: Go for a wheel that’s soft but not watery; chilling it makes carving easier.
- Blueberry jam: Provides that sweet contrast and adds a fun purple pop under the skull.
- Yogurt covered pretzels: Their white color and shape work great as the skeleton’s neck bones.
- String cheese: Perfect for the sternum because it’s firm and long.
- Young Manchego cheese: Slice into triangles to mimic ribs—this cheese is mild and easy to cut.
- Columbus Meats Italian Dry Salame: Its foldable texture lets you add dimension between ribs.
- Columbus Meats Charcuterie Tasting Board: A curated set that adds variety and ease to your meat selection.
- Mild cheddar (cubed): Adds color and chewiness, filling gaps in the design.
- Dark purple grapes: They pop with sweetness and help fill empty spaces to complete the spooky vibe.
- Dried orange slices: Adds a festive burst of color and a subtle citrus aroma—perfect for that autumn feel.
Variations
I love to make this Skeleton Charcuterie Board for a Halloween Scare-Cuterie Surprise Recipe my own by swapping ingredients to fit whatever I have on hand or dietary needs. You should totally feel free to play around with your favorites and make this scary snack truly yours.
- Vegetarian Variation: Use plant-based meats or more cheese varieties like smoked gouda or pepper jack—my family still loved it when I made it meat-free!
- Spicy Twist: Try adding some pepperoni or spicy salame for a little kick. The contrast of heat with the sweet jam was a fun surprise for my taste buds.
- Seasonal Change: Swap the dried orange slices for dried cranberries or Halloween-themed gummy candies if you’re serving kids—both options bring festive flair.
- Difficulty Levels: If you want to streamline, skip the brie skull carving and just serve a separate spooky cheese wheel decorated with edible markers.
How to Make Skeleton Charcuterie Board for a Halloween Scare-Cuterie Surprise Recipe
Step 1: Chill and Shape the Brie Skull
Start by popping your brie wheel in the freezer for 15 to 20 minutes—it firms up the cheese and makes carving so much easier. I discovered this trick after battling a squishy mess the first time I tried carving brie! Once chilled, cut wedges out of the sides on the bottom third of the wheel, shaping it into kind of a mushroom-like base. Then round off the top edges so your brie looks more skull-shaped. Slice off the top half-inch and set it aside for later. This brie skull will be the star of the show, so take your time with the shape—it’s worth it.
Step 2: Add Jam and Carve Facial Features
Spread blueberry jam on the bottom piece of your brie skull—my secret is choosing a jam that’s both sweet and slightly tart to cut through the cheese’s richness. Next, carefully carve out the mouth, nose, and eye sockets using a paring knife. I like to cut a small rectangle for the mouth, a triangle for the nose, and round circles for the eyes. If you want uniform eyes, a tiny cookie cutter works like magic. Place the top slice of brie back on the wheel, sandwiching that jam layer for a juicy, flavorful “face.”
Step 3: Add the ‘Teeth’ and Lay Out the Bones
Cut one slice of manchego into five small squares to serve as your skeleton’s teeth—placing them carefully in the mouth cutout brings your skull to life. Next, place the brie skull on your serving board. Use the yogurt-covered pretzels underneath it to create a neck; I love how their curved shape mimics vertebrae. Then, lay the string cheese below the pretzels—this will be your sternum. Flank the string cheese with rows of slender manchego triangles pointed in alternating directions to create ribs—that classic rib cage vibe looks so authentic and adds structure.
Step 4: Add Meats, Grapes, and Garnishes
Fold the salame slices into quarters and tuck them between the manchego ribs and the sternum to add depth and color variation. I like to serve olives and chocolate-covered cranberries in little ramekins to keep things neat, placing them on opposite sides of the board for balance. Spread the rest of the calabrese salame around edges to frame your skeleton. Fill empty spaces with juicy purple grapes and cubed mild cheddar—the pop of color and textures make the whole board come alive. Finally, garnish with dried orange slices to give it that festive fall flair and a subtle scent that sets the mood.
Pro Tips for Making Skeleton Charcuterie Board for a Halloween Scare-Cuterie Surprise Recipe
- Chill Your Brie First: I can’t stress enough how chilling the brie before carving saves you from a gooey disaster—your knife will glide through nicely.
- Use Small Tools for Details: A sharp paring knife or tiny cookie cutters are game changers for those eye holes—they make the skull look professional.
- Balance Colors and Textures: When placing items, think about mixing soft and firm textures and balancing dark with light colors—for me, grapes next to cheese and salame create that vibrant look.
- Prep Ahead: Cut all your cheeses and meats in advance; assembling the board is way more enjoyable when everything’s ready to go.
How to Serve Skeleton Charcuterie Board for a Halloween Scare-Cuterie Surprise Recipe
Garnishes
I love using dried orange slices and a few fresh herbs like rosemary sprigs to brighten up the board—they’re simple but add a natural, earthy scent that enhances the Halloween vibe. You can also toss in some edible flowers or small pumpkins for extra flair if you want to get creative.
Side Dishes
This skeleton board pairs wonderfully with some crusty artisan bread or crackers—you want something sturdy enough to hold all those tasty layers. I often serve it with a light fall salad dressed with balsamic vinaigrette to balance the richness on the board. Plus, a glass of red wine never hurts!
Creative Ways to Present
For a Halloween party, try placing your board on a black slate or rustic wooden tray to really make the colors pop. I once framed my board with battery-operated orange string lights—it added a spooky glow that guests loved. You can even use themed props like small skull figurines or plastic spiders for an extra touch of fun.
Make Ahead and Storage
Storing Leftovers
If you happen to have leftovers (though that’s rare!), wrap the smaller cheese cuts and meats separately in parchment paper, then store in an airtight container in the fridge. Grapes and chips should stay chilled but kept dry to avoid sogginess. I usually eat leftover components within 2-3 days for peak freshness.
Freezing
I generally don’t recommend freezing this kind of charcuterie board because the texture of cheese and some fruits changes when frozen. But if you want to prep parts like the salame or cubed cheddar ahead, they freeze well when vacuum sealed.
Reheating
Since this is a cold appetizer, reheating isn’t usually needed. However, if you want warmed cheese or bread on the side, heat them separately just before serving to keep the best texture.
FAQs
-
Can I use other cheeses instead of brie for the skull?
Absolutely! While brie is ideal due to its texture and shape, you can try camembert or a firm triple-cream cheese. Just make sure it’s soft enough to carve but still holds its form.
-
How far in advance can I assemble the board?
For best results, assemble the skeleton charcuterie board no more than 2 hours before serving to keep everything fresh. You can prep and cut ingredients ahead, but the final assembly is better just before guests arrive.
-
What if I don’t have yogurt-covered pretzels?
No worries! You can substitute with white chocolate-covered pretzels, white breadsticks, or even peeled string beans for the neck bones—anything long and pale works.
-
Is this recipe kid-friendly?
Definitely! This skeleton board is super fun for kids and adults alike. Just tailor the jam and meats to suit young palates—maybe use mild cheddar and grapes with a less intense jam.
Final Thoughts
Making the Skeleton Charcuterie Board for a Halloween Scare-Cuterie Surprise Recipe has become a Halloween tradition for me, and it never fails to bring smiles (and a little spooky fun) to the party. It’s the perfect way to combine visual creativity with delicious flavors that everyone loves. I hope you try this recipe and enjoy assembling and sharing it as much as I do—it’s such a rewarding little project that adds big personality to your Halloween celebrations. Happy haunting and happy snacking!
Print
Skeleton Charcuterie Board for a Halloween Scare-Cuterie Surprise Recipe
- Prep Time: 20 minutes
- Cook Time: 0 minutes
- Total Time: 20 minutes
- Yield: Serves 8-10 people
- Category: Appetizer
- Method: No-Cook
- Cuisine: American
Description
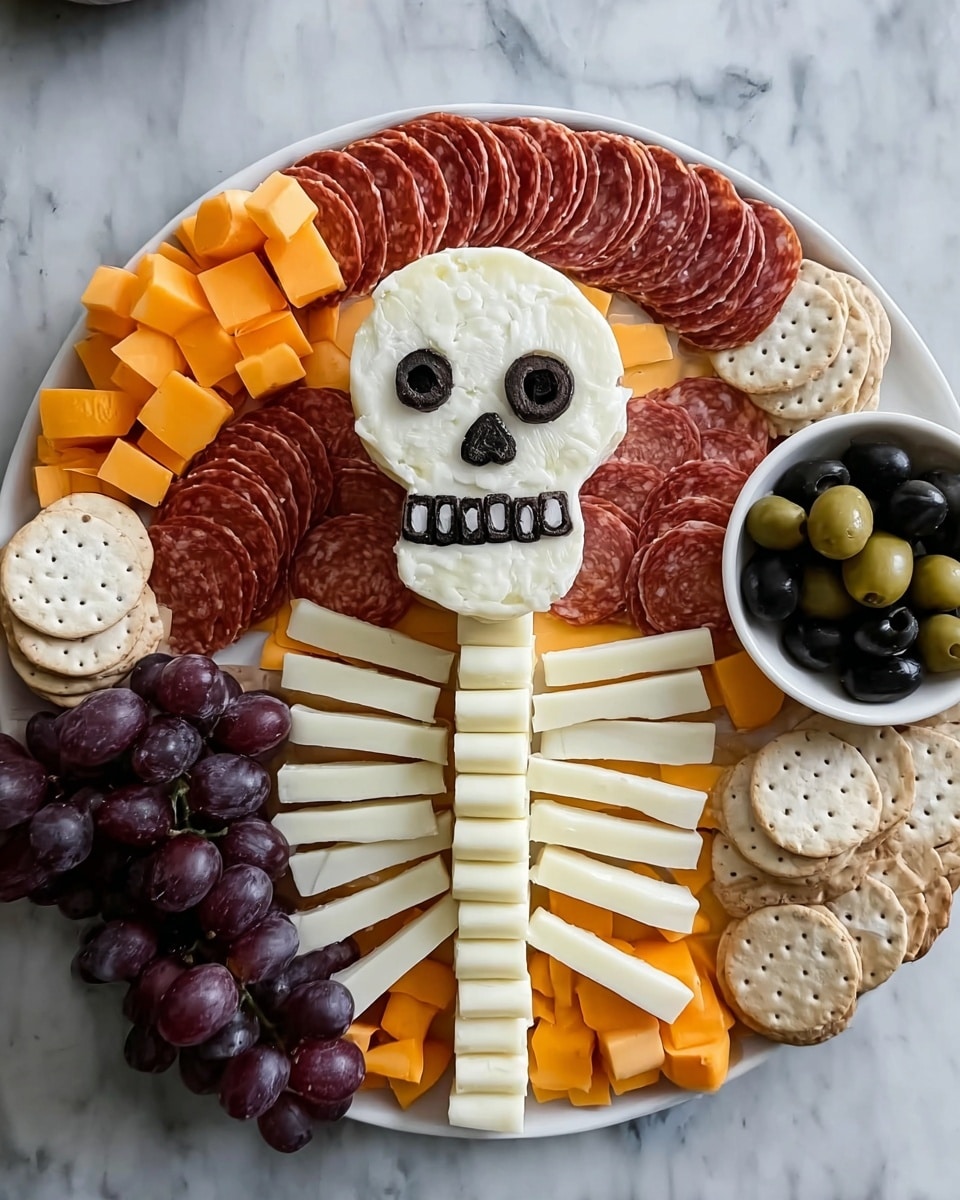
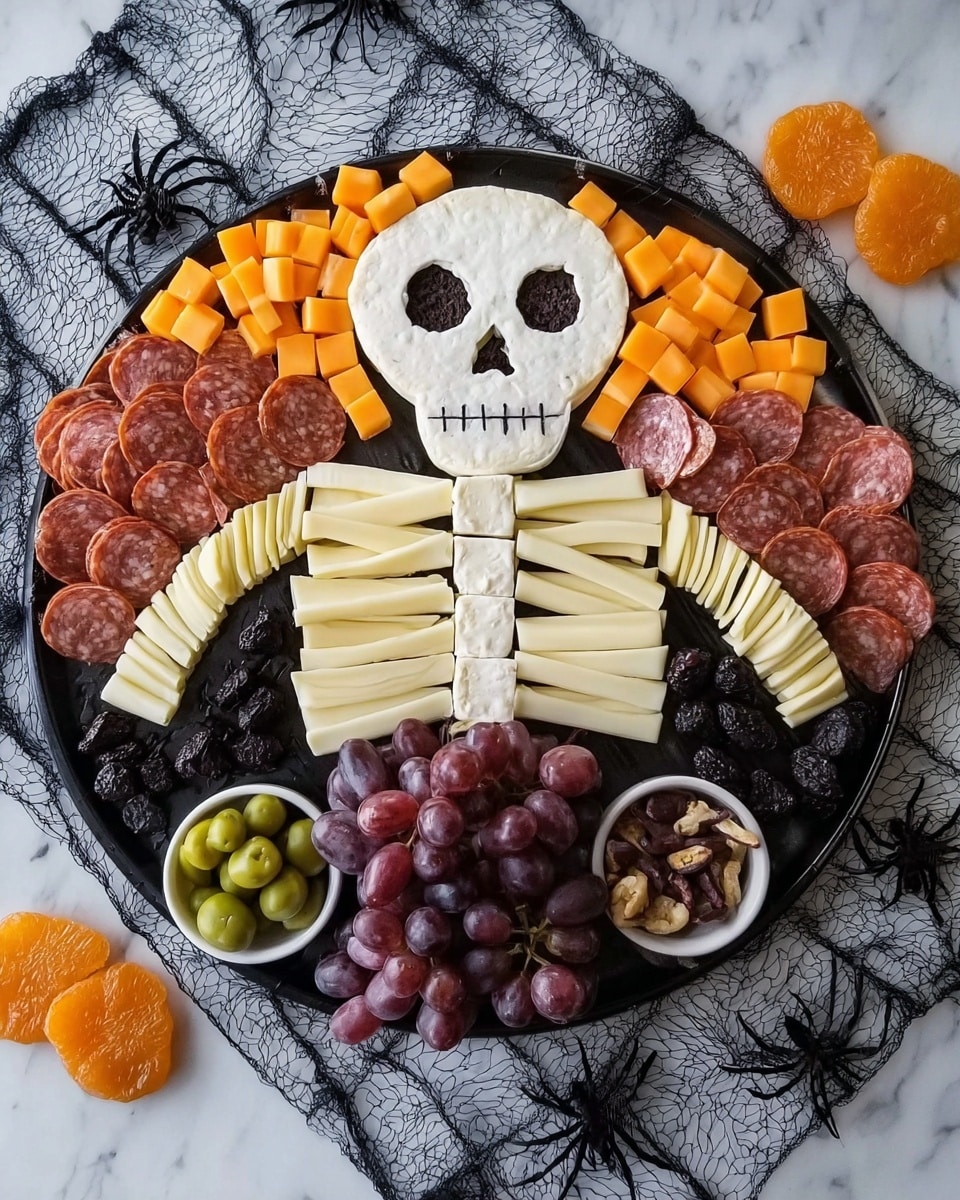
This Halloween-themed Skeleton Charcuterie Board combines an artful arrangement of cheeses, meats, fruits, and snacks to create a spooky skeleton design. Featuring a brie cheese skull with blueberry jam details, a rib cage of manchego triangles, Italian dry salame folded as ribs, and complementary accompaniments like grapes, cheddar, and dried orange slices, this board is a festive centerpiece perfect for autumn gatherings and Halloween parties.
Ingredients
Cheeses
- 1 (16-oz) brie wheel
- 16 oz young manchego, sliced into triangles
- 10 oz mild cheddar, cubed
- 1 string cheese
Meats
- 12 oz Columbus Meats Italian Dry Salame
- 1 (12.5-oz) package Columbus Meats Charcuterie Tasting Board
Fruits & Snacks
- 2 oz blueberry jam
- 4 yogurt covered pretzels
- 30 oz dark purple grapes
- 8 dried orange slices
Other
- Olives (amount not specified, use small ramekin)
- Chocolate covered cranberries (amount not specified, use small ramekin)
Instructions
- Chill Brie: Place the entire 16-oz brie wheel in the freezer for 15-20 minutes to firm it up, making it easier to carve the skull shape.
- Carve Brie Skull: Cut wedges out of the sides of the bottom third of the brie to create a mushroom-like base shape. Round the edges at the top to form the skull shape. Slice off the top ½-inch of brie and set this piece aside.
- Add Jam and Facial Features: Spread 2 oz of blueberry jam on the bottom piece of brie. Using a paring knife or small cookie cutters, carefully cut out a rectangular mouth, a triangular nose, and circular eyes on the jam-covered brie.
- Assemble Brie Skull: Place the reserved top ½-inch layer of brie back on top of the jam-spread bottom piece. Slice one slice of manchego cheese into 5 small squares and arrange them in the rectangular cut-out mouth to mimic teeth.
- Build the Skeleton Neck and Sternum: Position the brie skull on your serving board. Place the 4 yogurt-covered pretzels beneath it to serve as the neck, and then place the string cheese below the pretzels to resemble the sternum bone.
- Create Rib Cage: Arrange the manchego triangles in two rows on either side of the string cheese, alternating their direction to imitate ribs.
- Add Salame Ribs: Fold the Italian dry salame into quarters and tuck these pieces between the manchego ribs and around the string cheese sternum to enhance the rib cage look.
- Prepare Ramekins and Garnish Board: Fill two small ramekins—one with olives and the other with chocolate-covered cranberries—and place them on the board. Arrange the remaining Columbus Meats Charcuterie Tasting Board components along the edges of the display.
- Fill Gaps and Finish Decoration: Use the 30 oz of dark purple grapes and 10 oz of cubed mild cheddar to fill in empty spaces on the board. Finally, garnish the entire arrangement with 8 dried orange slices for a festive touch.
Notes
- This skeleton charcuterie board is perfect for a Halloween scare-cuterie surprise that delights guests with its spooky presentation.
- Use a sharp paring knife or small cookie cutters for precise facial feature cuts on the brie.
- Chilling the brie before carving prevents it from becoming too soft and difficult to shape.
- You can customize the board further by adding your favorite meats, cheeses, or seasonal fruits.
- For a gluten-free version, ensure pretzels and all ingredients used are gluten-free.
Nutrition
- Serving Size: 1/8th of board
- Calories: 320
- Sugar: 12g
- Sodium: 480mg
- Fat: 22g
- Saturated Fat: 10g
- Unsaturated Fat: 9g
- Trans Fat: 0g
- Carbohydrates: 16g
- Fiber: 2g
- Protein: 12g
- Cholesterol: 45mg

