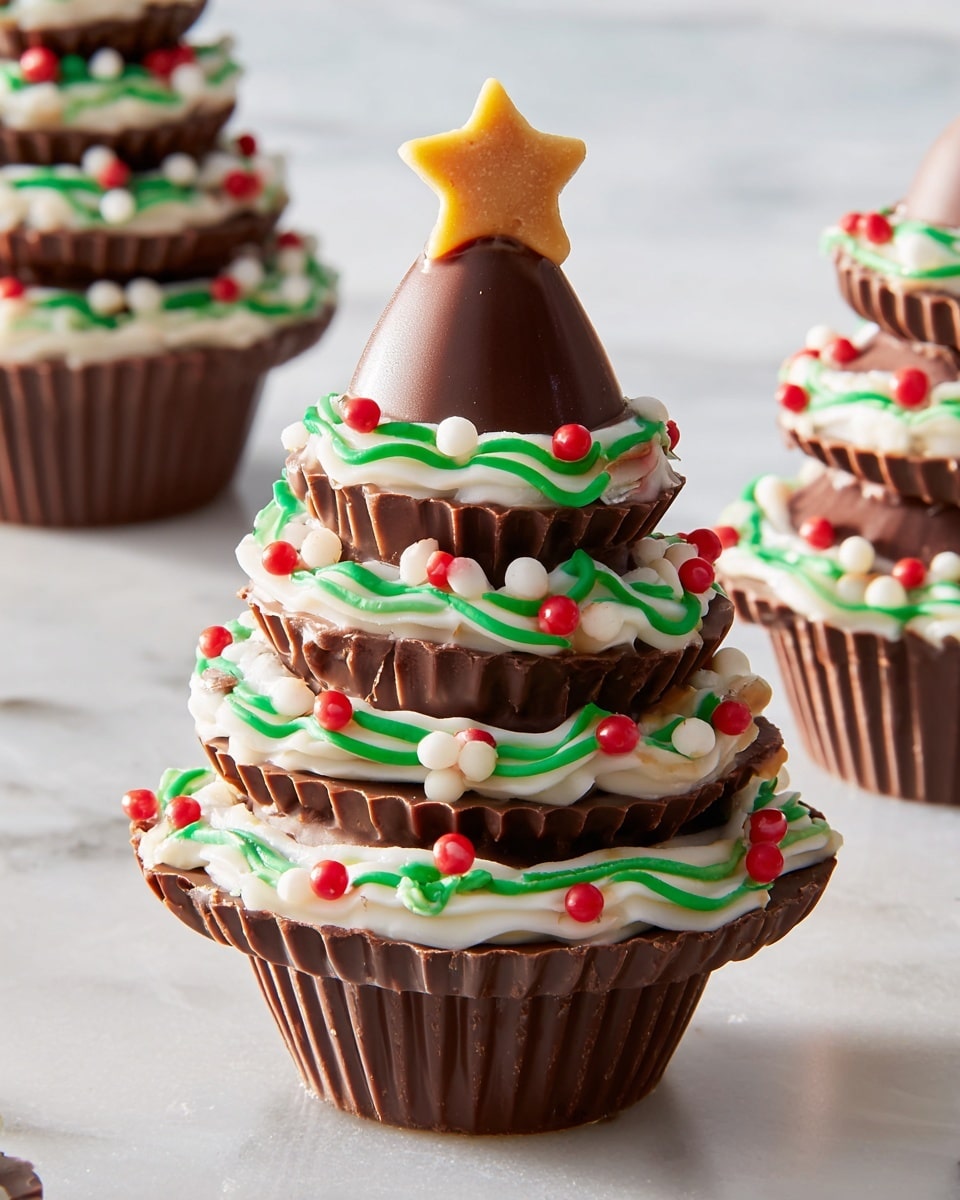
If you’re looking for a no-fuss dessert that’s festive, adorable, and irresistibly delicious, then you’ve got to try my Reese’s Trees Recipe. I absolutely love how these mini chocolate peanut butter Christmas trees come together with almost zero effort – plus, they look like little edible decorations that everyone will go nuts over. Get ready to impress guests, kids, or just satisfy your own sweet tooth with this fan-freaking-tastic treat!
Why You’ll Love This Recipe
- Super Easy Assembly: You don’t need baking skills—just some melted chocolate and stacking candies!
- Festive & Fun: These trees add instant holiday cheer to any dessert table or gift plate.
- Kid-Friendly Activity: Kids love helping build and decorate these sweet little trees.
- Peanut Butter Chocolate Bliss: Combines two classic flavors everyone adores in an eye-catching way.

Ingredients You’ll Need
The beauty of this Reese’s Trees Recipe lies in its simplicity. The ingredients work together perfectly to create that classic peanut butter and chocolate combo, and they’re easy to find at any grocery store during the holidays.
- Chocolate chips: I prefer semi-sweet for balanced sweetness; melting them smoothly is key to “glue” the tree pieces together.
- Mini Reese’s cups: These are the “branches” of the tree, perfect little layers for stacking.
- Regular Reese’s cups: The main body or “trunk” giving the tree structure and that iconic peanut butter punch.
- Hershey kisses: The tree topper! Chocolatey and perfect for the peak of the Christmas tree.
- White and green decorating icing: For piping the garland and adding fun festive details.
- Sprinkles and gold stars: These add sparkle and that final holiday touch everyone’s eyes go straight to.
- Confectioners’ sugar (optional): A dusting can mimic fresh snow—makes the trees look even more magical.
Variations
One thing I love about the Reese’s Trees Recipe is how easy it is to customize! Whether you want to tweak it for dietary needs or just switch up decorations for fun, the possibilities are endless.
- Nut-free version: Substitute peanut butter cups with allergy-friendly chocolate candies—my nephew loved this adjustment and still felt super festive.
- Decorating styles: Sometimes I use colored sugar, edible glitter, or tiny candy canes instead of sprinkles for a different look that impresses every year.
- Mini chocolate variations: Try using white chocolate kisses for a snowy tree topper twist—kids totally go crazy for that one.
How to Make Reese’s Trees Recipe
Step 1: Melt Your Chocolate and Prepare Your Workspace
The first thing I do is melt the chocolate chips gently in a microwave-safe bowl—30 seconds at a time with stirring in between works best to avoid burning. Set out all your candies and decorating materials nearby so you can build efficiently. You’ll appreciate how quick assembly goes once everything’s at arm’s reach!
Step 2: Create the Base Layer
Start by placing a small dollop of melted chocolate on the bottom of a mini Reese’s cup to help it stick to your serving plate or tray. This little touch keeps your trees steady when you stack up next layers. If your chocolate starts to harden, just reheat it briefly to keep it smooth.
Step 3: Stack Your Tree Layers
Flip a regular-size Reese’s cup upside down and gently press it on top of your mini Reese’s cup base, securing with a tiny dab of melted chocolate. Then add another mini Reese’s cup upside down on top of that, again with a small chocolate “glue” dot. Finally, place a Hershey’s kiss as the treetop by dabbing more chocolate underneath before setting it on.
Step 4: Decorate Your Trees
Now comes the best part — the decorating! Using your white and green icing, pipe “garlands” around the tree to give it some festive flair. Sprinkle on your colorful sprinkles for that extra holiday sparkle. I always add a bit of icing to the top of the Hershey’s kiss so I can stick on a tiny gold star. It’s those little touches that make these Reese’s Trees Recipe creations so magical.
Step 5: Add the Finishing Touches
If you want to create a winter wonderland vibe, lightly dust your finished trees with confectioners’ sugar. It looks just like fresh snow and makes me feel like I’m holding a little edible holiday forest in my hand. Let your chocolate set completely before moving your trees around.
Pro Tips for Making Reese’s Trees Recipe
- Chocolate Melting: Always melt your chocolate slowly and stir frequently to keep it smooth and prevent scorching—it makes stacking easier and looks better.
- Use Tweezers for Placement: When you’re stacking the tiny Reese’s cups and Hershey kisses, tweezers help keep your fingers clean and your assembly precise.
- Chill Before Decorating: I found that letting your stacked trees chill for 10 minutes in the fridge helps them firm up, making decorating less messy.
- Avoid Overloading Chocolate: Too much melted chocolate makes the layers slide — use just enough to hold them snug but stable.
How to Serve Reese’s Trees Recipe

Garnishes
I like to garnish with a little extra festive flair — sometimes a dusting of powdered sugar snow, or adding tiny edible glitter on the garlands. If you’re serving at a holiday party, sprinkle some crushed candy canes around the plate for brightness and crunch.
Side Dishes
These mini Reese’s Trees are perfect alongside a warm cup of hot cocoa or your favorite holiday punch. For a fuller dessert spread, pair them with classic sugar cookies or peppermint bark. The peanut butter and chocolate flavors balance beautifully with minty or creamy sides.
Creative Ways to Present
One year I arranged these Reese’s Trees Recipe treats on a festive platter lined with fresh pine sprigs and little fairy lights around the edges. It felt like a mini holiday forest! You can also place several in small gift boxes with clear lids as cute edible gifts for friends and coworkers—they’re always a hit.
Make Ahead and Storage
Storing Leftovers
I store leftover Reese’s Trees in an airtight container in the refrigerator to keep the chocolate firm. They stay fresh and delicious for up to a week, but honestly, mine rarely last that long!
Freezing
You can freeze these fun treats by arranging them in a single layer on a baking sheet, freezing until solid, then transferring to a freezer-safe container. Just remember to thaw them in the fridge before serving to avoid condensation ruining the decorations.
Reheating
No reheating needed here—these are best served cold or at room temperature. Just pull them from the fridge about 10 minutes before eating so the chocolate softens slightly and you get the perfect melt-in-your-mouth texture.
FAQs
-
Can I use different chocolates instead of Reese’s cups?
Absolutely! While Reese’s cups give that signature peanut butter and chocolate taste, you can swap in other chocolate candies you love. Just make sure they’re sturdy enough to stack and not too soft to melt too quickly.
-
How long do these Reese’s Trees last?
Stored properly in an airtight container in the refrigerator, these treats stay fresh for about a week. For longer storage, freezing is an option, but keep decorations in mind as they may soften.
-
Can kids help make this recipe?
Definitely! This recipe is great for involving kids because it’s more about assembly and decorating than baking. Just supervise the use of melted chocolate to keep things safe and mess-free.
-
What’s the best way to melt chocolate without burning it?
The key is to melt chocolate in short bursts of 20-30 seconds in the microwave, stirring well between each session. Alternatively, use a double boiler on the stove with gentle heat and stir constantly to avoid scorch.
Final Thoughts
This Reese’s Trees Recipe has become one of my absolute holiday favorites because it combines ease, fun, and incredible flavor in one neat little package. Whenever I pull these out, the smiles and “wow” reactions remind me that sometimes the simplest treats make the most lasting memories. Give it a try this season—you’ll love how easily you can create your own festive chocolate forest to share and enjoy!
Print
Reese’s Trees Recipe
- Prep Time: 10 minutes
- Cook Time: 0 minutes
- Total Time: 10 minutes
- Yield: 24 trees
- Category: Dessert
- Method: No-Cook
- Cuisine: American
Description
These adorable Reese’s Trees are the perfect no-bake Christmas treat, combining layers of mini Reese’s cups, regular Reese’s cups, and Hershey’s kisses decorated with festive icing, sprinkles, and stars. Easy to make and visually delightful, they bring a cute and tasty element to your holiday dessert table.
Ingredients
Chocolate Layer
- 1/2 cup chocolate chips, melted
Chocolate Cups
- 24 mini Reese’s cups
- 12 Reese’s cups (regular size)
- 12 Hershey kisses
Decorations
- White and green decorating icing
- Sprinkles
- Gold stars
- Confectioners’ sugar, for dusting (optional)
Instructions
- Prepare the Base: Place a small amount of melted chocolate on the bottom of a mini Reese’s cup. This melted chocolate will act as glue to hold the layers together securely.
- Build the Tree Layers: Arrange a regular-size Reese’s cup upside down on top of the mini Reese’s cup. Then, add another small drop of melted chocolate on top of the regular Reese’s cup.
- Add the Top Layer: Position a mini Reese’s cup upside down on top of the regular Reese’s cup. Dab more melted chocolate on this mini cup’s top to hold the final piece.
- Top with Hershey’s Kiss: Place a Hershey’s kiss on the very top of the tree, pressing gently into the melted chocolate to secure it.
- Decorate the Trees: Using white and green decorating icing, pipe garlands around the trees. Sprinkle with festive sprinkles to add color and texture. Add a dab of frosting on top of the Hershey’s kiss and adhere a gold star for a finishing touch.
- Add Snow Effect (Optional): Lightly dust the assembled trees with confectioners’ sugar to mimic fresh snow, enhancing the holiday feel of the treat.
Notes
- This is one of the easiest Christmas desserts to make, requiring no baking, just assembly and decoration.
- You can prepare these trees ahead of time and keep them refrigerated to maintain freshness.
- Use quality chocolate chips for melting to ensure smooth adhesion and taste.
- For a variation, try using different colored icings or sprinkles to match your holiday theme.
Nutrition
- Serving Size: 1 tree
- Calories: 140
- Sugar: 15g
- Sodium: 60mg
- Fat: 9g
- Saturated Fat: 5g
- Unsaturated Fat: 3g
- Trans Fat: 0g
- Carbohydrates: 16g
- Fiber: 1g
- Protein: 2g
- Cholesterol: 5mg


