
If you’re looking for a stunning, delicious treat that’s as fun to make as it is to eat, you’ve got to try this Red Velvet Rose Cookies Recipe. These little rossettes are elegantly charming, rich with cocoa, and have that classic red velvet flavor we all adore—plus, the way they pipe out into delicate roses makes your cookie platter look like a work of art. Trust me, once you try these, you’ll find yourself dreaming up every excuse to bake them again!
Why You’ll Love This Recipe
- Beautiful Presentation: These cookies pipe into delicate rose shapes, perfect for impressing friends or special occasions.
- Classic Red Velvet Flavor: The subtle cocoa and buttermilk create authentic, rich red velvet taste that’s simply irresistible.
- Quick and Simple: You can whip up these beauties in under 20 minutes—ideal for last-minute baking.
- Customizable Filling: I love sandwiching them with marshmallow buttercream, but you can switch it up to your favorite frosting.

Ingredients You’ll Need
The ingredients for this Red Velvet Rose Cookies Recipe come together to create a tender, flavorful dough that’s easy to pipe and bake. Each element plays a role in texture and taste, so picking quality ingredients really pays off!

- Shortening: I prefer shortening over butter here for a tender crumb and dough that holds its shape when piped.
- White sugar: Granulated sugar balances sweetness and helps the cookies crisp a bit on the edges.
- Eggs: Eggs bind everything, giving structure but keeping the cookies soft.
- Vanilla extract: Always use pure vanilla for the best flavor—it’s a subtle but critical touch.
- Buttermilk: This adds moisture and slight tang that defines red velvet’s signature flavor.
- Red gel food coloring: Gel coloring gives vivid color without extra liquid that might throw off the dough.
- All-purpose flour: The base of the dough for body and chewiness.
- Unsweetened cocoa powder: A little cocoa for that chocolate hint—don’t skimp here!
- Salt: Just a dash to balance the sweetness and enhance all the flavors.
Variations
One of the best things about this Red Velvet Rose Cookies Recipe is how you can make it your own. Whether you swap fillings, tweak the flavor, or adjust the piping tip, you’ll enjoy making it fit your style.
- Marshmallow Buttercream Filling: This is my go-to for sandwiching the cookies—I love how fluffy and sweet it pairs with the subtle cocoa.
- White Chocolate Ganache: For a richer twist, drizzle or sandwich with white chocolate ganache; my guests couldn’t get enough!
- Dairy-Free Version: Use dairy-free shortening and a non-dairy milk like almond with vinegar instead of buttermilk, and swap buttercream for coconut-based frosting.
- Colored Tips: Try different piping tips or add sprinkles for a playful look if you’re making these with kids.
How to Make Red Velvet Rose Cookies Recipe
Step 1: Cream the Shortening and Sugar
Start by heating your oven to 350°F and grabbing your stand mixer. Cream together the shortening and white sugar until the mixture is light and fluffy—that’s the key to tender cookies! I find mixing for about 3-4 minutes on medium speed does the trick. This step is important because it incorporates air, making the cookies delicate and soft.
Step 2: Add Eggs, Then Flavorings
Slowly add the eggs one at a time into the creamed mixture on medium-low speed. This ensures the dough doesn’t break and stays silky. Then turn the mixer on low and add the vanilla, buttermilk, and that gorgeous red gel food coloring. Using gel coloring is my favorite because it gives rich color without watering down the dough.
Step 3: Mix Dry Ingredients and Combine
In a separate bowl, whisk together the flour, cocoa powder, and salt. Gradually add these dry ingredients to the wet mixture on low speed so you don’t overwork the dough. If the dough feels too dry and crumbly, add a bit more buttermilk—but be careful to not exceed an extra 1/4 cup. You want the dough just moist enough to pipe but firm enough to hold its rose shape.
Step 4: Pipe Your Rose Cookies
Here’s where the magic happens. Fit a piping bag with a 1M or 2D tip (my favorite for this recipe) and spoon in the dough in very small amounts. Pipe out individual rosettes onto a parchment-lined baking sheet by swirling from the center outward. The dough will look a bit wet when placed, but that’s exactly what you want—it will bake up beautifully.
Step 5: Bake and Cool
Bake for 6 to 8 minutes, keeping a close eye so they don’t overbake. The edges will be set but the cookies will still have a slightly glossy appearance—that means perfect softness inside. Let them cool completely before moving to the next step.
Step 6: Assemble Your Cookie Sandwiches
If you want to make cookie sandwiches (and who doesn’t?), spread about a tablespoon of marshmallow buttercream on the bottom of one cookie, top with another, and press gently. The contrast of the fluffy filling against the tender cookie is what my whole family goes crazy for.
Pro Tips for Making Red Velvet Rose Cookies Recipe
- Use Gel Food Coloring: I learned that gel coloring keeps your dough from getting too runny, which is key for clean piping.
- Don’t Overbake: These cookies look a bit wet when done—that’s perfect! Overbaking causes dryness, so trust the texture, not just the timer.
- Practice Piping on Paper: Before piping your cookies, I practice swirls on parchment to get comfortable with pressure and motion; it really helps create perfect roses.
- Room Temperature Ingredients: Using room temperature eggs and buttermilk helps the dough combine smoothly and bake evenly, avoiding cracks.
How to Serve Red Velvet Rose Cookies Recipe

Garnishes
I like to keep the roses pure and simple, but a light dusting of powdered sugar or edible pearl dust adds a magical sparkle without overpowering. Sometimes a tiny fresh mint leaf or a single edible flower next to the plate makes them look extra fancy for guests.
Side Dishes
These cookies pair perfectly with a crisp cup of black coffee or a creamy chai latte. For parties, I like arranging them on a dessert tray alongside fresh berries or chocolate-dipped strawberries for a colorful spread.
Creative Ways to Present
One fun idea I tried was placing each cookie sandwich inside a mini cupcake liner, then arranging them like a bouquet in a pretty cake stand. You could also tie a bunch together with a little ribbon for edible gift-giving or a bridal shower favor. The rose shapes really lend themselves to creating edible floral arrangements!
Make Ahead and Storage
Storing Leftovers
I store leftover Red Velvet Rose Cookies in an airtight container at room temperature for up to 3 days. If I’ve sandwiched them with buttercream, I separate layers with parchment paper to keep them from sticking together. They stay wonderfully soft and flavorful this way.
Freezing
Freezing these cookies works great, especially before sandwiching. I freeze the piped and baked cookies flat on a tray, then transfer to a sealed bag for up to 3 months. When you’re ready, just thaw at room temp before adding your filling.
Reheating
If you want to revive a cookie that feels a bit firm, give it a 5-10 second zap in the microwave to soften it up—just watch carefully so it doesn’t melt the filling. I find this little trick brings back that fresh-baked feel perfectly.
FAQs
-
Can I substitute butter for shortening in the Red Velvet Rose Cookies Recipe?
You can, but keep in mind shortening helps these cookies keep their shape when piped. Butter will add more flavor but can make the dough softer and may cause flatter roses. If you want to try butter, chill the dough well before piping to help maintain the shape.
-
Why do the cookies look wet when done baking?
These cookies are intentionally baked until the edges are set but the centers appear slightly glossy or wet. This ensures they stay soft and tender inside. They firm up as they cool, so don’t worry if they don’t look fully dry when you take them out.
-
What piping tip should I use for the rose shape?
I recommend a 1M or 2D tip—they’re classic star tips that create the perfect petal effect. If you don’t have these, any open star-shaped tip will work. Remember to pipe slowly and steadily for the best rose shape.
-
Can I make these cookies gluten-free?
Absolutely! Use a gluten-free all-purpose flour blend that measures cup-for-cup. You might need to adjust your liquid slightly if the dough seems dry. The texture might be a little different, but you’ll still get delicious red velvet roses!
-
How long do Red Velvet Rose Cookies keep fresh?
Stored in an airtight container at room temperature, these cookies stay fresh for about 3 days. After that, their texture starts to change, so if you want to keep them longer, freezing is your best bet.
Final Thoughts
This Red Velvet Rose Cookies Recipe is one of those special finds that brings a little joy every time I make it. I love how easily the dough pipes into such elegant shapes, and the flavor is that perfect balance of sweet, chocolatey, and a little tangy from the buttermilk. If you’re looking to wow friends, celebrate a special moment, or just treat yourself, these cookies are a delightful choice. Give them a try—you’ll thank me later!
Print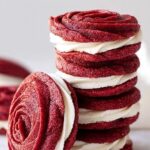
Red Velvet Rose Cookies Recipe
- Prep Time: 10 minutes
- Cook Time: 8 minutes
- Total Time: 18 minutes
- Yield: 8 servings
- Category: Dessert
- Method: Baking
- Cuisine: American
Description
These Red Velvet Rose Cookies are delicate, visually stunning treats perfect for any special occasion. Featuring a rich red velvet flavor with cocoa undertones, they are piped into beautiful rosettes and baked to perfection. The cookies are then sandwiched with a luscious marshmallow buttercream, creating a delightful balance of textures and flavors.
Ingredients
Cookie Dough
- 2/3 cup shortening
- 1 3/4 cup white sugar
- 2 eggs
- 1 teaspoon vanilla extract
- 1/4 cup buttermilk (plus up to additional 1/4 cup if needed)
- 1 teaspoon red gel food coloring
- 2 cups all-purpose flour
- 1/2 cup unsweetened cocoa powder
- 1/2 teaspoon salt
Filling
- About 1 tablespoon marshmallow buttercream per sandwich
Instructions
- Preheat Oven: Preheat your oven to 350°F (175°C) to prepare for baking the cookies.
- Cream Shortening and Sugar: In a stand mixer, cream together the shortening and sugar until smooth and fluffy for a good base texture.
- Add Eggs: Add eggs one at a time on medium-low speed, mixing well after each addition to fully incorporate them.
- Add Wet Ingredients: Turn mixer to low speed, and add vanilla extract, buttermilk, and red gel food coloring, mixing until combined.
- Mix Dry Ingredients: In a separate bowl, whisk together all-purpose flour, unsweetened cocoa powder, and salt.
- Combine Dry and Wet: With the mixer still on low, gradually add the dry ingredient mixture into the wet ingredients until dough forms. If dough feels too dry, add up to an additional 1/4 cup buttermilk as needed, but no more.
- Pipe Rosettes: Transfer dough into a piping bag fitted with a 1M or 2D tip. Pipe small rosettes onto a parchment paper-lined baking sheet, spacing them out evenly.
- Bake: Bake for 6-8 minutes. The cookies will look slightly wet when done, which is normal. Remove from oven and allow cookies to cool completely to room temperature.
- Assemble Sandwiches: Spread about 1 tablespoon of marshmallow buttercream on the bottom of one cookie and gently press another cookie on top to create a sandwich.
Notes
- Be careful not to add more than 1/4 cup extra buttermilk to avoid overly wet dough.
- Cookies look a bit wet when done; this is normal and they will firm up as they cool.
- You can substitute shortening with unsalted butter for a richer flavor if preferred.
- If you don’t have a piping tip 1M or 2D, other open star tips can be used to create similar rosettes.
- Marshmallow buttercream can be homemade or store-bought depending on your time and preference.
Nutrition
- Serving Size: 1 sandwich cookie
- Calories: 230
- Sugar: 20g
- Sodium: 120mg
- Fat: 12g
- Saturated Fat: 4g
- Unsaturated Fat: 7g
- Trans Fat: 0g
- Carbohydrates: 28g
- Fiber: 2g
- Protein: 2g
- Cholesterol: 30mg


