
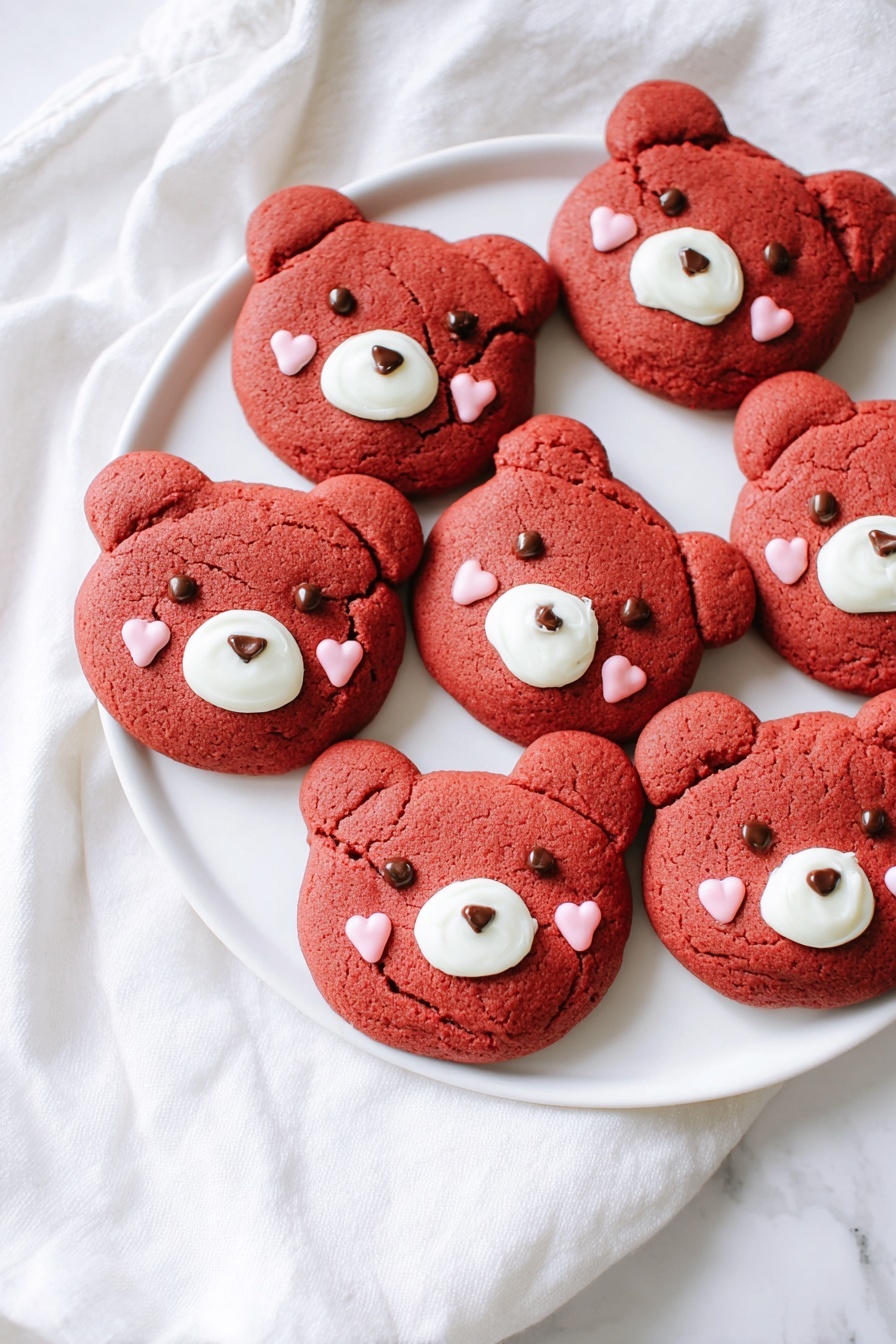
If you’ve ever wanted to surprise someone with a sweet, adorable treat that tastes as delightful as it looks, then this Red Velvet Bear Cookies Recipe is exactly what you need. I absolutely love how these little bear-shaped cookies turn out — all soft, chewy, and bursting with that classic red velvet flavor. Plus, they’re perfect for Valentine’s Day, a cozy afternoon snack, or whenever you want to put a smile on someone’s face. Stick around and I’ll walk you through everything, making it super easy to get these charming cookies just right!
Why You’ll Love This Recipe
- Adorable and Fun: These bear-shaped cookies are as cute as they are delicious, sure to impress anyone you share them with.
- Perfect Texture: Resting the dough in the fridge gives these cookies a chewy, melt-in-your-mouth quality you’ll adore.
- Customizable Decoration: You can get creative with the faces using melted chocolate, making each cookie unique and special.
- Great for All Skill Levels: Whether you’re a beginner or a pro baker, you’ll find this recipe straightforward and rewarding.

Ingredients You’ll Need
The ingredients in this Red Velvet Bear Cookies Recipe work beautifully together to create a rich, flavorful dough that’s the perfect balance of sweet and chocolatey. Plus, sort out your supplies ahead of time so you’re all set, especially when it comes to the red food coloring and chocolate for decorating.
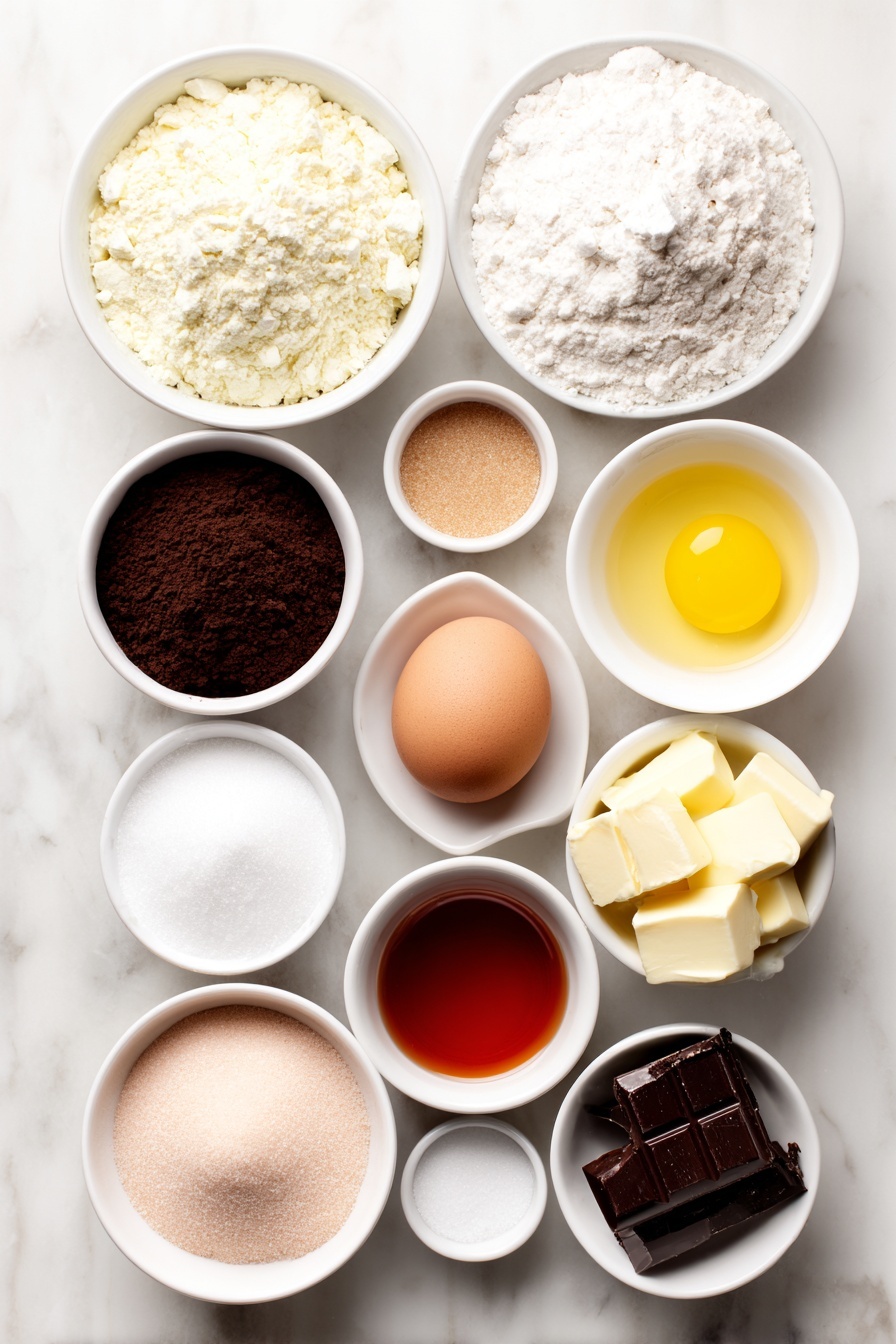
- All-purpose flour: Make sure to spoon and level for accuracy; this helps keep the cookies from becoming too dense.
- Cocoa powder: Sift it first to avoid lumps and ensure an even chocolate flavor throughout.
- Baking soda and baking powder: These give your cookies the right rise and tender crumb.
- Salt: Just a pinch to balance the sweetness perfectly.
- Unsalted butter: Melted and cooled so it incorporates smoothly with the sugars.
- Granulated and brown sugar: Using both keeps the cookies moist and adds a hint of caramel richness.
- Vanilla extract: This little addition really lifts the whole flavor profile.
- White vinegar: A bit of tang to brighten the red velvet taste – trust me, don’t skip this!
- Egg: Acts as a binder and adds moisture; make sure it’s fresh for best results.
- Red food coloring: Choose a vibrant, gel-based option for deep color without thinning the dough.
- Melted milk or dark chocolate: For the bear’s eyes and nose—rich and glossy finish.
- Melted white chocolate: Perfect for drawing the snouts and ears, plus easy to tint pink or red for blush.
- Oil-based food coloring: Essential if you want to color the white chocolate without seizing.
Variations
I love encouraging you to make this Red Velvet Bear Cookies Recipe your own! Over time, I’ve played around with all kinds of little tweaks to suit different occasions or to fit what we have on hand. Feel free to experiment—I promise it’s part of the fun!
- Vegan Version: I tried swapping vegan butter and omitting the egg (adding a bit of plant milk instead) and it came out surprisingly good—still super chewy and full of flavor.
- Stronger Chocolate Flavor: Add a little extra cocoa powder or use dark chocolate chips in the dough for a richer experience that my chocolate-loving family adored.
- Festive Colors: Instead of red, you can change up the food coloring for different holiday themes—green for Christmas bears, pastel pinks for spring celebrations.
- Nutty Cookies: Mixing in finely chopped nuts like pecans adds a delightful crunch and another layer of flavor that’s a personal favorite of mine.
How to Make Red Velvet Bear Cookies Recipe
Step 1: Prep the Dry Ingredients
Start by whisking together your all-purpose flour, sifted cocoa powder, baking soda, baking powder, and salt in a medium bowl. I find this makes a huge difference—getting those dry ingredients evenly mixed ensures every cookie bakes up perfectly consistent.
Step 2: Cream the Butter and Sugars
Using a stand mixer with the paddle attachment (or a hand mixer if you don’t have one), combine your melted, cooled butter with both granulated and brown sugar on medium speed. Scrape the sides down often so everything blends evenly; this step really sets the base for wonderfully soft cookies.
Step 3: Add the Wet Ingredients
Mix in the vanilla extract, white vinegar, one egg, and your red food coloring. I usually start with a teaspoon of food coloring and add more until I get that signature deep red hue. It never fails to brighten the kitchen and my mood!
Step 4: Combine with the Dry Ingredients
Dump in the dry ingredients and gently stir until just combined (don’t overmix). Once your dough comes together, cover it and pop it into the fridge for 20-30 minutes. This resting time is key—it lets the butter firm back up and the flour absorb the moisture, making the cookies chewier and much easier to shape.
Step 5: Shape and Bake Your Bears
Preheat your oven to 325°F (163°C) and line two baking trays with parchment paper or silicone mats—they help your cookies bake evenly without sticking. Use a small cookie scoop (about 1½ tablespoons) to portion dough into balls and place them spaced about 3 inches apart. For the ears, take about a teaspoon of dough, split that in two, roll into little balls, and stick them on top of your cookie dough balls like bear ears. Bake for 9-11 minutes. I love underbaking slightly for a softer, chewier texture—it’s a little trick I discovered and now rarely skip.
Step 6: Cool and Decorate the Bear Faces
Once out of the oven, let the cookies cool on the pan for 5-10 minutes before transferring to a wire rack to cool completely. Now comes the fun part: decorating! Grab a piping bag, toothpick, or cookie scribe to draw cute faces. Use melted white chocolate for the snouts and ears, and tint some with pink or red using oil-based food coloring for blush. If your chocolate gets lumpy when adding color, try stirring in a neutral oil a teaspoon at a time to smooth it out. Dark or milk chocolate works perfectly for noses and eyes. I always enjoy this creative step—it turns simple cookies into little works of art.
Pro Tips for Making Red Velvet Bear Cookies Recipe
- Chill the Dough Thoroughly: I sometimes let my dough rest for closer to 30 minutes for easier handling and better cookie texture.
- Use Gel Food Coloring: It delivers vibrant colors without altering dough consistency like liquid food coloring sometimes does.
- Underbake Slightly: Baking until edges just set keeps your bears soft and chewy inside—just how I like them.
- Avoid Chocolate Seizing: If you don’t have oil-based food coloring, add neutral oil carefully to melted chocolate when tinting so it stays smooth.
How to Serve Red Velvet Bear Cookies Recipe
Garnishes
When I serve these cookies, I like to sprinkle a little edible glitter or finely chopped freeze-dried raspberries around them for a festive touch. Sometimes a dusting of powdered sugar gives them a lovely snowy effect that’s perfect for winter holidays.
Side Dishes
Nothing pairs better with these soft, tender cookies than a cold glass of milk or a warm cup of hot cocoa. I also enjoy serving them alongside fresh strawberries or a simple fruit salad to balance the richness.
Creative Ways to Present
For Valentine’s Day, I’ve arranged these red velvet bears in a heart-shaped gift box with some ribbon. They make the sweetest edible gift or party favor. You can also string them on a decorative twine as a cute party garland or display on a tiered dessert stand at gatherings.
Make Ahead and Storage
Storing Leftovers
I store leftover Red Velvet Bear Cookies in an airtight container at room temperature. They stay fresh for up to a week, but I’m honest—I usually can’t keep them around that long! Just make sure they’re completely cool before sealing to avoid soggy cookies.
Freezing
These cookies freeze really well, which is perfect if you want to bake ahead for a party. I freeze them undecorated for up to 3 months, then decorate after thawing so the chocolate faces stay crisp and bright.
Reheating
If you want that just-baked warmth, pop cookies in a preheated oven at 300°F (150°C) for about 5 minutes. This refreshes their softness without melting the decorations, bringing them back to life beautifully.
FAQs
-
Can I make these Red Velvet Bear Cookies without food coloring?
You can skip the red food coloring, but your cookies won’t have that classic red velvet color. They’ll still taste delicious, just a bit less festive-looking. If you prefer a natural color, you might try beet powder as an alternative, but test in small batches first.
-
What’s the purpose of white vinegar in this recipe?
The white vinegar reacts with the baking soda to help the cookies rise and gives red velvet its distinctive tang. It enhances the flavor without leaving a sharp vinegar taste, so it’s an important ingredient not to skip.
-
How do I avoid the chocolate seizing when decorating?
When adding color to melted chocolate, especially white chocolate, always use oil-based food coloring rather than water-based. If your chocolate starts to seize, gently stir in a small amount of neutral oil like canola to smooth it out.
-
Can I make the dough ahead of time?
Absolutely! You can make the dough a day ahead and keep it tightly wrapped in the fridge. Just remember to let it come to a workable temperature before scooping and baking.
Final Thoughts
This Red Velvet Bear Cookies Recipe has become a beloved staple in my kitchen, thanks to how effortlessly it combines comfort, creativity, and cuteness. When I first made them, my whole family went crazy over the soft texture and charming faces—it’s such a joy to bake something that brings smiles and sweet memories. I can’t recommend giving it a try enough; once you do, I bet you’ll keep coming back to this recipe for every special occasion or just because. Grab your ingredients, have fun with the decorating, and share these little bears with those you love. Happy baking!
Print
Red Velvet Bear Cookies Recipe
- Prep Time: 20 minutes
- Cook Time: 11 minutes
- Total Time: 1 hour 1 minute
- Yield: 16 cookies
- Category: Dessert
- Method: Baking
- Cuisine: American
Description
These Red Velvet Valentine’s Day Bear Cookies are adorable, soft, and chewy treats perfect for celebrating the season of love. Featuring classic red velvet flavor with cocoa and a hint of vinegar, these cookies are decorated with melted chocolate and colorful blush details to create charming bear faces, making them a delightful bake for both kids and adults alike.
Ingredients
Dry Ingredients:
- 1 ½ cup (180 g) all-purpose flour, spooned and leveled
- 2 tbsp (14 g) cocoa powder, sifted
- ½ tsp (2 g) baking soda
- ½ tsp (2 g) baking powder
- ½ tsp (3 g) salt
Wet Ingredients:
- ½ cup (113.5 g) unsalted butter, melted and cooled
- ¼ cup (50 g) granulated sugar
- ¼ cup (55 g) light or dark brown sugar, packed
- 1 tsp (4 g) vanilla extract
- 1 tsp (5 g) white vinegar
- 1 large egg
- red food coloring, as needed
Decoration for Face:
- 1 tbsp (15 g) melted milk or dark chocolate
- 3 tbsp (44.36 g) melted white chocolate
- oil-based food coloring (pink/red), for coloring chocolate
Instructions
- Mix Dry Ingredients: In a medium bowl, whisk together the all-purpose flour, cocoa powder, baking soda, baking powder, and salt until evenly combined.
- Cream Butter and Sugars: Using a stand mixer fitted with the paddle attachment, or a hand mixer, beat the melted and cooled butter with granulated sugar and brown sugar on medium speed until well combined. Scrape the bottom of the bowl to ensure even mixing.
- Add Wet Ingredients: Add vanilla extract, white vinegar, egg, and red food coloring to the butter-sugar mixture. Mix until smooth and fully incorporated.
- Combine Dry and Wet: Gradually add the dry ingredient mixture into the wet ingredients. Stir or mix until a uniform dough forms. Add additional red food coloring as desired to achieve a vibrant red color.
- Rest the Dough: Cover the dough and refrigerate for 20–30 minutes. This step hydrates the flour and firms up the butter, resulting in chewier cookies and easier handling.
- Prepare Baking Trays: Preheat the oven to 325°F (163°C). Line two baking sheets with parchment paper or silicone baking mats.
- Shape Cookies: Using a small cookie scoop (about 1 ½ tablespoons), form dough balls and place them on the prepared trays spaced about 3 inches apart. Reserve some dough for the ears. For each bear, use about 1 teaspoon of dough split into two smaller balls to form ears and place them on top of the larger cookie dough balls.
- Bake Cookies: Bake cookies for 9–11 minutes, or until edges are set and centers appear slightly puffy. Underbaking slightly will yield chewier cookies.
- Cool Cookies: Allow cookies to cool on the baking sheet for 5–10 minutes before transferring them to a wire rack to cool completely.
- Decorate the Bears: Use a piping bag, toothpick, or cookie scribe to add face details. Melt white chocolate and use it to draw snouts and ears; color some white chocolate pink or red using oil-based food coloring for blush. If chocolate seizes, stir in small amounts of neutral oil until smooth. Use melted milk or dark chocolate for eyes and noses.
- Enjoy: Serve and enjoy your charming Red Velvet Valentine’s Day Bear Cookies!
Notes
- Store cookies in an airtight container at room temperature for up to one week to maintain freshness.
- To make this recipe vegan, substitute the butter with high-quality vegan butter and omit the egg. Add 2-4 tablespoons of alternative milk gradually until the dough becomes thick but scoopable. Use a vegan chocolate brand such as Pascha Chocolate for decorating.
- Use oil-based food coloring when coloring melted chocolate to prevent it from seizing. If it does seize, add a teaspoon of neutral oil at a time until smooth again.
Nutrition
- Serving Size: 1 cookie
- Calories: 110 kcal
- Sugar: 7 g
- Sodium: 90 mg
- Fat: 6 g
- Saturated Fat: 3.5 g
- Unsaturated Fat: 2 g
- Trans Fat: 0 g
- Carbohydrates: 14 g
- Fiber: 1 g
- Protein: 1.5 g
- Cholesterol: 25 mg


