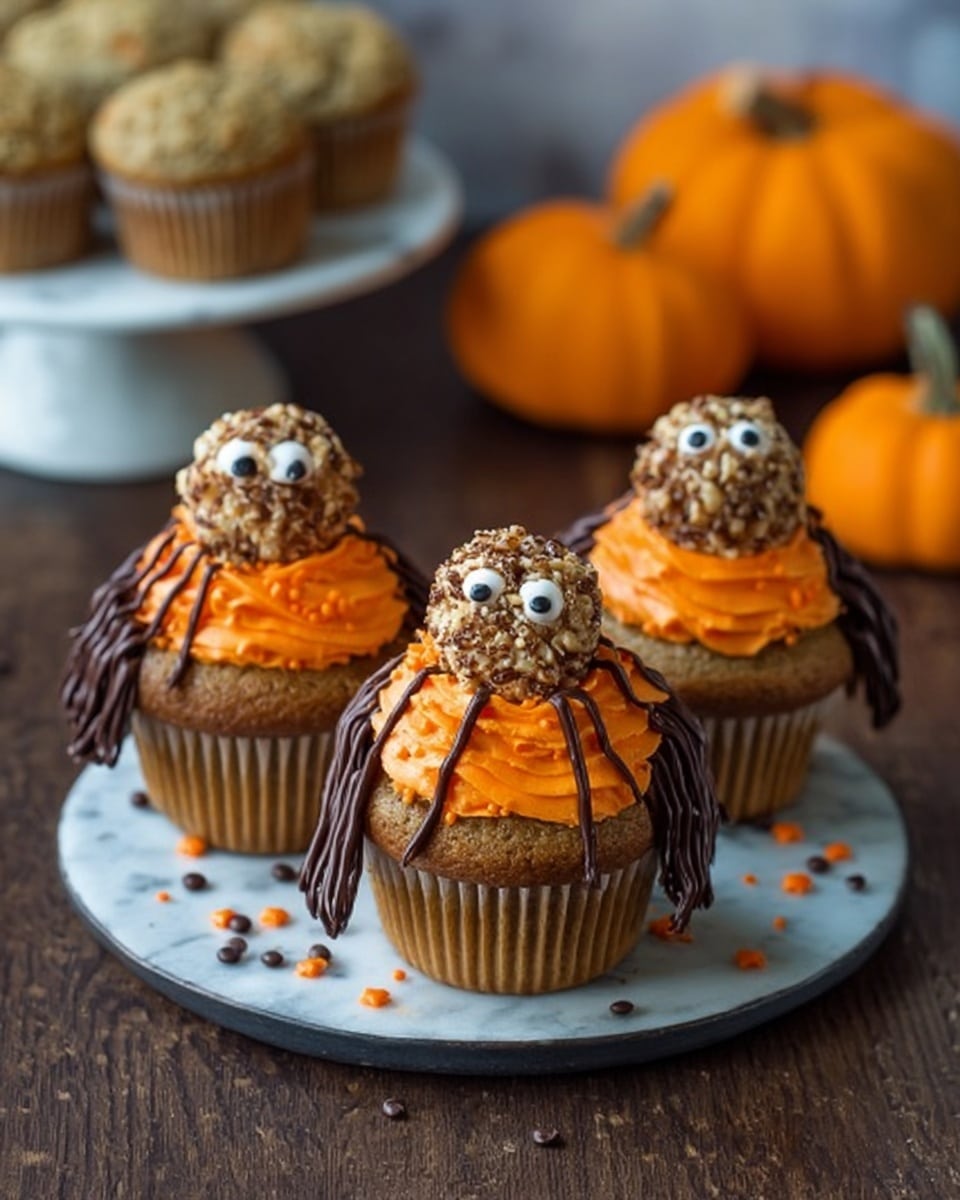
If you’re searching for a delightfully festive treat this season, you’re going to want to dive right into my Pumpkin Walnut Spider Cupcakes Recipe. These cupcakes are not only irresistibly moist and packed with autumnal flavors, but they come dressed up as the cutest little spider critters you’ll ever want to eat! I absolutely love how this recipe blends the comforting spice of pumpkin with the crunch of walnuts, topped off with playful spider decorations that are perfect for Halloween or any cozy fall gathering. Keep reading, because I’ve got all the tips to help you nail these adorable cupcakes on your very first try.
Why You’ll Love This Recipe
- Perfect balance of flavors: The warm pumpkin and spices mix beautifully with crunchy walnuts for a fall-inspired treat.
- Fun and festive presentation: These spider cupcakes are a guaranteed hit with kids and adults alike, making party prep a breeze.
- Easy to make at home: You’ll find the steps straightforward with helpful tips to avoid common baking pitfalls.
- Impresses every time: My family goes crazy for these, and honestly, I always get asked for the recipe!

Ingredients You’ll Need
The great thing about this Pumpkin Walnut Spider Cupcakes Recipe is how each ingredient plays a role in creating that perfect texture and flavor — from the basic pantry staples to the pumpkin puree that adds moisture and warmth. I like to buy fresh walnuts and chop them myself for extra crunch, but you can also use pre-chopped ones to save time.
- Flour: All-purpose flour works best to give you fluffy yet sturdy cupcakes.
- Baking powder & baking soda: These leavening agents ensure your cupcakes rise just right.
- Salt: Balances and enhances the sweetness.
- Cinnamon & pumpkin pie spice: The soul of the recipe, these spices make it unmistakably fall.
- Brown sugar: Adds a rich sweetness and moistness.
- Butter: Room temperature is key for smooth blending.
- Eggs: Bind everything together, making the cupcakes tender.
- Pumpkin puree: Use pure pumpkin, not pumpkin pie filling, for the best taste and control over sweetness.
- Walnuts (Diamond of California Shelled Walnuts): Chopped to add that satisfying nutty crunch in the batter and finely chopped for the legs.
- Large marshmallows: For creating the spider bodies atop the cupcakes.
- Chocolate candiquik (or almond bark) & vegetable shortening: Melt together to make smooth chocolate for legs that hold their shape.
- Candy eyeballs: The cutest touch that brings these spider cupcakes to life.
- Powdered sugar, vegetable shortening & vanilla extract: For the creamy, delicious frosting with gel food coloring for that perfect orange and brown tint.
- Orange & brown gel food coloring: Just a little goes a long way to get those vibrant autumn colors.
Variations
One of the things I love about this Pumpkin Walnut Spider Cupcakes Recipe is how easy it is to tweak for your taste or dietary needs. Feel free to get creative and make these little spiders your own — I’ve tried a few fun variations to suit different occasions and preferences.
- Gluten-Free Variation: Swap the all-purpose flour for a gluten-free blend. I’ve done this many times with great results; the cupcakes stay moist and fluffy.
- Nut-Free Version: Omit the walnuts and substitute with sunflower seeds or pumpkin seeds if you want that crunch without the nuts.
- Spice Level: Increase or decrease the pumpkin pie spice to suit your preference. I like to add a pinch of ground cloves for an extra cozy flavor.
- Chocolate Change-Up: Instead of chocolate candiquik for legs, melted dark chocolate works too — just make sure to temper it properly or it’ll melt too fast.
How to Make Pumpkin Walnut Spider Cupcakes Recipe
Step 1: Mixing Your Batter Just Right
Start by preheating your oven to 350°F (175°C) and lining a cupcake pan with liners. In a medium bowl, whisk together your flour, baking powder, baking soda, salt, cinnamon, and pumpkin pie spice. In a separate large bowl, cream the butter and brown sugar until fluffy — this step is key to that tender crumb texture. Add the eggs one at a time, beating well after each addition, and then mix in the pumpkin puree. Gradually blend in the dry ingredients just until combined; overmixing is a common mistake that leads to dense cupcakes.
Step 2: Folding in the Walnuts
Gently fold the chopped walnuts into your batter to keep all that nutty crunch intact. I like to reserve a few to sprinkle on top before baking for an extra nutty bite and a pretty finish. Scoop the batter evenly into the cupcake liners — they should be about 3/4 full to allow room to rise.
Step 3: Baking and Cooling
Bake the cupcakes for 15 minutes or until a toothpick inserted in the center comes out clean. Don’t open the oven door mid-bake — I’ve learned this the hard way and it can cause cupcakes to collapse. Once baked, let them cool completely on a wire rack before decorating. Patience here really pays off with the final look of your spiders.
Step 4: Making the Frosting and Coloring It
While the cupcakes cool, whip up your frosting by blending softened butter and vegetable shortening until smooth, then add vanilla and powdered sugar gradually. Split the frosting into two bowls and tint one with orange gel food coloring and the other with brown. This combo gives a fun contrast that echoes classic fall colors.
Step 5: Decorating Your Spider Cupcakes
Use a piping bag or a spatula to frost each cooled cupcake with the orange frosting. Then place one large marshmallow on top — this will be your spider’s body. Melt the chocolate candiquik with the vegetable shortening until smooth; this mixture is perfect for piping on the spider’s legs. Dip a toothpick into the chocolate and draw eight legs radiating out from the marshmallow. Before the chocolate sets, stick candy eyeballs onto the marshmallow. To finish, sprinkle the finely chopped walnuts around the marshmallow for a fuzzy spider look that’s just too cute to smash!
Pro Tips for Making Pumpkin Walnut Spider Cupcakes Recipe
- Room Temperature Ingredients: Make sure your butter and eggs are at room temp — it really helps the batter come together silky smooth.
- Don’t Overmix: When combining wet and dry ingredients, fold gently to keep your cupcakes light and fluffy.
- Marshmallow Placement: Press the marshmallow gently into the frosting to avoid it slipping off, but don’t push too hard or it will melt.
- Chocolate Legs Trick: Add a tablespoon of vegetable shortening to your melted candiquik for leg piping — it dries quicker and holds shape better.
How to Serve Pumpkin Walnut Spider Cupcakes Recipe
Garnishes
I love finishing these spider cupcakes with a sprinkle of finely chopped walnuts around the marshmallow — it gives the illusion of spider fuzz and adds amazing texture. The candy eyeballs bring the spiders to life, but if you want to get creative, tiny edible glitter or shimmer dust works beautifully for a magical Halloween touch.
Side Dishes
These cupcakes stand out on their own, but I like pairing them with a warm cup of spiced cider or pumpkin spice latte to complement their flavors. For a full party spread, add savory bites like mini grilled cheese or butternut squash soup shooters to balance the sweetness.
Creative Ways to Present
For Halloween parties, I’ve placed these Pumpkin Walnut Spider Cupcakes on a large black platter lined with faux spider webbing, surrounded by autumn leaves and mini pumpkins to create a spooky yet charming centerpiece. You could also serve them in little cupcake boxes or bags for party favors that guests will remember!
Make Ahead and Storage
Storing Leftovers
I always store leftover cupcakes in an airtight container at room temperature, but if your house is warm, refrigeration helps keep the frosting firm. Just be sure to bring them back to room temperature before serving so the flavors and textures shine.
Freezing
These cupcakes freeze really well without the frosting. I freeze the baked cupcakes wrapped tightly in plastic wrap, then thaw them on the counter before frosting to keep that fresh-baked taste. I haven’t had much luck freezing them fully decorated because the marshmallows and chocolate legs don’t hold up as nicely.
Reheating
If you want to warm a cupcake a bit, I pop it in the microwave for about 10 seconds — just enough to bring out that cozy pumpkin aroma without melting the frosting or marshmallow. It’s a little touch that guests really appreciate!
FAQs
-
Can I use canned pumpkin pie filling instead of pumpkin puree?
I recommend using pure pumpkin puree instead of pumpkin pie filling because the pie filling contains added sugar and spices, which can throw off the flavor balance and sweetness of the cupcakes. Pure pumpkin lets you control the spice levels and sweetness perfectly.
-
How do I prevent the marshmallow from melting off the cupcake?
After frosting, give your cupcakes a few minutes to set before placing the marshmallow bodies on top. Gently press them into the frosting without pushing too hard. Chilling the cupcakes in the fridge for 10 minutes before decorating can help the frosting firm up so it holds the marshmallow better.
-
What’s the best way to make the chocolate legs sturdy?
Mixing a tablespoon of vegetable shortening with your melted chocolate candiquik helps stabilize the chocolate so it sets firmly but doesn’t break easily. Use a toothpick or small piping bag for precise leg shapes and let them cool completely before handling.
-
Can I make these cupcakes ahead of time?
Absolutely! You can bake the cupcakes 1-2 days ahead, store them airtight at room temperature (or in the fridge if it’s warm), and frost them just before your event. This helps keep the marshmallows and decorations fresh and looks fantastic.
Final Thoughts
This Pumpkin Walnut Spider Cupcakes Recipe quickly became one of my favorite fall desserts not just because it tastes incredible, but because it brings a little magic and whimsy to the kitchen. Whether you’re baking with kids or just want to impress your guests, these little spider cupcakes never fail to get smiles and compliments. So go ahead, give this recipe a whirl — I promise you’ll love the combination of flavors and the fun of assembling those spider legs as much as I do. Happy baking!
Print
Pumpkin Walnut Spider Cupcakes Recipe
- Prep Time: 20 minutes
- Cook Time: 15 minutes
- Total Time: 35 minutes
- Yield: 12 cupcakes
- Category: Dessert
- Method: Baking
- Cuisine: American
Description
Delightful Pumpkin Walnut Spider Cupcakes perfect for Halloween celebrations. These moist pumpkin-infused cupcakes are studded with crunchy walnuts and topped with creamy, colorful frosting. Decorated with marshmallow spiders featuring walnut legs and chocolate details, they make an adorable and spooky treat for any party.
Ingredients
Cupcake Batter
- 1 1/4 cups flour
- 1 tsp baking powder
- 1/2 tsp baking soda
- 1/4 tsp salt
- 1/2 tsp cinnamon
- 1 tsp pumpkin pie spice
- 3/4 cup brown sugar
- 1 stick butter (1/2 cup, room temperature)
- 2 large eggs
- 1 cup pumpkin puree
- 1/3 cup Diamond of California Shelled Walnuts (chopped)
Spider Decorations
- Large marshmallows (one for each cupcake)
- Diamond of California Shelled Walnuts (finely chopped for legs)
- 2-3 squares chocolate candiquik or almond bark
- 1 tbsp vegetable shortening (to melt chocolate candiquik)
- Candy eyeballs
Frosting
- 2 sticks butter (1 cup, room temperature)
- 3/4 cup vegetable shortening
- 1 tsp vanilla extract
- 6-8 cups powdered sugar
- Orange gel food coloring
- Brown gel food coloring
Instructions
- Prepare the Cupcake Batter: In a mixing bowl, whisk together flour, baking powder, baking soda, salt, cinnamon, and pumpkin pie spice. In a separate bowl, cream the butter and brown sugar until light and fluffy. Beat in eggs one at a time, then add pumpkin puree. Gradually blend dry ingredients into the wet mixture until fully combined. Fold in chopped walnuts carefully to distribute evenly.
- Bake the Cupcakes: Preheat the oven to 350°F (175°C). Line a cupcake tray with paper liners and fill each about two-thirds full with batter. Bake for 15 minutes or until a toothpick inserted in the center comes out clean. Remove from oven and allow cupcakes to cool completely.
- Prepare the Frosting: In a large bowl, beat together butter and vegetable shortening until creamy. Add vanilla extract. Gradually mix in powdered sugar until desired consistency is reached. Add orange gel food coloring and blend well for a vibrant orange hue.
- Frost the Cupcakes: Once cupcakes are cooled, generously frost each cupcake with the orange buttercream using a spatula or piping bag.
- Create the Spider Decorations: Melt the chocolate candiquik with vegetable shortening until smooth. Dip each large marshmallow in the melted chocolate to coat and let set slightly. Using the finely chopped walnuts, attach eight pieces to each marshmallow to resemble spider legs. Using a small dab of melted chocolate, fix candy eyeballs to the top of the marshmallow spiders.
- Assemble the Spider Cupcakes: Carefully place each marshmallow spider atop the frosted cupcakes. Use brown gel food coloring as needed for additional spider detailing. Allow the decorations to set before serving.
Notes
- These walnut spiders are whimsical and fun, making them perfect for Halloween parties without worrying about creepy crawlers!
- Be sure to let cupcakes cool completely before frosting to avoid melting the frosting.
- Use gel food coloring for vibrant colors without thinning your frosting.
- If you prefer, substitute almond bark with white chocolate chips for coating the marshmallows.
- Store cupcakes in an airtight container at room temperature for up to 2 days or refrigerate for longer freshness.
Nutrition
- Serving Size: 1 cupcake
- Calories: 745 kcal
- Sugar: 79 g
- Sodium: 352 mg
- Fat: 42 g
- Saturated Fat: 21 g
- Unsaturated Fat: 19 g
- Trans Fat: 3 g
- Carbohydrates: 91 g
- Fiber: 1 g
- Protein: 3 g
- Cholesterol: 92 mg

