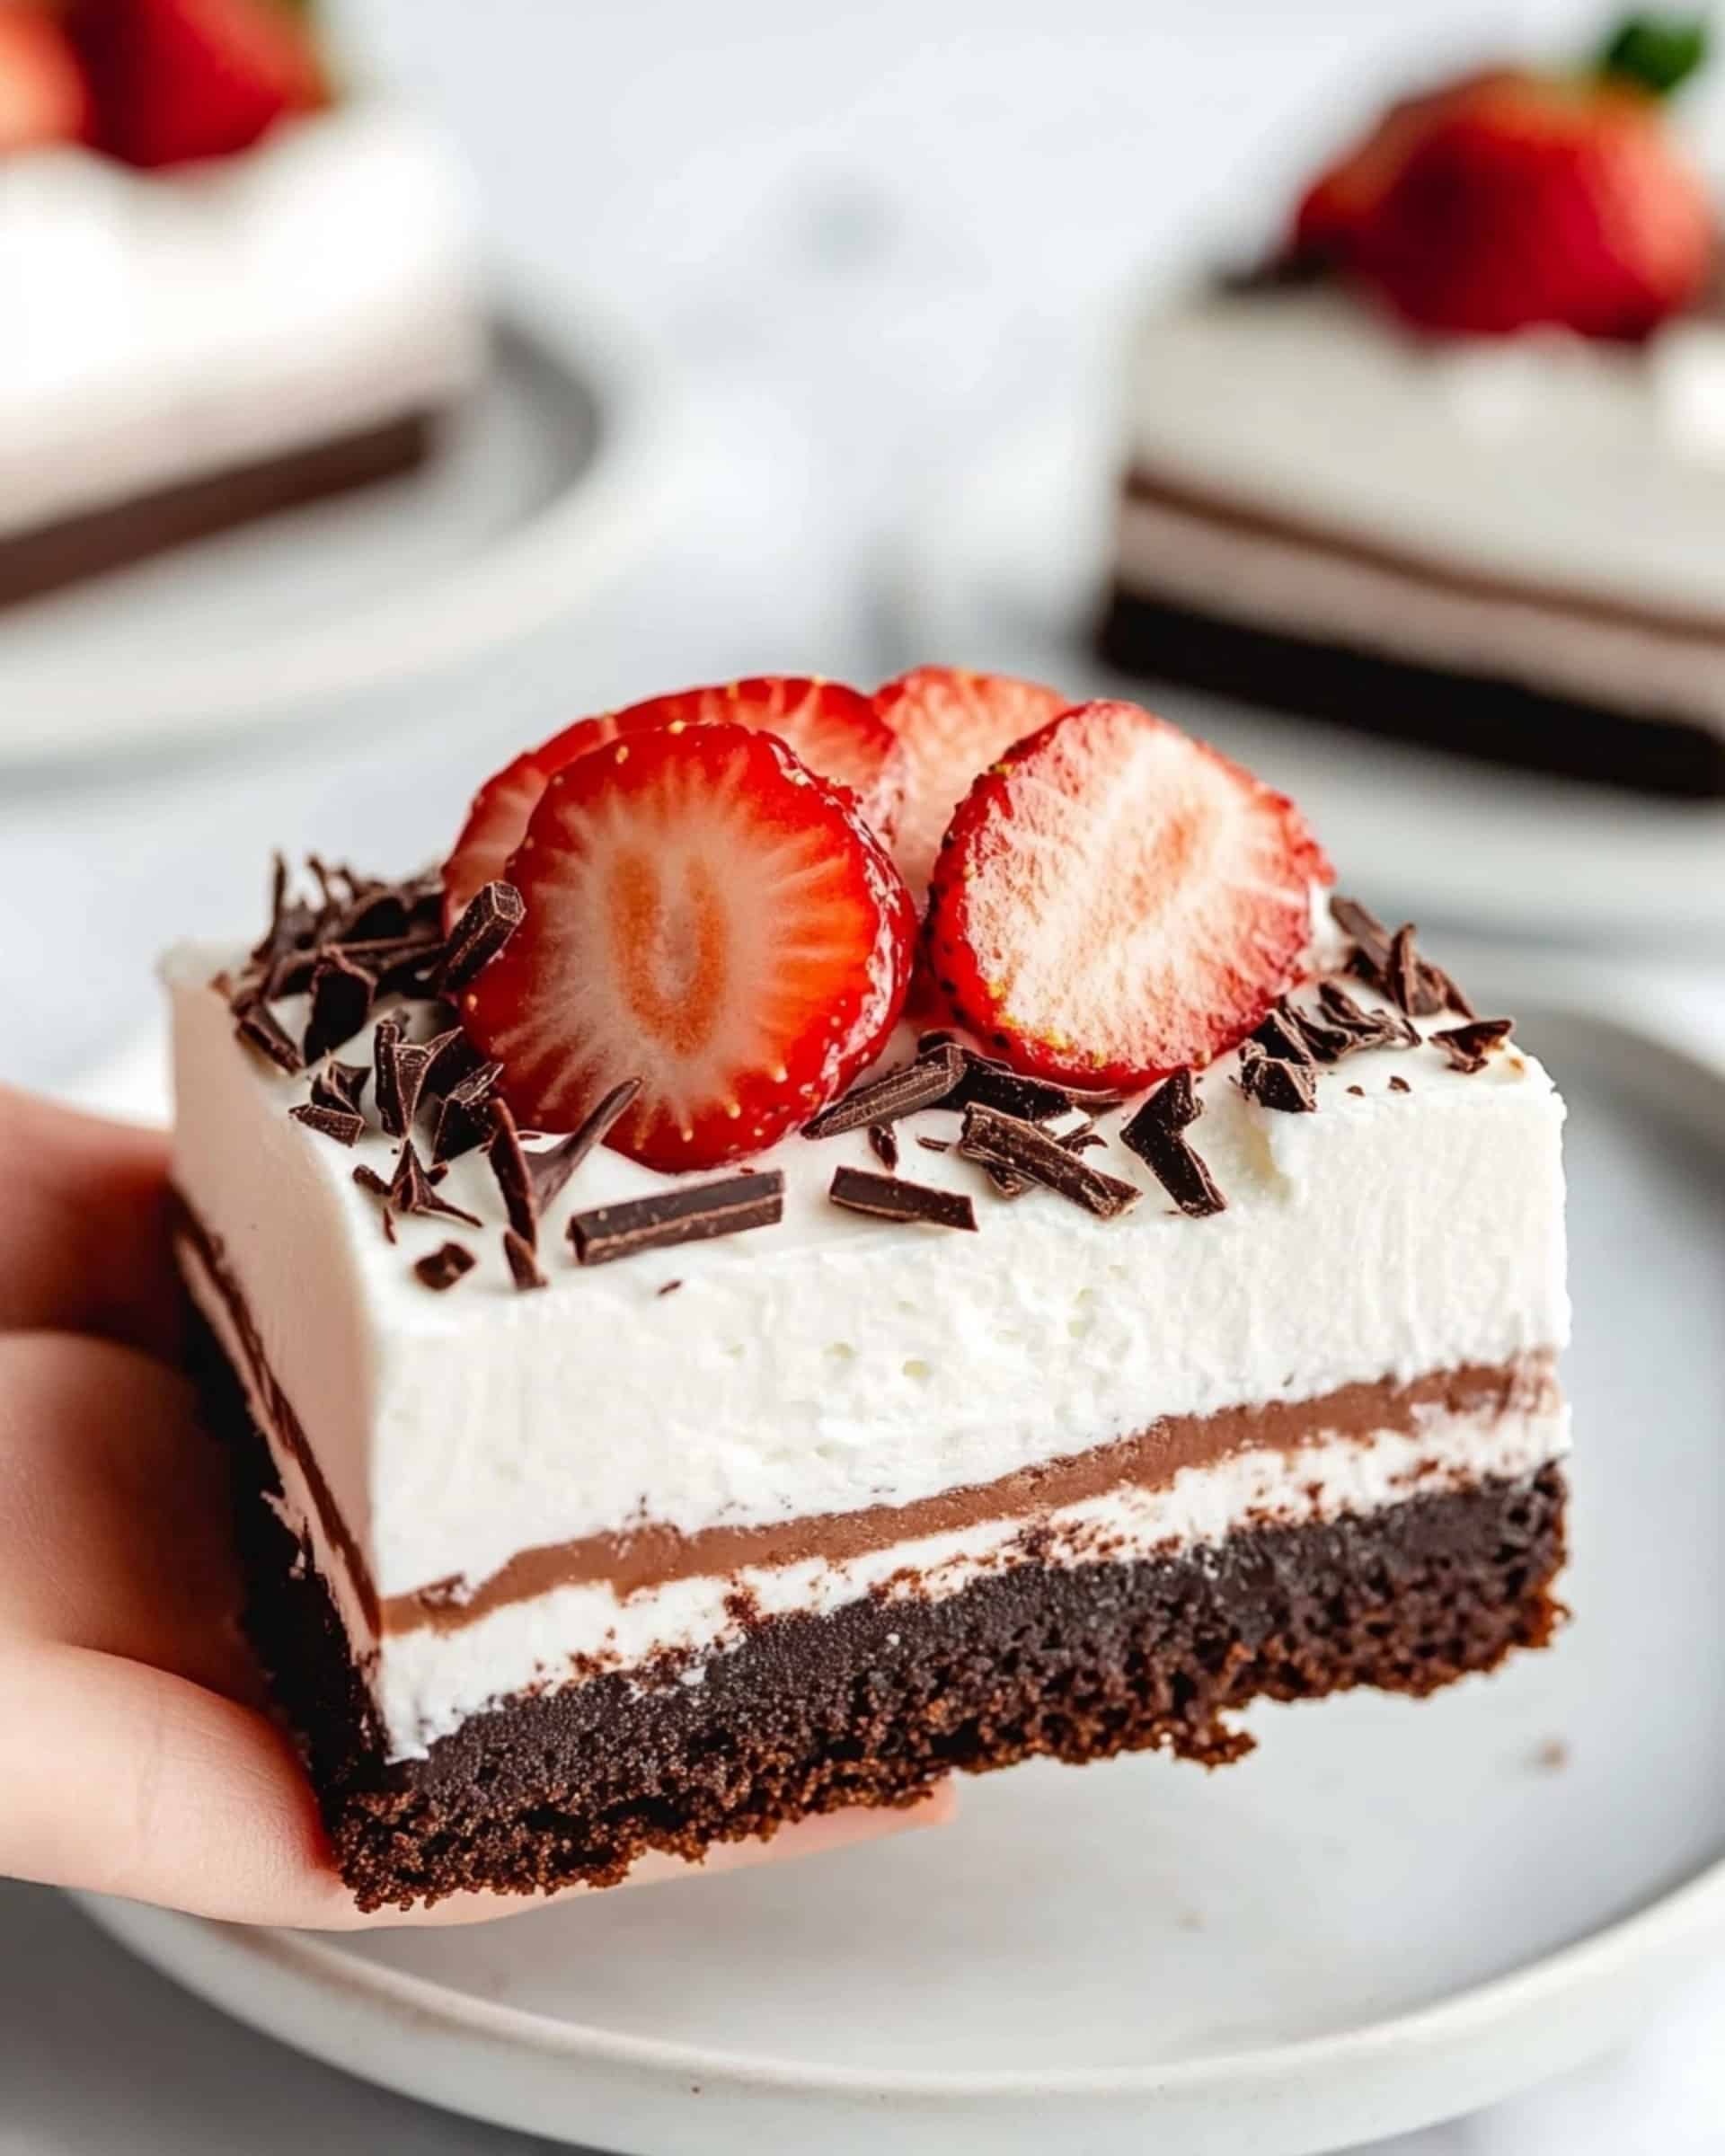
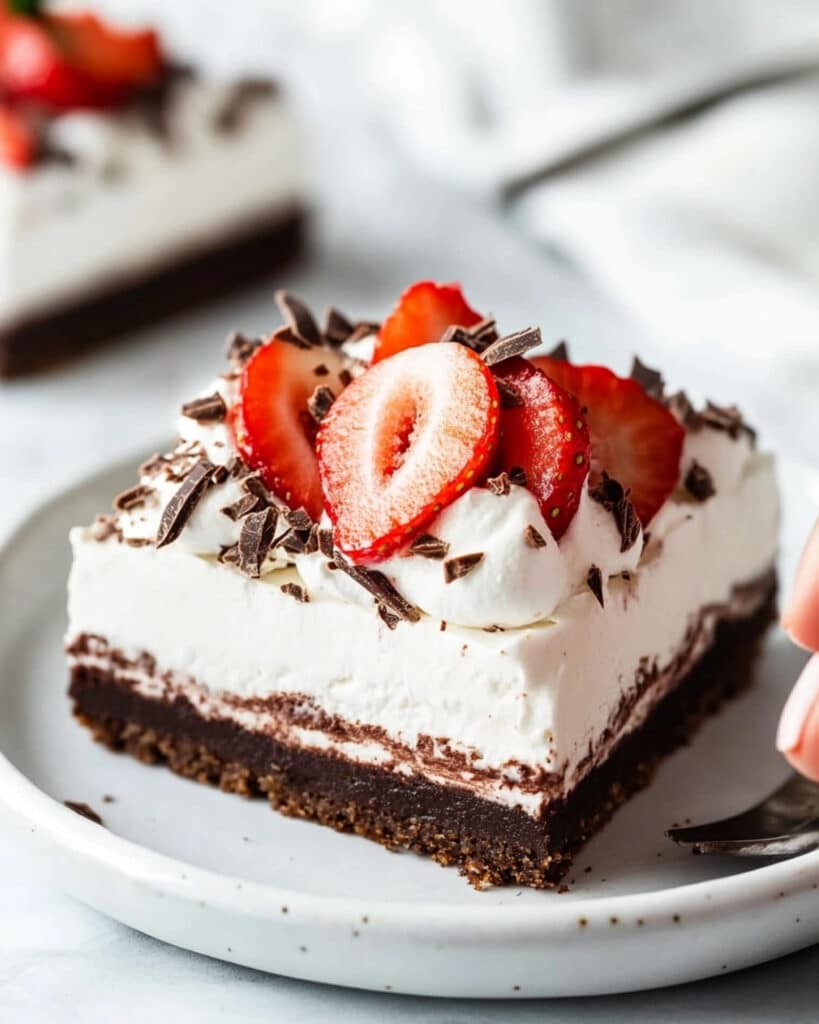
If you’re on the hunt for a dessert that requires almost zero effort but delivers maximum joy, No Bake Oreo Delight is calling your name. Imagine a cloud-like cream cheese layer, silky chocolate pudding, and a crunchy, buttery Oreo base—all coming together in one creamy, dreamy bite. Best part? No oven. No fussy steps. This is the go-to treat for any busy weeknight, potluck, or family gathering when you want the “wow” factor without the workload. Kids (and grown-ups!) will be scraping their plates, and you don’t need to be a kitchen whiz to make it happen.
Why You’ll Love This Recipe
- Incredibly Easy: No oven, no water baths, just pure no-bake bliss. Anyone can make this, truly!
- Quick to Assemble: You’ll have it chilling in the fridge within 25 minutes. It’s a lifesaver when last-minute guests are coming.
- Outrageously Delicious: Layers of crunchy Oreos, tangy-sweet cream cheese, and chocolate pudding—this dessert is rich, creamy, and satisfying in every bite.
- Perfect for All Occasions: Whether it’s a weeknight treat, holiday potluck, or birthday celebration, Oreo Delight fits right in.
- Customizable: Feel free to put your own spin on it—add toppings, new flavors, or different cookies.

Ingredients You’ll Need
Here’s everything required for building layers of decadent flavor:
-
Oreo Cookies: The star of the show. Use regular or double-stuffed for the best chocolatey crunch in the crust.
Tip: Don’t bother separating the cream from the cookies, just crush them whole! - Butter: Melted and mixed with crushed Oreos for a crust that actually holds together (and tastes amazing).
- Cool Whip: Adds a fluffy, light texture that balances out the richness of the cream cheese and chocolate.
- Cream Cheese: Room temperature is key here—it ensures a lump-free, smooth layer that’s oh-so luscious.
- Confectioners/Powdered Sugar: Sweetens and blends seamlessly into the cream cheese to keep that middle layer pillowy soft.
-
Chocolate Instant Pudding: Brings the classic chocolate flavor and sets up beautifully without lengthy chilling times.
Note: You CAN use cooked pudding, just make sure it’s chilled first! - Milk: To make the pudding irresistibly creamy.
Note: You’ll find the complete list of ingredients, along with their exact measurements, in the printable recipe card at the bottom of this post.
Variations
There’s no reason to stick to the basics if you’re in the mood to experiment:
- Different Cookies: Try Golden Oreos, chocolate chip cookies, or graham crackers for a unique crust.
- Pudding Flavors: Vanilla, banana, or even cheesecake instant pudding are all fun swaps for chocolate.
- Homemade Whipped Cream: Sub in homemade whipped cream for Cool Whip if you prefer a less sweet, more natural topping.
- Fruit Layers: Add sliced bananas or strawberries between layers for a fruity twist.
- Nutty Crunch: Sprinkle chopped walnuts or pecans on top for extra texture.
How to Make No Bake Oreo Delight
Step 1: Make the Oreo Crust
Crush the entire package of Oreos (filling included) using a food processor for fine crumbs or put them in a heavy bag and crush with a rolling pin. Combine with melted butter in a bowl until evenly mixed. Press this mixture firmly into the bottom of a 9×13-inch pan to make the perfect chocolatey crust.
Step 2: Prepare the Cream Cheese Layer
Using a hand mixer, beat the softened cream cheese until completely smooth—no lumps! Add HALF of your Cool Whip and all the powdered sugar. Beat again until well-blended and airy. Gently spread this mixture over the Oreo crust, taking care to keep the layers even.
Step 3: Whip Up the Pudding
In another bowl, whisk the instant chocolate pudding with cold milk for a couple of minutes (it will thicken quickly). Let it set for 5 minutes to finish thickening, then spread this luscious chocolate layer over the cream cheese layer.
Step 4: Finish and Chill
Top everything with the remaining Cool Whip, spreading it out evenly for a smooth, fluffy finish. Cover and refrigerate for at least 1 hour so the layers can set up and flavors can mingle.
Pro tip: You can leave it overnight for even deeper flavor and easier slicing.
Step 5: Garnish and Serve
Right before serving, add fresh strawberries or shaved chocolate if you like. Slice into generous portions and enjoy every creamy, crunchy bite.
Pro Tips for Making the Recipe
- Room Temperature Cream Cheese: Give it time to lose its chill—this ensures a velvety smooth layer without sneaky lumps.
- Pack the Crust Well: Use the back of a measuring cup or glass to press the Oreo mixture firmly so it holds together when you slice.
- Chill Thoroughly: Don’t rush this step—the dessert slices best when cold, and the flavors blend perfectly.
- Use Whole Oreos: Skipping the step of removing the filling isn’t just easy—it helps the crust stick together better.
How to Serve
- Serve chilled, straight from the fridge, with a spatula for clean layers.
- Garnish right before serving for that extra pop—fresh berries, a dusting of cocoa powder, or curls of chocolate are all wonderful.
- This dessert pairs beautifully with hot coffee or tall glasses of milk for the ultimate comforting combo.
- Want to make it fancy? Serve individual squares in pretty dessert glasses for parties.
Make Ahead and Storage
Storing Leftovers
Cover tightly and refrigerate any leftovers. This Oreo Delight is still delicious up to 3 days after assembling—just keep it cold!
Freezing
Yes, you can freeze it! Place in an airtight container or wrap tightly to avoid freezer burn. Let it thaw in the fridge overnight before serving. The texture will stay surprisingly creamy.
Reheating
No heating needed! Just serve straight from the fridge or after thawing if previously frozen.
FAQs
-
Can I make No Bake Oreo Delight ahead of time?
Absolutely! In fact, it’s even better after a night in the fridge—the flavors blend beautifully and the layers hold together. Make it a day in advance for stress-free entertaining.
-
Can I use homemade whipped cream instead of Cool Whip?
Yes! If you prefer homemade, whip heavy cream with a touch of sugar until soft peaks form. Just know that homemade whipped cream is less stable, so serve the dessert within a day or so for best results.
-
What if I don’t have a food processor to crush the Oreos?
No problem! Place the cookies in a sturdy plastic bag and smash them with a rolling pin or heavy pan. It’s quick and even a little bit fun.
-
Can I make this gluten-free or dairy-free?
Definitely. Substitute gluten-free chocolate sandwich cookies for the Oreos, and use dairy-free versions of the cream cheese, whipped topping, and pudding. Double-check ingredient labels to ensure everything fits your dietary needs.
Final Thoughts
This No Bake Oreo Delight is the kind of dessert that keeps you coming back for “just one more bite.” Fast, fabulous, and totally foolproof, it’s the answer to every dessert craving—no oven, no hassle, just pure, creamy comfort. Give it a try, get creative with your own favorite mix-ins, and make it a staple for every occasion!
Print
No Bake Oreo Delight Recipe
- Prep Time: 20 minutes
- Cook Time: 5 minutes
- Total Time: 25 minutes
- Yield: 10 servings
- Category: Desserts
- Method: No-cook
- Cuisine: American
- Diet: Vegetarian
Description
No Bake Oreo Delight is a creamy, decadent dessert featuring layers of crushed Oreos, a velvety cream cheese mixture, rich chocolate pudding, and fluffy Cool Whip. This easy-to-make, crowd-pleasing treat requires minimal effort—no baking necessary—and is perfect for parties, potlucks, or any time you need a sweet, refreshing dessert.
Ingredients
Crust
- 1 package Oreo cookies (regular or double stuffed)
- 1 stick butter, melted
Cream Cheese Layer
- 8 oz. cream cheese (at room temperature)
- 1 cup confectioners/powdered sugar
- 16 oz. Cool Whip, divided (use half for this layer, half for topping)
Pudding Layer
- 5.9 oz. chocolate instant pudding mix
- 2 3/4 cups milk
Topping (Optional)
- Strawberries, for garnish
- Shaved chocolate, for garnish
Instructions
- Prepare the Oreo Crust: Crush the whole bag of Oreo cookies in a food processor, or by hand if you prefer. Combine the crushed Oreos with the melted butter in a bowl until well-mixed. Press the mixture evenly into the bottom of a 9×13 inch pan to form the crust.
- Make Cream Cheese Layer: In a large bowl, beat the room temperature cream cheese for about 1 minute using a hand mixer until smooth. Add in HALF of the Cool Whip (reserve the rest for topping) and the powdered sugar. Beat until smooth and well-combined. Spread this mixture over the prepared Oreo crust in an even layer.
- Prepare Pudding Layer: In another bowl, whisk together the chocolate instant pudding mix and milk for 2 minutes. Let the pudding sit for 5 minutes to thicken. Once set, spread the pudding evenly over the cream cheese layer.
- Add Final Topping and Chill: Top the chocolate pudding layer with the remaining Cool Whip, spreading it evenly across the surface. Refrigerate the dessert for at least 60 minutes before serving, or overnight for best results.
- Garnish and Serve: Just before serving, garnish with sliced strawberries and/or shaved chocolate, if desired. Slice and enjoy your No Bake Oreo Delight!
Notes
- You can use cooked pudding instead of instant pudding, but be sure to chill it completely before adding it as a layer.
- This dessert can be frozen for future use. To serve after freezing, let it thaw in the refrigerator overnight.
- Using room temperature cream cheese is important to avoid lumps in the cream cheese layer.
- Customize with your choice of toppings like mini Oreos, fruit, or your favorite chocolate shavings.
Nutrition
- Serving Size: 1/10th of recipe
- Calories: 410
- Sugar: 32g
- Sodium: 420mg
- Fat: 25g
- Saturated Fat: 13g
- Unsaturated Fat: 9g
- Trans Fat: 0g
- Carbohydrates: 45g
- Fiber: 1g
- Protein: 4g
- Cholesterol: 41mg

