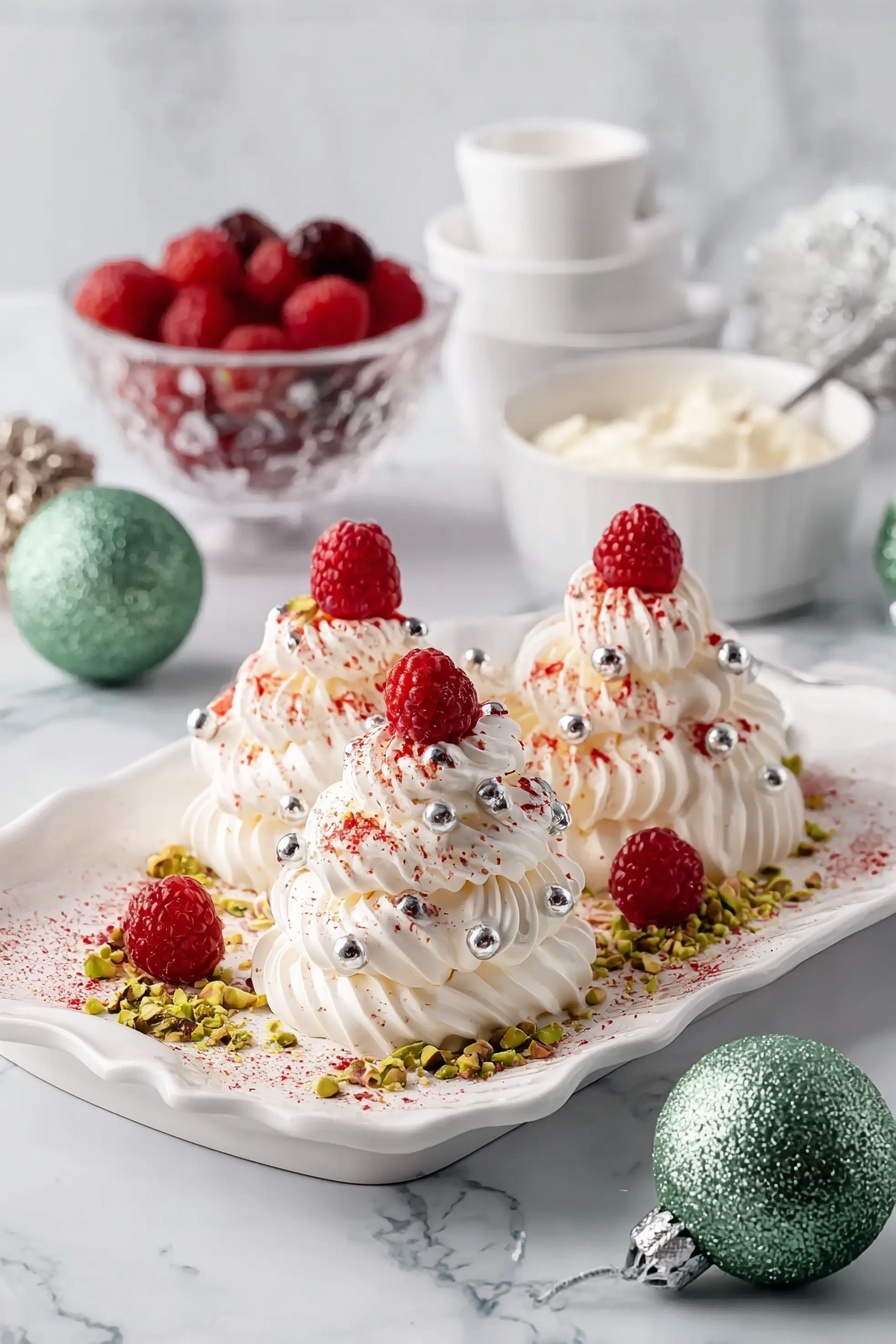
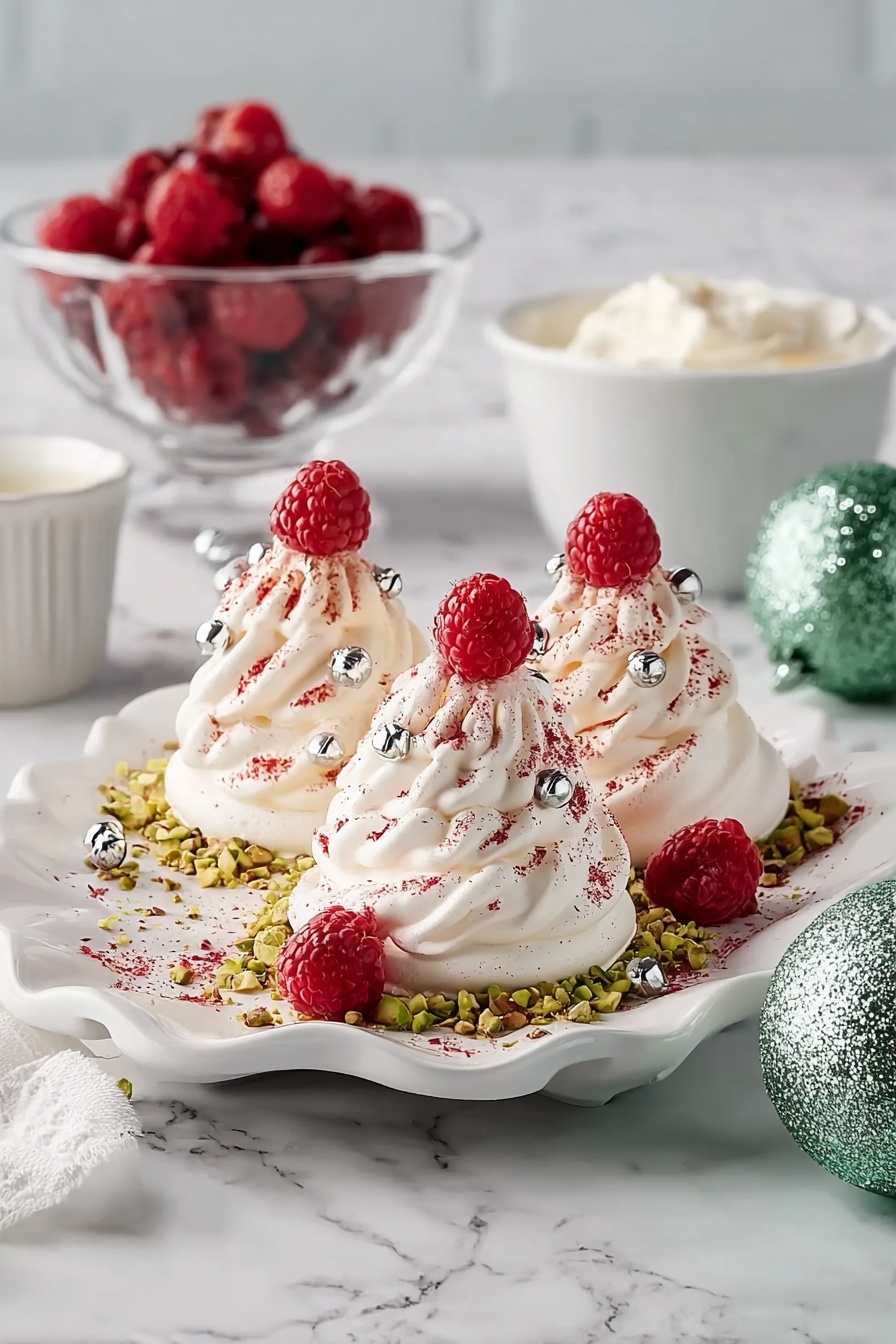
I’m so excited to share this delightful little treat with you—my Mini Pavlova Christmas Trees Recipe is exactly the kind of festive dessert that’ll have your family and friends oohing and aahing! These charming meringue trees are not only visually stunning, but they’re surprisingly easy to make once you get the hang of it. If you love pavlova but want to jazz it up for Christmas, you’ll find this recipe is a real winner and a total showstopper on the holiday table.
Why You’ll Love This Recipe
- Festive and Fun: These mini pavlova trees bring a festive spirit right to your dessert plate, making Christmas extra special.
- Light and Crispy Texture: The meringue is perfectly crisp on the outside and soft-ish inside, which I find absolutely delightful every time.
- Simple Ingredients: You probably already have most on hand — egg whites, sugar, cream, and a few extras for decoration.
- Impress Without Stress: The step-by-step is beginner-friendly but yields a polished, professional look that’ll wow your guests.

Ingredients You’ll Need
These ingredients work harmoniously to create that iconic pavlova crunch and cloud-like creaminess. I always recommend using fresh, room temperature egg whites—they whip better and result in a sturdier meringue, which is vital when piping these delicate Christmas trees.
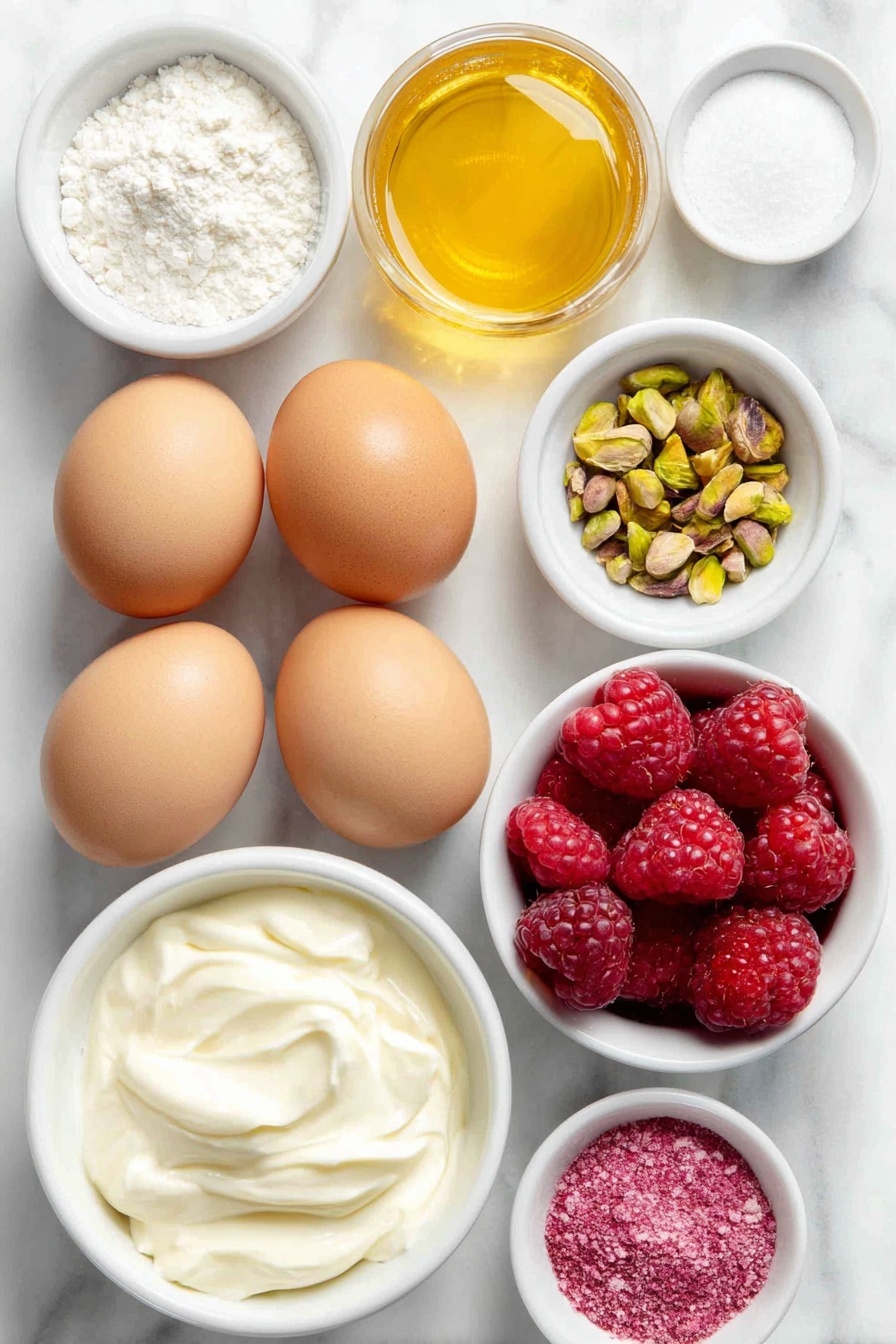
- Egg whites: Make sure they’re free-range and at room temperature for the fluffiest peaks.
- Caster sugar: This fine sugar dissolves quicker than granulated, helping avoid grainy meringue.
- White vinegar: Adds stability to your meringue and a slight tang to balance the sweetness.
- Cornflour: This little secret keeps the meringue crisp on the outside and slightly marshmallowy inside.
- Sunbeam Australian Pistachios: For an earthy crunch and a beautiful green contrast as garnish.
- Thickened cream: Whipped until just firm, it brings richness and softness to the finished trees.
- Icing sugar: Sweetens the cream lightly without granularity.
- Rosewater: Adds a subtle floral note—I promise it’s not overpowering, just elegant.
- Silver cachous, raspberries, freeze-dried raspberry powder, strawberries: All fun little decorations to make your trees sparkle and taste fresh.
Variations
I love to switch things up sometimes and play around with flavors and decorations on these Mini Pavlova Christmas Trees. Feel free to customize them to suit your family’s taste or dietary needs — the basics stay the same, but the toppings are where you can really get creative.
- Flavor Twist: Once, I swapped the rosewater for vanilla extract because a friend isn’t a fan of floral flavors. It was just as dreamy and kid-approved!
- Nut-Free Option: I’ve made them without pistachios and instead dusted with cocoa powder or cinnamon for a warm holiday vibe.
- Fruit Changes: Using a mix of fresh blueberries, pomegranate seeds, or even tiny candy canes makes the trees even more festive and fun.
- Vegan Adaptation: Though tricky with classic pavlova, you can experiment with aquafaba (chickpea water) as a substitute for egg whites to make vegan meringues.
How to Make Mini Pavlova Christmas Trees Recipe
Step 1: Prep Your Oven and Baking Sheets
Start by preheating your oven to 100°C fan-forced (or 120°C if you’re using a conventional oven). Trust me, this low-and-slow heat is crucial for drying out the meringue without browning it. Grease two large baking trays and place your baking paper on top. Here’s a little trick: before you flip the paper over, mark four 4.5cm circles on the back of each sheet as guides for piping your meringue — then place the paper with the marked side down so the circles won’t bake onto your pavlovas.
Step 2: Whip Your Meringue to Glossy Peaks
Using an electric mixer, beat your egg whites until soft peaks form—this usually takes a few minutes. Then, slowly add your caster sugar one tablespoon at a time. You’ll want to beat after each addition until the sugar fully dissolves (no graininess!) and the meringue turns glossy and thick. That sheen means your pavlovas will have the perfect texture. Once smooth, fold in the vinegar and cornflour; these help create that signature pavlova texture that’s crispy on the outside and marshmallowy inside.
Step 3: Pipe Your Mini Trees with Care
This part is where the fun begins. Scoop a quarter of your mixture into a piping bag with a 1cm plain nozzle and pipe little mounds onto the circles you’ve marked on your paper — these form the base of your trees. Next, switch to a piping bag with a 0.5cm fluted nozzle for the tree layers. Starting from the base of each mound, pipe three rows of small vertical layers to build a lovely tree shape. This piping step took me a couple of tries to get consistent, but once you’re rolling, it’s pretty addictive!
Step 4: Bake Slowly and Cool Gradually
Bake your tiny pavlova trees for 50 minutes to an hour. The goal: crisp edges that are pale, not browned. Once the timer’s up, turn off the oven but leave the door slightly ajar and let the pavlovas cool inside. This slow cooling helps prevent cracks and keeps the texture spot-on. I usually do this while prepping the cream topping—talk about multitasking!
Step 5: Prepare Pistachios and Whipped Cream
While your pavlovas cool, blitz the pistachios in a food processor until they’re finely crumbed. Then, with your electric mixer, whip the thickened cream together with icing sugar and rosewater until you get just-firm peaks. The rosewater adds a lovely festive floral note but don’t worry—it’s really subtle. If you’re not sure you’ll like it, start with half a teaspoon.
Step 6: Decorate Your Mini Pavlova Christmas Trees
Pop a quarter of your whipped cream into a small plain nozzle piping bag and pipe tiny rounds onto each meringue tree — this acts like glue for your silver cachous and other decorations. Next, sprinkle on the pistachio crumbs, scatter raspberries, dust freeze-dried raspberry powder, and add those sparkling silver cachous for that icy, magical effect. Serve with fresh strawberries and a dollop of the remaining cream on the side.
Pro Tips for Making Mini Pavlova Christmas Trees Recipe
- Room Temperature Matters: I used to rush straight to whipping cold egg whites, and the volume just wasn’t there. Bringing them to room temp really lifts the meringue.
- Sugar Addition Pace: Adding sugar slowly is key—dumping it all at once makes the meringue grainy instead of smooth and glossy.
- Low and Slow Baking: Don’t rush the oven temperature; 100°C fan-forced lets your pavlovas dry out perfectly for that melt-in-your-mouth texture.
- Cooling Technique: Cooling the meringues inside the turned-off oven helps avoid cracks and makes your pavlovas last longer without crumbling.
How to Serve Mini Pavlova Christmas Trees Recipe
Garnishes
I really adore using silver cachous and fresh raspberries to create that wintry sparkle and pop of color on these mini pavlova trees. The freeze-dried raspberry powder is my secret weapon—it adds a subtle fruity tang and a beautiful rosy dusting that makes each tree look extra magical. Plus, the crushed pistachios bring in a little green crunch that feels so festive.
Side Dishes
Since these are mini desserts, I like pairing them with other light holiday treats like gingerbread cookies or a refreshing citrus salad to balance the sweetness. Sometimes, I serve them alongside a rich Christmas pudding for a diverse festive spread.
Creative Ways to Present
For special Christmas parties, I’ve arranged these mini pavlova trees on a large platter lined with fresh pine branches and sprinkled edible glitter for that snowy effect. Another time, I served each tree in individual mini glass bowls with a spoonful of berry compote underneath — it made the presentation so charming and easy to serve at buffet-style gatherings.
Make Ahead and Storage
Storing Leftovers
If you happen to have leftovers, which is rare in my house, store the pavlova trees separately from the cream in an airtight container at room temperature for up to 1-2 days. They tend to soften in the fridge because of moisture, so keep them dry until just before serving.
Freezing
I’ve tried freezing the meringue bases on their own wrapped well in foil and sealed in a bag. They keep great for a few weeks, which lets you prep ahead. Just thaw them at room temperature before adding cream and decorations.
Reheating
Meringues are best enjoyed fresh or at room temperature, so I avoid reheating. If you need to crisp them up a bit, a few minutes in a low oven (around 90°C) can help, but watch carefully to avoid browning.
FAQs
-
Can I use regular sugar instead of caster sugar for the Mini Pavlova Christmas Trees Recipe?
While caster sugar is preferred because its fine texture dissolves quickly and easily into the egg whites, you can use granulated sugar if you don’t have caster sugar on hand. Just pulse the granulated sugar in a blender or food processor briefly to break it down before adding it in gradually to avoid grainy meringue.
-
What if my meringue cracks while baking?
Cracking usually happens if the oven temperature is too high or the pavlova cools too quickly. Make sure to bake at a low temperature and leave the meringues cooling inside the oven with the door ajar to prevent sudden temperature changes.
-
Can I make the meringue base a day ahead?
Absolutely! You can prepare and bake the meringue bases the day before your event. Store them in an airtight container at room temperature. Wait to whip and pipe the cream and add decorations just before serving to keep everything fresh.
-
How do I pipe the tree layers neatly?
Take your time and pipe slowly in small vertical layers starting at the base of your meringue mound. If you’re new to piping, practice on parchment paper first to get comfortable with the pressure and motion. A small fluted nozzle really helps create that classic tree texture.
-
Is rosewater necessary in the recipe?
Rosewater adds a subtle, festive floral note but isn’t essential. If you or your guests aren’t fans, you can leave it out or swap it for vanilla extract without losing the pavlova’s delightful flavor balance.
Final Thoughts
I absolutely love how this Mini Pavlova Christmas Trees Recipe has brightened up my holiday celebrations every year — it’s become a beloved tradition in my kitchen. It’s one of those recipes that looks like you put in way more effort than you actually did, which, let’s be honest, we all need around the busy festive season! I hope you’ll give it a go and enjoy making (and eating) these cute little pavlova trees as much as I do. From my kitchen to yours, happy baking and merry Christmas!
Print
Mini Pavlova Christmas Trees Recipe
- Prep Time: 20 minutes
- Cook Time: 1 hour
- Total Time: 1 hour 20 minutes
- Yield: 8 servings
- Category: Dessert
- Method: Baking
- Cuisine: Western, Australian
- Diet: Vegetarian
Description
These Mini Pavlova Christmas Trees are a festive and delightful dessert perfect for holiday celebrations. Light and crispy meringue bases are shaped into charming mini Christmas trees, topped with whipped cream, silver cachous, fresh raspberries, pistachio crumbs, and a dusting of freeze-dried raspberry powder for a visually stunning and delicious treat.
Ingredients
Meringue
- 6 free-range egg whites, at room temperature
- 1 1/2 cups caster sugar
- 1 tsp white vinegar
- 3 tsp cornflour
Decoration
- 1/4 cup Sunbeam Australian Pistachios
- 300ml thickened cream
- 1 tsp pure icing sugar
- 1 tsp rosewater
- Silver cachous
- Raspberries
- Freeze-dried raspberry powder
- Strawberries, to serve
Instructions
- Preheat and prepare trays: Preheat your oven to 100°C fan-forced (120°C conventional). Grease two large oven trays and place two sheets of baking paper on them. On each baking paper, mark four 4.5cm circles, spacing them evenly. Place the sheets on the trays with the marked side facing down.
- Beat egg whites and add sugar: Using an electric mixer, whisk the egg whites until soft peaks form. Gradually add caster sugar, one tablespoon at a time, ensuring each addition dissolves completely before adding the next. Then add the white vinegar and cornflour, beating until the mixture is combined and glossy.
- Pipe meringue shapes: Transfer a quarter of the meringue mixture into a large piping bag fitted with a 1cm plain nozzle. Pipe small mounds onto the circles on the prepared trays as bases for the trees. Place the remaining meringue into a separate piping bag fitted with a 0.5cm fluted nozzle.
- Create tree layers: Starting at the base of each small mound, pipe three rows of small vertical layers around each to build up a Christmas tree shape. Make sure the layers are even to resemble tree branches.
- Bake and cool meringues: Bake the meringue trees in the preheated oven for 50 minutes to 1 hour until the edges are crisp but not browned. Turn off the oven and allow the meringues to cool inside with the oven door slightly ajar.
- Prepare pistachio crumbs: Pulse the pistachios in a small food processor until finely crumbled. Set aside for decoration.
- Whip cream: Beat the thickened cream with icing sugar and rosewater using an electric mixer until just-firm peaks form. Transfer a quarter of the cream into a piping bag fitted with a small plain nozzle.
- Assemble and decorate: Pipe little rounds of cream onto the meringue trees to act as glue for the decorations. Decorate with silver cachous, fresh raspberries, and a sprinkle of freeze-dried raspberry powder. Finally, sprinkle with pistachio crumbs and serve alongside fresh strawberries and the remaining whipped cream.
Notes
- Ensure egg whites are at room temperature for better volume and stability.
- Pipe the meringue carefully to create even layers for an attractive tree shape.
- Cooling meringues slowly in the turned-off oven helps prevent cracks and ensures crisp texture.
- This recipe serves 8 and can be prepared a day ahead; store in an airtight container.
- Use fresh and good-quality ingredients, especially for the cream and pistachios, for best flavor.
Nutrition
- Serving Size: 1 mini pavlova tree
- Calories: 210 kcal
- Sugar: 24 g
- Sodium: 30 mg
- Fat: 8 g
- Saturated Fat: 5 g
- Unsaturated Fat: 3 g
- Trans Fat: 0 g
- Carbohydrates: 28 g
- Fiber: 1.5 g
- Protein: 3 g
- Cholesterol: 35 mg
