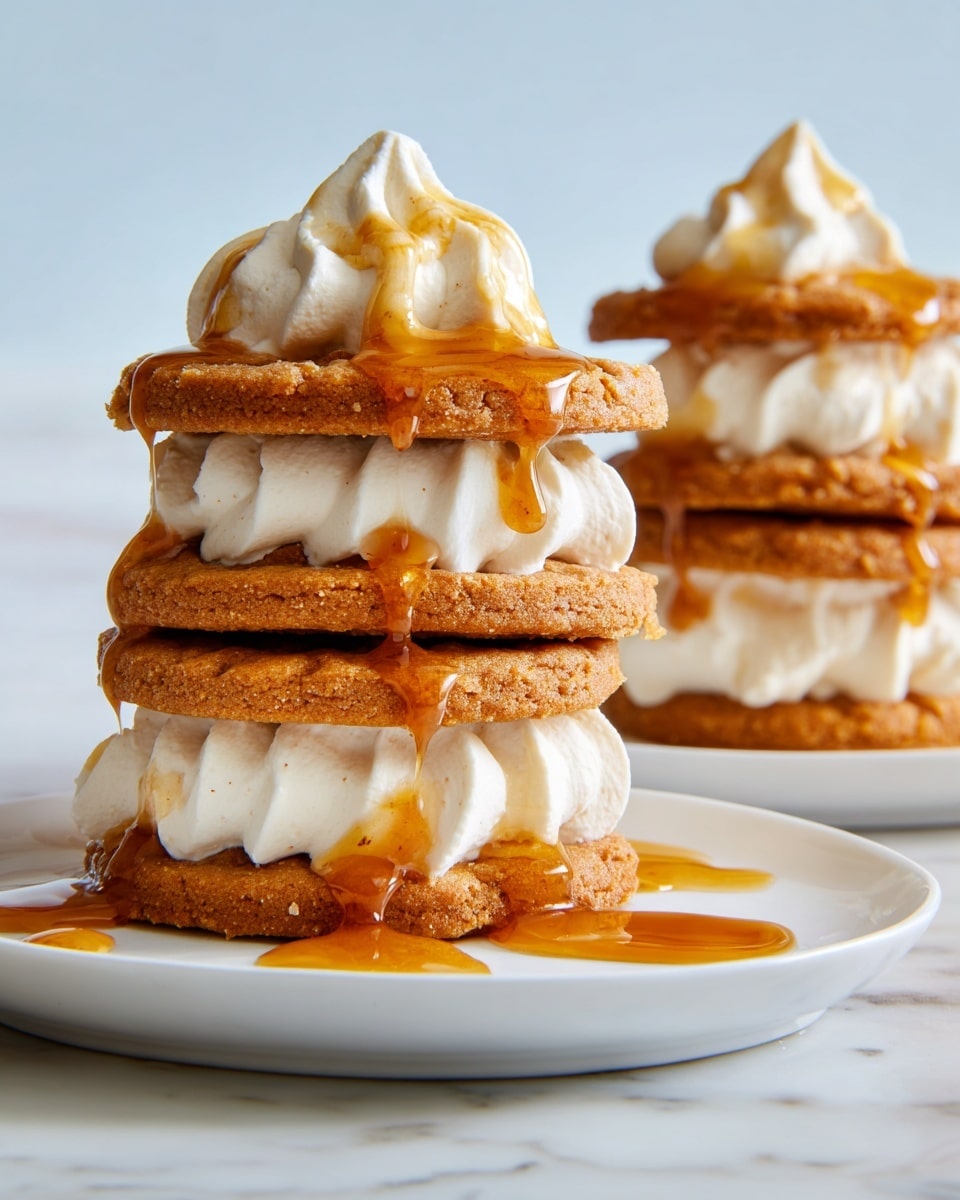
If you adore cozy, spiced desserts that come together without turning on the oven, you’re going to flip for this Mini No-Bake Gingerbread Icebox Cakes Recipe. I absolutely love how these little treats balance the snap of gingersnap cookies with a luscious, whipped cream and caramel filling. They’re elegant, festive, and so easy that I always keep the ingredients on hand when unexpected guests drop by or when I want a no-fuss holiday dessert. Trust me, once you try them, you’ll be making these over and over!
Why You’ll Love This Recipe
- No Oven Needed: Perfect for when you want an easy dessert with minimal effort and no heat.
- Festive Flavors: The gingerbread and pumpkin spice combo taste like holiday magic in every bite.
- Impressively Elegant: Mini cakes look fancy but come together surprisingly fast.
- Flexible & Fun: You can tweak the spices or toppings easily to suit your mood or occasion.

Ingredients You’ll Need
The magic of this Mini No-Bake Gingerbread Icebox Cakes Recipe lies in the harmonious combo of smooth cream cheese, sweet caramel, and the snap of spicy gingersnap cookies. Each ingredient plays a crucial role in getting that perfect texture and flavor, so try to use fresh, quality staples for best results.
- Cream Cheese: Softened cream cheese adds a rich, tangy base that balances sweet flavors beautifully.
- Confectioners’ Sugar: Powdered sugar blends smoothly into the cream cheese for a silky filling.
- Caramel or Dulce de Leche: This adds irresistible sweetness and a touch of decadence—don’t skimp here!
- Pumpkin Pie or Gingerbread Spice Blend: Gives the filling its seasonal warmth and cozy aroma.
- Heavy Whipping Cream: Cold cream whips to light, fluffy peaks to create that airy texture in the filling.
- Thin Gingersnap Cookies: The key crunchy element; make sure they’re thin so they soften perfectly in the fridge.
- Piping Bag with Star Tip: For that professional, pretty swirl that finishes off each mini cake.
Variations
When I first made this Mini No-Bake Gingerbread Icebox Cakes Recipe, I stuck close to the original but since then I’ve played around with it a lot. Feel free to make it your own by switching up spices or toppings.
- Spice it Up: Adding a pinch of cayenne or ground cloves can really deepen the gingerbread flavor—my family swears by it!
- Dairy-Free Version: I once swapped cream cheese and heavy cream for coconut cream and vegan cream cheese, and it turned out surprisingly creamy and delicious.
- Chocolate Drizzle: For a winter twist, drizzle melted dark chocolate instead of caramel. It’s a favorite hack in my house now.
- Mini Tart Version: I’ve also spooned the filling into mini tart shells and layered cookie crumbs on top for a fun change of pace.
How to Make Mini No-Bake Gingerbread Icebox Cakes Recipe
Step 1: Whip Up the Creamy Filling
In the bowl of your stand mixer fitted with a whisk attachment, beat together the softened cream cheese, confectioners’ sugar, caramel (or dulce de leche), and pumpkin pie spice on medium speed until everything is smooth, about 2 minutes. This blending step is crucial for a silky, well-incorporated filling. Then, with the mixer still running, slowly add the cold heavy cream and keep whisking until medium peaks form—about 3 minutes. You’ll know it’s ready when the cream holds soft peaks but still looks fluffy and luscious. I’ve found that chilling your mixing bowl beforehand can help the cream whip up faster and fluffier.
Step 2: Build Your Mini Gingerbread Icebox Cakes
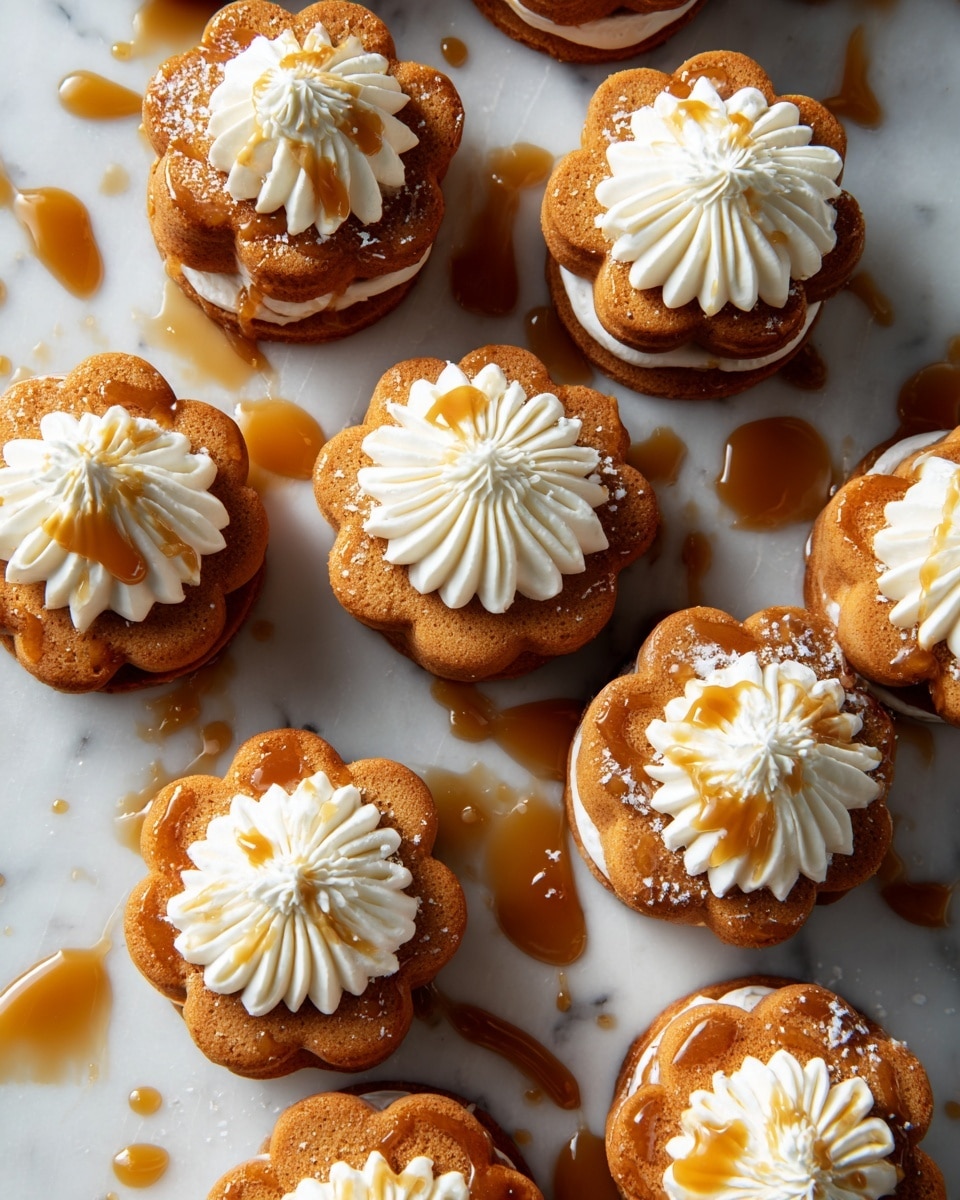
Line up 12 gingersnap cookies on a baking sheet or platter. Using a piping bag fitted with your star tip, pipe a generous zigzag layer of the creamy filling onto each cookie. Then, gently press a second cookie on top to make a sandwich, and pipe more filling on that layer. Repeat layering two more times, so you have five cookies stacked on each mini cake. The stacking gives you that perfect balance of crunchy cookie and creamy filling—trust me on this one! Finish each cake with a big rosette or multiple mini rosettes piped on top for a gorgeous, inviting finish.
Step 3: Chill and Soften for Perfection
Pop the cakes in the refrigerator and chill them until the cream sets, about one hour. Then loosely cover with plastic wrap and let them chill at least another three hours, or ideally overnight. This extra time lets the gingersnap cookies absorb moisture, softening nicely without losing their shape or flavor. When I first tried letting them sit only an hour, the cookies were still too crunchy—so definitely don’t skip this step if you want that melt-in-your-mouth texture!
Step 4: Add the Finishing Caramel Drizzle
Right before serving, drizzle a little more caramel sauce over the tops of the mini cakes. This adds a sticky sweetness that contrasts beautifully with the spices and cream. I like to use jarred caramel for convenience, but if you have homemade dulce de leche, even better—it elevates the flavor to the next level.
Pro Tips for Making Mini No-Bake Gingerbread Icebox Cakes Recipe
- Chill Your Tools: Cooling your mixing bowl and beaters beforehand helps the whipped cream whip up much faster and keeps it stable longer.
- Don’t Skip the Long Chill: I used to be impatient and shortchange the chilling time but the texture was always off—now I always give it at least 3 hours, preferably overnight.
- Cookie Choice Matters: Thin gingersnap cookies soften best without becoming mushy, so choose thinner ones over thick, crunchy varieties.
- Piping Bag Control: If you don’t have a piping bag with a star tip, you can use a zip-top bag with a corner snipped off, but the star tip really makes those rosettes pop!
How to Serve Mini No-Bake Gingerbread Icebox Cakes Recipe
Garnishes
I like to keep garnishes simple so the cake shines—extra caramel drizzle is a must, of course! Sometimes I sprinkle a tiny pinch of flaky sea salt on top to contrast the sweetness. For a festive touch, chopped toasted pecans or candied ginger bits work wonderfully and add texture. Fresh cranberries or a dusting of cinnamon sugar also make these mini cakes party-ready.
Side Dishes
These mini cakes are the star of the show on their own, but I love serving them alongside hot mulled cider or spiced coffee to amplify those cozy holiday vibes. A scoop of vanilla bean ice cream or a dollop of spiced whipped cream is also a lovely pairing if you’re indulging in dessert spreads.
Creative Ways to Present
For parties, I’ve served these mini icebox cakes on pretty tiered trays or nestled inside festive cupcake liners for an easy grab-and-go treat. Another fun idea is layering several mini cakes inside clear mason jars tied with ribbon—it makes a fantastic gift or holiday hostess surprise!
Make Ahead and Storage
Storing Leftovers
Once chilled, these mini gingerbread icebox cakes keep beautifully covered in the fridge for up to 3 days. I recommend storing them in an airtight container to avoid soaking up any fridge odors or drying out. When I’ve saved leftovers, the texture stays spot on—not too soft, not too crunchy.
Freezing
I’ve tried freezing these cakes wrapped tightly in plastic wrap and then placed inside a freezer bag. While freezing is possible, I’ve noticed the texture softens a bit after thawing, so I prefer enjoying these fresh or within a couple days of making them if you want that perfect balance of cream and cookie.
Reheating
Since these cakes are best served chilled, reheating isn’t really needed. If you prefer them less cold, just take them out of the fridge 15 minutes before serving. This brings out the flavors perfectly without losing that creamy, dreamy texture.
FAQs
-
Can I make the Mini No-Bake Gingerbread Icebox Cakes Recipe ahead of time?
Absolutely! This recipe actually improves with time since the cookies soften and absorb the creamy filling. It’s best to assemble at least 3 hours before serving, but overnight chilling works great too.
-
What if I don’t have a piping bag or star tip?
No worries—you can use a sturdy zip-top bag and snip off one corner to pipe the cream filling. While the decorative rosettes won’t be as defined, the cakes will still taste amazing!
-
Can I use other cookies instead of gingersnaps?
Yes! While the classic gingersnap flavor is best here, thin shortbread or cinnamon wafers can also work. Just make sure the cookies aren’t too thick or they won’t soften well.
-
Is it possible to make this recipe dairy-free?
Definitely. Substitute cream cheese with vegan cream cheese and use coconut cream instead of heavy whipping cream. The texture will be slightly different but still delicious and creamy.
Final Thoughts
This Mini No-Bake Gingerbread Icebox Cakes Recipe has become a go-to dessert whenever I want something special without the fuss of baking. I appreciate that it comes together quickly but tastes like you put in hours of effort. If you love the cozy flavors of the holidays paired with a creamy, elegant dessert, I can’t recommend this enough. Give it a try—you’ll be amazed at how such a simple recipe can bring such joy (and compliments) around your table.
Print
Mini No-Bake Gingerbread Icebox Cakes Recipe
- Prep Time: 20 minutes
- Cook Time: 0 minutes
- Total Time: 4 hours 25 minutes
- Yield: 12 servings
- Category: Dessert
- Method: No-Cook
- Cuisine: American
- Diet: Vegetarian
Description
These Mini No-Bake Gingerbread Icebox Cakes are a delightful holiday treat featuring layers of thin gingersnap cookies and a creamy, spiced filling made from cream cheese, caramel, and whipped cream. Easy to assemble and requiring no baking, these individual cakes are perfect for festive gatherings or a cozy dessert, offering a soft, melt-in-your-mouth texture after chilling.
Ingredients
Filling
- 4 oz. cream cheese, softened
- 2 tbsp. confectioners’ sugar
- 2 tbsp. jarred caramel or dulce de leche, plus more for drizzling
- 1/4 tsp. pumpkin pie or gingerbread spice blend
- 1 1/2 cups cold heavy whipping cream
Cake Assembly
- 2 (5.25-oz.) boxes thin gingersnap cookies (about 60 cookies total)
- A large piping bag with an open star or French star tip (between 3/4″ and 1/2″ in diameter)
Instructions
- Prepare the filling: In the large bowl of a stand mixer fitted with the whisk attachment, beat the softened cream cheese, confectioners’ sugar, caramel sauce, and pumpkin pie spice on medium speed until smooth, about 2 minutes. Gradually add the cold heavy whipping cream and continue beating on medium speed until medium peaks form, about 3 minutes. Transfer the cream mixture to a piping bag fitted with the star tip.
- Assemble the cakes: On a baking sheet, arrange 12 thin gingersnap cookies. Pipe a layer of the cream filling on each cookie in a zigzag motion. Top each with a second cookie, gently pressing down, then pipe on more cream. Repeat this layering 2 more times, ending with a fifth cookie on top. Pipe a large rosette or several mini rosettes on the top cookie for decoration.
- Chill the cakes: Refrigerate the assembled cakes until the cream filling has set, about 1 hour. Then, loosely cover the cakes with plastic wrap and refrigerate until the cookies have softened significantly, at least 3 hours and up to overnight for best texture.
- Serve: Right before serving, drizzle the cakes with additional caramel sauce.
Notes
- These mini icebox cakes are perfect for preparing ahead of time, allowing the cookies to soften and meld with the creamy filling.
- Use thin gingersnap cookies for the best texture; thicker cookies will not soften as well.
- You can substitute pumpkin pie spice with gingerbread spice for deeper holiday flavors.
- Feel free to swap caramel with dulce de leche or even a butterscotch sauce if desired.
- Store leftover cakes covered in the refrigerator for up to 2 days.
Nutrition
- Serving Size: 1 mini cake
- Calories: 270
- Sugar: 18g
- Sodium: 110mg
- Fat: 18g
- Saturated Fat: 11g
- Unsaturated Fat: 5g
- Trans Fat: 0g
- Carbohydrates: 23g
- Fiber: 1g
- Protein: 3g
- Cholesterol: 65mg

