
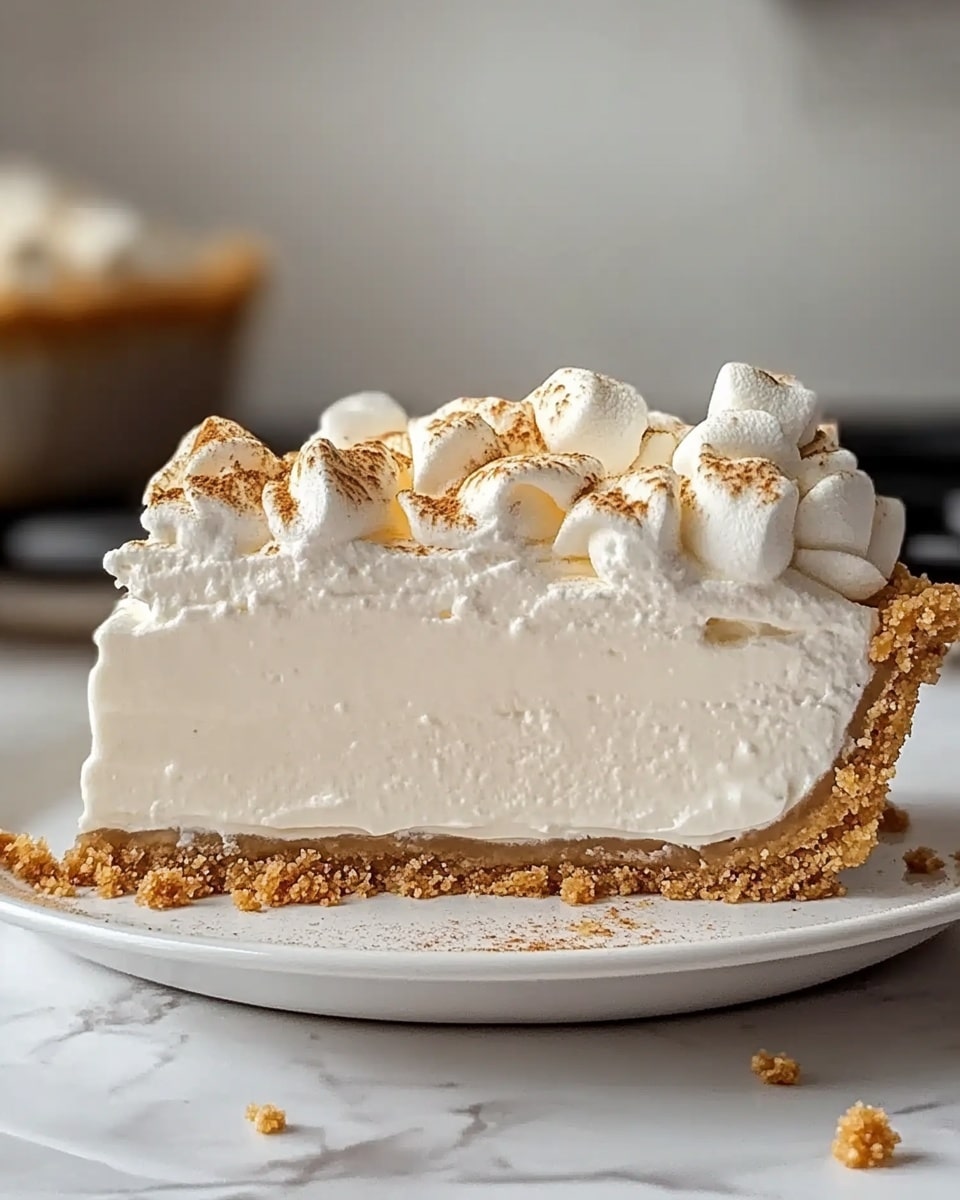
I absolutely love this Marshmallow Whip Cheesecake: No-Bake Dream Dessert Recipe because it’s such a fun twist on classic cheesecake that’s super light, fluffy, and perfectly sweetened with marshmallow fluff. It’s one of those recipes that instantly becomes a crowd-pleaser at gatherings, especially when you want a dessert that feels indulgent but doesn’t require turning on your oven on a hot day.
When I first tried this recipe, I was amazed at how effortlessly the creamy filling melded with the crunchy graham cracker crust, creating that dreamy texture everyone loves. You’ll find that the no-bake aspect not only saves time but also makes it incredibly easy to customize with your favorite toppings or mix-ins. Trust me, once you make this Marshmallow Whip Cheesecake: No-Bake Dream Dessert Recipe, you’ll be reaching for it again and again!
Why You’ll Love This Recipe
- No-Bake Convenience: Skip the oven and enjoy a creamy dessert that comes together quickly and chills to perfection.
- Fluffy, Light Texture: The marshmallow fluff and whipped topping create a cloud-like filling that’s easy to slice and serve.
- Versatile and Customizable: This cheesecake is a great base to add your favorite flavors or toppings for endless variations.
- Family Favorite: My kids and friends always ask for seconds, making it perfect for celebrations big or small.

Ingredients You’ll Need
The ingredients for this Marshmallow Whip Cheesecake: No-Bake Dream Dessert Recipe come together with ease, and each one plays an essential role in the perfect texture and flavor. I recommend picking good-quality cream cheese and fresh ingredients for the best results.
- Graham cracker crumbs: Use finely crushed crumbs to create a solid, tasty crust; homemade or store-bought both work.
- Granulated sugar: Adds just the right amount of sweetness to balance the tartness of the cream cheese.
- Unsalted butter: Melted to bind the crust crumbs and sugar together; unsalted allows better control over saltiness.
- Cream cheese: Make sure it’s softened to room temperature for a smooth, lump-free filling.
- Marshmallow fluff: The secret that brings sweetness and that signature marshmallow flavor along with lightness.
- Vanilla extract: A splash of vanilla enhances all the flavors and adds warmth.
- Whipped topping (like Cool Whip): Adds extra fluff and airiness to the filling, helping it set perfectly without baking.
Variations
I love playing around with this Marshmallow Whip Cheesecake: No-Bake Dream Dessert Recipe to suit different occasions or taste buds. Feel free to swap out flavors or add fun mix-ins — it’s a great way to make this recipe truly your own.
- Citrus twist: I often add a teaspoon of fresh lemon zest for a bright, refreshing flavor that cuts through the sweetness beautifully.
- Berry swirl: Before chilling, gently fold in some raspberry or strawberry jam to give the cheesecake a lovely fruity ripple — my family goes crazy for this version!
- Chocolate Delight: Swap the graham cracker crust for crushed Oreos or add a drizzle of melted chocolate over the top for an extra indulgence.
- Mini portions: I use muffin tins and cupcake liners to create individual cheesecakes for parties — so cute and perfect for grab-and-go desserts.
How to Make Marshmallow Whip Cheesecake: No-Bake Dream Dessert Recipe
Step 1: Create the Perfect Graham Cracker Crust
Start by mixing your graham cracker crumbs with sugar, then stir in the melted butter until everything is nicely combined and looks a bit like wet sand. Press this mixture firmly and evenly into the bottom of a 9-inch springform pan—don’t skip pressing hard enough because this helps your crust hold together when you slice. Pop it in the fridge while you prep the filling to let it firm up.
Step 2: Whip Up the Marshmallow Cheesecake Filling
Grab a large mixing bowl and beat the softened cream cheese until it’s really smooth and fluffy — this step makes a world of difference in texture! Then, add the marshmallow fluff and vanilla extract and beat again until well incorporated. Finally, gently fold in the whipped topping, taking care not to deflate the mixture, which keeps your cheesecake wonderfully airy.
Step 3: Assemble and Chill Your Dream Dessert
Spread the creamy filling over your chilled crust, smoothing the top with a spatula for an even finish. Cover the pan tightly with plastic wrap and refrigerate for at least 4 hours, but preferably overnight—this gives it time to set nicely so you can slice perfect pieces that hold their shape.
Step 4: Add Toppings and Serve
When you’re ready to serve, customize with fresh berries, mini marshmallows, a drizzle of chocolate, or crushed graham crackers — whatever makes you happy! Removing the springform ring carefully will reveal your beautiful cheesecake, ready to wow your guests or family.
Pro Tips for Making Marshmallow Whip Cheesecake: No-Bake Dream Dessert Recipe
- Softening Cream Cheese: I always let my cream cheese sit at room temp for at least 30 minutes—it blends so much easier and results in a smoother filling.
- Folding Technique: Instead of vigorous mixing, gently fold in the whipped topping with a spatula to keep the texture airy and light.
- Pressing the Crust: Using the bottom of a glass helps press the crust firmly and evenly, preventing crumbly slices later.
- Chill Time: Be patient! The longer you let it set, the better it holds — at least 4 hours, but overnight is ideal.
How to Serve Marshmallow Whip Cheesecake: No-Bake Dream Dessert Recipe
Garnishes
Personally, I like garnishing with fresh strawberries or blueberries for a pop of color and a fresh contrast to the sweet filling. Mini marshmallows add whimsical texture, and a drizzle of melted chocolate takes this dessert over the top for celebrations or special dinners.
Side Dishes
This cheesecake pairs wonderfully with a light cup of coffee or hot tea, making a simple afternoon treat. For a summer party, I enjoy serving it alongside a fresh fruit salad or even a scoop of vanilla ice cream to complement the creamy texture.
Creative Ways to Present
When I want to impress guests, I make mini versions in clear glasses or dessert jars, layering extra marshmallows and crushed graham crackers between layers of filling. It’s Instagram-worthy and reduces clean-up, plus everyone loves a personal-sized treat!
Make Ahead and Storage
Storing Leftovers
If you have leftovers, simply cover the cheesecake tightly with plastic wrap or store it in an airtight container and keep it refrigerated—it stays fresh for up to 3 days. I’ve found that the texture remains just as fluffy and delicious the next day.
Freezing
While I don’t often freeze this cheesecake because it’s so quick and easy to make fresh, you can freeze it if needed. Wrap tightly in plastic and foil, and thaw slowly in the fridge overnight before serving to keep the texture intact.
Reheating
This cheesecake is best served cold, so reheating typically isn’t needed. If you prefer a softer slice, let it sit at room temperature for 10-15 minutes before serving—it softens slightly while maintaining that delightful mousse-like texture.
FAQs
-
Can I use regular marshmallows instead of marshmallow fluff in this recipe?
Great question! Marshmallow fluff has a specially whipped texture that keeps the filling light and smooth. You could melt regular marshmallows with a bit of corn syrup or water and cool before mixing, but it’s a bit more work and could affect the texture. I recommend using marshmallow fluff for the best results.
-
How long should I chill the Marshmallow Whip Cheesecake before serving?
Ideally, chill the cheesecake for at least 4 hours so it sets properly and slices neatly. Overnight chilling works even better and is what I usually do to make sure the flavors meld perfectly and the texture is just right.
-
Can I make this cheesecake gluten-free?
Absolutely! Simply swap the graham cracker crumbs for gluten-free graham crumbs or use gluten-free cookies of your choice for the crust. The filling is naturally gluten-free, so this is a quick swap to keep everyone happy.
-
What if I don’t have a springform pan?
No worries! You can use a regular cake pan or pie dish, just be careful when slicing since you won’t be able to remove the sides like the springform pan. If slicing is tricky, chill longer or even freeze for a little while before serving for firmer slices.
Final Thoughts
This Marshmallow Whip Cheesecake: No-Bake Dream Dessert Recipe holds a special place in my heart because it’s the perfect combination of ease, beauty, and delicious flavor that everyone seems to love. Whether you’re making it for a family dinner, party, or just because you want something sweet without fuss, it’s a total winner. I hope you give it a try soon and enjoy every fluffy, creamy bite just like I do!
Print
Marshmallow Whip Cheesecake: No-Bake Dream Dessert Recipe
- Prep Time: 20 minutes
- Cook Time: 0 minutes
- Total Time: 4 hours 20 minutes
- Yield: 10 slices
- Category: Dessert
- Method: No-Cook
- Cuisine: American
- Diet: Vegetarian
Description
A light and fluffy no-bake Marshmallow Whip Cheesecake featuring a crunchy graham cracker crust and a creamy filling made with cream cheese, marshmallow fluff, and whipped topping. Perfectly chilled and topped with fresh berries, mini marshmallows, or chocolate for a dreamy dessert experience.
Ingredients
For the Graham Cracker Crust:
- 1 1/2 cups graham cracker crumbs
- 1/3 cup granulated sugar
- 1/2 cup (1 stick) unsalted butter, melted
For the Cheesecake Filling:
- 16 oz cream cheese, softened
- 7 oz marshmallow fluff (1 jar)
- 1 tsp vanilla extract
- 1 container (8 oz) whipped topping (like Cool Whip), thawed
Optional Toppings:
- Fresh berries
- Mini marshmallows
- Chocolate shavings or drizzle
- Crushed graham crackers
Instructions
- Make the Crust: In a medium bowl, mix graham cracker crumbs and sugar. Stir in the melted butter until well combined. Press the mixture firmly into the bottom of a 9-inch springform pan. Chill in the fridge while preparing the filling.
- Prepare the Filling: In a large mixing bowl, beat the cream cheese until smooth and fluffy. Add marshmallow fluff and vanilla extract, mixing until well combined and creamy. Gently fold in the whipped topping until the mixture is light and airy.
- Assemble the Cheesecake: Spread the cheesecake mixture evenly over the chilled crust. Use a spatula to smooth the top. Cover with plastic wrap and refrigerate for at least 4 hours, preferably overnight, to set properly.
- Decorate and Serve: Before serving, add your choice of toppings such as fresh strawberries, mini marshmallows, or chocolate sauce drizzle. Carefully remove the springform ring, slice, and serve chilled for the best texture and flavor.
Notes
- Crust swaps: Try chocolate wafer cookies or crushed Oreos for a different base.
- Flavor twists: Add lemon zest to the filling for a citrusy note or swirl in raspberry jam before chilling.
- Make it mini: Use a muffin tin and cupcake liners to create individual cheesecakes.
Nutrition
- Serving Size: 1 slice (1/10th of cheesecake)
- Calories: 310 kcal
- Sugar: 15 g
- Sodium: 150 mg
- Fat: 22 g
- Saturated Fat: 13 g
- Unsaturated Fat: 7 g
- Trans Fat: 0 g
- Carbohydrates: 10 g
- Fiber: 0.5 g
- Protein: 4 g
- Cholesterol: 55 mg
