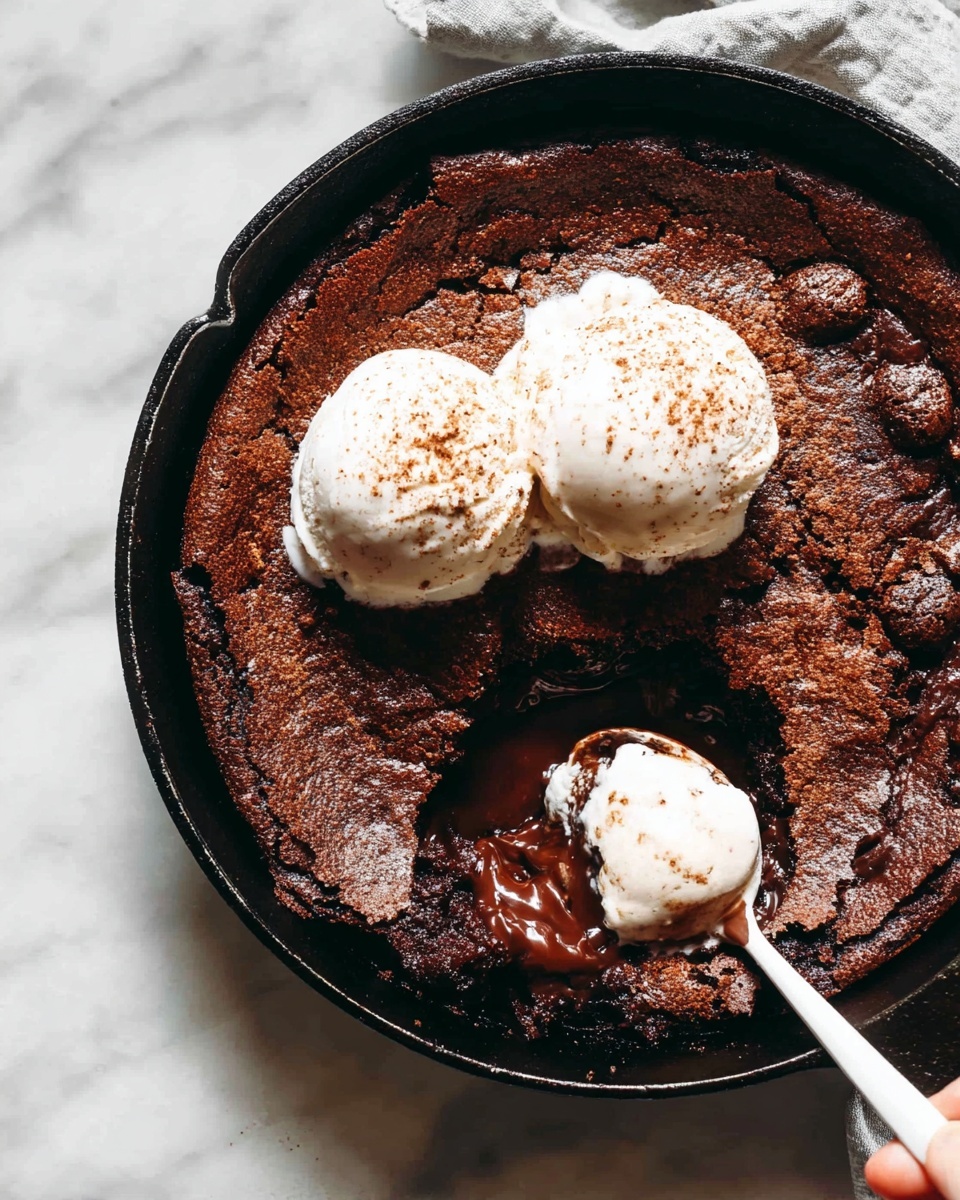
If you’re anything like me and have a soft spot for desserts that feel like a little bit of kitchen magic, then you are absolutely going to adore this Magic Chocolate Pudding Cake Recipe. Imagine a warm, fluffy chocolate cake with a luscious, gooey chocolate pudding layer hidden beneath it — that’s exactly what happens when you make this! It’s one of those recipes I turn to when I want something impressive but fuss-free, and I promise, once you try it, you’ll be hooked for life.
Why You’ll Love This Recipe
- Effortless Magic: You pour the ingredients, bake, and—voila—a pudding forms underneath a soft cake.
- Rich Chocolate Flavor: The combination of Dutch cocoa and instant coffee enhances depth without bitterness.
- Flexible and Friendly: Works great with gluten-free or plant-based substitutions.
- Family Favorite: My loved ones go crazy for this, making it my go-to dessert for gatherings.

Ingredients You’ll Need
All the ingredients you’ll need are pantry staples that come together beautifully to create contrasting textures and that unforgettable pudding layer. If you’re experimenting with plant-based milk or gluten-free flour, the results still stay wonderfully moist and decadent.
- All Purpose Flour (or gluten free baking flour): Provides the structure for the cake layer; gluten-free flour works well if you need it.
- Light Brown Sugar: Adds moisture and a subtle caramel note, essential for that rich pudding layer.
- Dutch Process Cocoa Powder: Gives a deep chocolate flavor; Dutch-processed is smoother and less acidic.
- Baking Powder: Leavens the cake for that perfect lightness.
- Instant Coffee Granules: Just a hint to boost the chocolate’s richness — you won’t taste coffee, promise!
- Salt: Balances the sweetness and intensifies the chocolate flavors.
- Milk (regular or plant-based): Moistens the batter; plant-based milk like almond or oat works great here.
- Unsalted Butter (or plant-based alternative): Adds richness and helps with the cake’s tender crumb.
- Vanilla Extract: Brings warmth and an inviting aroma to the cake.
- Granulated Sugar: Used on top to create that pudding layer when combined with boiling water.
- Boiling Hot Water: The final magic ingredient that triggers the pudding to form under the cake.
Variations
I love how versatile this Magic Chocolate Pudding Cake Recipe is. Depending on mood and dietary needs, you can easily tweak it to keep it cozy and crowd-pleasing. Don’t be shy to experiment a little!
- Vegan Version: I’ve swapped butter for coconut oil and used almond milk with great results — same fantastic pudding effect!
- Gluten-Free: Using a 1:1 gluten free baking flour mix works wonders; just make sure your baking powder is gluten-free as well.
- Extra Chocolate Intensity: Add a handful of mini chocolate chips to the batter for surprise pockets of melty chocolate.
- Spiced Chocolate: Mix in a pinch of cinnamon or chili powder for a subtle twist that wakes up the flavors.
How to Make Magic Chocolate Pudding Cake Recipe
Step 1: Preparing the Batter
Start by whisking together the dry ingredients—flour, brown sugar, cocoa powder, baking powder, instant coffee granules, and salt—in a large bowl. It helps to aerate everything and evenly distribute those flavors. In a separate bowl, mix the milk, melted butter, and vanilla extract. Then pour the wet ingredients into the dry ones and stir just until combined — don’t overmix! You’ll find the batter thick but smooth. This part is fun because you know the magic is about to happen.
Step 2: Assembling the Magic
Pour the batter into a buttered baking dish or cake pan. Here’s where it gets interesting: sprinkle granulated sugar evenly over the surface of the batter, then dutch-process cocoa powder on top of that. Lastly, immediately pour the boiling hot water over everything — don’t stir it in! This layering is what creates the pudding effect while baking. If you peek in the oven too early, you might worry, but trust the process.
Step 3: Baking and Cooling
Bake at 350°F (175°C) for around 30 minutes. The top will look like a soft cake, and the bottom will be the delicious pudding layer. I learned that letting the cake cool for about 10-15 minutes is key — it sets up the pudding without being lava-hot and perfect for digging in. You’ll find it’s easier to scoop, and all those textures shine.
Pro Tips for Making Magic Chocolate Pudding Cake Recipe
- Use Instant Coffee: This little trick really lifts the chocolate flavor without making it taste like coffee.
- Don’t Skip Sifting: Sifting cocoa and flour helps keep the batter clump-free and airy, which affects texture.
- Boiling Water Timing: Pour the boiling water immediately after layering sugar and cocoa to get the magic pudding.
- Avoid Stirring After Water: Stirring breaks the pudding formation; trust me, hands-off is best here.
How to Serve Magic Chocolate Pudding Cake Recipe
Garnishes
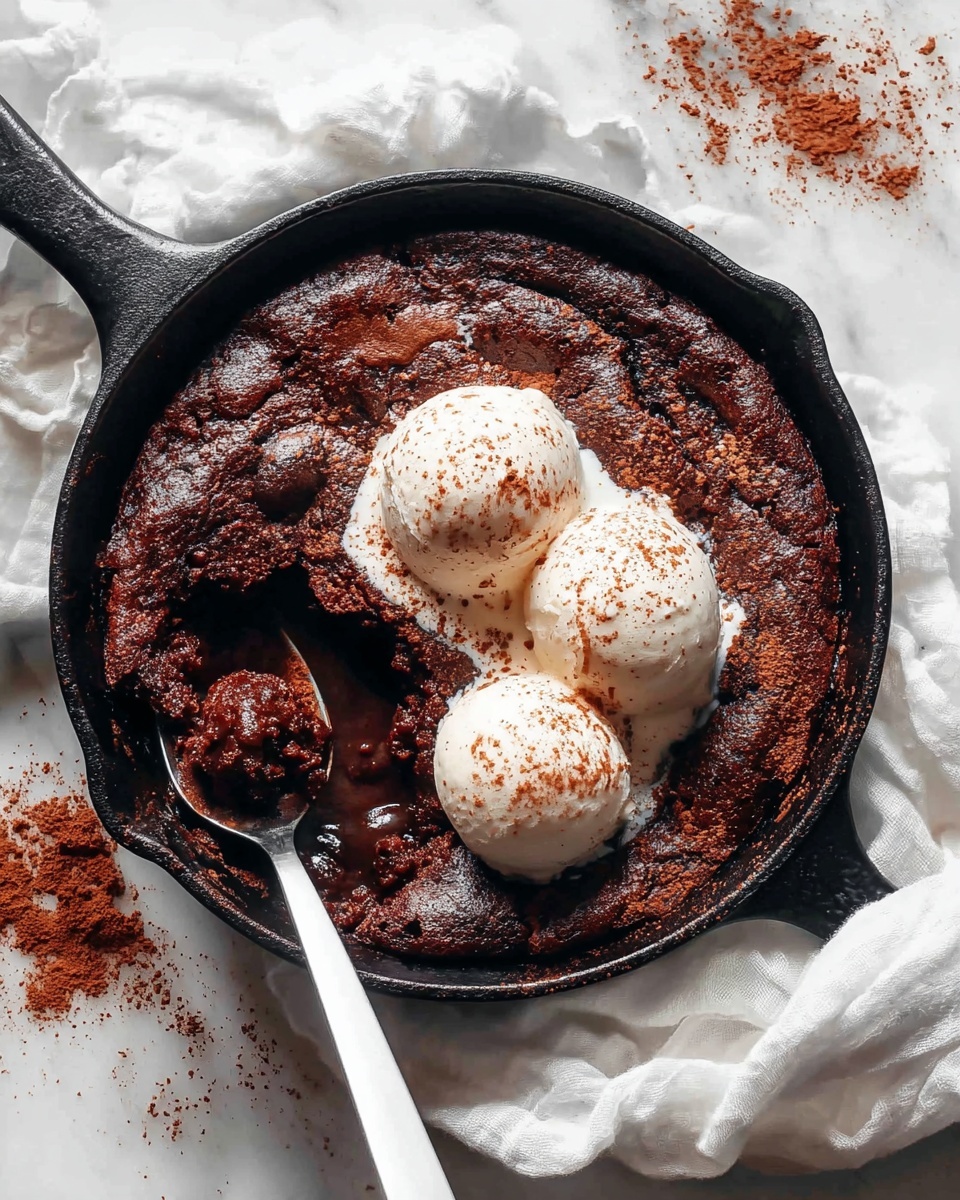
I love serving this with a big dollop of whipped cream or a scoop of vanilla ice cream — the temperature contrast is divine. A sprinkling of chopped toasted nuts or a few fresh mint leaves adds a lovely texture and freshness if you want to get fancy. For an easy everyday treat, a simple dusting of powdered sugar goes a long way.
Side Dishes
I often pair this with fresh berries or a fruit compote — the tartness cuts nicely through the rich chocolate pudding cake. If it’s cooler weather, a cup of rich coffee or spiced chai alongside this cake is pure comfort on a plate.
Creative Ways to Present
One of my favorite ways to present this for gatherings is to bake it right in a pretty ceramic baking dish and bring it to the table hot from the oven — it impresses everyone! Alternatively, for a more individual approach, try baking it in small ramekins for personal servings. Top each with a swirl of cream and a chocolate curl for that wow factor.
Make Ahead and Storage
Storing Leftovers
Store leftovers covered tightly with plastic wrap or in an airtight container in the fridge. I’ve found it stays beautifully moist and the pudding remains silky for 2-3 days. It’s an ideal make-ahead dessert for busy weeks.
Freezing
Freezing this cake works surprisingly well! I slice individual portions, wrap them tightly in plastic wrap and foil, then freeze. When you’re ready, thaw overnight in the fridge. The texture is still wonderfully pudding-like and tastes fresh.
Reheating
To reheat, I recommend warming in the microwave for about 20-30 seconds or in a 325°F (160°C) oven wrapped in foil until just warmed through. This preserves moisture and keeps that gooey pudding layer intact — no rubbery cake here!
FAQs
-
Can I make the Magic Chocolate Pudding Cake Recipe gluten-free?
Absolutely! Substitute the all-purpose flour with a gluten-free baking flour blend (make sure it contains xanthan gum or similar binder). The texture and taste will remain just as delicious, and the pudding effect stays perfect.
-
Why do we use boiling water on top of the batter?
Pouring boiling water over the sugar and cocoa spreads the sugar through the batter as it bakes and melts into a decadent pudding layer underneath the cake. This is the key to that “magic” transformation you’ll love.
-
Can I make this recipe vegan?
Yes! Use plant-based milk like almond or oat, and swap the butter with coconut oil or vegan butter. The results are just as heavenly, and the pudding cake is still rich and comforting.
-
How do I know when the cake is done baking?
The top of the cake should be set and spring back lightly when pressed. Be careful not to overbake—the pudding layer relies on a moist cake top, so baking for about 30 minutes is usually perfect.
-
Can I add mix-ins like nuts or chocolate chips?
Definitely! I often toss in mini chocolate chips or chopped nuts into the batter before baking for extra texture and flavor. Just fold them in gently to keep the batter light.
Final Thoughts
I absolutely love how this Magic Chocolate Pudding Cake Recipe feels like a little kitchen secret — something every home baker should have tucked away. It’s straightforward enough to whip up on a weeknight but special enough to grace any dessert table. Every time I serve it, I get amazed looks and happy smiles, and really, isn’t that what cooking’s all about? So go ahead, try it yourself, and share the magic with the people you love.