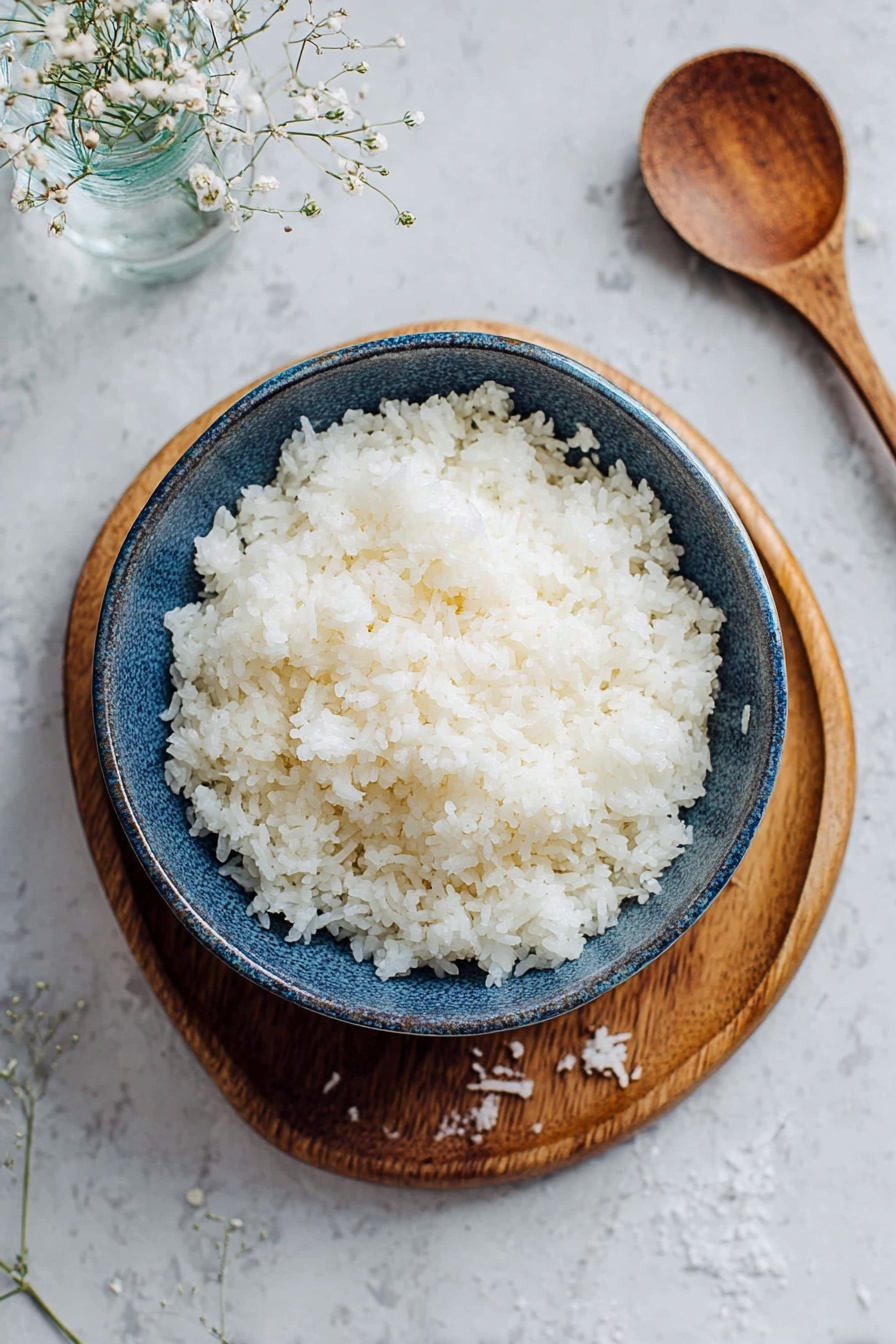
If you’ve ever tried making sushi at home, you know that getting the rice just right is half the battle. That’s why I’m so excited to share my foolproof guide on How To Make Perfect Sushi Rice Recipe. This recipe is fan-freaking-tastic because it gives you that perfect balance of sticky, yet fluffy sushi rice that holds together without being mushy. Whether you’re rolling traditional nigiri or vibrant California rolls, this rice sets the foundation for sushi that tastes like it came from a top-notch sushi bar. Stick with me, and I’ll show you everything from rinsing the rice to seasoning it with sushi vinegar, so you feel confident every step of the way.
Why You’ll Love This Recipe
- Simple and Straightforward: This recipe breaks down the sushi rice process into easy steps anyone can follow.
- Perfect Texture Every Time: You’ll get that ideal sticky but fluffy grain, which is crucial for great sushi.
- Flexible Cooking Methods: Whether you have a rice cooker or stovetop, I’ve got you covered with tips for both.
- Authentic Homemade Flavor: The homemade sushi vinegar seasoning elevates the flavor more than store-bought mixes.

Ingredients You’ll Need
Every ingredient here has a role to play in building that perfect sushi rice base. Using quality sushi rice and fresh rice vinegar really makes all the difference in taste and texture.

- Sushi Rice: Short-grain rice is the key here – it’s sticky enough to hold sushi together but still light.
- Water: The rice-to-water ratio is crucial; too much water and the rice gets mushy, too little and it’s undercooked.
- Rice Vinegar: This adds the signature tangy flavor that defines sushi rice.
- Sugar: Balances the acidity from the vinegar for the perfect sweet-tart taste.
- Salt: Enhances the overall flavor, just the right touch.
Variations
I love tailoring this recipe depending on what I’m making or who I’m sharing it with — feel free to tweak it to fit your tastes and needs!
- Vinegar Variations: Sometimes, I add a splash of kombu dashi to the vinegar mix for an umami boost—totally elevates the flavor.
- Brown Sushi Rice: For a healthier twist, brown short-grain rice works but requires more water and longer cooking.
- Low Sugar Option: You can reduce sugar slightly if you’re sensitive to sweetness, but I don’t recommend skipping it entirely.
- Seasoned Rice Alternatives: For poke bowls, I sometimes toss in a little toasted sesame oil after seasoning for an extra nutty flavor.
How to Make How To Make Perfect Sushi Rice Recipe
Step 1: Rinse Your Sushi Rice Thoroughly
This is essential. Place your sushi rice in a large bowl and rinse it under cold running water, moving the rice gently with your hand in a circular motion. Keep rinsing until the water runs clear—that’s when you’ve removed the excess starch which would otherwise make your rice gummy. Trust me, I used to skip this step once, and the difference was shocking—overly sticky and unappealing rice. So don’t rush here!
Step 2: Drain and Soak the Rice
After rinsing, drain the rice well using a sieve or fine colander. Then, add the rice and water to your rice cooker or pot and let it soak for 30 minutes—this hydration step is what helps the grains cook evenly and achieve that perfect tender-but-not-mushy texture. I always soak mine, even if I’m short on time because it really makes a difference.
Step 3: Cook Your Sushi Rice
If you’re using a rice cooker, add 1 ½ cups plus 1 tablespoon of water. Select the “sushi rice” setting if available, start cooking, and once done, leave the rice to steam inside for 10-15 minutes with the lid closed. Resist the urge to peek; this rest is key for fluffiness.
Cooking on the stovetop? Use 1 ⅜ cups of water. Bring the pot to a boil with the lid on, then drop the heat to the lowest setting for 8 minutes – absolutely no lid lifting! Remove from heat and let it rest for another 10-15 minutes with the lid on to finish steaming.
Step 4: Prepare the Sushi Vinegar Mix
While the rice is cooking, mix rice vinegar, sugar, and salt in a small saucepan. Heat it gently until the sugar dissolves completely, then turn off the heat. This is your flavor bomb. When I make sushi rice, I never skip this homemade sushi vinegar—store-bought versions just don’t hit the same note.
Step 5: Season and Cool Your Rice
Transfer the cooked rice to a wide bowl (a wooden or plastic bowl works best to avoid metallic taste). Pour over your hot sushi vinegar and gently fold the rice using a cutting motion with a spatula or rice paddle. This helps season every grain without squashing the texture. Cover with a damp tea towel to keep moisture in and let it cool to room temperature—don’t refrigerate or use hot rice immediately for sushi.
Pro Tips for Making How To Make Perfect Sushi Rice Recipe
- Rinsing is Non-Negotiable: Clear water means less starch and perfect texture—don’t skip! It took me a few tries to nail down this step, and now I tell everyone.
- Use a Wide Bowl for Seasoning: Helps cool the rice faster and makes mixing easier without crushing grains.
- Rest the Rice Covered: Letting it sit under a damp towel keeps it moist and shiny—essential for authentic sushi rice feel.
- Don’t Refrigerate Sushi Rice for Rolls: Leftover sushi rice turns hard and loses its sticky texture; save it for poke bowls or fried rice instead.
How to Serve How To Make Perfect Sushi Rice Recipe

Garnishes
I’m a big fan of classic toppings like toasted sesame seeds and thin strips of nori when serving plain sushi rice alongside. Sometimes I sprinkle a little furikake seasoning for an extra umami pop. These garnishes add flavor without overpowering the delicate rice.
Side Dishes
When I serve sushi rice, I usually pair it with fresh sliced sashimi, crunchy cucumber rolls, and pickled ginger for cleansing the palate. A side of miso soup or edamame rounds out the meal perfectly. These sides keep the experience balanced and authentic.
Creative Ways to Present
For special occasions, I love making sushi rice into cute bite-sized nigiri topped with colorful slices of fish or avocado. Another fun idea is sushi bowls layered with vibrant veggies, poke sauce, and crunchy toppings—a great way to enjoy the rice without rolling.
Make Ahead and Storage
Storing Leftovers
As much as I love fresh sushi rice, sometimes you have leftovers. Store them in an airtight container in the fridge for up to three days. I don’t recommend using refrigerated rice to make sushi rolls again, but it’s fantastic reheated or repurposed for dishes like fried rice or poke bowls.
Freezing
I generally avoid freezing sushi rice because its texture suffers badly. If you must freeze, portion it into airtight bags and thaw in the refrigerator; be aware it won’t be perfect for sushi, but still good for mixing into rice salads or fried rice later.
Reheating
When reheating leftovers, sprinkle a little water over the rice and cover it with a damp paper towel before microwaving to help retain moisture. Stir halfway through heating to evenly warm it without drying out. This trick keeps the rice soft and fluffy for best results.
FAQs
-
What type of rice should I use to make perfect sushi rice?
Always choose short-grain or medium-grain Japanese sushi rice. This type of rice has the right amount of starch to become sticky when cooked, which is essential for sushi that sticks well without being mushy.
-
Can I use regular white rice instead of sushi rice?
While you can use regular short-grain white rice, it won’t have the same texture or flavor. Sushi rice is specifically milled to hold together while still remaining firm and flavorful, so for best results, use authentic sushi rice.
-
Is rinsing the rice really necessary?
Yes! Rinsing removes excess surface starch, preventing the rice from becoming gummy and overly sticky. Make sure to rinse until the water runs clear for best texture.
-
How do I store leftover sushi rice?
Leftover sushi rice should be kept in an airtight container in the refrigerator and eaten within three days. It’s best used for dishes like fried rice or poke bowls rather than reused in sushi rolls, as the texture changes once refrigerated.
-
Can I make sushi rice without a rice cooker?
Absolutely! You can cook sushi rice on the stovetop by following the soaking, boiling, and resting instructions carefully. The key is to avoid opening the lid while cooking and to let the rice rest once cooked.
Final Thoughts
Making sushi rice at home might seem intimidating at first, but once you nail the steps I shared, you’ll find it incredibly rewarding—and your sushi will taste leagues better than store-bought rice. I absolutely love how this recipe turned my homemade sushi nights into a real celebration of flavors and textures. So grab your rice cooker or pot, follow these tips, and trust me, you’ll be hooked on your own delicious creations. Feel free to reach out if you have questions—cooking sushi rice is an art, but with a bit of patience and love, you can master it and impress your friends and family every time!
Print
How To Make Perfect Sushi Rice Recipe
- Prep Time: 40 minutes
- Cook Time: 10 minutes
- Total Time: 1 hour 50 minutes
- Yield: 4 servings (4-8 sushi rolls)
- Category: Side Dish
- Method: Stovetop
- Cuisine: Japanese
- Diet: Vegetarian
Description
Learn how to make perfect sushi rice every time with this detailed recipe. Whether you prefer the convenience of a rice cooker or the traditional stovetop method, this guide walks you through rinsing, soaking, cooking, and seasoning sushi rice with a flavorful sushi vinegar mix to create the ideal base for sushi rolls and poke bowls.
Ingredients
Sushi Rice
- 1 1/2 cups sushi rice
- 1 1/2 cups + 1 tbsp water (for rice cooker method)
- 1 3/8 cups (330ml) water (for stovetop method)
Sushi Vinegar
- 1/4 cup rice vinegar
- 2 tablespoons sugar
- 1 teaspoon salt
Instructions
- Rinse Rice: Place the sushi rice in a large bowl and wash it under running cold water until the water runs clear. Move the rice in a circular motion using your hand to speed up the rinsing process.
- Drain Rice: Carefully discard the rinsing water using a sieve or by pouring it off gently to remove excess water.
- Cook Sushi Rice in a Rice Cooker: Place the rinsed rice with 1 ½ cups plus 1 tablespoon of water (375ml) in the rice cooker bowl. Let it soak for 30 minutes. Turn on the rice cooker using the sushi rice setting if available. Once cooking is complete, turn off the cooker and let the rice sit with the lid closed for 10-15 minutes without opening it.
- Cook Sushi Rice on the Stovetop: Place the rinsed rice and 1 ⅜ cups (330ml) water in a pot. Soak the rice for 30 minutes with the lid on. Bring the pot to a boil with the lid on, then reduce heat to low and cook for 8 minutes without opening the lid. Remove the pot from heat and let the rice sit with the lid on for another 10-15 minutes.
- Make Sushi Vinegar: While the rice is cooking, combine rice vinegar, sugar, and salt in a small saucepan. Bring to a boil, then turn off the heat and stir until the sugar dissolves completely.
- Season Rice: Transfer the cooked rice to a large bowl and pour the hot vinegar mixture over it. Gently toss to combine and evenly coat the rice with the seasoned vinegar.
- Cool the Rice: Cover the bowl with a damp tea towel to prevent drying. Allow the rice to cool at room temperature until it reaches ambient temperature.
- Serve: Use the prepared sushi rice as a base for your favorite sushi rolls or delicious poke bowls.
Notes
- For beginners, the rice cooker method is recommended for consistent results.
- The rice-to-water ratio differs by method: use 1:1.1 for stovetop and about 1:1.25 for rice cooker, but adjust based on your rice cooker’s manual.
- 1 ½ cups (300g) uncooked rice yields enough for 4-5 thick California rolls or 7-8 medium Maki rolls, suitable for 2-4 people.
- Always use freshly cooked sushi rice for sushi—refrigerated leftover rice hardens and is best used in poke bowls or fried rice within 3 days.
Nutrition
- Serving Size: 1/4 recipe (approx. 100g cooked seasoned rice)
- Calories: 180
- Sugar: 4g
- Sodium: 240mg
- Fat: 0.2g
- Saturated Fat: 0g
- Unsaturated Fat: 0.2g
- Trans Fat: 0g
- Carbohydrates: 40g
- Fiber: 1g
- Protein: 3g
- Cholesterol: 0mg


