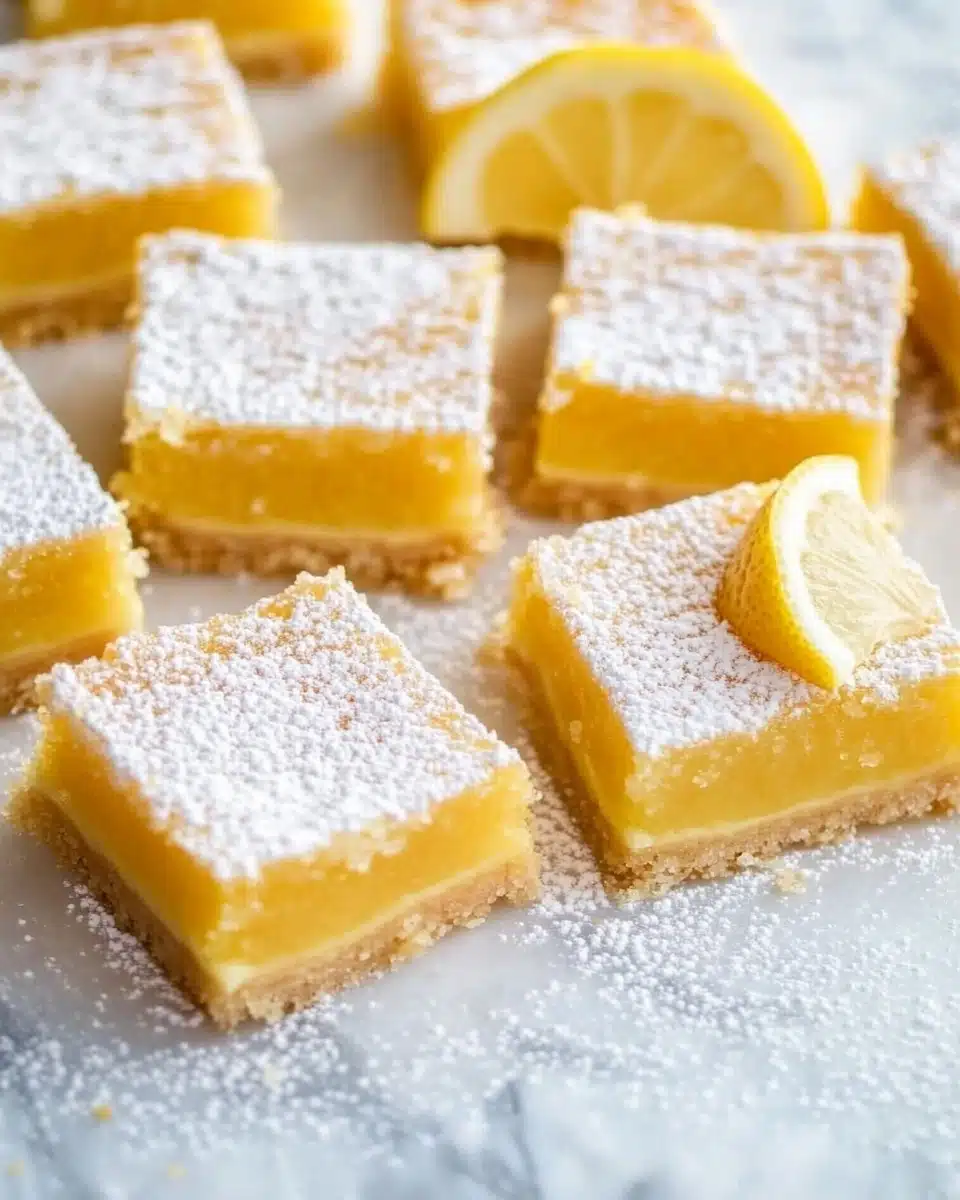
Brace yourself for zesty, sunshine-filled bliss—these Homemade Lemon Bars deliver a dreamy marriage of buttery shortbread and luscious, tangy lemon filling, all crowned with a dusting of powdered sugar. They’re the ultimate treat for lemon lovers, and perfect for picnics, holidays, or a sweet pick-me-up with your coffee break!
Why You’ll Love This Recipe
- Ridiculously Easy: Just a handful of basic ingredients and a few simple steps, perfect even for baking beginners.
- Max Lemon Flavor: Packed with zest and fresh juice, the lemon filling is the very essence of citrusy tang.
- The Dreamiest Texture: That melt-in-your-mouth shortbread under a creamy, vibrant lemon custard is irresistible.
- Perfect for Every Occasion: Homemade Lemon Bars brighten up potlucks, tea parties, and holiday cookie platters alike.

Ingredients You’ll Need
The magic of Homemade Lemon Bars is how a few basic ingredients create such a showstopping treat. Each component—the crust and the filling—plays a starring role, building irresistible layers of buttery sweetness and tart lemon glow.
- Cold Unsalted Butter: Grate it or cube it to make a truly tender, crumbly shortbread base that supports the bars.
- Powdered Sugar: This keeps the crust ultra-fine and smooth—no gritty texture here.
- All-Purpose Flour: The backbone of both crust and filling for structure and a delicate bite.
- Pinch of Salt: Just enough to balance the sweetness and make the lemon shine brighter.
- Granulated Sugar: Sweetens the lemon filling and helps it set with a glossy, curd-like finish.
- Lemon Zest: Don’t skip this! The zest infuses the bars with an aromatic vibrance that bottled juice can’t touch.
- Fresh Lemon Juice: For the brightest, tangiest filling—fresh-squeezed is the secret to true lemon bar bliss.
- Eggs and Egg Yolks: Whole eggs plus extra yolks give the filling a luxurious, creamy texture and just the right body.
- Baking Powder: A touch of lift keeps the filling light and perfectly set without being dense.
- Powdered Sugar (for dusting): The final snowy flourish that makes these bars bakery-beautiful.
Variations
One of the joys of Homemade Lemon Bars is how easily you can customize them to suit your taste, pantry, or dietary needs. Here are a few colorful twists you can try—don’t be afraid to experiment!
- Gluten-Free: Swap the all-purpose flour for your favorite 1:1 gluten-free baking blend; the bars are just as sunny and delicious.
- Berry Lemon Bars: Scatter a scant handful of fresh raspberries or blueberries on the crust before pouring the filling over.
- Extra Tangy: Boost the lemon juice or zest to dial the tartness up for serious citrus fans.
- Orange or Lime Bars: Substitute fresh orange or lime juice and zest for a whole new citrus personality—equally irresistible.
How to Make Homemade Lemon Bars
Step 1: Prep and Preheat
Preheat your oven to 350°F. If you’re working with a metal loaf pan, be sure to line it carefully with parchment paper—lemon’s acidity shouldn’t touch the bare metal, so don’t skip this step! Gather all your ingredients and let’s bake something incredible.
Step 2: Make the Shortbread Crust
Add the cold, cubed butter, powdered sugar, flour, and a pinch of salt to a medium bowl. Using your fingertips or a pastry blender, rub the butter into the dry ingredients until you have a coarse, sandy mixture. Press this evenly and firmly into the bottom of your prepared pan, then bake for about 25 minutes—look for edges that are just lightly golden and a surface that feels set but not browned.
Step 3: Whip Up the Lemon Filling
As soon as the crust comes out of the oven, get started on your filling. In a separate bowl, whip together the granulated sugar, lemon zest, fresh lemon juice, whole eggs, and extra yolks until the mixture is frothy and slightly thickened—one minute with a hand mixer does the trick. Add in the baking powder and flour, mixing just until smooth and lump-free.
Step 4: Bake the Bars
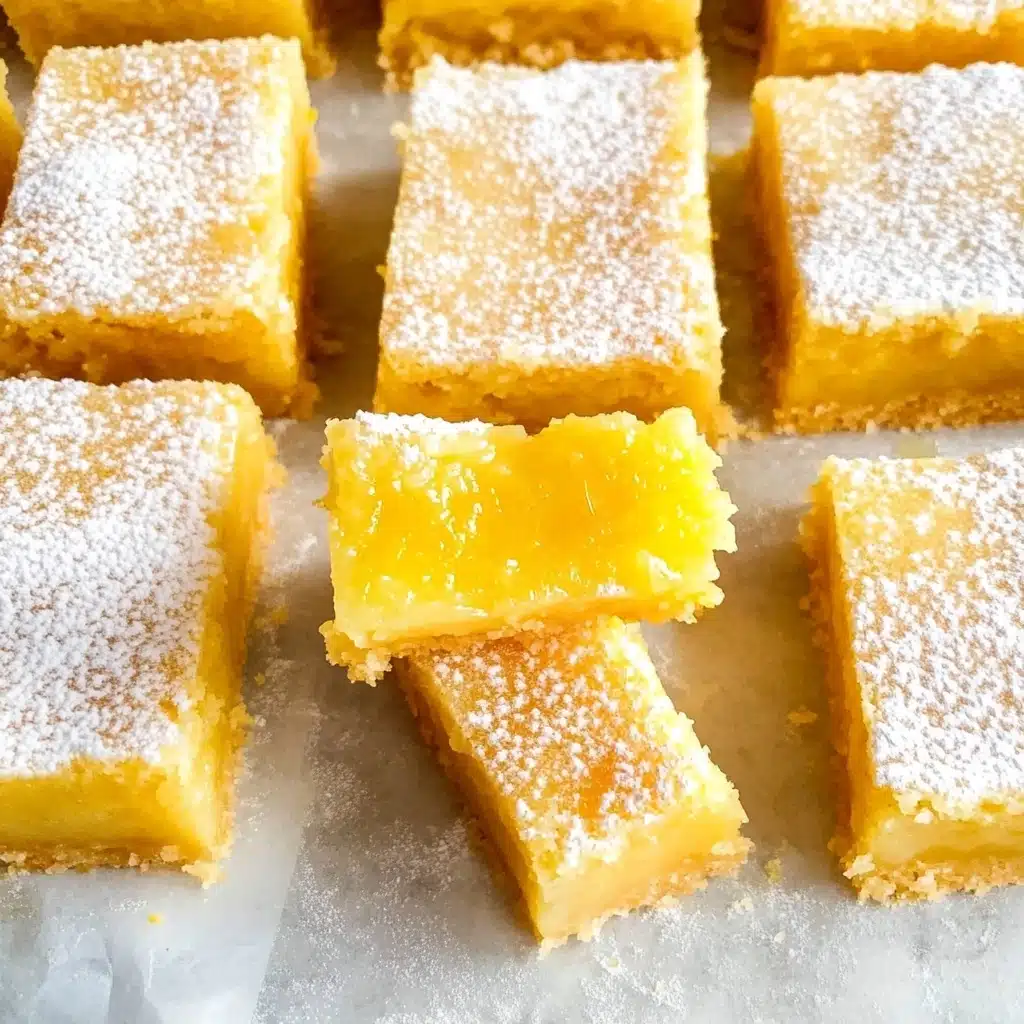
Pour the lemon filling over the warm crust, letting it settle into an even layer. Slide the pan back into the oven for another 20–23 minutes—watch for gentle set edges and a center that still has the faintest jiggle (it’ll finish setting as it cools). Remove from the oven and carefully lift out the bars to cool completely before dusting with powdered sugar.
Pro Tips for Making Homemade Lemon Bars
- Super Cold Butter: Pop your butter in the freezer for a few minutes before using—ultra-cold butter helps the shortbread stay extraordinarily tender and crumbly.
- Zest Before You Juice: Always zest your lemons before cutting and juicing—it’s so much easier to extract the flavorful oils from the whole fruit.
- Don’t Overbake the Filling: The filling should look barely set with a subtle wobble in the center; it will continue to firm up as it cools, giving you that perfect, creamy bite.
- Use Parchment for Easy Removal: Leave an overhang of parchment paper so you can lift the entire slab out before slicing—no stuck bottoms and neater edges every time.
How to Serve Homemade Lemon Bars
Garnishes
For a truly stunning finish, dust the cooled Homemade Lemon Bars liberally with powdered sugar right before serving. For extra flair, try a few twists of fresh lemon zest on top, or pop a raspberry or a sprig of mint onto each square for a pop of color and freshness.
Side Dishes
These bright bars are wonderful all on their own, but they pair especially well with simple accompaniments—think hot tea, iced coffee, or a scoop of vanilla bean ice cream. At a picnic or party, serve alongside fresh berries or a platter of mixed citrus segments for a cheerful contrast.
Creative Ways to Present
Cut the bars into tidy squares or playful triangles, and stack on a pretty cake stand for a tea party. For a modern touch, serve in mini cupcake liners as finger-friendly bites, or plate individually with a curl of lemon zest and a dusting of powdered sugar for plated elegance.
Make Ahead and Storage
Storing Leftovers
Homemade Lemon Bars store beautifully. Simply pop them into an airtight container and refrigerate—they’ll stay fresh, zesty, and delicious for up to 5 days with their texture perfectly intact.
Freezing
These bars are freezer-friendly! Layer the cut squares between sheets of parchment in a container, freeze solid, then thaw in the fridge overnight whenever a citrus craving hits. Dust with fresh powdered sugar before serving for the best presentation.
Reheating
Homemade Lemon Bars are best served chilled or at room temperature. If you’d like them just slightly warm, a brief 5–10 seconds in the microwave will lift the lemon aroma—just don’t go too far, or the filling may become too soft.
FAQs
-
Why do I need to line the pan if I’m using metal?
Lemon’s natural acidity can react with metal and give the bars an unwanted metallic taste. Lining the pan with parchment prevents this and makes it much easier to lift the bars out in perfect pieces.
-
Can I make Homemade Lemon Bars ahead of time?
Absolutely! These bars are even better after a night in the fridge, allowing the flavors to meld and the texture to set. Just wait to dust with powdered sugar until right before serving.
-
My bars seem too gooey—what went wrong?
If your filling isn’t setting, it might need a few more minutes in the oven, or you may have used too much juice. Aim for a barely-jiggling center when you remove them; they’ll firm up as they cool.
-
Can I use bottled lemon juice instead of fresh?
For Homemade Lemon Bars with true, vibrant citrus flavor, you really want to use fresh lemon juice and zest—bottled juice can taste dull and lacks those essential oils for the best lemony lift.
Final Thoughts
I hope these Homemade Lemon Bars bring a burst of joy and sunshine into your kitchen. They’re simple, foolproof, and guaranteed to make any day a little brighter—just give them a try, and you’ll see why they’re a favorite I come back to time and time again!
Print
Homemade Lemon Bars Recipe
- Prep Time: 20 minutes
- Cook Time: 45 minutes
- Total Time: 1 hour 5 minutes
- Yield: 12 bars
- Category: Dessert
- Method: Baking
- Cuisine: American
- Diet: Vegetarian
Description
These Homemade Lemon Bars are a delightful combination of a buttery shortbread crust and a tangy lemon filling, creating the perfect balance of sweet and citrusy flavors. Easy to make and even easier to enjoy, these bars are a great treat for any occasion.
Ingredients
FOR THE SHORTBREAD CRUST:
- 12 tablespoons cold unsalted butter
- 1/2 cup powdered sugar
- 1 1/2 cups flour
- pinch of salt
FOR THE LEMON FILLING:
- 1 cup granulated sugar
- 2 teaspoons packed lemon zest
- 6 tablespoons fresh lemon juice
- 2 large eggs
- 2 large egg yolks, white reserved for another use
- 1/2 teaspoon baking powder
- 2 tablespoons flour
- powdered sugar for sprinkling
Instructions
- Preheat the oven: Preheat the oven to 350°F. Line the pan with parchment paper if using a metal pan.
- Make the shortbread crust: Combine all crust ingredients and press into a loaf pan. Bake for 25 minutes.
- Prepare the lemon filling: Beat sugar, lemon juice, zest, eggs, and yolks. Add baking powder and flour. Pour over the crust and bake for 20-23 minutes.
- Cool and serve: Allow to cool, dust with powdered sugar, and cut into bars.
Notes
- For a small batch version, adjust ingredient quantities accordingly. Follow the same instructions with the same baking time.
Nutrition
- Serving Size: 1 bar
- Calories: 220
- Sugar: 16g
- Sodium: 90mg
- Fat: 11g
- Saturated Fat: 7g
- Unsaturated Fat: 3g
- Trans Fat: 0g
- Carbohydrates: 27g
- Fiber: 0.5g
- Protein: 3g
- Cholesterol: 75mg


