
If you adore creamy, dreamy frozen treats but want something a little different and tropical, this Homemade Coconut Ice Cream Recipe is an absolute game-changer. I’m telling you, once you make this rich, velvety coconut delight at home, you’ll never look at store-bought ice cream the same way again. It’s surprisingly simple, uses easy-to-find ingredients, and you get that irresistible coconut flavor paired with a smooth, luscious texture that just melts in your mouth. Stick around because I’m going to share all my tips and tricks to help you succeed every single time.
Why You’ll Love This Recipe
- Rich and Creamy Texture: Thanks to whipping cream and chilled ingredients, the ice cream feels luxuriously smooth and light.
- No Ice Cream Maker Needed: I love this because you can make it effortlessly with just a bowl and freezer, perfect for a no-fuss kitchen experience.
- Pure Coconut Flavor: The combination of coconut milk, toasted coconut flakes, and that subtle coconut extract gives it a deliciously authentic taste.
- Customizable and Easy: You’ll enjoy how simple it is to tweak sweetness levels or add mix-ins like toasted coconut or nuts for your own twist.

Ingredients You’ll Need
The magic of this Homemade Coconut Ice Cream Recipe really starts with using cold, full-fat ingredients to keep that creamy texture and rich flavor. You’ll want to pick the best quality coconut milk you can find and opt for unsweetened toasted coconut flakes to get a nice crunch without extra sweetness.

- Heavy Cream/Whipping Cream: Make sure it’s cold and preferably full-fat for best whipping results.
- Powdered Sugar: Dissolves easily to keep the texture silky, avoiding graininess you’d get with granulated sugar.
- Vanilla Extract: Adds depth and balances the coconut flavors beautifully.
- Coconut Milk (Full Fat): The creamier, the better—this is where the coconut flavor really shines.
- Sweetened Condensed Milk: Adds sweetness and helps keep the ice cream from turning into a solid block.
- Coconut Extract (optional): A tiny bit boosts coconut flavor without overpowering; feel free to adjust to taste.
- Dry Shredded Coconut / Coconut Flakes (toasted & unsweetened): Gives texture and an extra toasty note I adore in every bite.
Variations
I often like to play around with this Homemade Coconut Ice Cream Recipe depending on the season or what I have handy. Don’t hesitate to make it your own by adding flavors or omitting ingredients to suit your tastes.
- Tropical Twist: Adding fresh mango chunks or pineapple pieces before freezing gives it a sunny vibe my family goes crazy for during summer.
- Chocolate Swirl: Swirl in melted dark chocolate or sprinkle cocoa nibs after folding the mix for a decadent surprise.
- Vegan Version: Swap heavy cream with coconut cream (chilled solid part from canned coconut milk) and use maple syrup or agave instead of condensed milk.
- Nutty Coconut: Stir in toasted almonds or macadamia nuts for added crunch and richness.
How to Make Homemade Coconut Ice Cream Recipe
Step 1: Whip the Cream to Stiff Peaks
Start with cold heavy cream in a large bowl, add powdered sugar and vanilla extract. Using a hand blender or stand mixer, whip it until you see the volume double and stiff peaks form—this is what gives your ice cream that airy, creamy texture. I learned that whipping the cream well but not overbeating is key; overwhipped cream can turn grainy or buttery.
Step 2: Mix the Coconut Milk and Sweetened Condensed Milk
In a separate bowl, stir together the cold coconut milk, sweetened condensed milk, and optional coconut extract until smooth. Getting a homogenous mix here is important because it balances sweetness and coconut flavor evenly throughout the ice cream.
Step 3: Fold to Aerate and Combine
Take a few spoonfuls of whipped cream and gently fold it into the coconut milk mixture—this aeration step helps keep your ice cream light. Then fold the combined mixture back into the remaining whipped cream carefully and gradually, using a spatula. This folding keeps the air bubbles intact, which translates into creamy, scoopable ice cream instead of an icy block. It took me a couple of tries to master this gentle folding, so be patient and don’t rush.
Step 4: Add Toasted Coconut and Freeze
Fold the toasted shredded coconut flakes into your mixture, then transfer everything into a shallow rectangular container. Cover tightly with cling wrap pressed directly on the surface to avoid ice crystals forming on top. Freeze at least 8 hours or overnight for best results. One tip I’ve learned: keeping your mixture cold before freezing speeds up the setting time and gives a denser creaminess.
Step 5: Let It Rest Before Serving
When you’re ready to indulge, remove the wrap and let the ice cream rest at room temperature for about 5 minutes—this makes scooping much easier and preserves that lovely softness. Trust me, this makes all the difference!
Pro Tips for Making Homemade Coconut Ice Cream Recipe
- Keep Everything Cold: I always chill my bowls and utensils beforehand to help the cream whip up faster and maintain its volume.
- Fold Gently but Thoroughly: I learned that rushing or stirring vigorously deflates your whipped cream, leading to icy texture—so take your time.
- Toast Your Coconut Flakes: Toasting brings out an amazing nutty aroma that pairs perfectly with the creamy base.
- Skip Coconut Extract if You Prefer Subtlety: When I first made this, I added too much and the flavor was a bit overwhelming—start small and taste as you go.
How to Serve Homemade Coconut Ice Cream Recipe

Garnishes
To keep things simple yet tasty, I love sprinkling a little extra toasted shredded coconut on top just before serving—it adds a delightful crunch and makes it look gorgeous. Sometimes, fresh tropical fruits like diced mango or passion fruit make fantastic natural toppings that also brighten up the plate.
Side Dishes
This ice cream pairs wonderfully with warm desserts like a slice of pineapple upside-down cake or coconut macaroons. For a lighter option, serve alongside fresh fruit salad or a crisp, buttery cookie to balance the creamy richness.
Creative Ways to Present
For special occasions, I like to serve scoops in coconut shells or small martini glasses with a mini umbrella for that tropical vibe. Another fun idea is layering it with fruit compote or chocolate sauce in a parfait glass for a stunning visual treat.
Make Ahead and Storage
Storing Leftovers
I store leftover ice cream in an airtight container to prevent freezer burn and cover the surface with plastic wrap to stop ice crystals. This keeps it tasting fresh for up to a week, though I bet it won’t last that long in your house!
Freezing
After freezing overnight, this ice cream sets perfectly firm yet creamy. I discovered that freezing in a shallow container helps it freeze evenly and speeds up the process compared to larger, deeper tubs.
Reheating
Lucky for us, you don’t really “reheat” ice cream! But to soften it before scooping, just let it sit out at room temperature for about 5 minutes—this helps you get perfect, smooth scoops without melting too fast.
FAQs
-
Can I make this Homemade Coconut Ice Cream Recipe without an ice cream maker?
Absolutely! This recipe is designed so you can whip it up and freeze it right in the freezer without any fancy equipment. The whipped cream provides the airiness, and careful folding keeps the texture light and creamy.
-
Can I use canned coconut cream instead of coconut milk?
Yes, canned coconut cream works even better for an ultra-rich coconut flavor and creamier texture, but you might want to adjust the sweetness slightly if it’s thicker or richer than your usual coconut milk.
-
How do I prevent ice crystals in my homemade coconut ice cream?
Keeping all your ingredients cold, folding gently to preserve air, and pressing cling wrap directly on the surface before freezing are tricks I use to avoid ice crystals and keep the ice cream smooth.
-
Can I make this recipe vegan or dairy-free?
Definitely! Swap heavy cream with chilled coconut cream and replace sweetened condensed milk with a vegan condensed milk alternative or a thick natural sweetener like maple syrup to keep it creamy and sweet.
-
How long does homemade coconut ice cream last in the freezer?
When stored properly in an airtight container, it keeps well for about one week before texture and flavor start to decline.
Final Thoughts
I absolutely love how this Homemade Coconut Ice Cream Recipe comes together—it’s straightforward, indulgent, and always a crowd-pleaser in my house. I remember the first time I made it; my family couldn’t believe something so delicious was dairy-forward but still felt light and refreshing. You’ll find this coconut ice cream to be your go-to for an easy homemade dessert that feels a little special. Give it a try and watch it become a favorite you return to again and again!
Print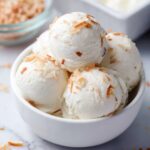
Homemade Coconut Ice Cream Recipe
- Prep Time: 15 minutes
- Cook Time: 0 minutes
- Total Time: 12 hours 15 minutes
- Yield: 10 servings
- Category: Dessert
- Method: No-Cook
- Cuisine: International
- Diet: Vegetarian
Description
This Homemade Coconut Ice Cream is a creamy, rich, and refreshing dessert made with full-fat coconut milk, whipped heavy cream, and sweetened condensed milk. It features a subtle hint of vanilla and optional coconut extract, enhanced by toasted shredded coconut flakes for added texture. Perfect for coconut lovers and a delightful treat any time of the year.
Ingredients
Ice Cream Base
- 1.5 cups Heavy Cream / Whipping Cream, cold
- ¾ cup Powdered Sugar
- 1 teaspoon Vanilla Extract
- 2 cups Full Fat Coconut Milk, cold
- ½ can (about 200 grams) Sweetened Condensed Milk, cold (from a 400-gram can)
- ⅛ teaspoon Coconut Extract (optional)
Topping
- ½ cup Dry Shredded Coconut / Coconut Flakes, toasted & unsweetened
Instructions
- Whip the Cream: In a large bowl, combine cold heavy cream, powdered sugar, and vanilla extract. Use a hand blender to whip the cream until it has doubled in volume and forms stiff peaks, providing a fluffy and airy texture.
- Mix Coconut Base: In a separate bowl, mix together the cold full-fat coconut milk, sweetened condensed milk, and optional coconut extract until well combined, creating a smooth, creamy mixture.
- Aerate the Coconut Mixture: Take a couple of scoops of the whipped cream and gently fold it into the coconut milk mixture. This step helps to aerate the mixture, incorporating air for a lighter texture.
- Combine Mixtures: Gradually fold the coconut milk mixture into the whipped cream in two batches using a spatula. Fold carefully to retain as much air as possible, ensuring the ice cream is light and creamy.
- Prepare to Freeze: Pour the combined mixture into a shallow rectangular container. Place a piece of cling wrap or baking paper directly on the surface and press gently to prevent ice crystals from forming.
- Freeze: Cover the container tightly with a lid, cling wrap, or foil. Freeze for at least 8 hours, preferably overnight, to allow the ice cream to fully set.
- Serve: Before serving, remove the cling wrap from the surface. Let the ice cream rest at room temperature for about 5 minutes to soften slightly. Scoop and serve with toasted shredded coconut flakes sprinkled on top for added crunch and flavor.
Notes
- Keeping all liquid ingredients cold helps the ice cream freeze more quickly and prevents ice crystal formation.
- Coconut extract is potent; 1/8 teaspoon provides a balanced coconut flavor, but you can increase up to 1/4 teaspoon for a stronger taste.
- To toast the shredded coconut, lightly dry-fry in a pan over medium heat until golden and fragrant, tossing frequently to prevent burning.
- This ice cream does not require an ice cream maker and is excellent for a no-churn homemade dessert option.
Nutrition
- Serving Size: 1/10 of recipe (~120 grams)
- Calories: 280
- Sugar: 23g
- Sodium: 45mg
- Fat: 22g
- Saturated Fat: 19g
- Unsaturated Fat: 2g
- Trans Fat: 0g
- Carbohydrates: 18g
- Fiber: 1g
- Protein: 2g
- Cholesterol: 75mg


