
If you love a creamy, satisfying treat that’s also packed with protein, you’re going to flip over this High-Protein Ninja Creami Milkshake Recipe. I’ve tried loads of high-protein shakes, but this one stands out because it’s got the perfect balance of flavor and nutrition, thanks to the magic of the Ninja Creami. Whether you need a post-workout boost or a guilt-free dessert, this milkshake hits all the right notes with peanut butter, chocolate, and vanilla that will keep you coming back for more.
Why You’ll Love This Recipe
- Deliciously Creamy: The Ninja Creami transforms simple ingredients into an indulgent, thick milkshake without added preservatives.
- High in Protein: Perfect for a post-workout refuel or a filling snack, helping you hit your daily protein goals.
- Customizable Flavors: You get to add just the right amount of chocolate syrup and swap milks to suit your taste and dietary needs.
- Simple Prep and Storage: Easy to make ahead and freeze, so you can enjoy this anytime without fuss.

Ingredients You’ll Need
These ingredients work together like a dream — creamy oat milk blends smoothly with peanut butter and maple syrup to create an irresistible base. I love how the vanilla protein powder adds a mild sweetness without overpowering the natural peanut flavor.

- Oat milk: Creamy and naturally sweet, it’s a fantastic dairy-free base; you can swap for soy milk if you want extra protein.
- Peanut butter: Adds rich flavor and healthy fats — choose natural peanut butter for the best taste and health benefits.
- Maple syrup: A touch of natural sweetness that complements the peanut butter perfectly.
- Vanilla extract: Enhances all the flavors with a subtle aromatic boost.
- Vanilla protein powder: The secret to the high-protein punch, opt for your favorite brand with a smooth vanilla taste.
- Chocolate syrup: Use a low-sugar or sugar-free variety if you want to keep things healthier without sacrificing that classic chocolate flavor.
Variations
I love to mix things up depending on my mood or what’s in the pantry. Feel free to tweak this High-Protein Ninja Creami Milkshake Recipe — it’s a blank canvas that’s easy to make your own.
- Nut Butter Swap: I’ve used almond or cashew butter instead of peanut butter for a milder, nuttier twist that my kids adore.
- Dairy Alternatives: Sometimes, I swap oat milk for soy milk to get an extra protein boost while keeping the texture luxuriously creamy.
- Flavor Boost: Adding a dash of cinnamon or espresso powder adds an exciting new dimension I discovered on a sleepy morning.
- Sweetener Adjustment: Maple syrup works wonders, but honey or even a sugar-free syrup can do the trick if you want to adjust sweetness levels.
How to Make High-Protein Ninja Creami Milkshake Recipe
Step 1: Create the Ice Cream Base
Start by whisking together your oat milk, peanut butter, maple syrup, vanilla extract, and vanilla protein powder until everything is smooth and well combined. This is the heart of your milkshake, so take a moment to make sure the peanut butter is fully blended — lumps just don’t taste as good. Pour the mixture into your Ninja Creami pint container, seal it up, and place it in the freezer for 12-24 hours. I usually do mine overnight; this way it’s perfectly firm when I’m ready to spin it the next day.
Step 2: Add the Milkshake Magic
When you’re ready, take the container out of the freezer and remove the lid. Add in the additional oat milk and chocolate syrup. I typically start with 2 tablespoons of syrup and add more if I want it extra chocolaty — just be cautious to keep it balanced. Secure the lid again, place it back in the machine, and use the milkshake setting to blend. After it’s done, give it a quick stir — then spin once more for that perfectly creamy texture. You’ll notice it’s thick but melts quickly into a luscious milkshake that tastes like a dream.
Pro Tips for Making High-Protein Ninja Creami Milkshake Recipe
- Use Natural Ingredients: I always choose natural peanut butter and pure maple syrup to keep the flavor wholesome and avoid artificial aftertastes.
- Freeze Thoroughly: Freezing the base for at least 12 hours is key — skipping this step means your shake won’t have that perfect thick creaminess.
- Adjust Sweetness Last: Add chocolate syrup gradually after spinning once so you don’t end up with an overly sweet shake.
- Avoid Lumps by Whisking: Mixing the peanut butter and oat milk really well before freezing saves you from little lumps later.
How to Serve High-Protein Ninja Creami Milkshake Recipe

Garnishes
I love topping mine with a sprinkle of crushed peanuts or a few mini dark chocolate chips for that extra texture and flair. Sometimes I add a small dollop of whipped cream if I’m feeling indulgent — it’s such a fun way to turn a healthy shake into a dessert-like treat.
Side Dishes
Since this milkshake is quite filling, I usually enjoy it on its own, but it pairs beautifully with a simple bowl of fresh berries or some crunchy granola if you want some bites to go along with the creamy texture.
Creative Ways to Present
For a fun twist, I’ve served this milkshake in a chilled glass jar with a colorful reusable straw for summer guests — it’s always a hit! Adding a cinnamon stick or a mint leaf garnish also makes it feel more special if you’re sharing with friends.
Make Ahead and Storage
Storing Leftovers
I usually keep any leftovers sealed in the Ninja Creami pint container in the freezer. It stays fresh for up to a week, which is perfect for quick snacks during busy days. Just make sure the lid is tight so no freezer odors sneak in.
Freezing
Freezing this milkshake base works beautifully for prepping ahead. After making the ice cream base, freezing it for the recommended 12-24 hours locks in the texture and flavor — the Ninja Creami does all the work to turn it into a creamy shake when you’re ready.
Reheating
If you want to enjoy the milkshake after it’s frozen solid, just let it sit at room temperature for about 10-15 minutes to soften slightly. Then, add a tablespoon of milk and spin it on the milkshake setting again. This simple trick brings back that fresh, creamy consistency without any fuss.
FAQs
-
Can I use other types of protein powder in this recipe?
Absolutely! While I prefer vanilla-flavored protein powder for its subtle sweetness, you can use chocolate, unflavored, or plant-based protein powders depending on your dietary preference. Just keep in mind that flavor intensity and sweetness might vary accordingly.
-
What do I do if my milkshake is too thick or too thin after spinning?
If it’s too thick, simply add an extra splash of oat milk and spin again until you reach your preferred consistency. Too thin? Freeze the mixture a bit longer before spinning or reduce milk added during the milkshake spin stage.
-
Is it possible to make this recipe vegan?
Yes! Stick with plant-based protein powder and use maple syrup or agave instead of honey if you substitute. The recipe already uses oat milk and natural peanut butter, so it’s mostly vegan-friendly as is.
-
How long does this milkshake last in the freezer?
Stored properly in an airtight container, leftovers stay fresh for up to a week. Beyond that, I find the texture and flavor start to degrade, so it’s best enjoyed sooner rather than later.
Final Thoughts
This High-Protein Ninja Creami Milkshake Recipe has truly become a staple in my kitchen, especially when I want indulgence without straying from my nutrition goals. It’s simple to whip up, easy to customize, and so satisfying that it never feels like a compromise. I recommend giving this a try—you might just discover your new favorite way to enjoy a protein boost with a delicious twist!
Print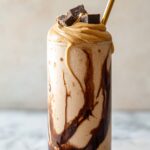
High-Protein Ninja Creami Milkshake Recipe
- Prep Time: 10 minutes
- Cook Time: 0 minutes
- Total Time: 12 hours 10 minutes
- Yield: 3 Servings
- Category: Drink
- Method: Blending
- Cuisine: American
- Diet: Vegetarian
Description
This Ninja Creami Protein Milkshake is a creamy, delicious, and protein-packed treat made with oat milk, peanut butter, and vanilla protein powder. Blended in the Ninja Creami machine, it combines smoothie and ice cream techniques for a thick milkshake that’s perfect for a healthy indulgence or a post-workout boost.
Ingredients
Ice Cream Base
- 2 cups oat milk
- 1/4 cup peanut butter
- 1/4 cup maple syrup
- 1 teaspoon vanilla extract
- 1/4 cup vanilla protein powder
Milkshake Add-Ins
- 1/2 cup oat milk
- 2-3 Tablespoons chocolate syrup (lower-sugar or sugar-free option is best!)
Instructions
- Prepare Ice Cream Base: Whisk together the oat milk, peanut butter, maple syrup, vanilla extract, and vanilla protein powder until smooth and well combined.
- Freeze Base: Pour the mixture into a Ninja Creami pint container, cover with the lid, and freeze solid for 12 to 24 hours.
- Process Milkshake: Remove the lid from the frozen pint, add the oat milk and chocolate syrup on top, then attach the lid designed for the Ninja Creami machine and spin using the milkshake setting to blend everything together.
- Mix and Respin: After the first spin, remove the pint, stir the milkshake thoroughly, then respin on the milkshake setting to achieve the perfect thick yet creamy milkshake consistency.
- Serve: Enjoy immediately or follow storage instructions for leftovers.
Notes
- Tip: Swap oat milk for soy milk to maintain a creamy texture while increasing protein content.
- Store any leftovers in a Ninja Creami pint container in the freezer for up to one week.
- To serve leftovers, let them sit at room temperature for 10-15 minutes, add a tablespoon of milk, and respin on the milkshake setting for best texture.
Nutrition
- Serving Size: 1 serving (approx. 1 cup)
- Calories: 280
- Sugar: 12g
- Sodium: 120mg
- Fat: 14g
- Saturated Fat: 3g
- Unsaturated Fat: 10g
- Trans Fat: 0g
- Carbohydrates: 26g
- Fiber: 3g
- Protein: 15g
- Cholesterol: 0mg

