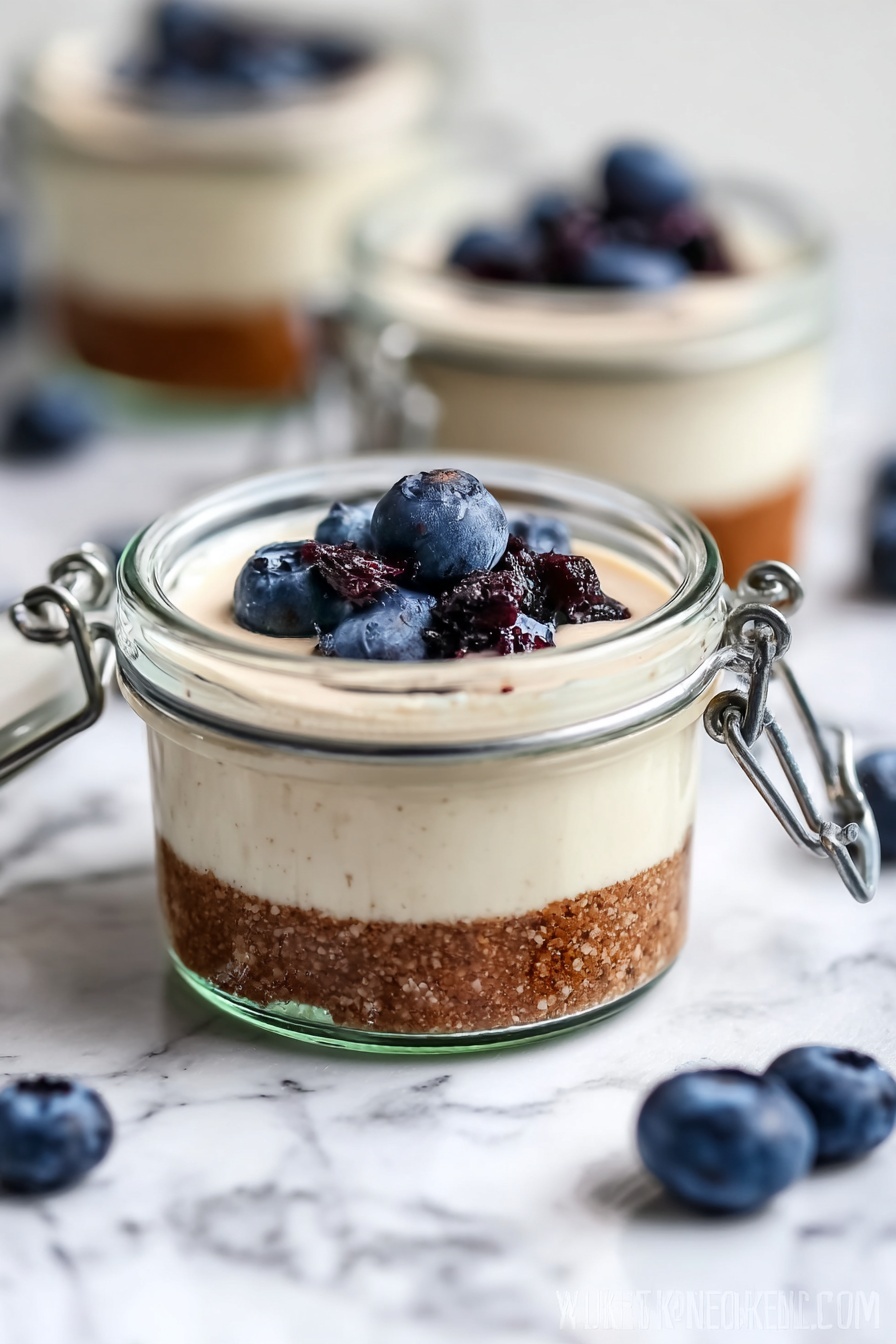
If you’re on the lookout for a dessert that’s both indulgent and packed with nutrients, you’re going to love this High Protein Cheesecake Jars Recipe. It’s a treat that’s creamy, satisfying, and surprisingly good for you. I love how you get the richness of cheesecake without the heavy guilt, and these jars are perfect for portion control or meal prepping. Plus, you can customize them however you like—more on that soon. Stick with me, and I’ll walk you through everything you need to know to nail this recipe.
Why You’ll Love This Recipe
- High Protein Boost: Thanks to the cottage cheese and protein powder, these jars make a perfect protein-packed dessert or snack.
- Easy to Make: Just blend, crush, layer, and chill – no baking required, which is great when you want something quick but impressive.
- Versatile Flavors: Whether you add cocoa for chocolate or fresh fruit toppings, you can tailor it to suit your cravings or diet.
- Perfect Portion Control: Jars keep everything neat and encourage mindful eating – I find I enjoy my dessert more this way.

Ingredients You’ll Need
Getting the mix of creamy and crunchy just right is what makes this High Protein Cheesecake Jars Recipe such a winner. I always pick keto graham crackers for that perfect crust texture without the carb overload, and the cream cheese combo ensures a smooth finish you’ll adore.

- Cottage Cheese: Adds creaminess and protein; blending it makes it silky smooth.
- Fat-Free Cream Cheese: Keeps it light but still rich in texture.
- Protein Powder: I love using vanilla salted caramel for a subtle sweetness; pick your favorite flavor.
- Sugar-Free Maple Syrup: Sweetens without the sugar crash, great for keeping carbs low.
- Vanilla Extract: Enhances all the flavors and adds warmth.
- Keto Graham Crackers: Your crust’s foundation that’s low-carb and crunchy.
- Butter (Melted): Binds the crust crumbs together for that satisfying clump.
- Fresh Fruits: Perfect for topping and adding natural sweetness and color.
- Blueberry Jam: Optional, but I love the tang it provides.
- Cocoa Powder (Optional): For my chocolate cheesecake variation, just mix it in with the filling.
Variations
I like to switch things up depending on the season or mood—this High Protein Cheesecake Jars Recipe is a great blank canvas, honestly. You can customize it to be more chocolatey, fruity, or even a little nutty if you’re feeling adventurous.
- Chocolate Cheesecake: When I first tried adding cocoa powder, it transformed the dessert into something luxurious yet still healthy—just add a bit more sweetness if you like.
- Berry Medley Topping: I love mixing fresh strawberries, blueberries, and raspberries for a colorful and vitamin-packed finish.
- Nutty Crunch: Sprinkling crushed pecans or almonds on top adds texture and healthy fats, something my family goes crazy for.
- Seasonal Spice: Around the holidays, a pinch of cinnamon or nutmeg in the filling makes these feel extra special.
How to Make High Protein Cheesecake Jars Recipe
Step 1: Blend the Creamy Filling
Start by adding the cottage cheese, fat-free cream cheese, protein powder, sugar-free maple syrup, and vanilla extract into a blender or food processor. I like to blend until the mixture is 100% smooth—that means no lumps, and a creamy texture that feels almost like a mousse. If you see bits stuck on the sides, simply scrape them down with a spatula and blend again. Trust me, this step makes all the difference!
Step 2: Crush the Graham Crackers for Crust
Place your keto graham crackers into the blender or food processor. If they don’t all fit at once, crush them in batches. Pulse until you get a fine crumb that’s perfect for your crust. Then, transfer the crumbs to a bowl and mix with the melted butter. You’re aiming for the crumbs to be evenly coated and clumpy enough so they’ll stick together at the bottom of the jars, forming that lovely crust layer.
Step 3: Assemble Your Jars
Layer spoonfuls of the graham cracker crust into the bottom of your jars or serving dishes, pressing lightly to form a base. Follow it up with a generous scoop of the cheesecake filling on top. If you’re making the chocolate version, blend cocoa powder right into the filling before layering. Pop them in the fridge for 1 to 2 hours so the flavors meld and the filling firms up just right.
Step 4: Top and Serve
After chilling, top each jar with your choice of fresh fruits or a spoonful of blueberry jam. I find it brings a lovely, fresh contrast to the richness, but don’t be shy—experiment with what you love! Serve these chilled, and enjoy. Honestly, every time I make this, my family asks for seconds.
Pro Tips for Making High Protein Cheesecake Jars Recipe
- Use Full Blending Power: I once tried blending on low speed only and ended up with a grainy texture; going high speed gives you that luxurious creaminess.
- Press the Crust Firmly: Compacting the crust crumbs in the jars helps prevent them from sliding around when you eat.
- Taste Before Chilling: If your protein powder is unsweetened or mildly flavored, you might want to add a touch more sweetener for your perfect bite.
- Avoid Overfilling Jars: Leaving a little space at the top makes adding toppings easier and prettier.
How to Serve High Protein Cheesecake Jars Recipe

Garnishes
I’m all about fresh berries on top—blueberries, raspberries, or sliced strawberries—and sometimes drizzle a little sugar-free chocolate sauce if I’m feeling fancy. A sprinkle of crushed nuts or a mint leaf also adds a nice touch for presentation and extra texture.
Side Dishes
The great thing about these jars is they work perfectly as a standalone dessert or alongside a light breakfast spread. I sometimes serve them with a side of Greek yogurt or almond butter toast when using it as a post-workout snack.
Creative Ways to Present
For special occasions, I like to layer these jars with alternating berry compotes or swirl in a bit of peanut butter into the filling for a marbled effect. Using mini mason jars makes them easy to grab and gorgeous on a dessert table.
Make Ahead and Storage
Storing Leftovers
Store the cheesecake jars in airtight containers or cover the jars tightly with lids or plastic wrap. They keep well in the fridge for up to 3 days, which makes them perfect for prepping ahead. I always keep an eye on the crust—it stays nice and crunchy in this recipe.
Freezing
I’ve tried freezing these jars, and while the texture changes slightly (it’s a bit denser), they still taste great. Just freeze before adding fresh fruit toppings, and thaw in the fridge overnight when ready to eat.
Reheating
Since this is best served cold, I don’t recommend reheating. If you want to take the chill off, simply let it sit at room temperature for 15-20 minutes, which softens the texture and brings out the flavors beautifully.
FAQs
-
Can I use regular cream cheese instead of fat-free?
Absolutely! Using regular cream cheese will make the cheesecake even richer and creamier. Just keep in mind that it will increase the fat and calorie content, so if you’re aiming for a lighter dessert, the fat-free version is your best bet.
-
What’s the best protein powder to use for this recipe?
I recommend using a vanilla or salted caramel flavored protein powder to complement the cheesecake flavors without overpowering them. Whey or plant-based powders both work, but make sure it mixes smoothly for the best texture.
-
Can I make these jars vegan?
This recipe depends on dairy for creaminess and protein, so making it fully vegan would require significant substitutions, like vegan cream cheese and a plant-based protein powder. You could experiment, but the texture and taste will be a bit different.
-
How long do these cheesecake jars last in the fridge?
They’re best eaten within 3 days to enjoy maximum freshness, especially with fresh fruit toppings. After that, the crust might lose its crunch, but the flavor should still be quite good.
-
Can I swap the keto graham crackers for another crust?
Yes! You can use almond flour mixed with melted butter for a low-carb crust or even crushed digestive biscuits if you’re not worried about carbs. Just adjust quantities so you get a firm base.
Final Thoughts
This High Protein Cheesecake Jars Recipe has genuinely become one of my go-to desserts when I want something special but don’t want to sacrifice nutrition. It’s simple enough for beginners and customizable for any taste, plus the jars make it so easy to serve and store. I hope you’ll give it a try—you might end up loving it as much as my family does. And honestly, nothing beats opening the fridge to see these beauties ready to enjoy after a long day!
Print
High Protein Cheesecake Jars Recipe
- Prep Time: 15 minutes
- Cook Time: 0 minutes
- Total Time: 1 hour 15 minutes
- Yield: 4 servings
- Category: Dessert
- Method: No-Cook
- Cuisine: American
- Diet: Low Fat
Description
These High Protein Cheesecake Jars are a delicious and nutritious dessert option packed with protein and low in fat. Made with creamy cottage cheese, fat-free cream cheese, and protein powder, layered over a buttery keto graham cracker crust, and topped with fresh fruits or blueberry jam, these no-bake cheesecake jars are perfect for a quick, healthy treat that you can prepare in minutes and enjoy chilled.
Ingredients
Cheesecake Filling
- 1 1/4 cup cottage cheese
- 1 cup fat-free cream cheese
- 1/2 cup vanilla salted caramel protein powder
- 1/4 cup sugar-free maple syrup
- 2 tsp vanilla extract
Graham Cracker Crust
- 6 keto graham crackers
- 1 tbsp melted butter
Toppings
- Fresh fruits (such as berries, sliced strawberries, or kiwi)
- Blueberry jam (optional)
Optional Chocolate Cheesecake Variation
- 1 tbsp cocoa powder
Instructions
- Prepare the Cheesecake Filling: In a blender or food processor, combine the cottage cheese, fat-free cream cheese, protein powder, sugar-free maple syrup, and vanilla extract. Blend until completely smooth and creamy, scraping down the sides as needed to ensure thorough mixing.
- Make the Graham Cracker Crust: Place the keto graham crackers into the blender or food processor. Pulse until the crackers are finely crushed into a crumb-like texture.
- Combine Crust Ingredients: Transfer the crushed graham crackers into a bowl and mix with the melted butter until the mixture is evenly coated and forms slightly clumpy crumbs.
- Assemble the Jars: Spoon a layer of the graham cracker crust into the bottom of each jar or serving dish, pressing down lightly to create a firm base.
- Add the Cheesecake Filling: Spoon the creamy cheesecake filling on top of the graham cracker crust layer in each jar.
- Refrigerate: Refrigerate the jars for 1 to 2 hours to allow the flavors to meld and the cheesecake filling to set properly.
- Add Toppings and Serve: Before serving, top each jar with fresh fruits and, if desired, a spoonful of blueberry jam. Serve chilled and enjoy your high-protein cheesecake jars!
- Optional Chocolate Variation: For a chocolate version, blend 1 tablespoon of cocoa powder into the cheesecake filling until smooth. Add extra sweetener to taste if necessary. Then assemble and chill as usual.
Notes
- For the chocolate cheesecake, add cocoa powder into the filling and adjust sweetener according to taste.
- Use fresh, seasonal fruits for the best flavor and texture.
- These jars can be stored in the refrigerator for up to 3 days.
- Use keto graham crackers or any low-carb cracker to keep the crust low in carbs.
- For a dairy-free version, substitute cream cheese and cottage cheese with plant-based alternatives.
Nutrition
- Serving Size: 1 jar (approx. 150g)
- Calories: 220 kcal
- Sugar: 3 g
- Sodium: 150 mg
- Fat: 6 g
- Saturated Fat: 3.5 g
- Unsaturated Fat: 2 g
- Trans Fat: 0 g
- Carbohydrates: 18 g
- Fiber: 2 g
- Protein: 24 g
- Cholesterol: 25 mg
