
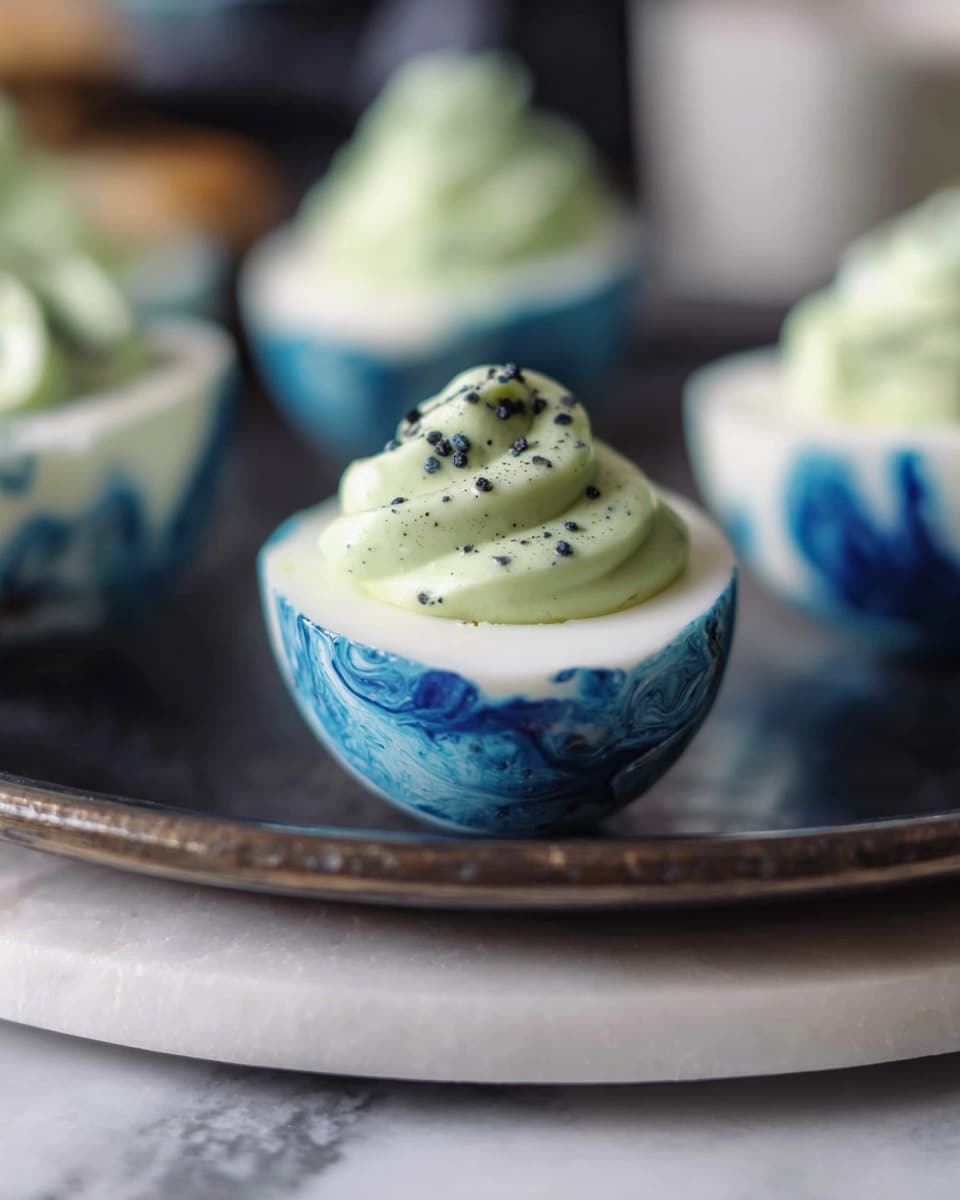
If you’re looking to add a little eerie fun to your Halloween spread, I absolutely love sharing this Halloween Spooky Dyed Deviled Eggs Recipe with friends and family. It’s not just the creepy black and green colors that grab attention, but the creamy, flavorful filling that makes everyone reach for seconds. Trust me, whether you’re hosting a spooky party or just want to impress your little ghouls, this recipe is fan-freaking-tastic and surprisingly easy to pull off!
Why You’ll Love This Recipe
- Eye-Catching Presentation: Those spooky black and green hues make these eggs the star of any Halloween party table.
- Simple Ingredients: You likely have most of what you need in your kitchen already, making it super convenient.
- Deliciously Creamy Filling: The mix of mayo, Dijon, and a hint of smoky paprika gives just the right flavor kick.
- Kid-Friendly and Fun: Even picky eaters get curious and excited about these Halloween treats.

Ingredients You’ll Need
Choosing the right ingredients for your Halloween Spooky Dyed Deviled Eggs Recipe really matters — especially the eggs and the food dyes. The colors are what make this recipe pop, and the creamy filling is the real payoff, so let’s go through what you’ll want to pick up.
- Extra large eggs: Bigger eggs mean you get more yolk filling to enjoy; plus, they hold up nicely when dyed and sliced.
- Mayonnaise: Use a good quality mayo for creaminess and that subtle tang everyone loves in deviled eggs.
- Dijon mustard: Adds a gentle sharpness — I use it daily in my egg dishes for that extra punch.
- Smoked paprika: I discovered this twist gives a subtle smoky depth that elevates the flavor without overpowering.
- Hot sauce: Just a touch wakes up the palette, but feel free to adjust based on how spicy your crowd likes things.
- Back gel food dye: This is for the spooky black background of the eggshell cracks — gel dyes are best for vivid color.
- Green gel food dye: Adds the eerie green tint right into the yolk filling.
- Salt and pepper: Essential for seasoning — I prefer black lava sea salt as a finishing sprinkle for dramatic effect.
- Black lava sea salt: Great for presentation and adding a mild crunch; it really pops against the green filling.
Variations
I love how flexible the Halloween Spooky Dyed Deviled Eggs Recipe is — once you get the basic technique down, you can tweak it all kinds of ways to suit your vibe or dietary needs. Play around and make it your own!
- Go Vegan: I once made these with mashed avocado instead of yolks for a creamy, green twist that was a hit even with egg lovers.
- Add Bacon Bits: My husband swears that sprinkling crispy bacon on top adds an unbeatable savory crunch.
- Spice it Up: Substitute the hot sauce with sriracha or add cayenne if you really want to scare the taste buds.
- Make Them Mini: If you’re planning a big party, deviled quail eggs dyed in the same way make cute bite-sized treats.
How to Make Halloween Spooky Dyed Deviled Eggs Recipe
Step 1: Perfect the Hard-Boiled Eggs
Arrange your eggs in a single layer at the bottom of a pot — I like to use a saucepan that fits them snugly to avoid jostling. Cover the eggs with cold water, about an inch above them, then turn the heat to high and bring the water to a boil, uncovered. Once boiling, let them cook for exactly 10 minutes; any longer and you risk greenish yolks or chalky whites. When done, immediately transfer the eggs to cold water or run under the faucet to stop the cooking. This step is crucial for that perfect texture and easy peeling later.
Step 2: Crack and Dye the Shells for Spooky Effect
Once cooled, gently roll each egg on the counter to crack the shell evenly without peeling off big chunks. The cracks help the black dye seep under the shells for that creepy marbled look. Whisk black gel food dye into cold water in a large bowl until the water turns jet black — trust me, this is where the magic happens. Submerge the cracked eggs completely in the black dye and pop it into your fridge for at least 4 hours. I’ve found overnight soaking gives an even deeper, spooky shade.
Step 3: Make the Creamy, Green Yolk Filling
Carefully peel the dyed eggs — the cracks make it easier, but go slow to keep that spooky marbling. Slice the eggs lengthwise and transfer all the yolks to a bowl. Add mayonnaise, Dijon mustard, green food dye, hot sauce, smoked paprika, salt, and black pepper. I like to start with a few drops of green dye and add more until the color feels just right. Mash everything together with a fork until your filling is smooth, creamy, and vibrant green, the perfect contrast to those black-splattered whites.
Step 4: Assemble and Garnish Your Spooky Deviled Eggs
Spoon or pipe your green yolk mixture into each egg white half. I often use a piping bag with a wide star tip for a polished look that’s also really easy. To finish, sprinkle black lava sea salt on top — not only does it add a wicked crunch, but visually it’s the perfect finishing touch for that spooky vibe.
Pro Tips for Making Halloween Spooky Dyed Deviled Eggs Recipe
- Use Fresh Eggs for Boiling: I’ve found fresher eggs are harder to peel, so buy eggs a week in advance for best peeling results.
- Control Coloring Intensity: Test your food coloring concentration on one egg first to avoid over-dyeing or patchy colors.
- Piping Bag Ease: Piping the yolk filling keeps your eggs neat and uniform, and it’s way faster than spooning if you’re making a crowd.
- Avoid Overboiling: Overcooked eggs get dry yolks – sticking to exact timing means creamy yolks perfect for mashing.
How to Serve Halloween Spooky Dyed Deviled Eggs Recipe
Garnishes
For garnishes, I love the black lava sea salt because it has a natural earthy crunch and looks super spooky. Sometimes I sprinkle thin slices of green onion or a tiny bit of chives for a fresh punch of color. If you want to get Halloween-y, you could even add little edible eyeball decorations or bits of crispy bacon for texture.
Side Dishes
This recipe shines as an appetizer alongside classic Halloween fare like pumpkin soup, roasted root veggies with herbs, or a simple spinach salad with a tangy vinaigrette. For parties, I like to set it with a platter of assorted cheeses and crackers — keeps the vibe festive and easy for guests to mingle and snack.
Creative Ways to Present
Want to wow your guests? Try arranging the eggs on a bed of black kale or dark lettuce to highlight their spookiness. Another fun idea I tried was placing them on “graves” made from carved cucumbers with hollowed-out centers, or even serving them on a platter decorated with plastic spiders and fake cobwebs for that full haunted house vibe.
Make Ahead and Storage
Storing Leftovers
After assembling your deviled eggs, store them in an airtight container in the fridge; I recommend eating them within 2 days for best taste and texture. The black dyed shells can stain your hands a bit during peeling, so gloves might help if you’re prepping lots at once. Leftovers keep surprisingly well, but the fresher the better!
Freezing
I don’t usually freeze deviled eggs because the texture of the yolk filling can get grainy and the egg whites become rubbery. But if you must, freeze just the yolk filling separately and make fresh egg whites before assembling.
Reheating
Deviled eggs are best served cold, so reheating isn’t recommended. If your eggs were refrigerated, just take them out about 15 minutes before serving so the filling isn’t too chilled.
FAQs
-
Can I use regular powdered food dye instead of gel for this Halloween Spooky Dyed Deviled Eggs Recipe?
You can, but gel food dye is strongly recommended because it provides deep, vibrant color without thinning the water. Powder or liquid dyes may not give the intense black or green shades that make the eggs look spooky.
-
How long should I soak the eggs in the black dye for the best effect?
For a rich black marbling, I suggest soaking the cracked eggs at least 4 hours in the dye, though overnight will deepen the color. Just make sure the eggs are fully submerged for even coloring.
-
Do the eggs have a strong flavor from the food coloring?
Nope! The food coloring is tasteless and only affects the appearance, so you still get that classic, creamy deviled egg flavor with a spooky twist.
-
Can I prepare these deviled eggs a day ahead of time?
Absolutely. In fact, preparing them a day ahead allows the flavors to meld beautifully. Just keep them refrigerated, covered tightly to prevent drying out.
-
What’s the best way to peel boiled eggs without messing up the dye effect?
After boiling, cool your eggs quickly in ice water, then gently crack them all over before peeling. Going slow and under running water helps keep the shell and dye intact for the neatest spooky marbled look.
Final Thoughts
I still remember the first time I made these Halloween Spooky Dyed Deviled Eggs Recipe, and how much fun my whole family had peeling those cracked, black shells to reveal the eerie pattern underneath. It’s such a simple technique that turns an everyday appetizer into something memorable and festive. If you want to wow your guests this Halloween with minimal fuss but maximum impact, give these a try — I promise, you’ll be thrilled with how spooky and delicious they turn out!
Print
Halloween Spooky Dyed Deviled Eggs Recipe
- Prep Time: 4 hours 20 minutes
- Cook Time: 10 minutes
- Total Time: 4 hours 30 minutes
- Yield: 6 servings
- Category: Appetizer
- Method: Boiling
- Cuisine: American
Description
Spooky Halloween Deviled Eggs featuring black-dyed egg whites and a creamy, flavorful yolk filling with a hint of heat and smoked paprika. Perfect for Halloween parties, these deviled eggs combine visual fun with tasty, savory bites.
Ingredients
Eggs and Dye
- 6 extra large eggs
- Black gel food dye
- Green gel food dye
Yolk Filling
- 1/4 cup mayonnaise
- 1 tablespoon dijon mustard
- 1/4 teaspoon smoked paprika
- 1 teaspoon hot sauce
- 1/2 teaspoon salt
- 1/4 teaspoon black pepper
Finishing Touch
- Black lava sea salt
Instructions
- Boil the Eggs: Arrange eggs in a single layer in a pot and cover with cold water, ensuring the water level is at least one inch above the eggs. Bring the water to a boil uncovered over high heat. Once boiling, continue boiling for 10 minutes, then remove the pot from the heat and run the eggs under cold water to stop cooking.
- Crack the Eggs: Use the back of a spoon or gently roll each egg on the counter to crack the shells carefully without removing them completely.
- Dye the Eggs: Fill a large bowl with water and add black gel food dye, whisking until the water is evenly black. Submerge the cracked eggs fully in the black dyed water. Refrigerate the bowl with eggs for at least 4 hours to allow the dye to seep through the cracks, creating a spooky marbled effect on the egg whites.
- Peel and Prepare: Carefully peel the dye-marble eggs under cold running water to remove shells while preserving the unique coloring. Cut each egg in half lengthwise and transfer the yolks to a medium bowl.
- Make Yolk Filling: Add mayonnaise, Dijon mustard, green gel food dye, hot sauce, smoked paprika, salt, and black pepper to the yolks. Mash the yolks with a fork until the mixture is smooth and creamy, with a vibrant green tint.
- Fill Egg Whites: Spoon or pipe the yolk mixture into the hollowed egg whites, creating a decorative filling. Sprinkle the tops generously with black lava sea salt for a striking contrast and added texture before serving.
Notes
- For best color penetration, allow the eggs to soak in the black dye for a full 4 hours or longer.
- You can adjust the hot sauce amount to control the spice level of the filling.
- Use a piping bag with a wide star tip for a professional-looking presentation.
- Black lava sea salt adds a wonderful dramatic touch and a slight crunch.
- These eggs can be made a day ahead and refrigerated to allow flavors to meld.
Nutrition
- Serving Size: 1 egg
- Calories: 128 kcal
- Sugar: 0.3 g
- Sodium: 361 mg
- Fat: 11 g
- Saturated Fat: 2 g
- Unsaturated Fat: 8 g
- Trans Fat: 0.03 g
- Carbohydrates: 1 g
- Fiber: 0.2 g
- Protein: 6 g
- Cholesterol: 168 mg


