
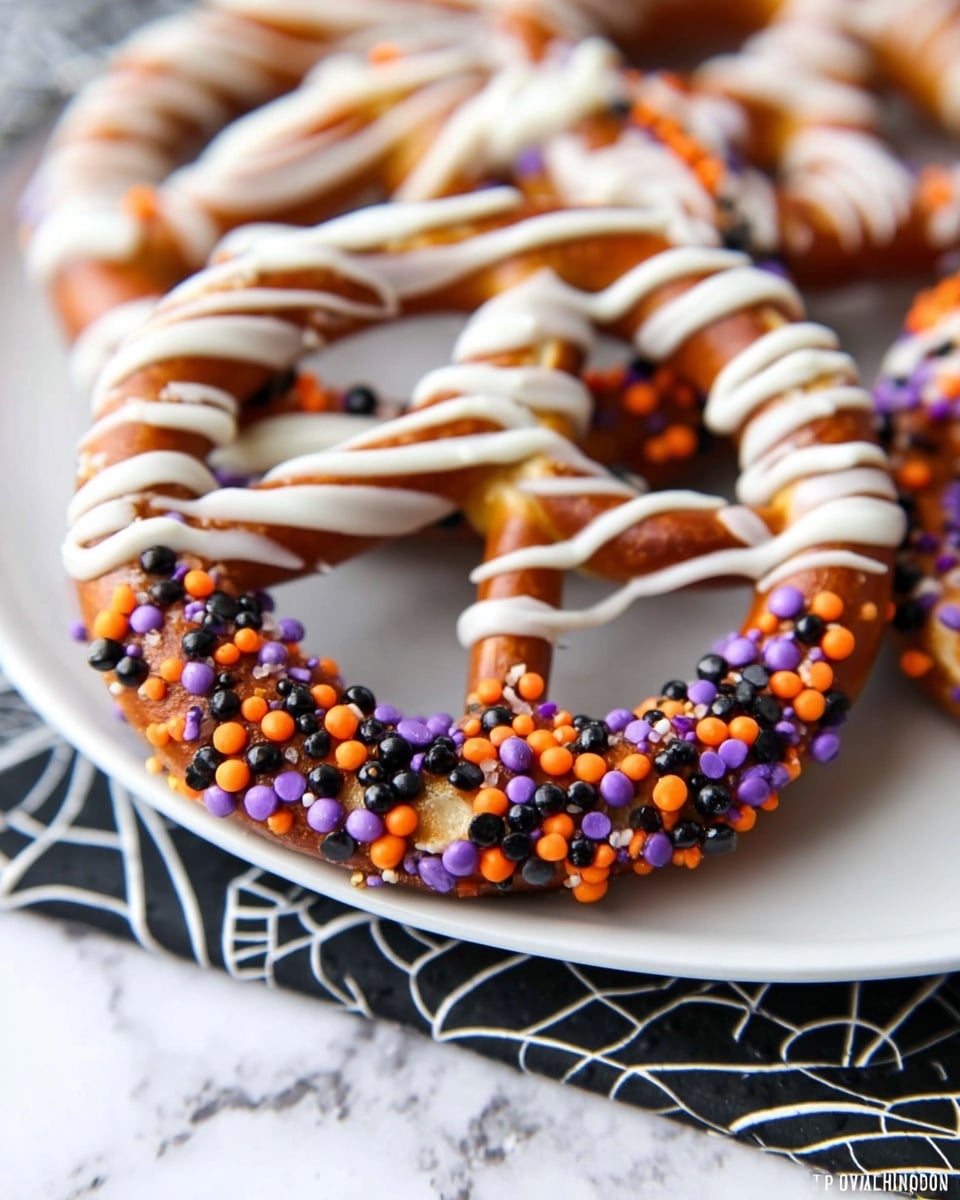
If you’re looking for a spook-tacular treat that’s as fun to make as it is to eat, you’re going to love this recipe for Halloween Pretzel Treats ~ Candy Spiderwebs Recipe. I absolutely love how these sweet and salty spiderwebs come together with just a few simple ingredients, and they’re an instant crowd-pleaser at any Halloween party. Plus, the kids go wild for the candy spiderweb detail — it’s not just a snack, it’s a festive craft you can eat!
Why You’ll Love This Recipe
- Perfect Balance of Flavors: The combination of salty pretzels and sweet candy coating is simply irresistible.
- Fun & Festive: These spiderwebs are a creative way to celebrate Halloween with edible decorations.
- Kid-Friendly Activity: Making these pretzel treats is a great hands-on project to enjoy with little ones.
- No Baking Required: Simple melting and piping means you can whip these up in under 30 minutes.

Ingredients You’ll Need
Each ingredient in this Halloween Pretzel Treats ~ Candy Spiderwebs Recipe plays an important part—from the crunchy crunch of pretzels to the creamy sweetness of vanilla candy coating. Here’s what you’ll need to make sure your spiderwebs turn out perfectly every time.
- Wax paper: This is key for making your spiderwebs easy to lift off and keeps things mess-free.
- Pretzel sticks: I prefer the classic thin sticks—they make the perfect web “spokes” and offer just the right salty snap.
- Vanilla/white chocolate candy coating: Smooths out nicely when melted and contrasts beautifully with the pretzels.
- Halloween sprinkles: Adds that festive pop of color and a bit of extra fun texture.
- Chocolate chips: These melt easily for piping on the spider details—you want good quality for smooth melting.
Variations
While I adore the classic look of these candy spiderwebs on pretzels, I love mixing things up depending on the occasion or who I’m making them for. You’ll find that tweaking colors or adding different candy details really personalizes these treats.
- Colorful Candy Melts: I once swapped in orange or purple candy melts instead of vanilla for a more vibrant Halloween vibe — it was a hit at the party!
- Nut-Free Option: If you’re serving kids with allergies, skip the sprinkles and use crushed freeze-dried fruit or colored sugar instead for decoration.
- Mini Spiderwebs: I sometimes use smaller bowls to make bite-sized webs — perfect for party platters or classroom treats.
- Spicy Twist: For adults, I added a pinch of cinnamon to the melted chocolate for a little warmth that paired nicely with the salty pretzels.
How to Make Halloween Pretzel Treats ~ Candy Spiderwebs Recipe
Step 1: Prep Your Canvas
Start by tracing circles about 8 inches in diameter on wax paper—this helps keep your spiderwebs uniform and gives you a perfect working space. Cut the circles out and place them on cookie sheets. Arrange 8 pretzel sticks on each circle like spokes on a wheel, making sure each stick touches in the center for the spiderweb base. It’s a simple step but crucial for that authentic web look!
Step 2: Melt and Pipe the Candy Coating Webs
Follow the package directions to melt your vanilla or white chocolate candy coating—don’t overheat it, or it might get grainy. Once silky smooth, transfer it to a sturdy plastic bag and snip a 1/4-inch hole in the corner. Begin by piping a small circle right at the center where the pretzels meet. Then spiral outward, encircling the pretzels gradually like weaving a spiderweb. Be sure to stop a bit before the pretzel tips so those crunchy edges stick out, and reinforce the outer most ring by piping over it several times. This thicker edge holds the sprinkles better.
Step 3: Add the Sprinkles for That Halloween Flair
Pour your Halloween sprinkles into a bowl and use a spoon to carefully sprinkle over that thick outer candy ring. This little touch really brings those Halloween vibes to life and adds a fun crunch contrast. It’s one of my favorite parts — it’s like giving your webs a bit of candy sparkle magic.
Step 4: Create the Creepy Chocolate Spiders
Pop chocolate chips into a microwave-safe bowl and heat them in short 30-second bursts, stirring in between until fully melted and smooth. Transfer the chocolate to a tiny plastic baggie and snip a tiny hole at the corner for fine piping work. On each spiderweb, draw a spider using the chocolate: start with the legs by making a plus sign (+) crossed with an X to give eight legs, then pipe a small circle in the middle for the spider’s body. I add two tiny sprinkles for eyes—it really brings these little critters to life and always gets laughs!
Step 5: Let Them Set and Serve
Allow your spiderweb pretzels to dry completely—this usually takes a few hours, but if you’re in a hurry, a quick chill in the fridge helps speed this process up. Once set, gently peel the webs from the wax paper if you want to plate them nicely; otherwise, serving them right on the wax paper circles works just fine and reduces breakage. Either way, these spooky snacks will disappear fast!
Pro Tips for Making Halloween Pretzel Treats ~ Candy Spiderwebs Recipe
- Don’t Overheat Candy Coating: I learned the hard way that overheating makes your white chocolate clumpy; melt gently and stir often for the smoothest finish.
- Use Fresh Pretzels: Stale pretzels can be soft and mushy, which ruins the web’s crunch—always use fresh, crisp pretzel sticks.
- Pipe Slowly and Steadily: When creating the spiral, it really helps to move your hand slowly to keep the candy lines even and neat.
- Chill to Set Faster: If you’re eager to serve, popping your spiderwebs in the fridge speeds drying time without compromising quality.
How to Serve Halloween Pretzel Treats ~ Candy Spiderwebs Recipe
Garnishes
I usually keep garnishes simple—a sprinkle of extra Halloween candy bits or edible glitter can take these spiderwebs from fun to dazzling. Sometimes, I scatter a few gummy spiders around the plate to up the creepy-crawly factor, which always cracks up the kids (and adults).
Side Dishes
These pretzel spiderwebs pair beautifully with a light and tangy fruit salad or a refreshing pumpkin spice iced tea to balance the sweetness. I’ve also served them alongside warm apple cider for a cozy Halloween snack time.
Creative Ways to Present
For Halloween parties, I like to arrange these pretzel treats on a large black platter sprinkled with “cobweb” made from spun sugar or thin strands of icing. To make an eye-catching centerpiece, place the webs atop a tray of dry ice to create spooky fog – it’s a guaranteed conversation starter!
Make Ahead and Storage
Storing Leftovers
I store any leftovers in an airtight container at room temperature. The webs keep their crisp crunch for a few days if you avoid humidity. Just make sure you layer them with parchment paper so they don’t stick together.
Freezing
Freezing isn’t ideal for these because the moisture can make pretzels soggy. However, if you want to prep them well in advance, make and freeze the candy webs and store pretzels separately to assemble right before serving.
Reheating
These treats don’t really need reheating. If they lose a bit of their fresh crispness, a quick 5-minute toast in a low oven (around 300°F) can help revive that crunch, but watch carefully so the candy doesn’t melt.
FAQs
-
Can I use other types of pretzels for this recipe?
Absolutely! While thin pretzel sticks work best for the traditional spiderweb look, you can experiment with mini pretzel rods or even pretzel twists. Just make sure they’re sturdy enough to hold the candy webbing.
-
What if I don’t have white chocolate candy coating?
It’s fine to substitute vanilla-flavored melting wafers or even regular white chocolate chips, but be careful when melting as real chocolate can seize if overheated. Adding a bit of coconut oil while melting can help keep it smooth.
-
How long do Halloween Pretzel Treats ~ Candy Spiderwebs last?
When stored properly in an airtight container at room temperature, they stay fresh and crunchy for up to 3 days. After that, they may start to get soft.
-
Can kids help make these Halloween Pretzel Treats?
Definitely! This recipe is great for getting kids involved because they can help arrange the pretzels, sprinkle decorations, and even draw the spiders with melted chocolate (with a bit of adult supervision). It makes Halloween prep even more fun.
Final Thoughts
This Halloween Pretzel Treats ~ Candy Spiderwebs Recipe has become a beloved tradition in my house—I love how it brings together creativity, fun, and flavor all in one festive bite. It’s easy enough to whip up last minute but special enough to impress guests or delight kids. I hope you’ll give it a try this spooky season and see for yourself how magical these little candy spiderwebs can be!
Print
Halloween Pretzel Treats ~ Candy Spiderwebs Recipe
- Prep Time: 20 minutes
- Cook Time: 10 minutes
- Total Time: 30 minutes
- Yield: 9 spiderweb pretzel treats
- Category: Dessert
- Method: No-Cook
- Cuisine: American
Description
These Halloween Pretzel Treats feature festive candy spiderwebs made from vanilla white chocolate and pretzel sticks, decorated with Halloween sprinkles and chocolate spiders. They are sweet, salty, visually appealing, and perfect for parties or fun activities with kids.
Ingredients
Materials
- Wax paper
Main Ingredients
- 1 package (16 ounces) vanilla or white chocolate candy coating
- Halloween sprinkles (quantity as desired)
- 1/2 cup chocolate chips
- Pretzel sticks (enough to arrange 8 on each web, approximately 72 sticks for 9 webs)
Instructions
- Prepare Wax Paper Circles and Arrange Pretzels: Use an approximately 8-inch diameter bowl to trace circles onto wax paper and cut them out. Place these wax paper circles on cookie sheets. For each circle, arrange 8 pretzel sticks so they touch at the center and radiate outward, forming the base for the spiderweb.
- Melt and Pipe Candy Coating Web: Melt the vanilla or white chocolate candy coating according to package directions, being careful not to overheat. Stir the melted coating until smooth. Transfer it into a gallon-sized heavy-duty/freezer plastic bag and snip a 1/4-inch hole in the corner. Pipe a flat circle at the center where the pretzels meet, then starting from the center and working outward, pipe a spiraling line across the pretzels to create the spiderweb pattern. Stop before reaching the tips of the pretzels so they extend slightly beyond the web. Pipe over the outermost ring multiple times to thicken it, ensuring sprinkles will stick.
- Add Sprinkles: Pour Halloween sprinkles into a bowl. Use a small spoon to carefully cover the thick outer ring of the spiderweb with sprinkles to decorate.
- Melt and Pipe Chocolate Spider: Place chocolate chips in a microwave-safe bowl and heat in 30-second increments, stirring after each, until melted and smooth. Transfer melted chocolate to a small plastic baggie and snip a tiny hole in the corner. In the center of each spiderweb, pipe the spider: start by drawing a thin plus sign (+) topped with an X to resemble 8 small legs, and then pipe a small circle on top for the spider’s body. Add two tiny sprinkles on top of the body for eyes.
- Allow to Set and Serve: Let the spiderweb treats dry for several hours until completely set. Carefully peel each spiderweb from the wax paper, if possible without breaking, or serve them directly from the wax paper circles.
Notes
- The Candy Spiderwebs make a festive and sweet-salty Halloween treat that’s fun to make with kids or serve at parties.
- Be careful not to overheat the candy coating to avoid burning and graininess.
- Allow plenty of time for the chocolate and candy coating to set fully before handling.
- You can customize the sprinkles and chocolate spiders to match any Halloween theme or color scheme.
Nutrition
- Serving Size: 1 spiderweb treat
- Calories: 289 kcal
- Sugar: 32 g
- Sodium: 134 mg
- Fat: 13 g
- Saturated Fat: 12 g
- Unsaturated Fat: 1 g
- Trans Fat: 0 g
- Carbohydrates: 40 g
- Fiber: 1 g
- Protein: 1 g
- Cholesterol: 1 mg


