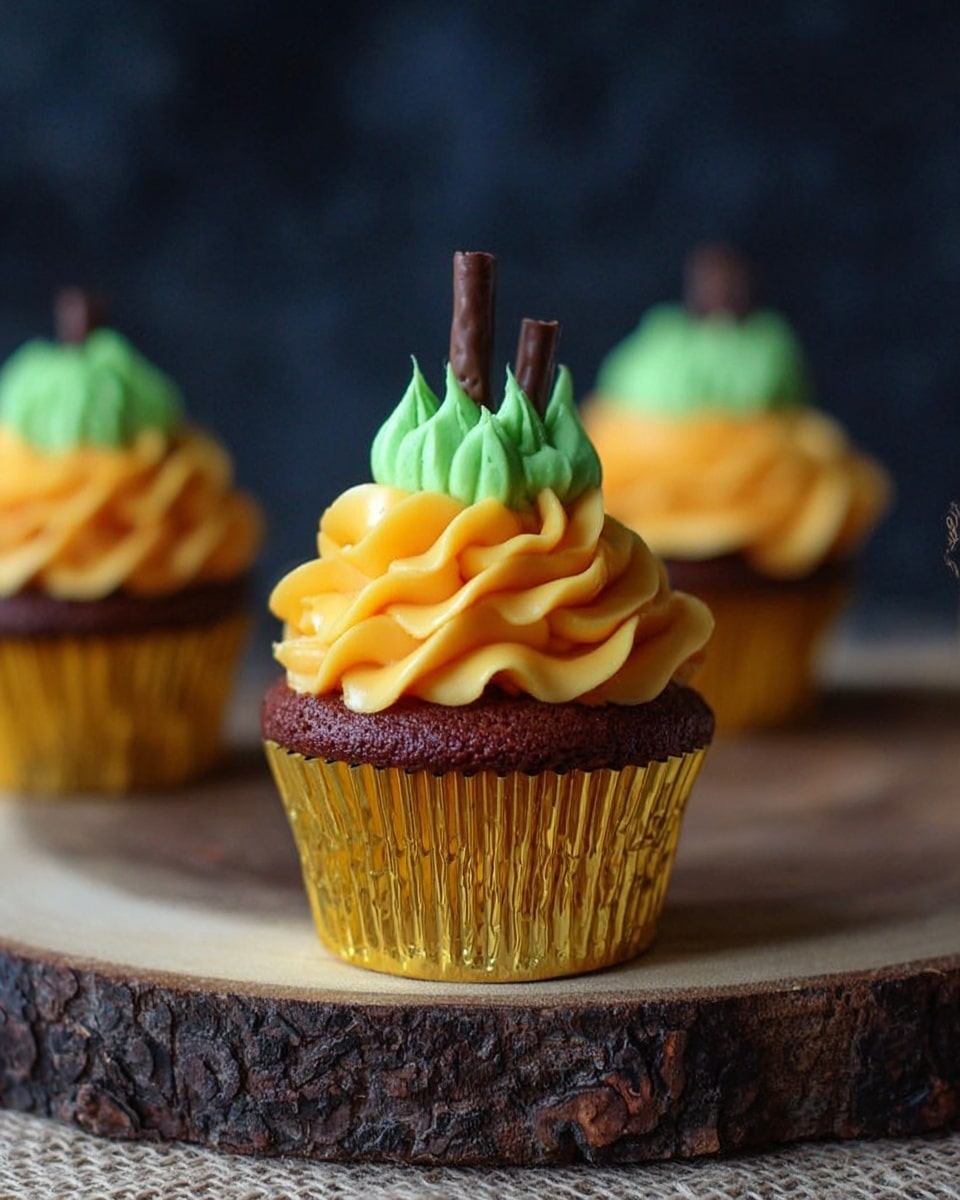
If you’re looking for a festive and fun treat this spooky season, you’re going to love this Halloween Cauldron Cupcakes Recipe. These cupcakes bring together rich red velvet goodness, bright flame-colored frosting, and the cutest little peanut butter cup “cauldrons” bubbling with green frosting magic — trust me, they’re as delicious as they look! I can’t wait to share all my tips so you’ll nail this festive crowd-pleaser with ease.
Why You’ll Love This Recipe
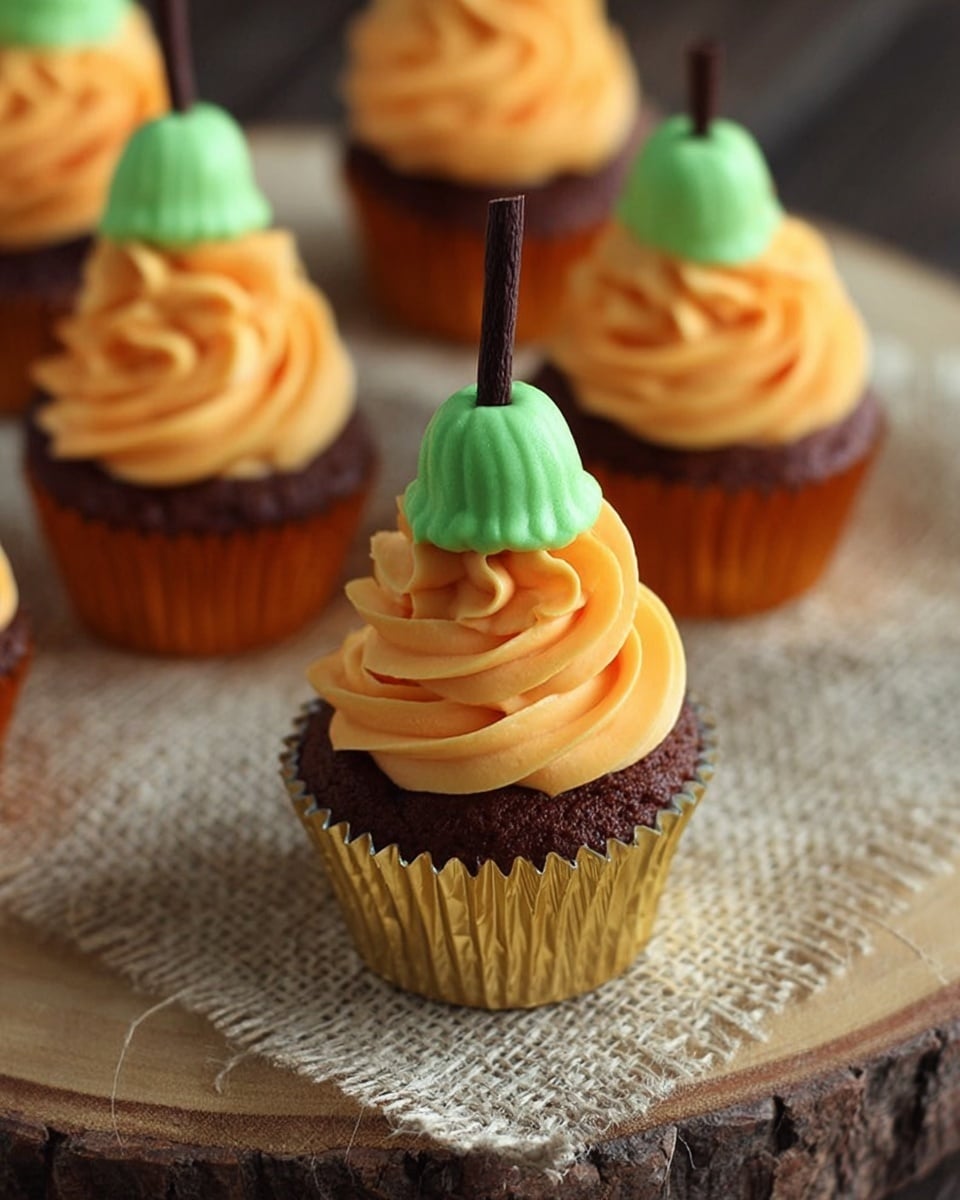
- Visual Wow Factor: Those swirling orange and yellow frostings mimic flames perfectly — a guaranteed conversation starter at any Halloween party.
- Fun & Easy Assembly: The peanut butter cup cauldrons make decorating feel like kid’s play with impressive results.
- Perfect Balance of Flavors: The creamy buttercream and chocolatey peanut butter cups pair beautifully with the rich red velvet cupcake base.
- Make-Ahead Friendly: You can bake, frost, and assemble these in stages — perfect if you want to spread out your prep.

Ingredients You’ll Need
The beauty of this Halloween Cauldron Cupcakes Recipe is how few ingredients you need to create something spectacular. I recommend using a trusty red velvet cupcake recipe as the base since its deep color sets the spooky mood. Also, don’t skimp on the frosting — smooth, rich buttercream is what makes the flame effect pop.
- Red Velvet Cupcakes: Choose a classic recipe or even a boxed mix for convenience; just make sure to bake them completely and cool before decorating.
- Buttercream Frosting: Homemade or store-bought works fine, but I love making mine so I can customize the colors more vividly.
- Food Coloring (Orange, Yellow, Green): Gel food coloring gives you bright colors without thinning your frosting too much.
- Miniature Peanut Butter Cups: These become your cauldrons—grab the mini size for perfect proportions.
- Chocolate Chips: For melting and piping little “spoons” — bittersweet or semisweet plain chocolate works best.
Variations
What makes this Halloween Cauldron Cupcakes Recipe extra fun is how easy it is to switch things up depending on your taste or dietary needs. I’ve tried a few versions, and here’s what I recommend if you want to make it your own.
- Chocolate Cupcakes Instead of Red Velvet: I tried swapping to a rich chocolate base once — super decadent and the cauldron concept still rocked!
- Dairy-Free or Vegan: Swap out butter for vegan margarine and use dairy-free chocolate chips; the frosting held up beautifully for me making these changes.
- Spicy Pumpkin Flavor: Adding a pinch of pumpkin spice to the batter brings seasonal warmth if you want to mix flavors.
- Mini Cupcakes: Making mini versions means more treats and they look even cuter, especially with extra tiny cauldrons piled on top.
How to Make Halloween Cauldron Cupcakes Recipe
Step 1: Bake and Cool Your Cupcakes
Start by baking your red velvet cupcakes following your favorite recipe or the one linked in the notes. This step is key: be sure to let them cool completely before frosting, or the buttercream will melt and get messy. Cooling usually takes about 30 minutes, so maybe clean up while you wait. If you want mini cupcakes, plan on making about 70 since you’ll assemble multiple tiny cauldrons.
Step 2: Prepare Your Frosting Shades
Make a batch of buttercream frosting. I like to reserve about 1 cup plain and then divide the rest into two bowls — tint one half orange and the other yellow with gel food coloring. Use a separate bowl to tint your reserved 1 cup of frosting green. This green frosting becomes the “bubbling” inside the cauldrons, so make it a vibrant shade. Remember, gel coloring keeps your frosting thick and perfect for piping.
Step 3: Create the Flame Swirl
Fit a piping bag with a large star tip, then carefully spoon the orange frosting on one side and yellow on the other. It doesn’t have to be precise — in fact, that slight swirl makes the flame effect look more natural. Pipe a generous swirl in the center of each cupcake. I love to start from the outside edge of the cupcake and work inward to get a full, rounded flame shape. Place these aside for the next step.
Step 4: Make Your Cauldron Tops
Use a smaller piping bag with a round tip (or a zip-top bag with a tiny snip) filled with the green frosting. Pipe a small dollop onto the flat top of each miniature peanut butter cup. This gives the bubble effect for your cauldron. Then place a peanut butter cup on each frosted cupcake, pressing lightly so it sticks but doesn’t squish the frosting underneath.
Step 5: Craft the Chocolate Spoons
Melt your chocolate chips in short 25-second bursts in the microwave, stirring in between, until smooth. Transfer the melted chocolate to a zip-top bag and cut off a tiny corner. Pipe 1-inch lines onto parchment paper to look like spoons — make a whole batch! Once set, carefully peel them off and place one “spoon” into each cauldron topping. They add the perfect finishing touch and a bit of extra chocolatey goodness.
Pro Tips for Making Halloween Cauldron Cupcakes Recipe
- Swirling Colors: I found that spooning the two colors gently into the piping bag instead of mixing gives the best swirl effect with minimal effort.
- Peanut Butter Cups: Chill the cups briefly before placing on cupcakes to avoid melting your frosting when you press them down.
- Chocolate “Spoons”: Use a firm hand when piping and let them fully harden on parchment paper so they don’t break when you transfer.
- Make Ahead Strategy: You can bake and frost cupcakes a day ahead; assemble with cauldrons and chocolate spoons right before your party for freshest appearance.
How to Serve Halloween Cauldron Cupcakes Recipe
Garnishes
I love to keep garnishes simple so the cauldrons shine, but a sprinkle of edible glitter or orange sanding sugar on the flame frosting adds a little sparkle that catches the light wonderfully. Sometimes I also tuck a few candy eyeballs near the cupcake base to sneak in that classic Halloween vibe.
Side Dishes
These cupcakes are so rich and festive that I usually pair them with light sides like fresh fruit skewers or a simple green salad for a Halloween party. If you want something thematic, pumpkin spice popcorn or candied nuts make great crunchy companions.
Creative Ways to Present
You can turn these cupcakes into the highlight of your Halloween dessert table by grouping them on a black tiered cake stand with faux spider webs stretched around for atmosphere. Another fun idea is to place each cupcake in a little witch hat cupcake liner or surround the platter with sprigs of fresh rosemary for a smoky forest look.
Make Ahead and Storage
Storing Leftovers
Once assembled, store cupcakes in an airtight container in the fridge. I’ve had great luck keeping them fresh for up to 3 days this way. Just be sure to bring them to room temperature before serving so the frosting softens up and tastes just right.
Freezing
I don’t recommend freezing the cupcakes fully assembled since the frosting and peanut butter cups can lose texture. However, you can freeze the baked cupcakes (without frosting) wrapped tightly for up to 2 months, then thaw and decorate fresh on the day you plan to serve them.
Reheating
When reheating leftover cupcakes, skip the microwave to avoid melting the frosting. Instead, take them out of the fridge about 30 minutes before serving to warm gently to room temperature. If you want to revive a little warmth, 5 minutes in a 300°F oven does wonders without ruining the texture.
FAQs
-
Can I use store-bought frosting for this Halloween Cauldron Cupcakes Recipe?
Absolutely! Store-bought frosting works fine if you’re short on time. Just add gel food coloring gradually until you reach the vibrant orange, yellow, and green shades—gel colors are best since they don’t thin the frosting.
-
What if I don’t like peanut butter cups? Can I substitute?
You can definitely switch these out! Mini chocolate cups or even hollowed-out chocolate candy shells would look great as cauldrons, but the peanut butter inside really adds a tasty surprise. If you avoid peanut butter due to allergies, try a plain mini chocolate cup instead.
-
How can I make the chocolate spoon decorations without a piping bag?
If you don’t have a piping bag, use a small zip-top bag and snip a tiny corner to pipe the melted chocolate lines. Alternatively, you can use a toothpick to draw spoon shapes on parchment paper carefully.
-
Can I make mini versions of these cupcakes?
Yes! Mini cupcakes work brilliantly and melt hearts with their tiny size. You’ll want about 70 mini peanut butter cups for proportionate cauldrons, so plan on baking enough mini cupcakes to match.
-
What’s the best way to get that flame effect with two frostings in one bag?
My trick is to carefully spoon orange on one side of the piping bag and yellow on the other without mixing them beforehand. As you pipe, the two colors swirl together naturally, creating a beautiful flame gradient without any extra work.
Final Thoughts
I absolutely love how these Halloween Cauldron Cupcakes turn out every time, and I know you will too. They’re festive without being fussy, tasty without being too sweet, and impressive enough to wow both kids and adults. When I first made these, my family went crazy over the playful design — and since then, they’ve become a Halloween staple I can count on. Give this recipe a try and let it bring a little magic (and delicious fun) to your celebration!
Print
Halloween Cauldron Cupcakes Recipe
- Prep Time: 30 minutes
- Cook Time: 20 minutes
- Total Time: 50 minutes
- Yield: 24 regular-sized cupcakes
- Category: Dessert
- Method: Baking
- Cuisine: American
Description
These Halloween Cauldron Cupcakes feature rich red velvet cupcakes topped with a vibrant swirl of orange and yellow buttercream frosting resembling flames. Mini peanut butter cups, decorated with green frosting to look like bubbling cauldrons, sit atop each cupcake, finished with delicate melted chocolate drizzles for added spooky detail. Perfect for festive gatherings, these cupcakes combine classic flavors with playful decoration to bring Halloween magic to your dessert table.
Ingredients
Red Velvet Cupcakes
- 24 Red Velvet Cupcakes (see note for recipe)
Buttercream Frosting
- 2 ½ cups Buttercream Frosting (divided)
- Orange food coloring (to tint frosting)
- Yellow food coloring (to tint frosting)
- Green food coloring (to tint frosting)
Decorations
- 24 Miniature peanut butter cups (if making mini cupcakes, approximately 70 mini peanut butter cups needed)
- ½ cup chocolate chips, melted
Instructions
- Bake the Cupcakes: Prepare the red velvet cupcakes according to your favorite recipe or the note provided, then allow them to cool completely.
- Prepare the Frosting: Make buttercream frosting and portion out 1 cup, setting it aside. Divide the remaining frosting in half, tint one half yellow and the other half orange. Tint the reserved 1 cup of frosting green.
- Fill Piping Bag with Flame Colors: Fit a piping bag with a large star tip and spoon yellow frosting onto one side of the bag and orange frosting onto the other side. This creates a swirl effect to resemble flames.
- Pipe Flame Swirls: Pipe a swirl of the orange and yellow frosting onto each cooled cupcake. Set the frosted cupcakes aside for the next step.
- Decorate Peanut Butter Cups: Fit another piping bag with a medium round tip or use a zip-top bag with a snipped corner. Fill with the green frosting and pipe a small amount onto the top of each miniature peanut butter cup to create a bubbling cauldron effect.
- Place Peanut Butter Cups on Cupcakes: Gently place one decorated peanut butter cup onto the top of each frosted cupcake.
- Melt Chocolate: Melt the chocolate chips in a microwave-safe bowl in 25-second increments, stirring after each interval until smooth and fully melted.
- Create Chocolate Decorations: Transfer the melted chocolate into a small zip-top bag and snip a tiny corner. Line a counter or baking sheet with parchment paper and pipe small 1-inch lines of chocolate. Allow the lines to set and harden completely.
- Assemble with Chocolate Spoons: Carefully peel the chocolate lines off the parchment paper and gently place one into each peanut butter cup on the cupcakes to complete the cauldron look.
Notes
- These adorable Halloween cupcakes are simple to decorate yet impressively festive, featuring little bubbling peanut butter cup ‘cauldrons’ perched atop a swirling orange flame of buttercream.
- If you prefer mini cupcakes, increase the peanut butter cups to approximately 70 minis to match quantity.
- For best results, ensure the cupcakes are completely cooled before frosting to prevent melting the buttercream.
- The chocolate decorations can be made ahead and stored in a cool place until use.
Nutrition
- Serving Size: 1 cupcake
- Calories: 350
- Sugar: 30g
- Sodium: 180mg
- Fat: 22g
- Saturated Fat: 10g
- Unsaturated Fat: 8g
- Trans Fat: 0g
- Carbohydrates: 35g
- Fiber: 1g
- Protein: 4g
- Cholesterol: 55mg
