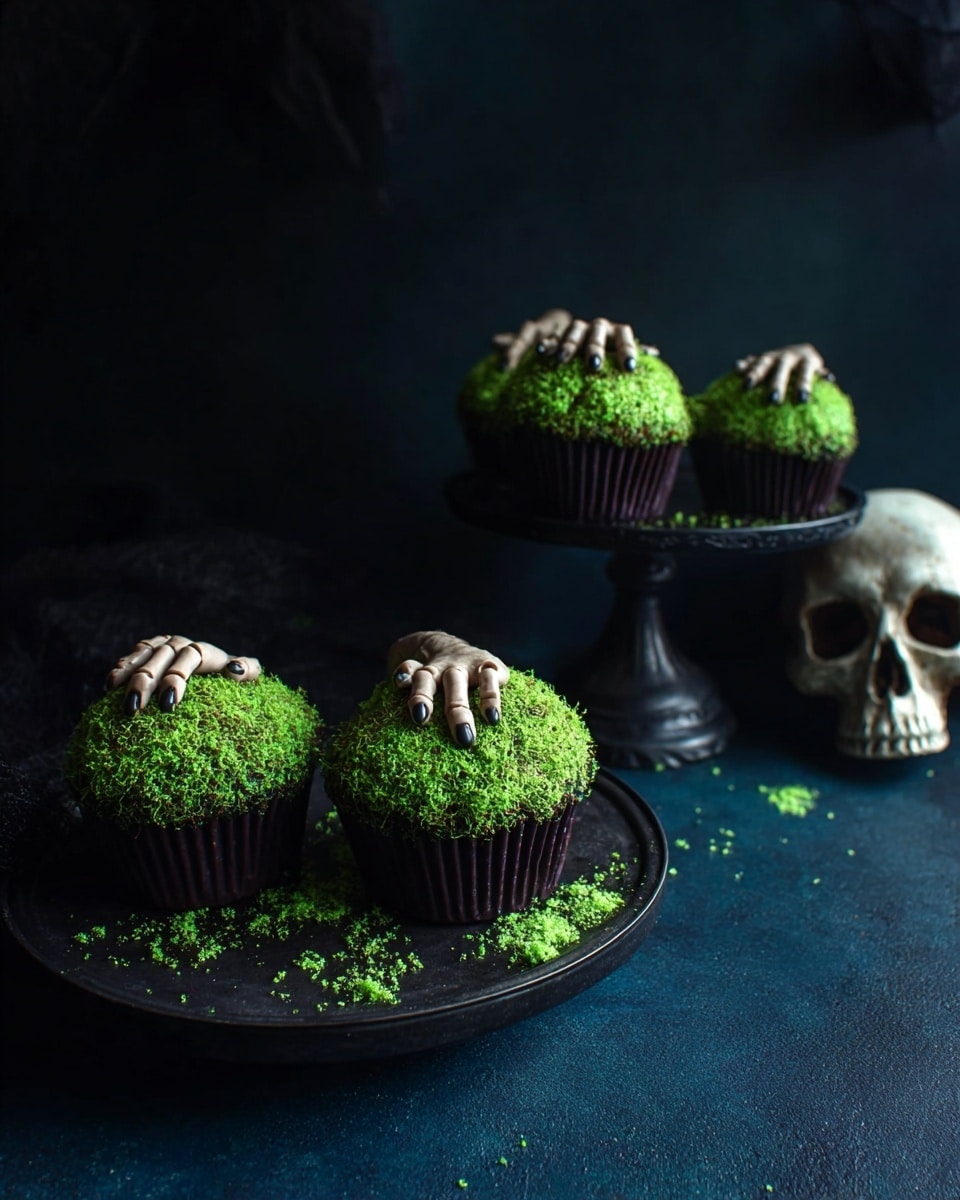
If you’re looking for a cupcake that’s as clever as it is delicious, you’ve got to try my Forget Me Not Cupcakes Recipe. These little treats are not just cupcakes — they’re edible reminders, complete with creepy-cute fondant fingers peeking out of mossy green frosting. I absolutely love how they turn out, and trust me, once you see them, you’ll want to make them again (and again!). Whether you’re gearing up for Halloween, a themed party, or just want a whimsical dessert, these cupcakes are sure to impress and delight.
Why You’ll Love This Recipe
- Unique and Playful Design: The fondant fingers add a fun, spooky twist that’s perfect for Halloween or themed parties.
- Mossy Green Crumb Coating: Using colored graham cracker crumbs gives the cupcakes a wonderfully textured, earthy look you won’t find in the typical cupcake.
- Perfect Balance of Flavor and Texture: Soft cupcakes topped with rich, velvety frosting and just the right crunch make these unforgettable treats.
- Impress Your Guests: Everyone you serve these to will be talking about them long after the last crumb disappears.

Ingredients You’ll Need
To make these spooky sweet delights come alive, the ingredients are simple but thoughtfully combined to give you that perfect cupcake canvas with stunning decorations. Don’t skip on any of the coloring bits, as they really make the design pop!
- Cupcakes: I usually start with your favorite plain or vanilla cupcakes; they provide the perfect light base for the mossy green frosting and decorations.
- Frosting: Choose a smooth, creamy frosting—cream cheese or buttercream works great and holds up well under the crumb coating.
- Fondant: You’ll shape this into ‘fingers’ for that creepy detail. Fondant that’s pliable and not too dry is easier to work with.
- Graham Crackers: Crushed finely to create that crumbly texture which, once colored, gives the moss effect.
- Food Coloring (Blue, Yellow, Brown): These are essential to create your green frosting shade and tinted crumbs—you’ll mix these to get your ideal mossy green.
- Baking Cocoa and Black Powdered Food Coloring: These add dimension and shading to the fondant fingers, making them look authentically eerie.
- Black Thread or Embroidery Floss: For tying little bows around the fondant fingers—not edible, but adds to the charm.
Variations
I love making this recipe my own, and you’ll find it super fun to customize too! Whether you want a less spooky vibe or a variation that suits special diets, there’s something here for everyone.
- Alternative Cupcake Flavors: I’ve made these cupcakes with chocolate or pumpkin spice bases for seasonal twists that pair wonderfully with the mossy green look.
- Dairy-Free Option: Swap out the frosting with coconut cream-based frosting to please dairy-sensitive guests without losing any charm.
- Edible Thread: If you want to skip the black thread, I’ve used very thin licorice strings as a fun edible alternative that’s just as cute.
- Color Palette Changes: Try pastel shades for a springtime version, keeping the same fondant fingers but softer colors for something lighter.
How to Make Forget Me Not Cupcakes Recipe
Step 1: Crafting the Fondant Fingers
This is where the magic—and the creepiness—begins. Start by rolling a small quarter-size ball of fondant until it’s about the length and width of your pinky finger. If it gets a little too long, trim off the excess so you get that realistic finger size. Using your thumb and index fingers, pinch the fondant on either side where the knuckles will be. To add more details, I use a straw sliced in half and smoothed at the edges to create tiny indentations resembling fingernails. A ball tool helps me carve the finger’s base and give an aged, textured effect. I especially love using a scribe tool to carve knuckle lines and make shallow strokes across the finger to add realistic textures. Pro tip: lay your fingers on a straw or similar item to shape them slightly bent. Let them harden while you work on the rest.
Step 2: Coloring and Finishing Your Fingers
For this, brush your hardened fondant fingers lightly with baking cocoa. Then use a damp paper towel to blot some of that off—it creates a perfect uneven, organic look. To add depth, I repeat the process with black powdered food coloring, layering until I get just the right creepy tone. When I’m happy with the coloring, I tie a tiny black thread bow around each finger, giving it a quirky finishing touch that also subtly hints at the old “string on your finger” reminder idea.
Step 3: Preparing the Mossy Green Crumb Coating
Next, pulse your graham crackers in a food processor until finely ground, or crush them in a plastic bag with a rolling pin if you don’t have one handy. Mix blue and yellow food coloring with a splash of vodka or water to thin it out—vodka works best as it evaporates quickly but water does the job fine. Stir the colored liquid into your crumbs, repeating the process until the crumbs reach a rich mossy green that you love. This step always feels a bit like painting with food—so fun!
Step 4: Tinting and Piping the Frosting
Tint your frosting by blending blue, yellow, and a touch of brown food coloring until you get that perfect moss green shade. I suggest mixing gradually, testing the color with a spoon. Once you’ve got the shade, scoop the frosting into a piping bag fitted with a large round tip (like an Ateco 809). Pipe a beautiful, generous swirl on each cupcake—these swirls will be your “bushes” hiding those creepy fingers.
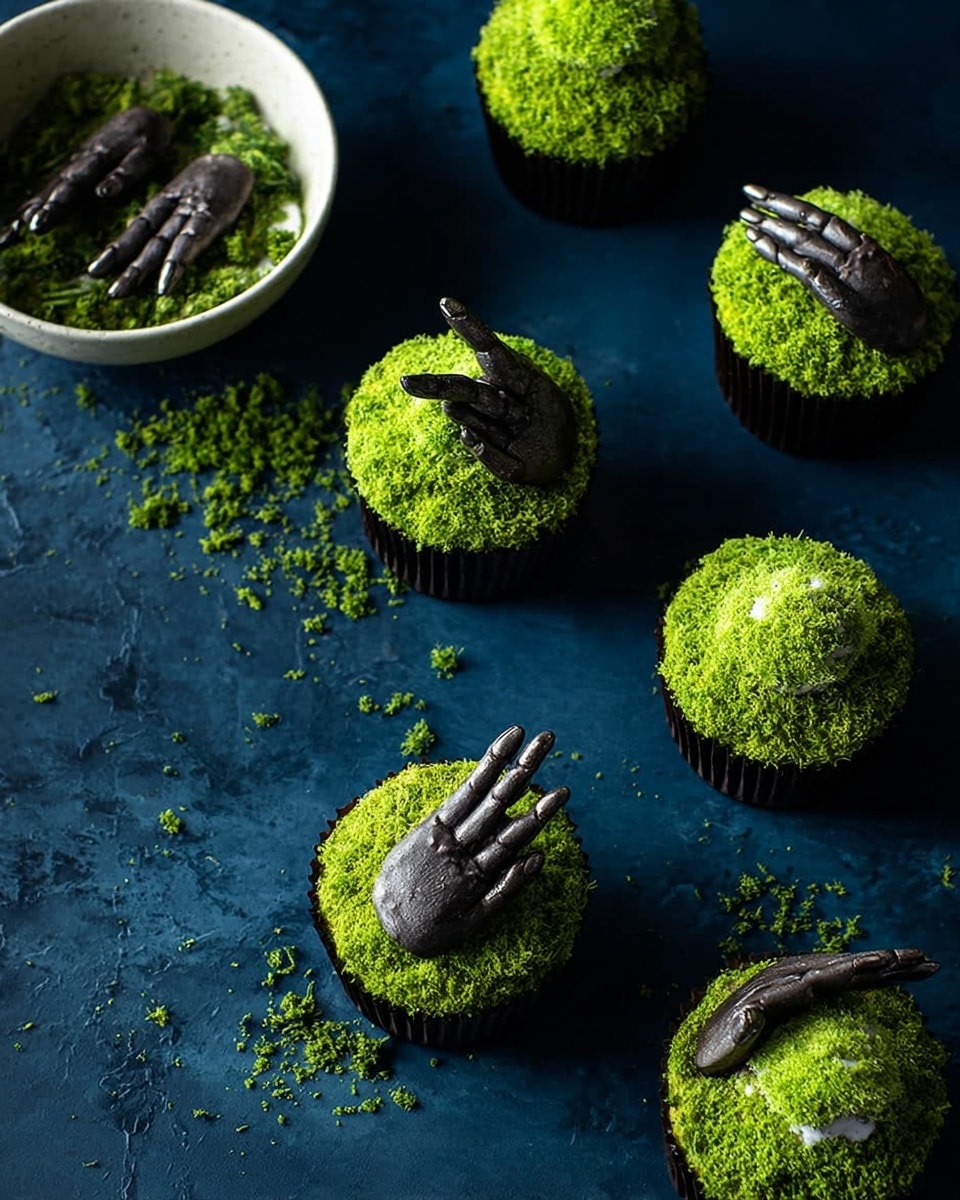
Step 5: Adding the Finishing Touches
Carefully press your piped cupcakes into the green graham cracker crumbs, turning them gently to coat the frosting completely. Then, tuck fondant fingers into the frosting—they’ll look like they’re emerging from the mossy ground, which is exactly the spooky effect we want! This is always the crowd-pleaser moment where friends gather ’round and start guessing what’s coming next.
Pro Tips for Making Forget Me Not Cupcakes Recipe
- Fondant Consistency: If your fondant is too sticky, sprinkle a tiny bit of cornstarch on your workspace—that saved me from a sticky mess more than once.
- Color Mixing: When mixing green for frosting and crumbs, add color little by little to avoid going too dark too fast.
- Holding Fingers Shape: Let the fondant fingers dry on a straw or pencil to keep them naturally curved and lifelike.
- Avoid Oversoaking Crumbs: Don’t drench your crumbs in liquid; a lightly moistened batch coats beautifully without becoming soggy or clumpy.
How to Serve Forget Me Not Cupcakes Recipe
Garnishes
I love keeping it simple with this recipe and letting the fondant fingers steal the show. A tiny sprinkle of edible glitter adds a mysterious shimmer that’s subtle but magical. Some natural edible flower petals can be a lovely touch for springtime or garden-themed events.
Side Dishes
Pair these cupcakes with a light herbal tea or a sparkling lemonade to balance the rich frosting and crumb topping. For Halloween, a chilled blood orange mocktail complements the spooky theme perfectly.
Creative Ways to Present
For parties, I like to arrange these cupcakes on a black slate board surrounded by faux cobwebs and mini pumpkins to amp up the creepy factor. Another fun idea is serving them in little terracotta pots lined with parchment paper—giving the illusion the fingers are growing right out of the earth!
Make Ahead and Storage
Storing Leftovers
I usually keep leftover cupcakes in an airtight container in the fridge, especially because of the frosting and fondant decorations. They stay fresh for 3-4 days, and the frostings stay nice and moist without drying out.
Freezing
If I need to freeze them, I wrap each cupcake individually in plastic wrap to protect the fondant fingers, then place them in a freezer bag. When defrosting, I leave them wrapped in the fridge overnight to prevent condensation from messing up the frosting.
Reheating
Thankfully, these cupcakes are best enjoyed chilled or at room temperature. If you like your cupcakes a bit warmer, just let them sit out for 20-30 minutes before serving to bring out the flavors without melting the fondant details.
FAQs
-
Can I make the fondant fingers ahead of time?
Absolutely! You can mold and color the fondant fingers a few days ahead and store them in an airtight container at room temperature. That way, they’re ready to embellish the cupcakes right before serving.
-
What if I don’t have black powdered food coloring?
No worries—regular black gel food coloring diluted with a little cornstarch can work for dry brushing the fondant fingers. If you prefer, cocoa powder alone can add some nice shading too.
-
Can I use store-bought green frosting instead of tinting my own?
You can, but mixing your own gives you that perfect mossy shade that really makes this cupcake unique. Store-bought greens may be too bright or not the right tone, so I recommend tinting your frosting for best results.
-
Is the thread on the fondant fingers edible?
The black thread or embroidery floss is not edible; it’s used as a cute finishing touch. If you want to keep everything edible, try thin licorice strings or edible sugar ribbons as alternatives.
-
How do I avoid the crumb coating from falling off?
Make sure your frosting is slightly sticky and moist before dipping into the crumbs. Also, press the crumbs into the frosting gently to help them adhere firmly but avoid pressing too hard or the frosting may start to flatten.
Final Thoughts
When I first tried the Forget Me Not Cupcakes Recipe, I was absolutely charmed by how much joy and surprise it brought to everyone around the table. These cupcakes are more than just a dessert—they’re a conversation starter, a piece of edible art, and a perfect reminder of fun times with friends and family. If you like baking that mixes creativity with deliciousness, I promise you’ll enjoy making and sharing this recipe as much as I do. Go ahead and give it a try—you’ll be so glad you did!
Print
Forget Me Not Cupcakes Recipe
- Prep Time: 1 hr
- Cook Time: 0 min
- Total Time: 1 hr
- Yield: 12 cupcakes
- Category: Dessert
- Method: No-Cook
- Cuisine: American
Description
Forget Me Not Cupcakes are creatively decorated treats featuring fondant shaped like realistic fingers tied with thread as a whimsical reminder. These 12 cupcakes are frosted with mossy green, tinted frosting coated in colored graham cracker crumbs, making them perfect for Halloween or any spooky-themed event. The detailed fondant fingers add a fun, eerie element while the cupcakes themselves remain delicious and visually striking.
Ingredients
Cupcakes and Frosting
- 12 cupcakes
- 2 1/2 cups frosting
- Food coloring in blue, yellow, and brown
Fondant Fingers
- 1/3 lb fondant
- Black thread or embroidery floss (for tying bows on fingers)
- Black powdered food coloring
- Baking cocoa
Graham Cracker Coating
- 5 graham crackers, crushed
- Blue and yellow food coloring
- Vodka or water (to thin food coloring)
Instructions
- Shape Fondant Fingers: Begin with a small quarter-size ball of fondant. Roll it out to roughly the length and width of your pinky finger. Trim the ends if necessary to maintain the right size.
- Create Knuckles and Nail Indentations: Pinch the fondant on either side where knuckle joints would be using your thumb and index fingers. Then, use a straw cut in half with rounded edges to press an indentation for the fingernail. Use a ball tool to make an indent at the larger end to mimic the finger’s shape, pulling the ends to give a frayed effect.
- Texture Fingers: Carve knuckle lines with a scribe tool, and score the finger surface repeatedly with short shallow strokes to add texture and realism. Repeat for all fondant fingers.
- Shape and Harden: To set a slightly bent finger shape, lay the fondant fingers on an elevated surface such as a straw. Allow them to dry and harden completely.
- Color the Fingers: Brush the hardened fondant fingers with baking cocoa for a base color. Blot some cocoa off with a damp paper towel to create a mottled, organic finish. Apply black powdered food coloring similarly to deepen shading and add realistic effects until the desired appearance is achieved.
- Add Finger Bows: Tie small bows on each fondant finger using black thread or embroidery floss to resemble tied reminders.
- Prepare Colored Graham Cracker Coating: Pulse graham crackers in a food processor until finely ground. Alternatively, crush them in a plastic bag with a rolling pin. In a small bowl, mix blue and yellow food coloring with vodka or water to thin the color. Toss the crushed crackers in the colored liquid and stir until evenly coated. Repeat adding coloring until you reach a vibrant mossy green shade.
- Tint Frosting: Using blue, yellow, and brown food coloring, tint the frosting to a mossy green color that complements the crumb coating.
- Pipe Frosting onto Cupcakes: Fill a piping bag fitted with a large round tip (such as Ateco 809) with the green frosting. Pipe a generous swirl onto the top of each cupcake.
- Coat Frosted Cupcakes: Dip each frosted cupcake into the green-colored graham cracker crumbs, pressing gently so the entire frosting surface is coated evenly.
Notes
- The tradition of tying string around a finger as a reminder may have uncertain origins, but these cupcakes ensure your reminder will be unforgettable!
- Perfect as creative party invitations or a standout in your Halloween dessert spread.
- Fondant fingers can be made ahead and dried thoroughly for ease on decorating day.
- Use vodka rather than water for coloring crumbs if you want quicker drying and less sogginess.
- Store cupcakes in a cool, dry place to keep crumbs crisp and fondant intact.
Nutrition
- Serving Size: 1 cupcake
- Calories: 320
- Sugar: 28g
- Sodium: 150mg
- Fat: 18g
- Saturated Fat: 7g
- Unsaturated Fat: 8g
- Trans Fat: 0g
- Carbohydrates: 38g
- Fiber: 1g
- Protein: 2g
- Cholesterol: 25mg

