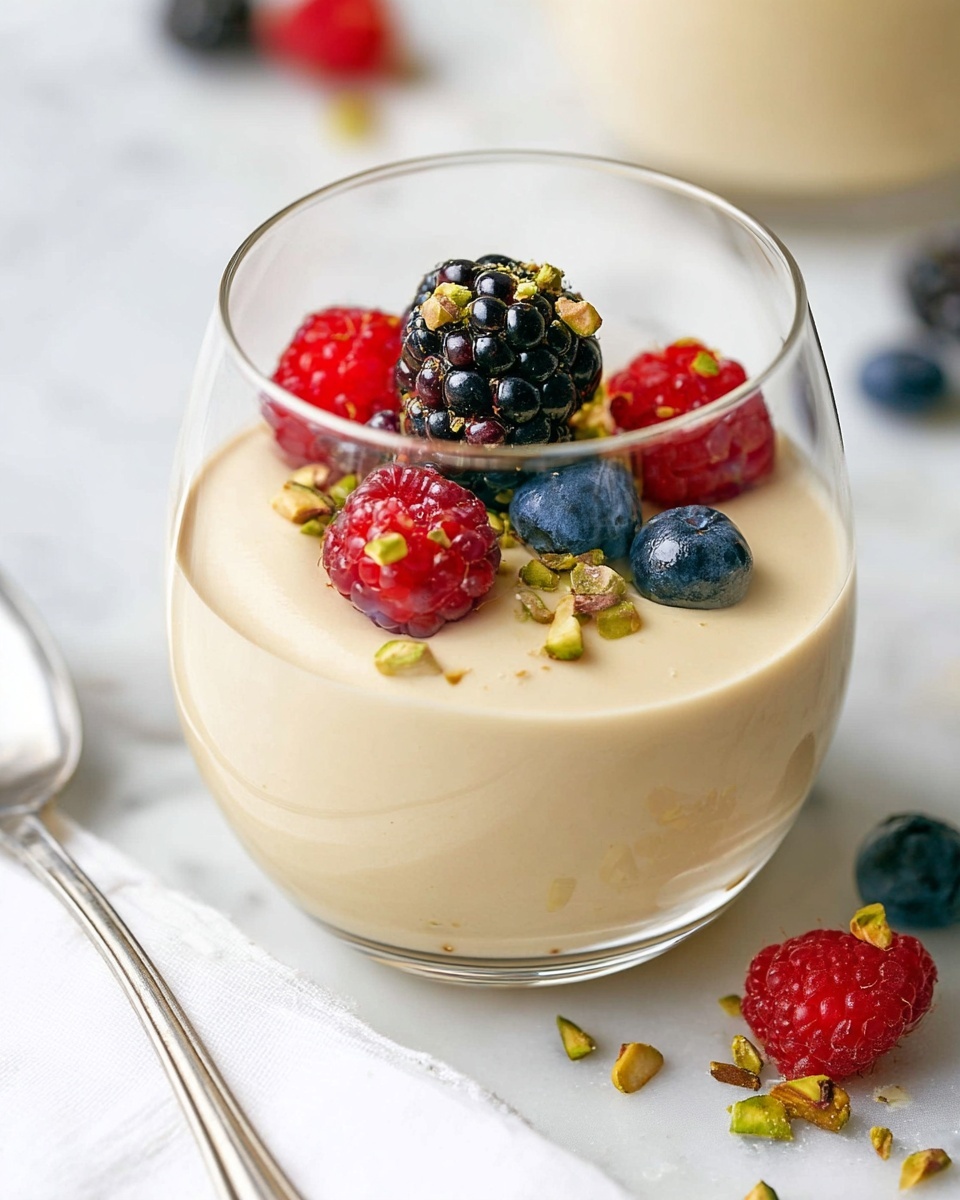
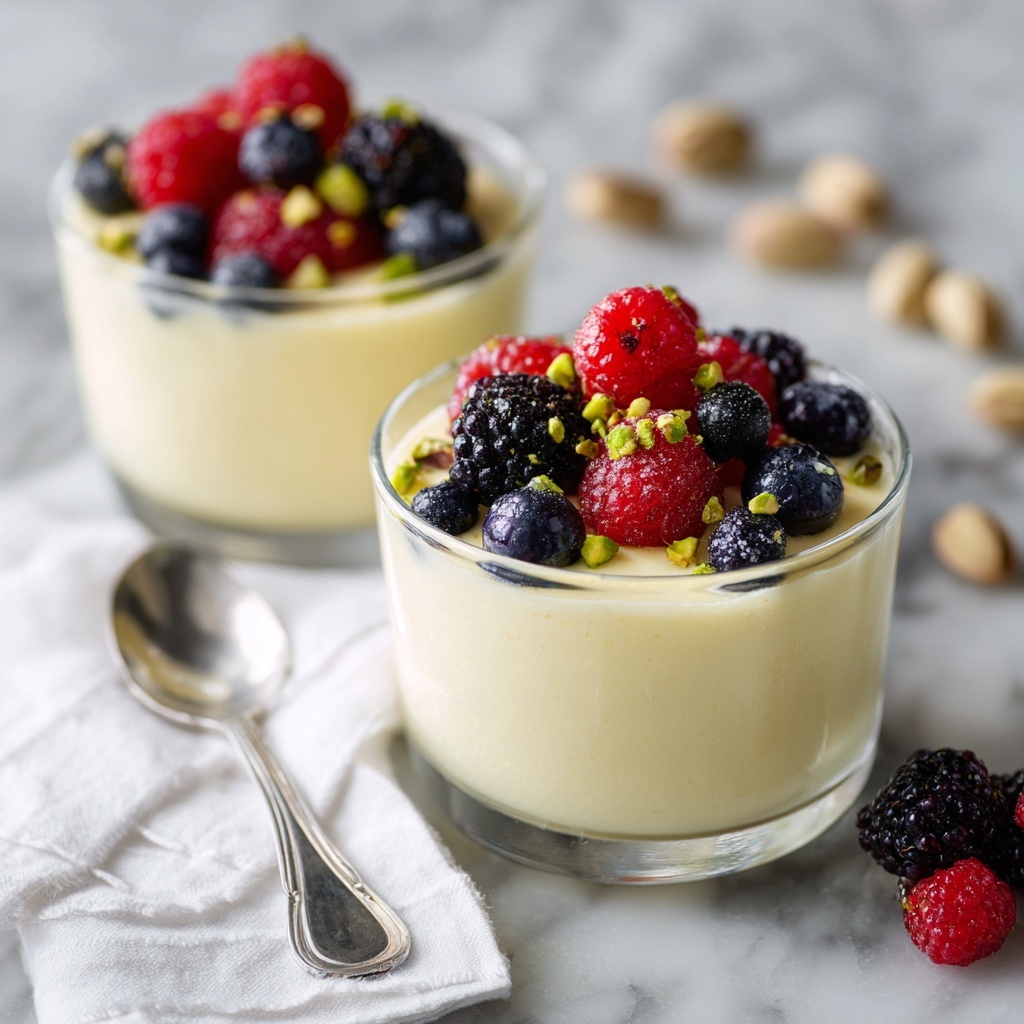
If you’re craving a dessert that feels like a warm hug in a bowl, then I’ve got just the thing for you. This Easy Vanilla Custard Recipe is one of those classic treats that’s silky, creamy, and surprisingly simple to whip up at home. Seriously, you don’t need to be a pastry chef to make this a star in your kitchen — I’m sharing all my insider tips to help you get it just right every time. Whether you like it warm poured over pie or chilled in little glasses, this custard never disappoints!
Why You’ll Love This Recipe
- Super Simple Ingredients: You probably have everything you need right in your fridge or pantry.
- Creamy Texture Every Time: The balance of cream, milk, and egg yolks makes it luxuriously smooth and rich.
- Versatile Serving Options: Warm over desserts or chilled on its own — it’s perfect for any occasion.
- Fail-Safe Technique: I’ll show you how to avoid curdling with a simple tempering step that guaranteed my success.

Ingredients You’ll Need
These ingredients work together so beautifully to create that classic custard flavor and creamy consistency. I always recommend using the freshest eggs and real vanilla extract because those details make a big difference in taste and texture.
- Heavy Cream: Provides richness and that silky mouthfeel you want in custard.
- Whole Milk: Balances out the cream so it’s not too heavy but still indulgent.
- Egg Yolks: The magic binders that thicken and give custard its smooth texture.
- Honey: A natural sweetener I prefer over sugar because it adds subtle floral notes.
- Cornstarch (or Arrowroot/Tapioca Flour): Helps stabilize the custard, preventing it from curdling while thickening it nicely.
- Vanilla Extract: For that unmistakable warm, comforting flavor — fresh is best!
Variations
I love how customizable this Easy Vanilla Custard Recipe is — it’s a great base to experiment with different flavors or dietary tweaks. Sometimes I like to switch things up depending on what’s in season or who I’m cooking for.
- Fruit-Infused Custard: Once, I stirred in some freshly mashed strawberries before chilling it, and my family went crazy — the natural fruit sweetness pairs beautifully with the vanilla.
- Dairy-Free Version: Try swapping the cream and milk for coconut milk and coconut cream! I found it creates a lovely tropical twist while keeping the custard silky.
- Spiced Custard: Add a pinch of cinnamon or nutmeg during the warming stage for a cozy fall vibe that’s perfect for cooler months.
- Less Sweet: Reduce the honey by half if you prefer a subtler sweetness — perfect for pairing with very sweet desserts.
How to Make Easy Vanilla Custard Recipe
Step 1: Warm Up the Cream and Milk Slowly
Start by combining the heavy cream and milk in a medium saucepan over medium heat. I always whisk gently here so the mixture heats evenly without forming a skin on top. Keep a close eye — as soon as you see small bubbles forming around the edges, that’s your cue to take it off the heat. You don’t want it boiling, just heated enough to gently steam and release those creamy flavors.
Step 2: Temper Your Egg Yolks Without Stress
In a separate bowl, whisk together your egg yolks, honey, cornstarch (or your chosen thickener), and vanilla extract. This combo makes the custard luxuriously smooth and flavorful. Now comes a crucial step: to avoid scrambled eggs in your custard, you want to temper the yolks. Slowly pour about half of the hot cream mixture into the yolks while whisking continuously. Take your time — this gradual warming is what keeps it silky and prevents curdling.
Step 3: Cook the Custard Gently to Thicken It
Pour the tempered yolk mixture back into the saucepan with the rest of the cream. Now, over medium-low heat, stir constantly for 1 to 3 minutes until the custard thickens slightly. It’s perfectly normal if it takes a bit of patience here. Don’t rush or stop stirring — I’ve learned that constant movement and gentle heat are the keys to silky custard. Remember, it thickens more as it cools, so don’t worry if it looks a little loose at first.
Step 4: Serve Warm or Cool It Down
If you’re in the mood to enjoy it warm, go ahead and pour it over your favorite cake or pie — it’s like an instant upgrade. If you prefer it chilled, transfer your custard into a bowl and cover the surface directly with plastic wrap to avoid that annoying skin forming. Pop it in the fridge for at least 4 hours or overnight. When you’re ready, scoop it into glasses or bowls for a lovely presentation.
Pro Tips for Making Easy Vanilla Custard Recipe
- Slow and Steady Heating: Heating the cream mixture slowly helps avoid scorching and keeps the custard smooth.
- Whisk During Tempering: Constant whisking while adding the hot cream to the yolks is my secret for preventing lumps or curdling.
- Use a Silicone Spatula to Stir: It’s gentle on the pan and helps you scrape the bottom without burning the custard.
- Cover Custard Surface While Chilling: Placing plastic wrap directly on the custard stops that unpleasant skin from forming.
How to Serve Easy Vanilla Custard Recipe
Garnishes
I love topping my custard with a sprinkle of freshly grated nutmeg or a few fresh berries to add a pop of color and flavor contrast. Sometimes a drizzle of caramel sauce or a dusting of cocoa powder is just the right touch to impress guests.
Side Dishes
This custard pairs wonderfully with classic British custard desserts, like warm apple pie or sticky toffee pudding. For a lighter touch, I often serve it alongside fresh fruit salads or a crisp biscotti for dipping.
Creative Ways to Present
For special occasions, I’ve layered my custard with crushed cookies and whipped cream in clear glasses, creating effortless parfaits that always wow the crowd. Adding edible flowers or a cinnamon stick as a stirrer gives it that extra “wow” factor for dinner parties.
Make Ahead and Storage
Storing Leftovers
Whenever I have leftovers (which is rare because it usually gets devoured!), I keep the custard in an airtight container in the fridge for up to 3 days. Make sure to cover the surface with plastic wrap to maintain that silky texture and prevent skin formation.
Freezing
I’ve tried freezing this custard a couple of times with mixed results. Because of the dairy and eggs, the texture can change slightly, sometimes becoming grainy when thawed. I’d recommend enjoying it fresh or chilled rather than frozen to really savor that perfect creaminess.
Reheating
If you’ve chilled your leftover custard and want to enjoy it warm, reheat it gently in a double boiler or microwave it in short bursts while stirring in between. This keeps the texture smooth without overheating or cooking the eggs further.
FAQs
-
Can I make this Easy Vanilla Custard Recipe without cornstarch?
Yes! While cornstarch helps thicken and stabilize the custard, you can omit it if you’re careful with cooking times and heat. The egg yolks do most of the thickening. Just be sure to cook gently and watch for the custard to coat the back of a spoon as a cue it’s ready.
-
How do I know if my custard is cooked perfectly?
You’re looking for a custard that’s thick enough to coat the back of a spoon and leaves a clean line when you run your finger through it. It should be smooth and silky without any lumps or graininess. If it starts to scramble, the heat is too high or you’ve missed the tempering step, so gentle heat and whisking are key!
-
Can I use this Easy Vanilla Custard Recipe as a base for other desserts?
Absolutely! This custard is a fantastic base for things like crème brûlée, trifle layers, or even an ice cream base if you chill it well first. Its creamy texture and vanilla flavor make it incredibly versatile.
-
Why did my custard develop skin while chilling?
That annoying skin forms when the surface of the custard is exposed to air. To avoid it, always press plastic wrap directly onto the custard’s surface before refrigerating. This simple step keeps it silky smooth.
Final Thoughts
This Easy Vanilla Custard Recipe is honestly one of my favorite go-to desserts when I want something comforting but not complicated. Every time I make it, I’m reminded how a few simple ingredients and some careful stirring can create a pure classic that feels indulgent yet homey. I really hope you’ll try this — it’s a total crowd-pleaser and so rewarding to make from scratch. Trust me, once you nail this, you’ll want to keep it in your recipe arsenal forever!
Print
Easy Vanilla Custard Recipe
- Prep Time: 5 minutes
- Cook Time: 15 minutes
- Total Time: 4 hours 20 minutes
- Yield: 4 servings
- Category: Dessert
- Method: Stovetop
- Cuisine: Western
- Diet: Gluten Free
Description
This easy custard recipe yields a silky, creamy, and versatile vanilla custard that can be served warm or chilled. Made with simple ingredients like heavy cream, whole milk, egg yolks, honey, and vanilla, it’s perfect as a decadent topping for cakes, pies, or enjoyed on its own as a smooth dessert.
Ingredients
Custard Ingredients
- 1 cup heavy cream
- 1 cup whole milk
- 5 large egg yolks
- 2 tablespoons honey
- 2 teaspoons cornstarch, arrowroot powder, or tapioca flour
- 1 teaspoon vanilla extract
Instructions
- Heat the cream: Add the heavy cream and milk to a saucepan over medium heat. Whisk occasionally until the mixture just starts to simmer and bubbles form along the edges, then immediately remove from the heat to prevent boiling.
- Temper the eggs: In a medium bowl, whisk together the egg yolks, honey, chosen starch (cornstarch, arrowroot powder, or tapioca flour), and vanilla extract. While continuously whisking, very slowly pour half of the hot cream mixture into the bowl to gradually warm the eggs without curdling them.
- Combine and cook the custard: Return the tempered egg mixture back into the saucepan with the remaining cream mixture. Stir constantly over medium-low heat for 1 to 3 minutes, until the custard slightly thickens. Be careful not to overcook to avoid curdling. The custard will thicken further as it cools.
- Serve: Serve the custard warm drizzled over cakes, pies, or other desserts. Alternatively, transfer it to a bowl and cover the surface tightly with plastic wrap to prevent a skin from forming, then chill in the refrigerator for at least 4 hours or overnight. Spoon into individual glasses for serving cold.
Notes
- This vanilla custard is silky, creamy, and simple to make with basic pantry ingredients.
- Be sure to temper the eggs slowly to prevent curdling and achieve a smooth texture.
- Covering the custard with plastic wrap touching the surface avoids skin formation when chilling.
- Custard continues to thicken as it cools, so avoid overcooking during the stove step.
Nutrition
- Serving Size: 1 serving
- Calories: 353
- Sugar: 14 g
- Sodium: 51 mg
- Fat: 29 g
- Saturated Fat: 17 g
- Unsaturated Fat: 10 g
- Trans Fat: 0 g
- Carbohydrates: 16 g
- Fiber: 0.1 g
- Protein: 7 g
- Cholesterol: 318 mg


