
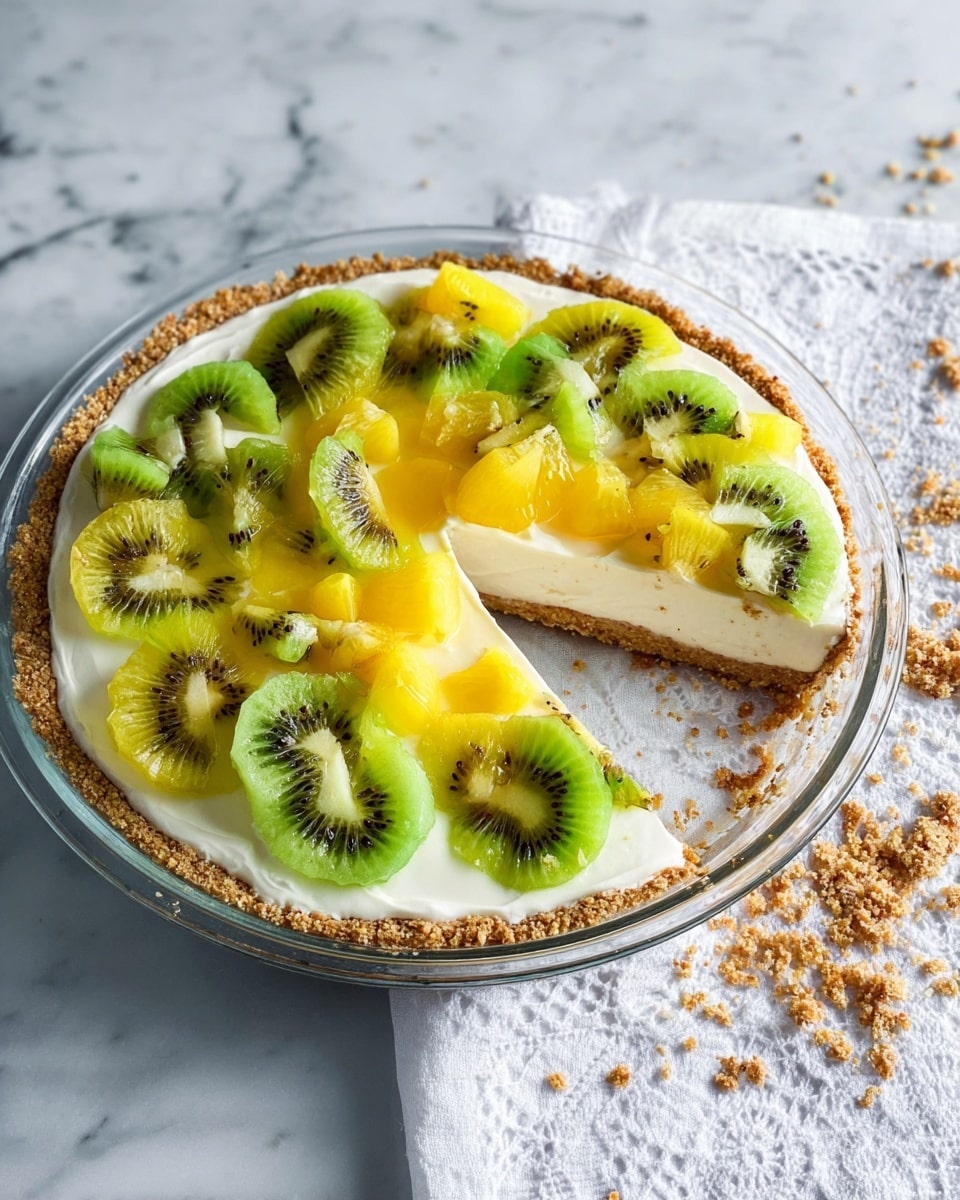
If you love a dessert that’s both refreshing and a little tropical, then wait until you try my Easy Kiwi Lime Pie (with Gluten-Free Option) Recipe. I absolutely love how this pie balances the tang of fresh lime with the sweet, slightly tart flavor of kiwi, all wrapped up in a creamy, cheesecake-like filling. It’s so simple to make—no baking required—plus, you can easily switch to a gluten-free crust without sacrificing any of the texture or flavor. Trust me, you’ll want to keep this one in your summer dessert rotation.
Why You’ll Love This Recipe
- No-Bake Convenience: You don’t need an oven to pull this pie together, making it perfect for warm days or quick dessert fixes.
- Bright, Fresh Flavors: The combination of kiwi and lime gives this pie a vibrant and refreshing twist that everyone raves about.
- Gluten-Free Friendly: Easily swap the graham crackers for gluten-free crumbs to make it safe and delicious for gluten-sensitive eaters.
- Crowd Pleaser: My family goes crazy for this pie whenever I make it, and it literally disappears at every gathering!

Ingredients You’ll Need
The ingredients here come together to create a smooth, creamy pie with a buttery crunch from the crust and a fresh, fruity punch from the kiwi and lime. When shopping, look for ripe but firm kiwis—they’ll be juicier and easier to puree without becoming mushy.
- Graham cracker crumbs: Choose gluten-free crumbs if you need to; they hold the crust together with just the right amount of sweetness and crunch.
- Brown sugar: Adds depth of flavor and a subtle molasses note to the crust.
- Butter: Melted butter is key here to bind the crust ingredients and give it richness.
- Vanilla extract: A splash brightens up the base flavor of the crust nicely.
- Powdered gelatin: Helps set the filling without baking, creating that perfect cheesecake texture.
- Cold water: Needed to bloom the gelatin before mixing it into the filling.
- Heavy whipping cream: Whipped to add lightness and fluffiness to the filling.
- Cream cheese (block-style, softened): The creamy backbone of the filling; make sure it’s room temperature for smooth blending.
- Sweetened condensed milk: Brings sweetness and silkiness to the pie filling.
- Pureed kiwi: Adds that amazing fresh fruit flavor—it’s best to puree 3-4 fresh kiwis to get the desired amount.
- Freshly-grated lime zest: Zest makes a huge difference by adding bright citrus oils that lift the whole filling.
- Fresh kiwis (sliced and quartered): For a colorful and tasty garnish on top.
Variations
I love mixing things up with this kiwi lime pie depending on the occasion or ingredients I have on hand. Feel free to get creative—you’ll find that small tweaks can really make this pie your own.
- Using Alternative Crusts: I once swapped graham cracker crumbs for gluten-free almond flour crust, which added a lovely nutty flavor and was a hit with my gluten-intolerant guests.
- Adding Fresh Mint: Finely chopped mint mixed into the filling or sprinkled on top gives a fantastic fresh note that pairs beautifully with kiwi and lime.
- Incorporating Coconut: Mixing shredded coconut into the crust or sprinkling toasted coconut on top adds a tropical twist perfect for summer vibes.
- Making Mini Pies: I like preparing this recipe in mini tart pans for parties—serving sizes are perfect, and they look adorable!
How to Make Easy Kiwi Lime Pie (with Gluten-Free Option) Recipe
Step 1: Prepare the Crust
Start by combining the graham cracker crumbs (or your gluten-free alternative) with the brown sugar in a bowl. Pour in the melted butter and vanilla, then mix until the mixture resembles wet sand. Press this firmly into your 9-inch pie pan, making sure to pack it tightly along the bottom and up the sides. I find pressing down with the back of a measuring cup works wonders for an even crust. Pop it in the fridge while you prepare the filling so it firms up nicely.
Step 2: Bloom the Gelatin
Sprinkle the powdered gelatin over the cold water in a small bowl. Let it sit for 5 minutes to bloom—that’s the magic step for your filling to set perfectly without baking. If you add the gelatin while it’s not bloomed, the texture can turn grainy, so don’t skip this!
Step 3: Whip the Cream
In a medium bowl, whip the heavy cream until stiff peaks form. This gives the filling its light, velvety texture, so take your time here. Set aside once done.
Step 4: Mix the Filling
In a large mixing bowl, beat the softened cream cheese until smooth and creamy. Slowly drizzle in the sweetened condensed milk while continuing to beat until combined. Warm the bloomed gelatin gently in the microwave for about 10 seconds (just until liquid), then whisk it quickly into the cream cheese mixture. Next, fold in the pureed kiwi and freshly grated lime zest. Finally, gently fold in the whipped cream, being careful not to deflate it too much—the filling should look fluffy and luscious.
Step 5: Assemble and Chill
Pour the filling over your chilled crust and spread it evenly. Smooth the top with a spatula, then cover with plastic wrap and refrigerate for at least an hour, or until set. It’s worth the wait—the filling firms up to a creamy, sliceable perfection. Right before serving, arrange the sliced and quartered fresh kiwis on top in a pretty pattern. This not only looks gorgeous but adds that fresh bite every pie needs.
Pro Tips for Making Easy Kiwi Lime Pie (with Gluten-Free Option) Recipe
- Room Temperature Cream Cheese: I learned the hard way that too-cold cream cheese results in lumps; always let it soften fully before mixing.
- Bloom the Gelatin Properly: Don’t rush this step—allowing the gelatin to bloom and then warming it gently avoids gritty texture in the filling.
- Press the Crust Firmly: Using the bottom of a measuring cup to pack the crust ensures it stays intact when slicing the pie.
- Chill Overnight if Possible: While an hour works, letting the pie chill overnight deepens the flavors and improves the texture immensely.
How to Serve Easy Kiwi Lime Pie (with Gluten-Free Option) Recipe
Garnishes
I love topping this pie with extra fresh kiwi slices as recommended, but sometimes I add a sprinkle of chopped fresh mint or a light dusting of powdered sugar for a little extra elegance and burst of flavor. For parties, a few edible flowers can also make your pie look spectacular and festive.
Side Dishes
This pie pairs wonderfully with simple sides like freshly brewed coffee or a scoop of vanilla bean ice cream. If you’re serving it after a barbecue or a fresh salad-focused meal, the fruity brightness of the pie is a great way to finish on a cooling, sweet note.
Creative Ways to Present
I recently tried serving this pie in individual mason jars layered with whipped cream on top and slices of kiwi around the rim—guests loved the personal touch and it made serving a breeze. You can also drizzle some kiwi or lime syrup over the slices for a glossy finish that looks as good as it tastes.
Make Ahead and Storage
Storing Leftovers
Leftovers should be stored in the refrigerator, covered tightly with plastic wrap or stored in an airtight container. I find the pie holds up nicely for 3-4 days, and in fact, the flavors deepen after a day or two in the fridge.
Freezing
I don’t recommend freezing this pie with the fresh kiwi topping, as the texture suffers after thawing. However, you can freeze the pie without the kiwi slices for up to 1 month. Just thaw overnight in the fridge, then add fresh kiwi before serving.
Reheating
Since this is a no-bake, chilled dessert, reheating isn’t necessary or recommended. Serve it cold straight from the fridge for the best texture and flavor.
FAQs
-
Can I use canned kiwi or kiwi jam instead of fresh kiwi?
Fresh kiwi is best for this recipe because it provides the necessary texture, flavor, and natural tartness. Canned kiwi or jams tend to be sweeter and have a different consistency, which can affect the pie’s texture and overall taste. If fresh kiwi is unavailable, you might consider substituting with another fresh tart fruit like green grapes or a mix of citrus peel, but it will change the flavor profile.
-
How can I make this recipe completely vegan?
To make a vegan version of this Easy Kiwi Lime Pie (with Gluten-Free Option) Recipe, swap the cream cheese for a dairy-free vegan cream cheese, use coconut cream in place of heavy whipping cream, and select a vegan butter substitute for the crust. For the gelatin, replace it with agar-agar powder, a plant-based setting agent—just follow its blooming and dissolving instructions carefully, as it behaves differently from gelatin.
-
What’s the best way to soften cream cheese quickly?
If you forgot to take your cream cheese out of the fridge early, I’ve found two quick tricks: cut it into small cubes and let it sit at room temperature for 15 minutes or microwave it on low power (about 10-second bursts) until soft but not melted. Room temperature cream cheese blends much smoother, which helps your filling be silky.
-
Can I make this pie in advance?
Absolutely! In fact, the flavors meld beautifully when the pie chills for several hours or overnight. Just keep the fresh kiwi topping separate until right before serving to keep it vibrant and fresh-looking.
Final Thoughts
This Easy Kiwi Lime Pie (with Gluten-Free Option) Recipe has become one of my go-to desserts when I want something that feels special but isn’t complicated. The fresh kiwi and sharp lime brighten up every bite, and that creamy filling makes it feel indulgent without being heavy. Whether you’re hosting a summer barbecue or just want a fun way to treat yourself, this pie is such a winner. I can’t wait for you to try it and hear how much your family and friends love it, too!
Print
Easy Kiwi Lime Pie (with Gluten-Free Option) Recipe
- Prep Time: 1 hr 30 min
- Cook Time: 10 min
- Total Time: 1 hr 40 min
- Yield: 9, one 9″ pie
- Category: Dessert
- Method: No-Cook
- Cuisine: American
- Diet: Gluten Free
Description
This Easy Kiwi Lime Pie offers a refreshing tropical twist on the classic key lime pie. Featuring a buttery graham cracker crust and a creamy, no-bake cheesecake-style filling, it’s infused with bright lime zest and pureed fresh kiwis. Topped with vibrant, fresh kiwi slices, this pie is an ideal, crowd-pleasing dessert for summer barbecues, cookouts, and gatherings. The recipe includes a gluten-free crust option for dietary flexibility.
Ingredients
Crust
- 2 ⅛ cups (8 3/8 ounces) graham cracker crumbs (use gluten-free if desired)
- 2 tablespoons packed brown sugar
- 7 tablespoons (3 1/2 ounces) butter, melted
- 1 teaspoon vanilla extract
Filling
- 1 ¾ teaspoon powdered gelatin
- 2 tablespoons cold water
- ⅝ cup (5 ounces) heavy whipping cream
- 11 ½ ounces full-fat cream cheese, softened (block-style)
- ¾ cup (8 1/4 ounces) sweetened condensed milk
- 12 tablespoons + 3/4 teaspoon (6 ounces) pureed kiwi (from 3-4 fresh kiwis)
- 1 ¾ teaspoons freshly-grated lime zest
Topping
- 3-4 fresh kiwis, peeled, sliced, and quartered
Instructions
- Prepare the crust: In a medium bowl, combine graham cracker crumbs, brown sugar, melted butter, and vanilla extract. Mix thoroughly until the mixture resembles wet sand. Press the crust evenly into the bottom and up the sides of a 9-inch pie dish. Chill in the refrigerator while preparing the filling to set.
- Bloom gelatin: Sprinkle the powdered gelatin over 2 tablespoons of cold water in a small bowl. Let it sit and bloom for about 5 minutes to activate.
- Whip the cream: In a chilled mixing bowl, whip the heavy whipping cream until stiff peaks form. Set aside.
- Make the filling base: In a separate large bowl, beat the softened cream cheese until smooth and creamy. Gradually add the sweetened condensed milk and continue beating until fully combined and silky.
- Incorporate the gelatin: Warm the bloomed gelatin gently in the microwave or over a double boiler until fully dissolved (do not boil). Quickly whip the dissolved gelatin into the cream cheese mixture to ensure even distribution before it starts to set.
- Add kiwi and lime zest: Fold the pureed kiwi and freshly grated lime zest into the cream cheese mixture until evenly combined.
- Fold in whipped cream: Carefully fold the whipped cream into the kiwi-lime cream cheese mixture, maintaining as much airiness as possible for a light, creamy texture.
- Assemble and chill: Pour the filling over the chilled crust, smoothing the top with a spatula. Refrigerate the pie for at least 1 hour to allow it to set properly.
- Add fresh kiwi topping: Before serving, arrange peeled, sliced, and quartered fresh kiwi pieces decoratively over the set filling to add a fresh, colorful garnish.
- Serve: Slice and serve chilled for the best texture and flavor. Store any leftovers covered in the refrigerator.
Notes
- This kiwi lime pie is a tropical twist on classic key lime pie, perfect for summer gatherings.
- The crust can be made gluten-free by using gluten-free graham cracker crumbs.
- The filling is no-bake and has a rich, cheesecake-like texture.
- Ensure the gelatin is fully dissolved before adding to avoid lumps in the filling.
- Use ripe, fresh kiwis for the best flavor and vibrant color.
- Chilling time is crucial for the filling to properly set.
Nutrition
- Serving Size: 1 slice
- Calories: 565
- Sugar: 34.3 g
- Sodium: 350.3 mg
- Fat: 36.7 g
- Saturated Fat: 20.9 g
- Unsaturated Fat: 15.3 g
- Trans Fat: 0.5 g
- Carbohydrates: 53.2 g
- Fiber: 2.2 g
- Protein: 8.4 g
- Cholesterol: 98.7 mg


