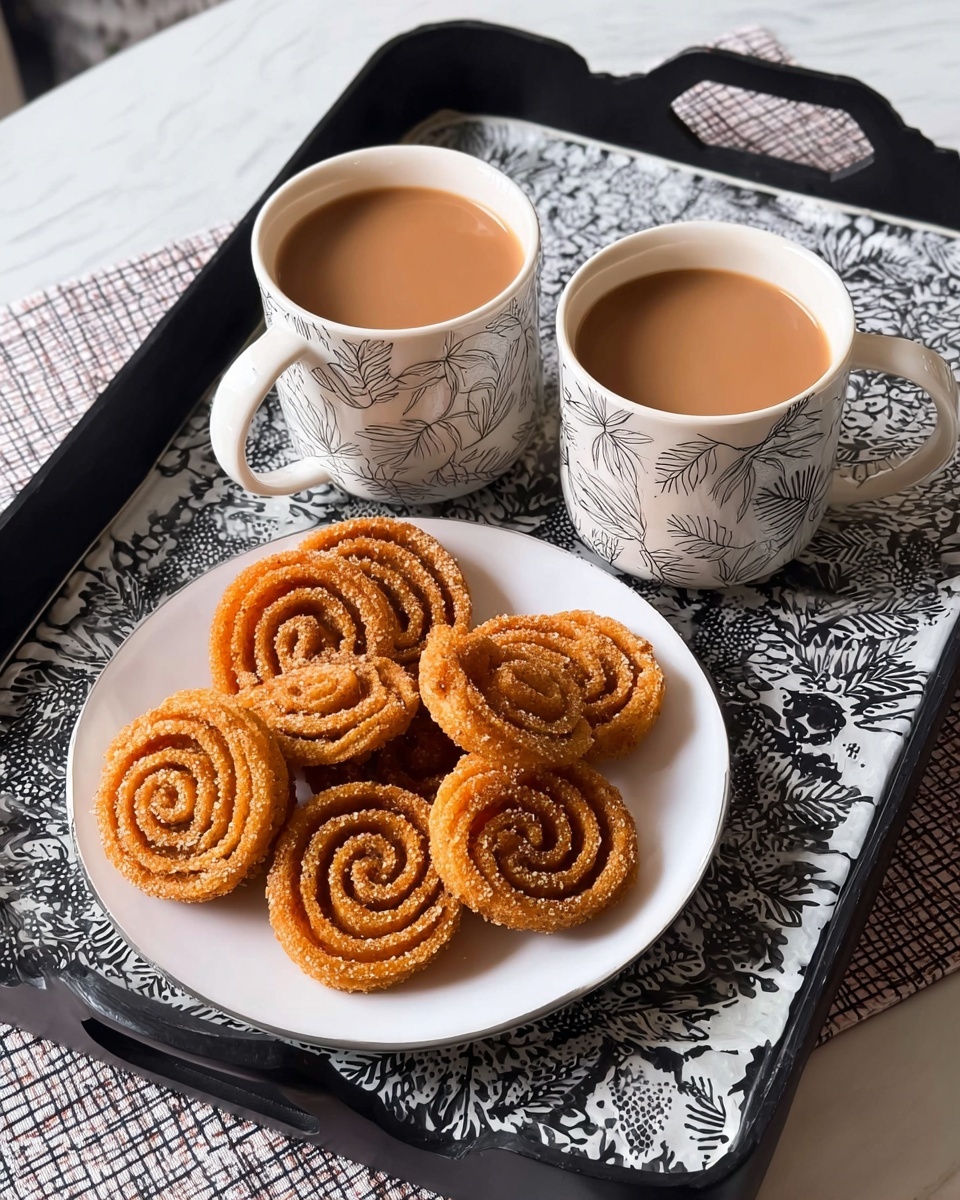
If you’re on the hunt for a delightful, crunchy snack that’s both comforting and easy to make, then you’re in for a treat. This Easy Butter Murukku Recipe with Chickpea Flour Recipe is one of my all-time favorites, especially when I want something crispy and buttery without too much fuss. It’s a fantastic snack to enjoy with your afternoon chai or as a party appetizer that your friends will keep requesting again and again.
Why You’ll Love This Recipe
- Quick and Simple: You can whip up this snack in just about 25 minutes, making it perfect for last-minute cravings or unexpected guests.
- Perfect Crunch: The combination of rice flour and chickpea flour (besan) gives the murukku that irresistible crispy texture.
- Subtle Flavors: A hint of cumin and asafoetida (hing) balance the rich buttery taste and make every bite full of character.
- Kid and Adult Friendly: My family goes crazy for this snack, making it a staple during festivals and everyday tea time alike.

Ingredients You’ll Need
Choosing the right ingredients here makes all the difference. The mix of rice flour and chickpea flour gives you that perfect crunch and a slightly nutty flavor, while the butter adds a luxurious taste and texture that’s hard to beat. I always recommend using fresh spices for that extra aroma punch.
- Rice flour: This is the key for crispiness, so try to use finely ground rice flour for the best results.
- Besan (Chickpea flour): Adds nuttiness and structure; make sure it’s fresh for a clean flavor.
- Softened butter: Use unsalted or adjust salt accordingly; butter makes the snack melt in your mouth.
- Cumin seeds: Toast them lightly if you want a deeper, earthy aroma.
- Hing (Asafoetida): Just a pinch works wonders to enhance flavor and aid digestion.
- Salt: Add cautiously, especially if your butter is salted already.
- Water: A few tablespoons to bring everything together into a pliable dough.
Variations
I love experimenting with this Easy Butter Murukku Recipe with Chickpea Flour Recipe, and you’ll enjoy how easy it is to switch things up based on your mood or what you have on hand. Don’t hesitate to make it your own!
- Spice It Up: I’ve added chili powder or black pepper to my dough for a spicy kick, and it’s fantastic with tea on chilly evenings.
- Seed Mix: Sometimes, I replace cumin seeds with ajwain (carom seeds) for a slightly different flavor profile that my family also loves.
- Gluten-Free Friendly: This recipe is naturally gluten-free thanks to rice and chickpea flour, perfect for friends with dietary restrictions.
- Butter Substitutes: If you prefer, you can use ghee instead of butter for a richer aroma—I’ve done this for special occasions.
How to Make Easy Butter Murukku Recipe with Chickpea Flour Recipe
Step 1: Prepare the Dough
Start by mixing the rice flour and besan in a large bowl. Add softened butter and rub it into the flours with your fingers until the mixture looks a bit crumbly but well blended. Then, sprinkle in cumin seeds, hing, and salt. Gradually pour in water, starting with about 4 tablespoons, and knead gently to form a smooth, pliable dough. Don’t add too much water at once; you want a dough that’s firm enough to hold its shape but soft enough to press through your murukku maker.
Step 2: Shape the Murukkus
Transfer the dough into a murukku press fitted with the star-shaped nozzle. If you don’t have a murukku press, a sturdy piping bag with a star tip or even a plastic bag with a snipped corner works in a pinch. Press spirals or coils of dough onto parchment or an oiled plate to get ready for frying. Keep the shapes uniform so they cook evenly—it’s a little meditative, and I find shaping relaxing.
Step 3: Fry Until Golden and Crisp
Heat enough oil in a deep pan over medium heat—test by dropping a small dough piece; it should sizzle and rise to the top immediately. Fry the murukkus in batches, flipping gently, until they are golden brown and crisp. This usually takes about 3–4 minutes per batch. Remove with a slotted spoon and drain on paper towels. Be careful not to overcook; murukku crisps up as it cools, so a light golden color is perfect.
Step 4: Cool and Store
Let the murukkus cool completely before storing to keep that crunch locked in. I like to keep mine in an airtight container on the counter for up to a week, though they rarely last that long in my house!
Pro Tips for Making Easy Butter Murukku Recipe with Chickpea Flour Recipe
- Butter Temperature: Make sure the butter is softened, not melted—this helps the dough bind perfectly without becoming greasy.
- Oil Temperature: Use medium heat for frying; too hot and the murukku will brown outside but remain raw inside.
- Dough Consistency: If your dough feels too dry, add water one teaspoon at a time. Too soft? Add a little more rice flour. This balance is key for crispy murukku.
- Cooling Time: Don’t rush—cool your murukkus completely before storing to avoid sogginess and preserve that crunch.
How to Serve Easy Butter Murukku Recipe with Chickpea Flour Recipe
Garnishes
I personally enjoy these murukkus plain because the buttery, spiced flavor stands beautifully on its own. However, for a festive touch, sprinkling a little chaat masala or garam masala on top right after frying can add a wonderful zing that my family loves.
Side Dishes
While murukku is fantastic solo, it pairs amazingly with a cup of steaming masala chai, coconut chutney, or even a fresh carrot and cucumber salad for a bit of crunch and freshness to balance the snack’s richness.
Creative Ways to Present
For special occasions, I like to arrange murukku in small decorative baskets lined with banana leaves or colorful napkins. You can also serve them in small cones made from parchment paper for a casual party vibe—people love snacking straight from the cone!
Make Ahead and Storage
Storing Leftovers
Store your cooled murukkus in an airtight container at room temperature. I find they stay fresh and crunchy for up to a week. Just make sure the container is sealed tightly to avoid moisture getting in.
Freezing
Freezing isn’t my go-to for murukku because they tend to lose their texture when thawed. If you do freeze them, be sure to cool completely and pack in an airtight, freezer-safe container. Reheat in a hot skillet to regain some crispness.
Reheating
To refresh murukku, I gently warm them on a dry pan over low heat for a couple of minutes. This brings back the crunch and toasty flavor without drying them out as a microwave might.
FAQs
-
Can I use only chickpea flour for this murukku?
While chickpea flour provides good flavor and structure, combining it with rice flour is essential for that traditional crisp texture. Using only chickpea flour will make your murukku denser and less crunchy.
-
What’s the role of hing (asafoetida) in this recipe?
Hing adds a unique umami flavor and also aids digestion, making the snack easier on the stomach. Use just a pinch—it shouldn’t overpower but gently enhance the other spices.
-
How do I know when the oil is at the right temperature?
Drop a tiny piece of dough into the oil: if it floats to the surface immediately and bubbles actively without burning, your oil is ready. Medium heat works best to cook murukku evenly.
-
Can I make murukku without a special mould or press?
Yes! If you don’t have a murukku press, a piping bag with a star tip, or a plastic bag with a small snip at the corner, can work just fine. The shape might not be traditional, but the taste will still be spot on.
Final Thoughts
This Easy Butter Murukku Recipe with Chickpea Flour Recipe has been a game changer for me—not only because it’s quick and easy but because it feels like a warm hug from home every time I bite into it. Whether you’re a seasoned pro or new to South Indian snacks, give this recipe a try. I promise, once you taste that buttery crunch with just the right hint of spice, it’ll become a snack you want to keep in your repertoire to share with family and friends over and over again.
Print
Easy Butter Murukku Recipe with Chickpea Flour Recipe
- Prep Time: 10 minutes
- Cook Time: 15 minutes
- Total Time: 25 minutes
- Yield: 3 servings
- Category: Snack
- Method: Frying
- Cuisine: South Indian
- Diet: Vegetarian
Description
Butter Murukku is a classic South Indian crispy snack that combines the nutty flavors of besan (chickpea flour) and rice flour with aromatic cumin seeds and a hint of hing (asafoetida). This deep-fried treat is rich with the indulgent taste of softened butter, making it irresistibly crunchy and flavorful—perfect for tea time or festive occasions.
Ingredients
Main Ingredients
- 1/2 cup rice flour
- 1/2 cup besan (gram) flour (chickpea flour)
- 28 grams softened butter (2 tablespoons)
- 1 teaspoon cumin seeds
- A pinch of hing (asafoetida)
- Salt to taste (adjust or skip if using salted butter)
- 4 to 6 tablespoons water (approximate, as needed for dough consistency)
Instructions
- Prepare the dough: In a mixing bowl, combine rice flour and besan. Add softened butter and rub it into the flours using your fingertips until the mixture resembles coarse crumbs.
- Add seasonings: Sprinkle cumin seeds, hing, and salt into the flour mixture. Mix everything well to evenly distribute the spices.
- Form the dough: Gradually add water, a tablespoon at a time, kneading gently to form a smooth, pliable dough that holds together but is not sticky.
- Shape the murukku: Fill a murukku press or piping bag fitted with a star-shaped nozzle with the dough. Press designs onto small pieces of parchment paper or directly into the hot oil carefully.
- Heat oil for frying: In a deep frying pan or kadai, heat oil on medium flame until it reaches about 350°F (175°C). To test, drop a small bit of dough into the oil – it should rise slowly to the surface and sizzle.
- Deep fry the murukku: Gently slide the shaped murukku into the hot oil in batches. Fry on medium heat, turning occasionally until they turn golden brown and crispy, approximately 3 to 4 minutes per batch.
- Drain excess oil: Remove the fried murukku using a slotted spoon and place them on paper towels to absorb excess oil.
- Cool and store: Allow the murukku to cool completely before storing in an airtight container to maintain crispness.
Notes
- Butter murukku is best enjoyed fresh but can be stored airtight for up to 2 weeks.
- Adjust water quantity carefully to avoid a sticky or dry dough.
- Use fresh oil heated to the correct temperature to ensure crispiness without absorbing excess oil.
- Traditionally served as a snack during festivals but great for any time of the day.
- For a variation, you can add sesame seeds for extra texture.
Nutrition
- Serving Size: 1 serving
- Calories: 258 kcal
- Sugar: 1 g
- Sodium: 334 mg
- Fat: 12 g
- Saturated Fat: 7 g
- Unsaturated Fat: 4 g
- Trans Fat: 0 g
- Carbohydrates: 32 g
- Fiber: 2 g
- Protein: 5 g
- Cholesterol: 27 mg

