
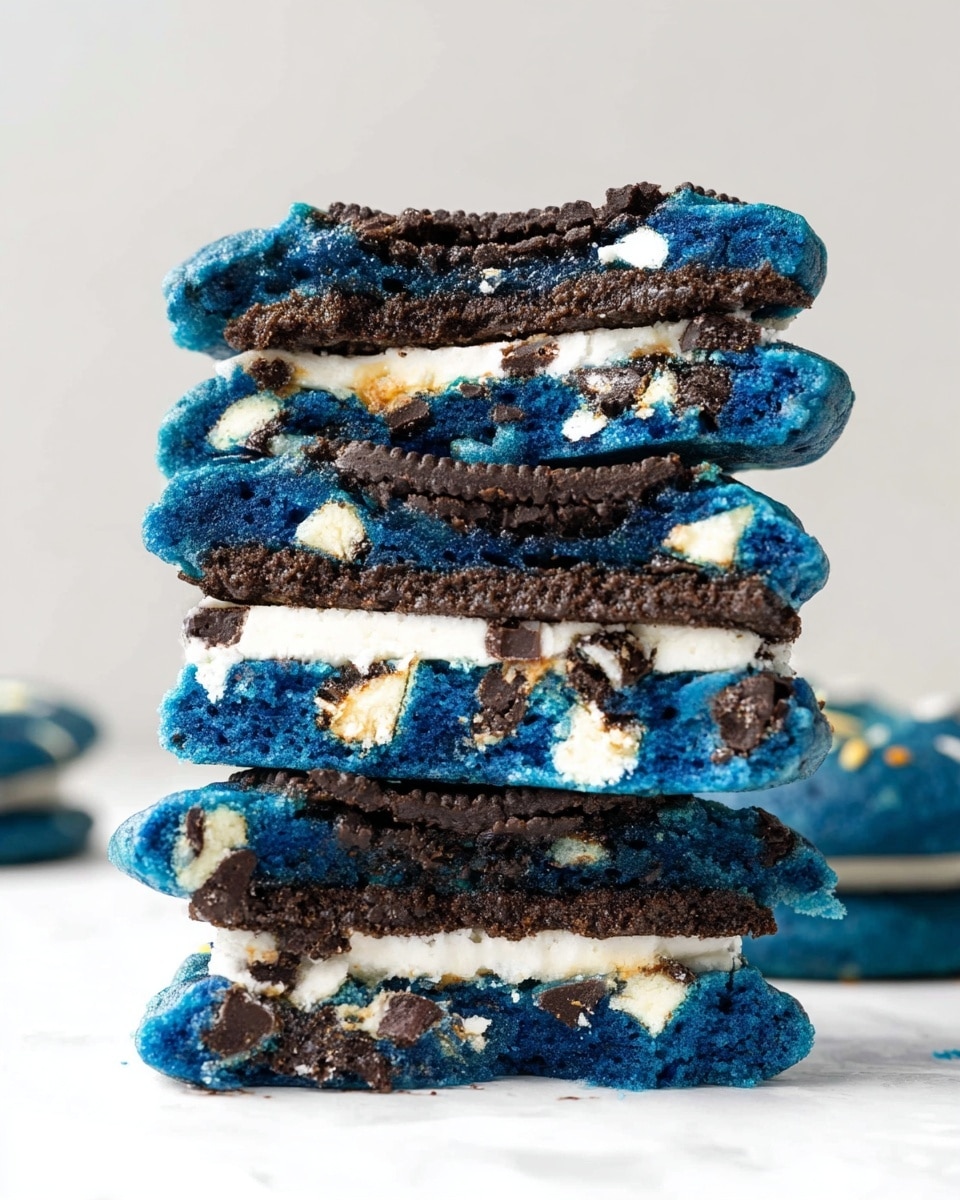
Let me tell you, this Cookie Monster Cookies with Cookie and Chocolate Stuffing Recipe is an absolute showstopper. I first stumbled upon the idea when I wanted something playful yet indulgent for a birthday party, and boy, these cookies did not disappoint. They’re not just ordinary cookies—they’re packed with a surprise center of either a whole cookie or a gooey milk chocolate square, which makes every bite a fun and delicious adventure.
You’ll find that these cookies are perfect for when you want to wow guests or need a creative treat for family movie night. The bright blue cookie dough alone will make anyone smile, but when you bite into the rich chocolate or crunchy cookie stuffing, it takes things to a whole new level. I absolutely love how this turns out every time, and I’m excited for you to try it too!
Why You’ll Love This Recipe
- Fun Surprise Inside: Each cookie hides a gooey or crunchy filling that makes them more exciting to eat.
- Vibrant Blue Dough: The blue cookie dough adds a playful twist that’s perfect for kids and adults alike.
- Customizable Stuffing: You can choose chocolate squares or whole cookies for the perfect texture you love.
- Easy to Prep Ahead: Chill the dough for hours or even bake later—great for planning your baking schedule.

Ingredients You’ll Need
The magic of these Cookie Monster Cookies lies in their blend of basic baking staples with fun add-ins like crushed cookies and chocolate chips. Using bread flour helps create that perfect chewy texture, while the crushed cookies in the dough add little bursts of extra crunch and flavor.
- Butter: Make sure it’s softened at room temperature for easy creaming and a smooth dough.
- Brown sugar: Adds moisture and rich caramel notes that complement the cookie dough beautifully.
- Granulated sugar: Balances the sweetness and helps achieve a slight crisp on the edges.
- Vanilla extract: A splash of vanilla elevates every bite with warmth and depth.
- Eggs: They bind everything together and give the dough structure.
- Royal Blue gel food coloring: This concentrated color gives you that signature Cookie Monster blue without watering down the dough.
- Bread flour: Provides chewiness; if you don’t have it, all-purpose works just fine too.
- Baking powder & baking soda: Essential for the right rise and texture.
- Salt: To balance the sweetness and bring out all the flavors.
- Crushed cookies (Oreos, Chips Ahoy): These add irresistible chunks of texture inside the cookie dough.
- White and milk chocolate chips: Combining both adds a delicious sweet and creamy dimension.
- Milk chocolate bars or whole cookies: These are your hidden stuffing in the center—choose whatever you love!
- Candy eyeballs: For that fun, whimsical Cookie Monster look that’s impossible to resist.
Variations
I love experimenting with this recipe to match different occasions or taste preferences. You can easily swap the cookie stuffing or chocolate types, and I encourage you to make it your own. It’s all about having fun in the kitchen!
- Stuffing Alternatives: Once, I stuffed mine with peanut butter cups instead of chocolate bars—my family went crazy for that nutty-sweet surprise.
- Gluten-Free Version: I’ve had success using a gluten-free flour blend in place of bread flour for friends with gluten sensitivities; just watch texture adjustments.
- Smaller Bites: Using a tablespoon scoop instead of two enables you to make mini stuffed cookies—perfect for parties or kids’ lunchboxes.
- Natural Coloring: I discovered Butterfly Pea Flower powder gives a gentle blue hue if you prefer natural food coloring over gels.
How to Make Cookie Monster Cookies with Cookie and Chocolate Stuffing Recipe
Step 1: Cream Your Butter and Sugars Until Fluffy
This first step is crucial. Beat together softened butter, brown sugar, granulated sugar, and vanilla extract on medium speed for about 6 to 8 minutes. I usually stop halfway and scrape down the bowl to make sure everything is mixed well and fluffy. You’ll notice the texture change—it should be soft, light, and creamy, which helps make your cookies tender and chewy.
Step 2: Add Eggs and Blue Food Coloring
Add the eggs one at a time, beating well after each addition. Then mix in your blue gel food coloring until the dough is vibrantly blue—this is the fun part where your Cookie Monster really starts to come to life. Remember, gel coloring is more concentrated, so a little goes a long way.
Step 3: Incorporate Dry Ingredients Gently
Sift the bread flour, baking powder, baking soda, and salt over the batter, or whisk them together in a separate bowl before adding. Mix at low speed just until everything is combined—overmixing here can make your cookies tough. The dough should be thick and hold together nicely, perfect for stuffing soon.
Step 4: Stir in Crushed Cookies and Chocolate Chips
Fold in the crushed Oreos, Chips Ahoy, and both white and milk chocolate chips with a spatula. This is where textures marry beautifully—the cookies add crunch and bursts of flavor, and the chips melt during baking to keep things decadent.
Step 5: Shape, Stuff, and Chill the Cookie Dough
Using a large cookie scoop (about 2 tablespoons), scoop 12 balls of dough onto your workspace. Flatten each slightly and press a square of milk chocolate or a whole cookie right in the center. Top with another scoop of dough and carefully pinch the edges to seal the filling completely. Press some crushed cookies and chocolate chips on top and add candy eyeballs for that iconic Cookie Monster look. Pop them all in the fridge for at least 3 hours — I swear this makes them easier to bake without losing their shape.
Step 6: Bake to Perfection
Preheat your oven to 350°F and line baking sheets with parchment paper. Place the chilled stuffed cookies on the sheets about 2 inches apart. Bake the smaller cookies for 10 to 12 minutes, and the larger ones for around 20 to 22 minutes. When they come out, let them rest on the sheet for 10 minutes before moving to a cooling rack. This gives them time to set perfectly so you get that soft chew inside and slight crisp on the edges.
Pro Tips for Making Cookie Monster Cookies with Cookie and Chocolate Stuffing Recipe
- Don’t Skip Chilling: Chilling the dough makes handling the stuffed cookies so much easier, and helps the cookies keep their shape while baking.
- Seal the Edges Well: When you pinch the dough around the stuffing, take your time to seal completely so nothing leaks out during baking.
- Use Gel Food Coloring: I learned that gel coloring gives you that vibrant blue without thinning your dough, unlike liquid colors.
- Cool Before Serving: Let these cookies cool on the sheet for a bit so they finish setting—warm chocolate is amazing but too-hot dough can be messy.
How to Serve Cookie Monster Cookies with Cookie and Chocolate Stuffing Recipe
Garnishes
I always add candy eyeballs—it’s the perfect playful touch that transforms these into true “Cookie Monster” cookies. Sometimes, I dust them lightly with powdered sugar for a frosted effect or add a drizzle of melted white chocolate on top for a more decadent presentation.
Side Dishes
Pair these with a cold glass of milk (classic!) or even a scoop of vanilla ice cream for a fantastic dessert experience. I’ve served these cookies alongside coffee at brunch, and they’re a definite crowd-pleaser.
Creative Ways to Present
During Halloween, I shaped a batch with mini candy eyes and presented them on a plate that looked like Cookie Monster’s face—it was a huge hit with kids. You can also serve these in a clear jar at parties for a cute display that lets the bright blue dough shine through.
Make Ahead and Storage
Storing Leftovers
If you have leftovers (and believe me, you probably will), store the baked cookies in an airtight container at room temperature for up to 3 days. They keep their softness and that chocolatey surprise in the center stays perfect.
Freezing
I often freeze the stuffed dough balls before baking—they freeze well for up to one month. Just thaw in the fridge overnight before baking, and don’t forget to chill again if they’ve warmed up too much from thawing.
Reheating
To enjoy leftovers warm, pop cookies in the microwave for 15 to 20 seconds — the chocolate center becomes delightfully melty again. Alternatively, a few minutes in a warm oven brings back that just-baked texture I love.
FAQs
-
Can I use regular all-purpose flour instead of bread flour?
Absolutely! Bread flour gives a chewier texture because of its higher protein content, but all-purpose flour works fine too. Your cookies will be slightly less dense and more tender, which many people prefer.
-
What if I don’t have gel food coloring?
You can substitute liquid food coloring, but you’ll need to use twice as much to get a similar vibrant blue. Just be cautious not to add too much liquid, or your dough might become sticky. A natural option like Butterfly Pea Flower powder can also be used for a gentle blue hue.
-
Can I prepare the cookie dough in advance?
Yes! You can prepare and even assemble the stuffed cookie dough balls up to a week in advance and keep them in the fridge. Just be sure to bake them within that time for the best texture and flavor.
-
What kinds of cookies can I use for stuffing?
Feel free to get creative! Oreos, Samoas, Chips Ahoy, or even small brownies all make fantastic stuffing. Choose crisp cookies if you want more texture or stick with chocolate bars for ooey-gooey centers.
Final Thoughts
Honestly, this Cookie Monster Cookies with Cookie and Chocolate Stuffing Recipe has become my go-to when I want to bake something that’s both impressive and comforting. It’s a joy to make, and every batch brings smiles, especially from the kids. If you’re looking for a recipe that’s fun to bake and even more fun to eat, give this one a try—you might just find it becomes a family favorite like it did for me!
Print
Cookie Monster Cookies with Cookie and Chocolate Stuffing Recipe
- Prep Time: 20 minutes
- Cook Time: 20 minutes
- Total Time: 40 minutes
- Yield: 10 to 12 large cookies
- Category: Dessert
- Method: Baking
- Cuisine: American
Description
Cookie Monster Cookies are fun, colorful stuffed cookies packed with a delightful mix of crushed cookies, white and milk chocolate chips, and a hidden surprise inside. This recipe combines a soft, chewy cookie dough tinted with vibrant blue food coloring with either a milk chocolate bar or whole cookie stuffed in the center, topped with playful candy eyeballs for a whimsical touch. Perfect for celebrations or a fun baking project that kids and adults will love.
Ingredients
Cookie Dough
- 1/2 cup butter, softened
- 1/2 cup brown sugar, packed (105 grams)
- 1/2 cup granulated sugar (100 grams)
- 2 teaspoons vanilla extract
- 2 large eggs
- 1/2 teaspoon Royal Blue gel food coloring
- 2 1/3 cups bread flour or all-purpose flour (280 grams)
- 1 3/4 teaspoons baking powder
- 1 teaspoon baking soda
- 1 teaspoon salt
- 1 cup crushed cookies (Oreos and Chips Ahoy recommended)
- 1/2 cup white chocolate chips
- 1/2 cup milk chocolate chips
Stuffing Options
- 2 milk chocolate bars, cut into squares
- 12 whole cookies, such as Oreos, Samoas, or Chips Ahoy
Topping
- 1/2 cup crushed cookies
- Candy eyeballs
Instructions
- Prepare the dough base: In a large mixing bowl, combine the softened butter, brown sugar, granulated sugar, and vanilla extract. Beat on medium speed for 6 to 8 minutes, scraping down the bowl halfway through, until the mixture is soft and fluffy.
- Add eggs and coloring: Add the eggs one at a time, mixing thoroughly after each addition. Stir in the blue gel food coloring until the dough is evenly tinted.
- Incorporate dry ingredients: Using a sifter, sift together the flour, baking powder, baking soda, and salt over the wet mixture. Alternatively, whisk these dry ingredients separately before adding. Mix on low speed just until well combined.
- Mix in inclusions: Fold in the crushed cookies along with the white and milk chocolate chips, ensuring even distribution throughout the dough.
- Form stuffed dough balls: Using a large cookie scoop (approximately 2 tablespoons), scoop 12 dough balls. Flatten each slightly and place a milk chocolate square or a whole cookie in the center. Then scoop additional dough on top, seal the edges completely around the stuffing, and gently press to shape. Optionally press extra crushed cookies and chocolate chips on top, and add candy eyeballs for decoration.
- Chill dough balls: Place the prepared cookie dough balls into the refrigerator and chill for at least 3 hours to firm up for better baking results.
- Preheat oven and prepare baking sheets: Preheat your oven to 350°F (175°C) and line baking sheets with parchment paper to prevent sticking.
- Arrange and bake: Place the chilled stuffed cookies on the baking sheets about 2 inches apart. Bake one tray at a time for 10 to 12 minutes for smaller cookies or 20 to 22 minutes for larger cookies, until golden and set.
- Cool cookies: Allow the cookies to cool on the baking sheet for 10 minutes before transferring them to a wire rack to cool completely. Enjoy warm for melty centers!
Notes
- Bread flour results in denser, chewier cookies compared to all-purpose flour.
- Use a #30 cookie scoop (2 tablespoons) for sizing the dough balls accurately.
- Gel food coloring is more concentrated; available online or at craft stores. Substitute with double the amount of liquid food coloring if needed, or use Butterfly Pea Flower powder as a natural alternative.
- Raw dough or assembled stuffed dough balls can be refrigerated for up to 1 week before baking.
- Variety in stuffing: use milk chocolate squares or crisp cookies like Oreos, Samoas, Chips Ahoy, Nutter Butter, or even brownie pieces.
- Best enjoyed warm so the chocolate center is melty and delicious.
Nutrition
- Serving Size: 1 large cookie
- Calories: 367
- Sugar: 24g
- Sodium: 301mg
- Fat: 15g
- Saturated Fat: 7g
- Unsaturated Fat: 7g
- Trans Fat: 0g
- Carbohydrates: 52g
- Fiber: 1g
- Protein: 6g
- Cholesterol: 30mg


