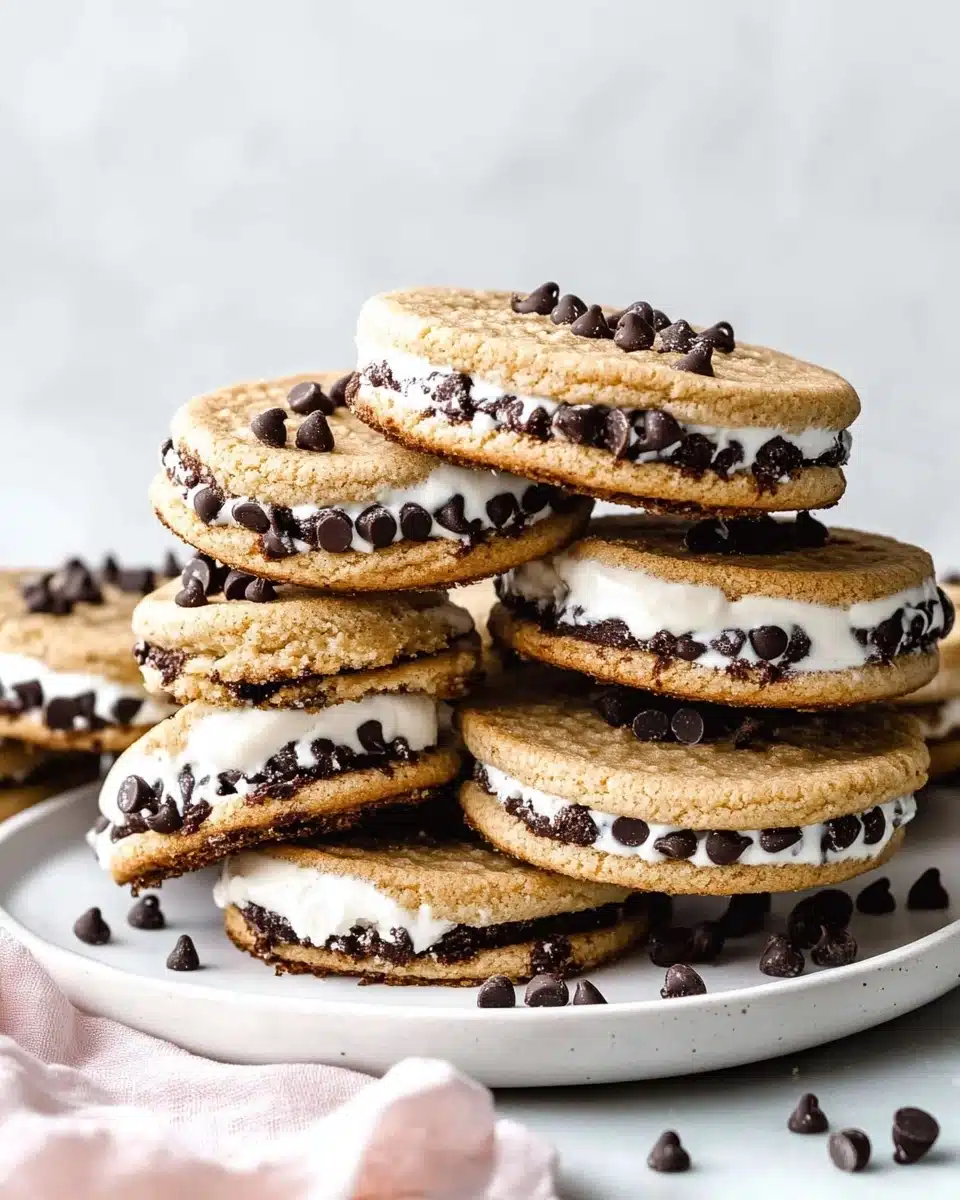
Cookie Ice Cream Sandwiches are the ultimate nostalgic treat—think soft, chewy chocolate chip cookies sandwiching your favorite flavor of creamy ice cream, with all the sprinkles, chips, or nuts your heart desires. This recipe is your ticket to pure dessert bliss, the kind that turns any day into a little celebration of summer (or just a really sweet afternoon). If you’ve never made Cookie Ice Cream Sandwiches from scratch, you’re in for a delightful surprise!
Why You’ll Love This Recipe
- Irresistibly Chewy Cookies: Each cookie is soft and tender with melty mini chocolate chips, staying just the right texture even after freezing.
- Customizable Fun: Choose your favorite ice cream flavors and roll the sides in anything from rainbow sprinkles to salty peanuts for personal flair.
- Perfect Make-Ahead Treat: Prepare Cookie Ice Cream Sandwiches ahead of time—they store beautifully in the freezer for instant treats whenever the craving strikes.
- Nostalgic and Crowd-Pleasing: These sandwiches tap right into that inner child joy, making them a hit for parties, BBQs, or just a laid-back summer night in.

Ingredients You’ll Need
Great Cookie Ice Cream Sandwiches start with simple, pantry staples, carefully chosen for perfect flavor and the ultimate soft bite. Each ingredient adds a special touch—think of the brown sugar for a caramel note, or cornstarch for melt-in-your-mouth cookies that don’t turn rock-hard in the freezer. Let’s take a closer look!
- All-purpose flour: This provides the right structure so your cookies are sturdy enough to sandwich, but tender enough to bite through—even straight from the freezer.
- Cornstarch: The secret weapon for super-soft, bakery-style cookies that hold their texture alongside cold ice cream.
- Baking soda: Helps the cookies rise and keeps them just the right thickness for sandwiching.
- Salt: Just enough to balance the sweetness and make the chocolate flavor pop.
- Unsalted butter (softened): For rich, buttery flavor and that classic crispy-chewy edge you crave in a cookie.
- Brown sugar: Adds moisture, a hint of molasses, and helps achieve that soft, tender crumb.
- Granulated sugar: For structure and a touch of sweetness that helps the cookies bake up beautifully.
- Egg + extra egg yolk: That extra yolk is pure gold—making the cookies richer and softer, almost like cookie dough!
- Pure vanilla extract: The aromatic base that ties everything together with warmth and depth.
- Mini semi-sweet chocolate chips: Mini chips stay tender (not tooth-cracking hard) when frozen, and make sure every bite of the sandwich is chocolatey.
- Vanilla ice cream (or your favorite flavor): Creamy, dreamy filling for your sandwiches—get creative and go wild with your options.
- Mini chocolate chips, sprinkles, or finely chopped nuts (for rolling): The “bling” for your ice cream sandwiches, adding color, crunch, and personality.
Variations
Don’t be afraid to put your own spin on these Cookie Ice Cream Sandwiches! This recipe is a blank canvas for mix-ins, fun flavors, and dietary tweaks—making it easy to match your mood, preference, or what’s in your pantry.
- Gluten-free swap: Use flourless almond butter or peanut butter chocolate cookies as the base for a naturally gluten-free treat—just double-check your ice cream labels!
- Flavor explosion: Try chocolate ice cream, strawberry, caramel swirl, or even coffee for decadent variations—you’re the boss of this ice cream party.
- Mix-in magic: Stir crispy rice cereal, chopped Oreos, or colorful M&Ms into your cookie dough for a delightful surprise in every bite.
- Grown-up twist: Add a pinch of espresso powder or a sprinkle of flaky sea salt to the dough for something a little more sophisticated.
How to Make Cookie Ice Cream Sandwiches
Step 1: Prep and Preheat
Start by preheating your oven to 350°F (177°C) and lining three large baking sheets with parchment paper or silicone baking mats. This not only prevents sticking, but also ensures your cookies spread evenly and lift right off—no drama, just perfect cookie rounds.
Step 2: Whisk Dry Ingredients
In a medium bowl, whisk together the all-purpose flour, cornstarch, baking soda, and salt. Since cornstarch keeps things tender and baking soda ensures lift, mixing these dry ingredients first gets you one step closer to cookie perfection.
Step 3: Cream Butter and Sugars
In a large bowl, cream the softened butter, brown sugar, and granulated sugar on medium-high speed until it’s light and fluffy—about two minutes will do it. This step is all about building lift and flavor, so don’t rush it!
Step 4: Add Egg, Yolk, and Vanilla
Next, add in the egg, extra yolk, and vanilla extract. Beat on medium-high speed until combined, then scrape down the sides and bottom of your bowl—making sure every bit of that rich, golden batter is part of the magic.
Step 5: Mix in Dry Ingredients & Chips
Switch to low speed and add your dry ingredients, mixing just until combined (don’t overwork it!). Gently fold in the mini chocolate chips, creating a soft, slightly sticky dough that’s speckled with chocolate in every scoop.
Step 6: Scoop & Bake
Use a medium cookie scoop to portion your dough—about 1.5 tablespoons per cookie—for even, bakery-style results. Space the dough balls 3 inches apart and bake for 12–13 minutes, until lightly golden on the edges and still soft in the center. This keeps them chewy enough for sandwiching later!
Step 7: Cool Completely
Let the cookies cool on the baking sheet for five minutes before transferring to a wire rack. A quick tip: if you want extra chocolatey tops, gently press more mini chips into the cookies while they’re still warm. Cool completely—this step is key to keeping your ice cream from melting when you assemble.
Step 8: Assemble Cookie Ice Cream Sandwiches
Flip a cooled cookie over, scoop about 1/4 cup of firm ice cream on top, and gently spread to the edges. Sandwich with another cookie, gently pressing to secure. Roll the sides in your favorite mini chips, sprinkles, or chopped nuts for an extra fun (and tasty) finish. Enjoy immediately or wrap them tightly and pop in the freezer for later!
Pro Tips for Making Cookie Ice Cream Sandwiches
- Freeze the Cookies Briefly Before Assembling: Ten minutes in the freezer makes your cookies sturdier and easier to fill—no more melty mess while sandwiching!
- Scoop Your Ice Cream Hard, Not Soft: Slightly firmer ice cream holds its shape in the sandwich, letting you create thick, even layers that won’t drip or run.
- Work in Batches: Keep half your cookies and ice cream in the freezer while assembling the first batch—especially on a hot day, this keeps everything perfectly chilled.
- Wrap Individually for Perfect Storage: Tightly wrap each sandwich in plastic wrap or parchment before freezing so they stay fresh, flavorful, and easy to grab on the go!
How to Serve Cookie Ice Cream Sandwiches

Garnishes
Dressing up your Cookie Ice Cream Sandwiches is half the fun! Roll the edges generously in mini chocolate chips for extra chocolate crunch, or toss them in rainbow sprinkles for a burst of color and whimsy. Crushed pretzels or salted peanuts add a playful, salty contrast, while toasted coconut gives a tropical vibe—let your sweet tooth guide you!
Side Dishes
Serve Cookie Ice Cream Sandwiches alongside fresh summer berries, a bowl of cherries, or a simple fruit salad for a perfect balance to the sweetness. For a party atmosphere, offer a platter of cold lemonade, iced coffee, or even root beer floats—there’s just something magical about classic treats with creamy ice cream.
Creative Ways to Present
Stack Cookie Ice Cream Sandwiches tower-style for a dramatic dessert centerpiece, or wrap them in wax paper and tie with twine for charming picnic-ready bundles. Hosting a gathering? Set up a “sandwich bar” with bowls of sprinkles, chips, and nuts so everyone can roll their own customized creation—it’s a surefire hit at any age.
Make Ahead and Storage
Storing Leftovers
If you manage to have any leftovers, individually wrap each Cookie Ice Cream Sandwich in plastic wrap or parchment and store in a freezer-safe container. This keeps them from soaking up freezer odors and helps prevent freezer burn, so every sandwich is just as fresh and tempting as the first.
Freezing
Once assembled and wrapped, these Cookie Ice Cream Sandwiches freeze beautifully for up to three months! For best results, let them chill for at least three hours before serving—the cookies and ice cream set together, giving that perfect “bite through” texture you crave.
Reheating
No reheating needed (or wanted!) here. To soften your Cookie Ice Cream Sandwiches to that dreamy, creamy state, simply let them sit at room temperature for 3–5 minutes before serving—this way, the cookies are tender and easy to eat with every blissful bite.
FAQs
-
Can I make the cookie dough in advance?
Absolutely! You can prepare the cookie dough up to two days in advance and keep it tightly covered in the fridge. When you’re ready to bake, let it soften slightly at room temperature for easier scooping.
-
Do I have to use mini chocolate chips, or can I use regular?
Mini chocolate chips are recommended because they stay softer and more pleasant to eat even when frozen. Regular chips work, but they can get quite firm and make the sandwiches a bit harder to bite into.
-
How do I keep the ice cream from melting too fast when assembling?
Work quickly, use firm ice cream, and keep your cookies in the freezer for a few minutes before assembly. If it’s especially warm in your kitchen, assemble just a few at a time, keeping the rest of the ingredients chilled in between batches.
-
Can I use store-bought cookies instead of homemade?
Definitely! Store-bought cookies are a great shortcut for busy days—just look for soft-baked varieties for the best texture. Homemade cookies, however, give you more control over thickness, flavor, and size for perfect Cookie Ice Cream Sandwiches every time.
Final Thoughts
If you’re looking for a playful, homemade dessert that melts hearts (and maybe a little ice cream!), you’ve got to try these Cookie Ice Cream Sandwiches. They’re just the right combination of comfort and excitement—so gather your ingredients, invite some friends, and prepare to indulge in a treat that always delivers a smile.
Print
Cookie Ice Cream Sandwiches Recipe
- Prep Time: 30 minutes
- Cook Time: 13 minutes
- Total Time: 3 hours, 30 minutes (includes freezing)
- Yield: 12 3-inch sandwiches
- Category: Baking
- Method: Oven
Description
Delicious and easy-to-make cookie ice cream sandwiches that are perfect for a sweet treat on a hot day. Soft and chewy cookies filled with creamy ice cream and coated with your favorite toppings.
Ingredients
Cookies:
- 2 and 1/4 cups (281g) all-purpose flour (spooned & leveled)
- 1 and 1/2 teaspoons cornstarch
- 1 teaspoon baking soda
- 1/2 teaspoon salt
- 3/4 cup (12 Tablespoons; 170g) unsalted butter, softened to room temperature
- 3/4 cup (150g) packed light or dark brown sugar
- 1/2 cup (100g) granulated sugar
- 1 large egg + 1 egg yolk, at room temperature
- 2 teaspoons pure vanilla extract
- 1 and 1/4 cups (225g) mini semi-sweet chocolate chips
Sandwiching:
- 3 cups (about 540g) vanilla ice cream (or your desired flavor)
- 1 cup mini chocolate chips (180g), sprinkles (150g), or finely chopped nuts (100g)
Instructions
- Preheat oven to 350°F (177°C). Line 3 large baking sheets with parchment paper or silicone baking mats. (If you don’t have 3 baking sheets, bake the cookies in batches.)
- Whisk the dry ingredients. In a medium bowl, whisk the flour, cornstarch, baking soda, and salt together.
- Cream butter and sugars. Using a mixer, beat the butter, brown sugar, and granulated sugar until creamy. Add eggs and vanilla.
- Mix in dry ingredients and chocolate chips. Beat in the dry ingredients, then fold in the chocolate chips.
- Bake and cool. Scoop dough onto baking sheets, bake until lightly browned, and cool on a wire rack.
- Assemble sandwiches. Place a scoop of ice cream between two cookies, press gently, and roll in toppings.
- Freeze. Wrap sandwiches in plastic wrap and freeze for at least 3 hours before serving.
Notes
- Make Ahead Instructions: Bake cookies up to 3 days before assembling. Assembled sandwiches can freeze for up to 3 months.
- Special Tools: Baking Sheets, Silicone Baking Mats or Parchment Paper, Glass Mixing Bowl, Whisk, Electric Mixer, Cookie Scoop, Cooling Rack, Ice Cream Scoop, Plastic Wrap or Parchment Paper
- Why the cornstarch and extra egg yolk: Cornstarch creates soft cookies, and the extra yolk adds flavor and tenderness.
- I recommend mini chocolate chips for a better texture when frozen.
- Gluten-Free Options: Use flourless cookies and gluten-free ice cream.
Nutrition
- Serving Size: 1 sandwich
- Calories: 350
- Sugar: 25g
- Sodium: 200mg
- Fat: 18g
- Saturated Fat: 10g
- Unsaturated Fat: 6g
- Trans Fat: 0g
- Carbohydrates: 45g
- Fiber: 2g
- Protein: 4g
- Cholesterol: 50mg


