
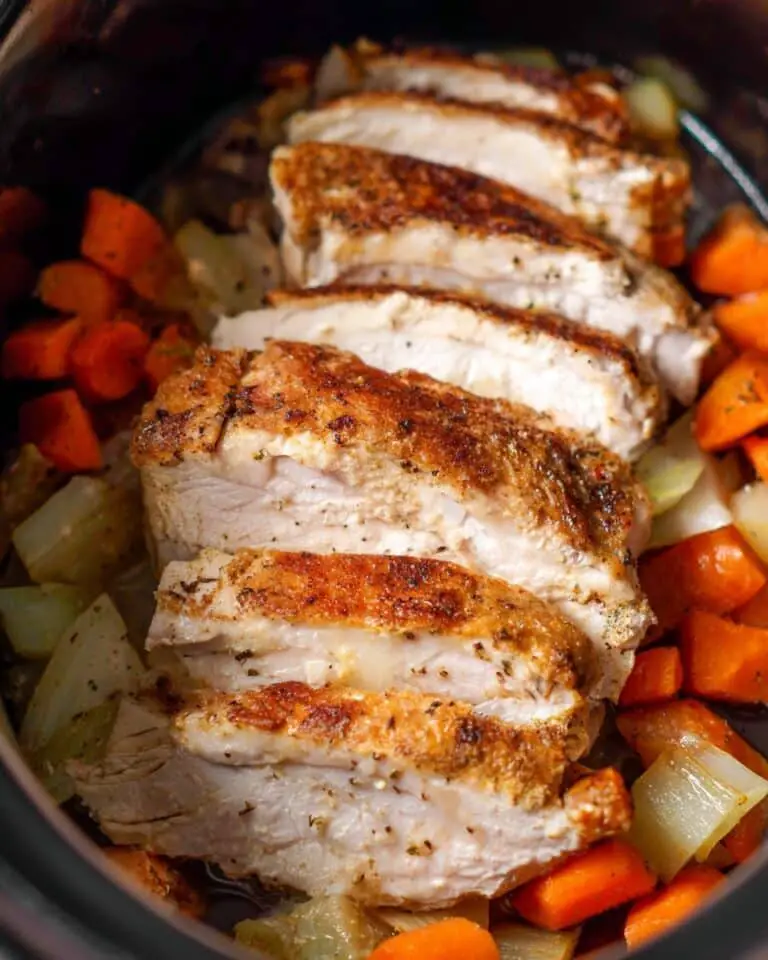
If you’re craving perfectly tender, juicy, and flavorful roast beef, then you’re going to want to try this Classic Roast Beef Recipe. Trust me, I absolutely love how this turns out every time—it’s one of those recipes that feels both comforting and special. Whether it’s a family dinner or a cozy Sunday meal, this roast beef delivers rich, savory goodness that everyone will go crazy for. Stick with me through the steps, and I’ll share all the little tips I’ve picked up so your roast comes out spot-on.
Why You’ll Love This Recipe
- Tender and Juicy Every Time: Slow roasting at the right temperatures makes even tougher cuts melt in your mouth.
- Simple Ingredients: You don’t need fancy seasonings—just garlic, olive oil, salt, and pepper to unlock amazing flavor.
- No Turning Required: Placing the roast on the oven rack with a drip tray below creates perfect circulation for even cooking.
- Delicious Homemade Gravy: Use those pan drippings to whip up a savory sauce that takes the meal to the next level.

Ingredients You’ll Need
What I love about the ingredients for this Classic Roast Beef Recipe is how straightforward and easy to source they are, yet they combine to produce such deep, rich flavors. Choosing the right cut and letting the beef rest before roasting truly transforms the dish.
- Boneless Rump Roast: Aim for an end cut with a nice fat layer—this fat bastes the meat as it cooks for amazing moisture.
- Extra Virgin Olive Oil: Rubbing the roast with oil helps with browning and keeps the garlic flavors sealed in.
- Garlic: Use fresh cloves sliced lengthwise to tuck into the roast’s incisions, infusing it with subtle, savory notes.
- Salt and Pepper: Essential for seasoning every inch and bringing out the natural beefy flavor.
- Red Wine, Water, or Beef Stock: Perfect for deglazing the drippings and creating a luscious gravy.
- Cornstarch: A simple thickener to get your gravy just right without lumps.
Variations
One of the things I appreciate about this Classic Roast Beef Recipe is how easy it is to tweak. You can personalize it to suit your tastes or dietary needs without losing that delicious roast flavor.
- Herb-Infused: I often add fresh rosemary or thyme tucked alongside the garlic for an extra aromatic touch, which really brightens the roast.
- Spicy Kick: For a bit of heat, I like rubbing in some crushed red pepper flakes or smoked paprika—you’ll find it surprisingly good!
- Oven Temperature Adjustments: If you prefer rare to medium-rare, feel free to pull the roast out earlier; just watch the internal temp carefully.
- Diet-Friendly: This recipe is naturally gluten-free, and you can skip butter in the gravy or swap olive oil for a dairy-free option—easy!
How to Make Classic Roast Beef Recipe
Step 1: Bring Your Roast to Room Temperature
One of the biggest game-changers I’ve learned is letting the beef sit out for at least an hour, preferably two. This takes the chill off the meat, so it cooks more evenly and stays juicy. Before letting it rest, I open the packaging, sprinkle salt all over the roast’s surface, then wrap it back up. This pre-salting step really helps season the meat through and tenderize it a bit.
Step 2: Prep Your Roast with Garlic and Seasoning
Pat the roast dry—this helps get a nice crust when it browns. Using a knife, carefully make about 8 to 10 small incisions all over the meat and slide a sliver of garlic into each. It’s like little flavor bombs that permeate every bite. Then, rub a generous layer of olive oil evenly on all sides and sprinkle with salt and freshly ground black pepper. This simple seasoning is all you need for deeply savory results.
Step 3: Oven Setup and Cooking
Place your oven rack in the center position and another rack just below to hold a roasting pan. Here’s a trick I discovered: put the roast directly on the middle rack, fat side up, above a drip pan. This setup lets hot air circulate around the meat like a convection oven, so you don’t have to turn the roast during cooking. The fat on top slowly melts and keeps everything moist and flavorful.
Start roasting at 375°F (190°C) for 30 minutes to get a beautiful browned crust. Then lower the temp to 225°F (107°C) and slow roast for another 1 ½ to 2 ½ hours, depending on roast size and shape. I always check internal temperature with a meat thermometer once the juices start running and the outside is nicely browned. Pull it at 135°F to 140°F for a perfect medium-rare finish.
Step 4: Rest the Roast and Make Gravy
After the roast is out, tent it loosely with foil and let it rest 20 to 30 minutes. Resting is critical—cutting too soon lets all the juicy goodness escape. While the roast rests, grab that pan with all the drippings and place it on the stove at medium heat. If drippings look light, leave the roast in a bit longer at a very low heat (around 175°F) to coax more out.
Deglaze the pan with red wine, water, or beef stock, scraping up the browned bits (pure flavor gold!). Mix a tablespoon of cornstarch with some cold water and stir it into the drippings to thicken. If the fat seems thin, add a bit of butter for richness. Season with salt, pepper, and if you have fresh thyme, toss some in—that little herb makes it extra special.
Step 5: Slice and Serve
Once rested, slice the roast thinly with a sharp, serrated knife (a long bread knife works great here). Serve slices with that luscious gravy poured over or on the side for dipping. You’ll notice the deep, savory layers and tender texture that make this Classic Roast Beef Recipe a go-to favorite in my family’s kitchen.
Pro Tips for Making Classic Roast Beef Recipe
- Salt Early and Well: Pre-salting the roast before it hits the oven deeply flavors and helps tenderize it.
- Use a Meat Thermometer: I can’t stress this enough—checking internal temp eliminates guesswork and overcooking.
- Don’t Skip the Rest: Letting the roast sit after cooking locks in juices for a moist, tender bite.
- Convert the Oven to Convection: Placing the roast on a rack above a drip tray really simulates convection for even cooking without flipping.
How to Serve Classic Roast Beef Recipe

Garnishes
I love garnishing with fresh herbs like parsley or thyme—it adds a pop of color and fresh aroma that balances the rich beef beautifully. A little sprinkle of flaky sea salt just before serving also brings out all the savory notes.
Side Dishes
Some classic pairings that my family adores with this roast beef include creamy mashed potatoes, roasted root vegetables, and a crisp green salad. Yorkshire puddings or buttered dinner rolls make it feel like a full-on Sunday roast feast.
Creative Ways to Present
For holidays or special dinners, I like serving the roast on a wooden cutting board surrounded by fresh herbs and roasted garlic cloves. Presenting the gravy in a small gravy boat on the side invites everyone to ladle as much as they want—makes it feel interactive and cozy.
Make Ahead and Storage
Storing Leftovers
I always wrap leftover roast beef tightly in foil or plastic wrap and store it in an airtight container in the fridge. It keeps well for up to 4 days. This way, the beef remains juicy and tender for quick lunches or sandwiches.
Freezing
If you want to freeze leftovers, slice the beef first and lay the pieces flat in a freezer bag with parchment paper between layers to avoid clumping. It freezes nicely for up to 3 months and thaws quickly in the refrigerator overnight.
Reheating
To reheat, I like gently warming slices in a covered pan with a splash of beef stock or water to keep them moist. Alternatively, you can microwave on medium power, covered, checking frequently to avoid drying out the meat.
FAQs
-
Can I use a different cut besides rump roast for this Classic Roast Beef Recipe?
Absolutely! Round roast or sirloin roast also work well with this method. Just remember that different cuts might vary slightly in cooking time due to shape and fat content, so keep an eye on internal temperature to get your preferred doneness.
-
How do I know when the roast is done?
The best way is to use a meat thermometer. For medium-rare, pull the roast at 135°F to 140°F. The shape and size affect timing, so taking the temperature removes guesswork and ensures juicy results.
-
Why do I need to let the roast rest after cooking?
Resting allows the juices to redistribute throughout the meat instead of spilling out when sliced. This keeps the roast moist and flavorful—cutting it too soon leads to dryer slices.
-
Can I make the gravy ahead of time?
While the best gravy comes from fresh pan drippings right after cooking, you can prepare a simple gravy base ahead and add drippings or wine when ready to serve. Just reheat gently and thicken with cornstarch as needed.
Final Thoughts
This Classic Roast Beef Recipe has become such a family favorite in my home because it hits that perfect balance of simplicity and remarkable flavor. I love that with just a handful of ingredients and a little patience, you get a roast that’s tender, juicy, and bursting with garlicky goodness. If you’re looking for a recipe that’s both approachable and impressive, I can’t recommend this enough—give it a try and watch it become a staple in your kitchen, just like it has in mine.
Print
Classic Roast Beef Recipe
- Prep Time: 8 min
- Cook Time: 180 min
- Total Time: 308 min
- Yield: 6 servings
- Category: Main Course
- Method: Roasting
- Cuisine: American
Description
This classic roast beef recipe features a tender, juicy rump roast cooked low and slow to perfection. Infused with garlic and seasoned simply with salt, pepper, and olive oil, the roast is browned at high heat then slow-roasted to achieve a medium-rare finish. Served with a rich homemade gravy made from drippings, red wine, and beef stock, this timeless dish is perfect for a comforting family dinner or special occasion.
Ingredients
Beef Roast
- 3 to 3 1/2 pounds (1.3 to 1.6 kg) boneless rump roast (preferably an end cut with a layer of fat)
- 1 tablespoon extra virgin olive oil
- 8-10 slivers of garlic (3 to 4 cloves, sliced in half or into thirds)
- Salt and pepper to taste
Gravy
- Red wine, water, and/or beef stock (as needed for deglazing)
- 1 tablespoon cornstarch
- Butter (optional, if drippings are low in fat)
- Fresh thyme (optional)
Instructions
- Bring roast to room temperature. Remove the beef from the refrigerator at least 1 hour, preferably 2 hours before cooking. Unwrap, sprinkle all sides generously with salt, then rewrap and allow to sit to ensure even cooking.
- Prepare the oven and roast. Preheat the oven to 375°F (190°C). Place a rack in the center and another rack below it for catching drippings. Pat the roast dry with paper towels.
- Insert garlic slivers. Using the tip of a sharp knife, make 8 to 10 small incisions around the roast. Insert one garlic sliver into each incision to infuse flavor.
- Season the roast. Rub olive oil all around the roast, then season liberally with salt and pepper on all sides.
- Arrange in oven. Place the roast directly on the middle oven rack, fat side up, with a roasting pan underneath on the lower rack to catch drippings. This placement allows convection heat circulation, cooking the roast evenly.
- Browning phase. Roast at 375°F (190°C) for 30 minutes to develop a browned crust.
- Slow roast. Lower the oven temperature to 225°F (107°C) and continue cooking for an additional 1 1/2 to 2 1/2 hours depending on roast shape and size. Monitor closely as longer, narrower roasts may cook faster.
- Check doneness. When juices begin to drip and the roast is browned, insert a meat thermometer. Remove the roast once the internal temperature reaches 135°F to 140°F for medium rare.
- Rest the roast. Transfer the roast to a cutting board, tent loosely with aluminum foil, and let it rest for 20 to 30 minutes. Resting allows juices to redistribute for moist, tender slices.
- Make the gravy. Place the roasting pan with drippings on the stovetop over medium heat. If drippings are sparse, consider keeping the roast in the oven longer at 175°F to extract more juices. Deglaze the pan with red wine, water, or beef stock, scraping up browned bits. Dissolve cornstarch in water, add to the pan, and stir quickly until gravy thickens. Add butter if needed for richness, and season with salt, pepper, and fresh thyme if desired.
- Serve. Thinly slice the rested roast with a long, sturdy bread knife. Serve with the gravy poured over or on the side.
- Enjoy and share feedback. Relish your perfectly cooked classic roast beef and consider leaving a rating and review.
Notes
- Suitable for rump, round, or sirloin roast cuts.
- Slow roasting on low heat tenderizes tougher cuts beautifully.
- Resting meat before slicing is essential to retain juices.
- Using a meat thermometer ensures perfect doneness.
- Adding fresh thyme to gravy enhances flavor.
Nutrition
- Serving Size: 1 serving (approx. 5 oz cooked beef)
- Calories: 527 kcal
- Sugar: 0 g
- Sodium: 128 mg
- Fat: 28 g
- Saturated Fat: 10 g
- Unsaturated Fat: 18 g
- Trans Fat: 0 g
- Carbohydrates: 2 g
- Fiber: 0 g
- Protein: 59 g
- Cholesterol: 188 mg


