If you’re looking for a festive, fun, and downright adorable dessert this holiday season, you’re going to love this Christmas Tree Brownies Recipe. It’s one of those treats that brings out the kid in all of us—brownies shaped like Christmas trees, decorated with green icing and twinkling sprinkles. Trust me, I’ve made these for family gatherings more times than I can count, and they never fail to bring smiles (and disappear fast!). So, stick around, because I’m sharing my personal tips to make these holiday brownies your go-to festive favorite.
Why You’ll Love This Recipe
- Simple and Quick: You only need a box of brownie mix and a few decorations to whip this up, perfect if you’re short on time.
- Kid-Approved Fun: Decorating the trees is half the joy, making it a wonderful activity with kids or even party guests.
- Festive Presentation: The candy cane “trunks” and green icing transform ordinary brownies into holiday showstoppers.
- Customizable Decorations: Use your favorite sprinkles and stars to make each brownie tree uniquely yours.

Ingredients You’ll Need
The beauty of this Christmas Tree Brownies Recipe is in its simplicity—classic brownie goodness paired with white icing turned green and topped with festive sprinkles. You’ll find everything easily at the grocery store, and the candy canes add that perfect holiday touch.
- Brownie Mix: The base of your brownies—choose your favorite brand for tried-and-true fudgy results.
- White Vanilla Icing: This creates the “branches” of your tree when colored green; simple and sweet.
- Green Food Colouring: Just a few drops will transform your white icing into a festive Christmas tree shade.
- Small Round Sprinkles: Ideal for adding colorful “ornaments” to your trees—pick fun holiday colors or mix and match.
- Small Star Sprinkles: Don’t skip these—they make perfect tree toppers!
- Candy Canes: The “tree trunks”—breaking them into small pieces gives a lovely final touch that’s both cute and crunchy.
Variations
While I love keeping this Christmas Tree Brownies Recipe classic, I also enjoy mixing things up depending on who I’m serving or what I have on hand. Feel free to get creative and make this recipe your own—it’s all about spreading joy and having fun with your holiday baking!
- Gluten-Free Option: I once swapped the box mix for a gluten-free brownie mix and was thrilled how everyone couldn’t tell the difference—still rich and fudgy!
- Chocolate Icing: Instead of green, try tinting vanilla icing with cocoa powder for a chocolaty Christmas tree alternative.
- Alternative Tree Trunks: I’ve used pretzel sticks or even mini chocolate bars instead of candy canes for different textures and flavors.
- Extra Festive: Adding edible glitter or tiny candy pearls makes your brownie trees sparkle on holiday dessert tables.
How to Make Christmas Tree Brownies Recipe
Step 1: Prep Your Pan and Bake the Brownies
Start by lining an 8″x8″ baking pan with aluminum foil and spraying it with cooking spray—trust me, this foil lining makes removing the brownies super easy later on. Then, prepare your brownie mix exactly according to the package instructions, pour it into the pan, and bake as directed. When I first tried this, I learned not to overbake—the brownies should be just set so they’re fudgy but not dry. Once baked, let the brownies cool completely—this can take about 1.5 hours, but don’t rush this step unless you want messy, crumbly cuts.
Step 2: Cut the Brownies into Tree Shapes
Once cool, lift the brownies out using the foil edges and place on a cutting board. This is where the magic happens: cut the brownies into triangles to resemble Christmas trees. I like to slice the pan into three even rows, then cut alternating diagonal slices across those rows—it’s easier than it sounds and creates perfect little tree shapes. If your cuts seem crumbly, a sharp serrated knife usually helps get those clean edges.
Step 3: Make the Candy Cane Trunks
Carefully unwrap your candy canes and use a sharp knife to cut or break them into 1.5-inch pieces to serve as the “tree trunks.” Press the sharper end gently into the bottom of each brownie triangle. I discovered this trick when I wanted to add a bit of crunch and a whimsical touch—it instantly adds character to the brownies and makes them look extra festive.
Step 4: Color and Pipe the Icing
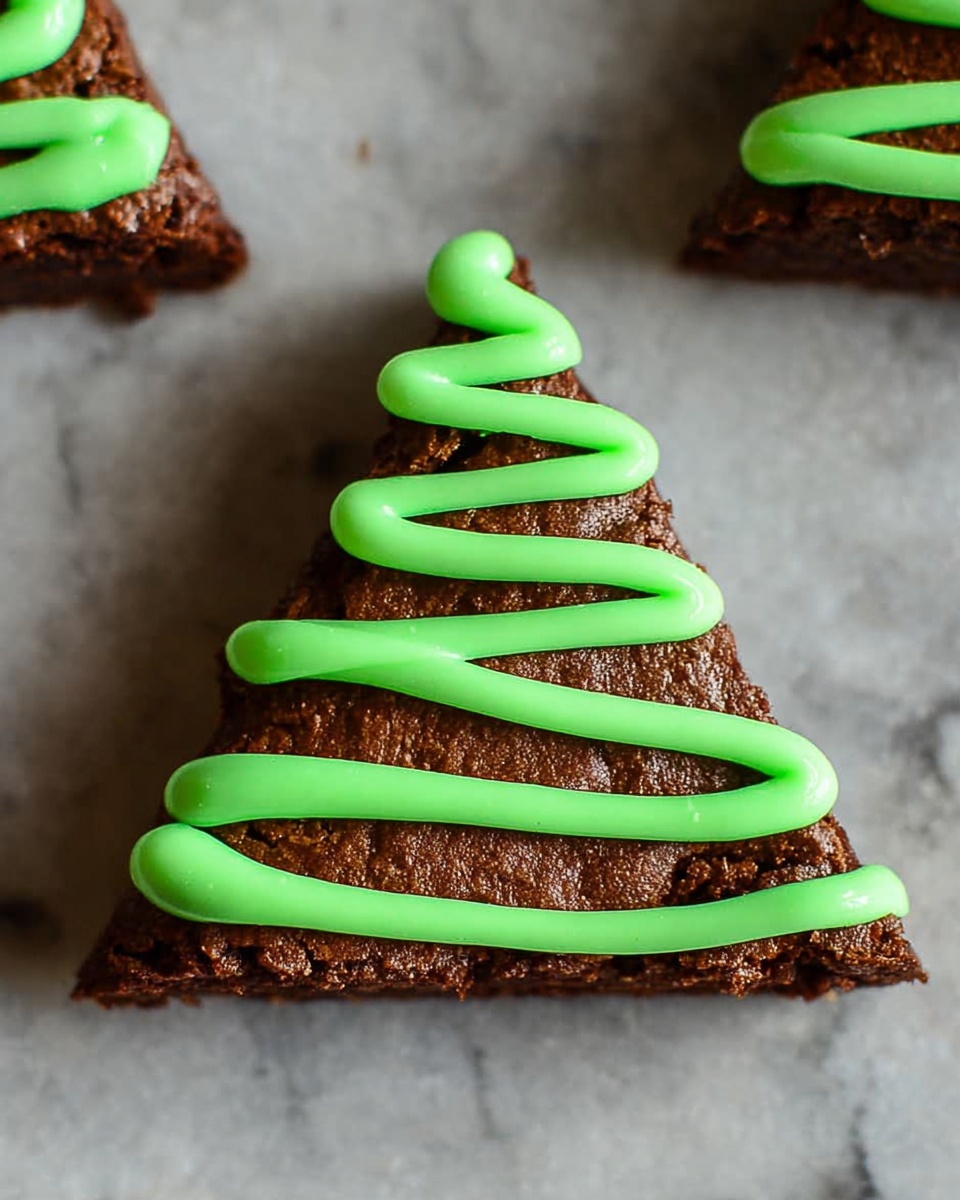
Spoon about half of your tub of white vanilla icing into a bowl and add green food coloring a drop at a time until you get the vibrant shade you love. This is one of my favorite parts—watching the pure white turn into a festive green gets me in the holiday spirit every time! Transfer the green icing into a zip-top bag, seal it, and snip off a tiny corner. Starting at the top of each brownie triangle, gently squeeze out the icing in a zigzag pattern, mimicking the look of pine branches.
Step 5: Decorate and Enjoy!
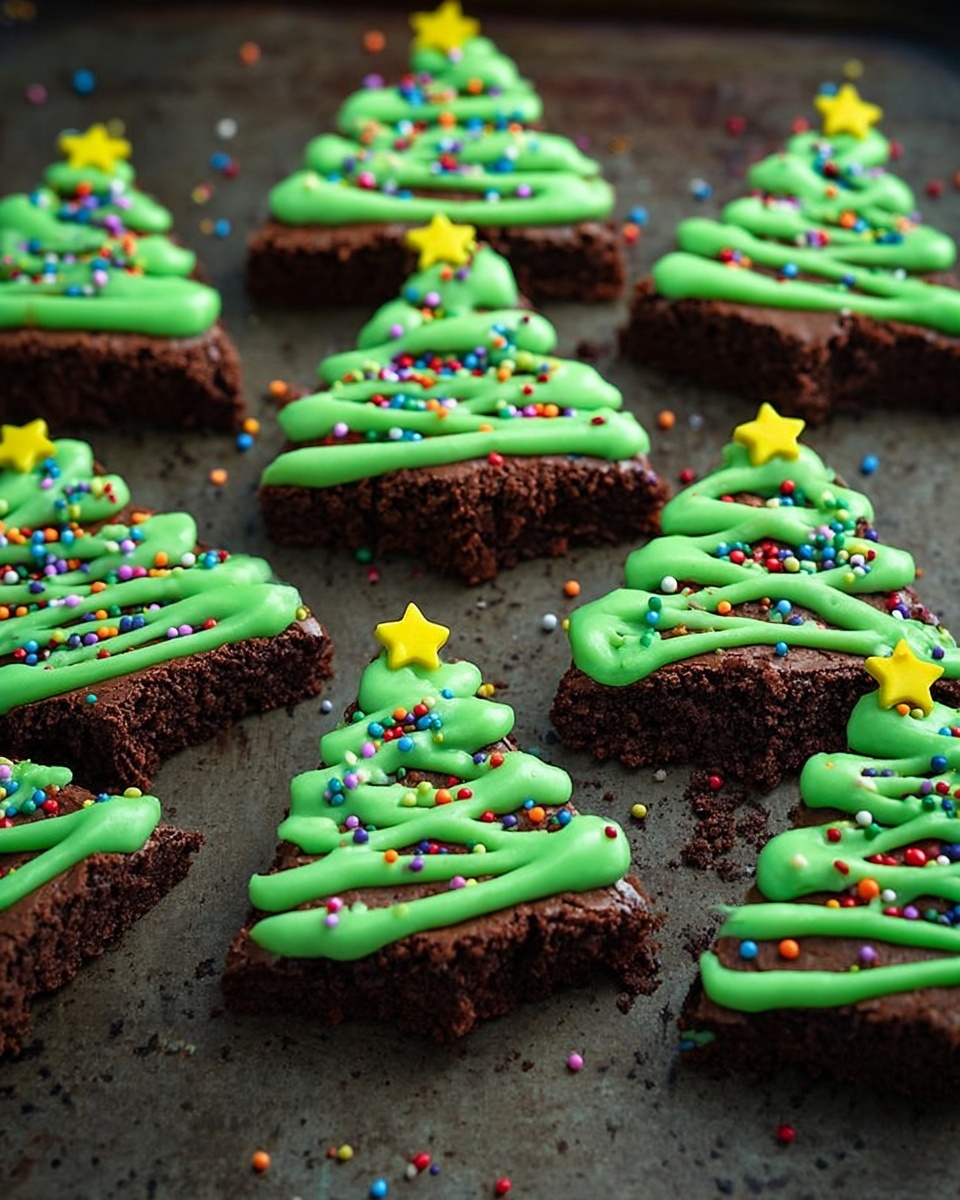
Finally, sprinkle your favorite small round sprinkles as ornaments all over the icing and place a small star sprinkle at the top of each brownie tree. These finishing touches make these Christmas Tree Brownies Recipe pop with charm and holiday cheer. Now step back, admire your work, and prepare for the compliments when these beauties hit the table!
Pro Tips for Making Christmas Tree Brownies Recipe
- Cool Completely Before Cutting: Brownies are easier to cut into clean triangles once fully cooled—warm brownies crumble more easily.
- Use a Serrated Knife: This helps achieve sharper cuts without squashing the brownie shape.
- Control Icing Flow: When piping the green icing, start slow and use gentle pressure for neat zigzags.
- Candy Cane Placement: Insert candy cane trunks carefully at an angle to avoid cracking the brownie edges.
How to Serve Christmas Tree Brownies Recipe
Garnishes
I usually keep the garnishes simple—classic red, white, and green sprinkles really make the trees festive without being overwhelming. Sometimes, I throw in edible glitter or tiny silver balls for a sparkly effect that wows my guests. The small star sprinkle on top is a must; it’s the tiny detail that pulls everything together and makes these brownies so charming.
Side Dishes
These Christmas Tree Brownies pair wonderfully with a warm cup of hot cocoa or spiced cider. I also love serving them alongside peppermint bark or a simple bowl of candy canes for a coordinated holiday dessert spread that guests always rave about.
Creative Ways to Present
One holiday season, I arranged these brownies standing upright on a rectangular tray lined with “snow” made from shredded coconut. It looked like a miniature Christmas forest and was a total conversation starter. You can also tie a little festive ribbon around the candy cane trunks for edible “ornament tags” if you’re gifting these brownies. Presentation is half the fun, and I promise your friends will love the creativity!
Make Ahead and Storage
Storing Leftovers
I usually store leftover Christmas Tree Brownies in an airtight container at room temperature for up to 3 days. Keeping them from drying out is key, so I place a piece of parchment paper between layers if I’m stacking. After a day, the candy cane trunks stay crunchy, and the icing remains soft but firm.
Freezing
If you want to make these ahead even earlier, freezing is your friend! I wrap each brownie tree individually in plastic wrap and place them in an airtight container or freezer bag. They freeze well for up to two months. Just thaw in the fridge overnight before serving to protect the icing decoration.
Reheating
Since these brownies shine best when cool and fresh, I recommend enjoying them straight from the fridge or at room temperature. However, if you prefer them slightly warm, pop them in the microwave for just 5-7 seconds—any longer and you risk melting the decorations or making candy canes sticky.
FAQs
-
Can I use homemade brownies instead of a box mix for this Christmas Tree Brownies Recipe?
Absolutely! Homemade brownies work wonderfully. Just be sure they’re fully cooled before cutting and decorating to keep your tree shapes neat and the icing from melting.
-
What’s the best way to get the green icing color just right?
Start with a few drops of green food coloring and mix well, then add more a little at a time. It’s easier to darken color gradually than to fix icing that’s too dark!
-
How should I handle cutting the candy canes safely?
Use a sharp knife on a solid cutting surface and press firmly but slowly to break candy canes into pieces. You can also wrap them in a kitchen towel before breaking to keep shards contained.
-
Can I make these Christmas Tree Brownies Recipe vegan-friendly?
Yes! Use a vegan brownie mix and substitute dairy-free icing. Just double-check that your sprinkles and candy canes are vegan, as ingredients can vary by brand.
Final Thoughts
I absolutely love how this Christmas Tree Brownies Recipe turns out every time—it’s festive, approachable, and full of sweet holiday spirit. When I first tried making them, I was amazed at how such simple ingredients could be transformed into a centerpiece dessert that’s both fun to make and delicious to eat. Whether you’re baking with family, bringing a homemade treat to a party, or just want to spread some Christmas cheer, these brownies are a surefire crowd-pleaser. Give it a try—I promise you’ll be hooked as soon as you take that first bite!
Print
Christmas Tree Brownies Recipe
- Prep Time: 15 minutes
- Cook Time: 30 minutes
- Total Time: 1 hour 45 minutes
- Yield: 12 brownies
- Category: Dessert
- Method: Baking
- Cuisine: American
- Diet: Vegetarian
Description
Celebrate the holidays with these festive and easy Christmas Tree Brownies. Soft, chocolaty brownie triangles are transformed into whimsical Christmas trees with green vanilla icing, colorful sprinkles, and candy cane trunks. Perfect for holiday parties, family gatherings, or festive treats, this recipe combines convenience and creativity to delight both young and old.
Ingredients
Brownie Base
- 1 box Brownie Mix
- Cooking spray (for greasing the pan)
Decoration
- 1 tub white vanilla icing (approximately 16 oz)
- Green food colouring (enough to tint icing green)
- Small round sprinkles (for decoration)
- Small star sprinkles (for tree toppers)
- Candy canes (enough to create trunks for 12 brownies, about 6 standard candy canes)
Instructions
- Prepare the Pan and Brownie Mix: Line an 8″x8″ baking pan with aluminum foil and spray it lightly with cooking spray to prevent sticking. Follow the package instructions to prepare the brownie mix, then pour it into the prepared pan.
- Bake the Brownies: Bake the brownies according to the package directions, usually around 25-35 minutes at 350°F (175°C). Once baked, allow the brownies to cool completely in the pan for about 1.5 hours to ensure they set properly for cutting.
- Cut the Brownies into Triangles: Carefully remove the brownies from the pan using the foil as handles. Place on a cutting board and cut into triangles by slicing into three rows horizontally, then cutting diagonally in alternating directions to create tree-shaped pieces.
- Prepare Candy Cane Trunks: Unwrap candy canes and carefully cut or break them into approximately 1.5 inch long pieces. These will serve as the trunks of the Christmas tree brownies. Insert the sharper end of each candy cane piece gently into the bottom center of each brownie triangle.
- Make the Green Icing: Spoon about half of the white vanilla icing from the tub into a mixing bowl. Add green food colouring gradually until you achieve a rich, festive green. Mix thoroughly to ensure an even color.
- Fill Piping Bag: Transfer the green icing into a resealable plastic zip lock bag. Seal the bag tightly, then use scissors to carefully cut a small corner off to create a piping tip for controlled icing application.
- Decorate the Trees: Starting at the top of each brownie triangle, gently pipe the green icing in a curvy zigzag pattern downward to mimic the branches of a Christmas tree. Immediately before the icing sets, decorate with small round sprinkles for ornaments and place a small star sprinkle at the top as the tree topper.
- Serve and Enjoy: Once decorated, the Christmas Tree Brownies are ready to serve. They make a delightful festive dessert or a fun holiday treat for kids and adults alike.
Notes
- Ensure brownies are completely cool before cutting and decorating to prevent icing from melting.
- The size of triangles can be adjusted depending on desired serving size.
- Customize decorations with your favorite sprinkles or edible glitter for extra sparkle.
- Leftover icing can be stored in an airtight container in the refrigerator for up to a week.
- For a gluten-free option, choose a gluten-free brownie mix.
Nutrition
- Serving Size: 1 brownie (approx. 60g)
- Calories: 220 kcal
- Sugar: 18 g
- Sodium: 150 mg
- Fat: 10 g
- Saturated Fat: 3.5 g
- Unsaturated Fat: 5 g
- Trans Fat: 0 g
- Carbohydrates: 30 g
- Fiber: 1 g
- Protein: 2 g
- Cholesterol: 15 mg
