
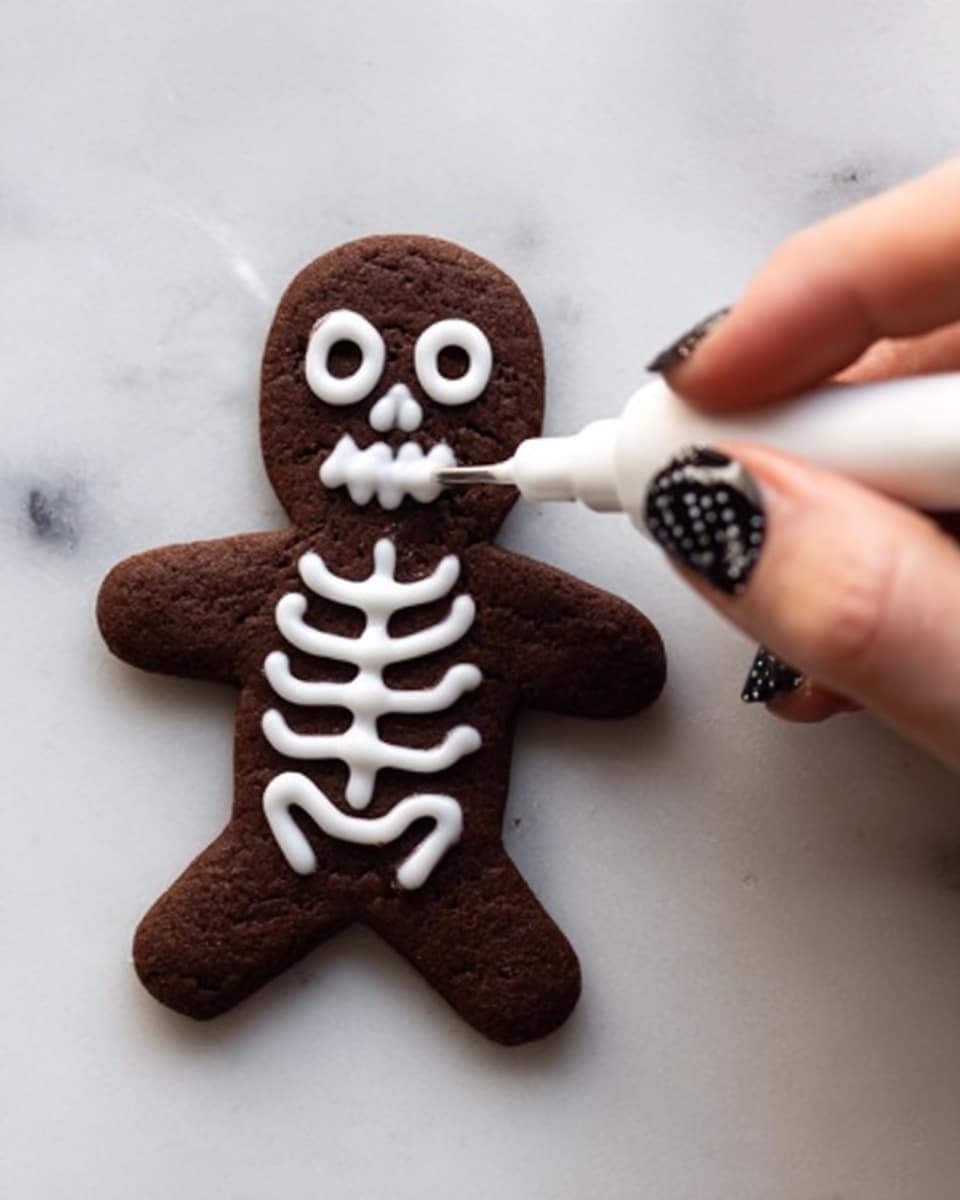
If you’re on the hunt for a fun, festive cookie that captures the playful spooky spirit of the season, you’ve gotta try this Chocolate Skeleton Cookies Recipe. These cookies aren’t just adorable—they pack rich chocolate and cinnamon flavors with a sweet royal icing that makes the skeleton design really pop. I absolutely love how they turn out: crisp yet tender, with a look that makes both kids and adults smile. Stick around, and I’ll share my favorite tips to make sure your cookies come out perfectly every time!
Why You’ll Love This Recipe
- Perfect Balance of Flavors: The cocoa and cinnamon create a rich, warming cookie base that’s absolutely irresistible.
- Fun and Festive: Decorating the skeleton design with royal icing is a creative treat for all ages.
- Make-Ahead Friendly: The dough can chill overnight, so you can prep ahead and bake when you’re ready.
- Fail-Proof Royal Icing: The icing recipe is simple and holds up perfectly for detailed piping and flooding.

Ingredients You’ll Need
The magic of this Chocolate Skeleton Cookies Recipe comes down to combining rich cocoa, warm cinnamon, and creamy butter into tender dough that holds its shape well for piping icing skeleton details. Each ingredient plays a key role in both taste and texture, so I always recommend using the best you can find.
- All-purpose flour: The sturdy base for your cookies; I like to sift it for a smoother dough.
- Unsweetened cocoa powder: Use a good-quality natural cocoa for that deep chocolate flavor.
- Salt: Just a pinch balances the sweetness perfectly.
- Cinnamon: Adds a cozy warmth that complements the cocoa beautifully.
- Unsalted butter: Make sure it’s softened to room temperature for easier mixing.
- Confectioners’ sugar: For both the dough and icing—to keep everything tender and smooth.
- Large eggs: Helps bind the dough and adds richness.
- Vanilla extract: A splash elevates the whole flavor profile.
- Meringue powder (or powdered egg whites): Essential for the royal icing’s perfect hold.
- Water: Just enough to bring the icing to the right consistency.
- White sanding sugar: Great for a bit of sparkle on some of the skeletons—pure fun!
Variations
I totally encourage you to make this Chocolate Skeleton Cookies Recipe your own! Whether it’s adjusting flavors, swapping out decorating styles, or making it fit your holiday vibe, there’s plenty of room for creativity.
- Spiced Up: I once added a pinch of cayenne to the dough for a subtle spicy kick—it was unexpected and awesome!
- Gluten-Free Version: Try substituting the flour with a 1-to-1 gluten-free baking mix for a safe, delicious alternative.
- Colorful Icing: Mix food coloring into your royal icing to create rainbow skeletons that are especially fun for kids’ parties.
- Chocolate Shell: Drizzle melted white chocolate over the finished cookies for a stunning contrast.
How to Make Chocolate Skeleton Cookies Recipe
Step 1: Mix the Dry Ingredients
Start by whisking together your flour, cocoa powder, salt, and cinnamon in a large bowl. This step ensures the cocoa and cinnamon are evenly distributed, which is key for flavor consistency. I love doing this while the butter softens because it saves time. Set this mixture aside for a bit.
Step 2: Cream Butter and Sugar, Then Add Eggs and Vanilla
Using an electric mixer, beat the softened butter and confectioners’ sugar on medium speed until the mix is light and fluffy—about 2 minutes. This aerates the dough, making it tender. Next, add in your eggs one at a time, then pour in the vanilla extract, mixing well after each addition. You’ll notice the mixture becomes creamy and deliciously fragrant.
Step 3: Combine Flour Mixture into Wet Ingredients
Working in two batches, add the flour mixture to the butter mixture. Mix on low speed until just combined; you don’t want to overwork the dough or your cookies will be tough. The dough will look dense but pliable. Divide it into two halves, wrap each in plastic, flatten into disks, and pop them in the fridge for at least an hour or overnight. This chilling step is crucial for easy rolling and clean cookie cuts.
Step 4: Roll, Cut, and Bake Your Cookies
Preheat your oven to 350ºF. Lightly flour your work surface and roll one disk of dough to about ¼ inch thickness. Using a 5-inch gingerbread man cookie cutter (it’s perfect for skeleton shapes), cut out as many cookies as you can. Don’t worry about the scraps—you can reroll those once. Place the cookies onto unlined baking sheets. Bake them in your preheated oven for about 12 minutes, or until they spring back when you gently press the top. Cool them on wire racks completely before decorating.
Step 5: Prepare and Pipe the Royal Icing
While the cookies cool, get your royal icing ready. Using an electric mixer, combine confectioners’ sugar, meringue powder, and water. Mix on low speed, scraping the bowl sides to avoid lumps, until the icing reaches a soft whipped cream texture—this usually takes about 10 minutes. Transfer your icing to a piping bag fitted with a #2 plain tip for precise skeleton lines. I like to first outline the skulls, then pipe eyes and mouths, and finally flood the face with icing. For some fun sparkle, sprinkle white sanding sugar on a few skulls before the icing dries completely.
Pro Tips for Making Chocolate Skeleton Cookies Recipe
- Chill Is Your Best Friend: Don’t skip the chilling step; it prevents spreading and makes rolling much easier.
- Mix Icing Slowly: Mixing your royal icing at low speed helps avoid air bubbles, which means smoother decorating.
- Use Parchment Paper Under Cookies: I bake directly on the sheet for a crisper bottom, but parchment gives an easier cleanup.
- Patience with Drying: Let the icing dry fully before stacking or storing to keep decorations intact—usually a few hours or overnight is best.
How to Serve Chocolate Skeleton Cookies Recipe
Garnishes
I often add a sprinkle of white sanding sugar over the royal icing while it’s still wet to give the skeletons some festive sparkle. Sometimes, I dust a little edible glitter for a subtle shimmer that catches the light—perfect if you’re serving these at a Halloween party!
Side Dishes
These cookies go great alongside a warm mug of spiced apple cider or a cup of creamy hot chocolate. For a Halloween gathering, I like to set them near bowls of pumpkin seeds or caramel popcorn—sweet meets savory, and my guests love the combo.
Creative Ways to Present
One fun idea I’ve used is to place the cookies on a “graveyard” themed platter, using crushed chocolate cookies as “dirt” and candy bones scattered around. It’s a hit with kids and makes the whole display feel like a little spooky scene!
Make Ahead and Storage
Storing Leftovers
I store leftover Chocolate Skeleton Cookies in an airtight container at room temperature. If you layer them, I place parchment paper between layers to keep the icing from sticking. They stay fresh for up to a week this way, though they rarely last that long in my house!
Freezing
If you want to freeze them, I recommend freezing the plain baked cookies first (before icing) in a sealed bag. When ready, thaw them and decorate fresh! You can also freeze fully decorated cookies, but I find the icing can get a little softer after thawing, so handle with care.
Reheating
These cookies don’t need reheating, but if you prefer them slightly warm, I pop them in a 300ºF oven for 5 minutes. Just watch carefully so the icing doesn’t melt. Warmed this way, they’re extra comforting on chilly days.
FAQs
-
Can I use regular egg whites instead of meringue powder for the royal icing?
Yes, you can substitute pasteurized egg whites or fresh egg whites for meringue powder, but meringue powder is preferred for safety and consistency. If using fresh egg whites, make sure they’re pasteurized and handle carefully to avoid any risk of contamination.
-
How thick should I roll the cookie dough?
Roll your dough to about ¼ inch thick. This thickness helps the cookies bake evenly and hold their shape nicely without becoming too fragile or doughy.
-
What’s the best way to store decorated skeleton cookies?
Store them in an airtight container at room temperature with parchment paper between layers to keep the royal icing decorations safe. Avoid refrigerating, which can cause the icing to sweat and get sticky.
-
Can I make these cookies without the cinnamon?
Absolutely! Cinnamon adds warmth, but leaving it out won’t harm the cookie. You might consider a tiny bit of espresso powder or chili powder if you want to experiment with other flavor twists.
-
How long does royal icing take to dry completely?
Royal icing usually takes a few hours to dry to the touch, but for full firmness—especially if you’ve flooded the surface—it’s best to let it dry overnight in a cool, dry place.
Final Thoughts
This Chocolate Skeleton Cookies Recipe has become my go-to when I want to wow my family and friends with something both charming and delicious. The combination of chocolate, cinnamon, and sweet royal icing really hits the spot—and decorating the skeletons offers a little moment of creative fun that’s hard to beat. I hope you enjoy making and sharing these as much as I do. Trust me, once you try them, they’ll become a favorite in your holiday rotation!
Print
Chocolate Skeleton Cookies Recipe
- Prep Time: 20 minutes
- Cook Time: 10 minutes
- Total Time: 2 hours
- Yield: 24 cookies
- Category: Dessert
- Method: Baking
- Cuisine: American
Description
These Chocolate Skeleton Cookies offer a delightful spooky treat perfect for Halloween. Featuring a rich cinnamon chocolate cookie base, they are decorated with sweet, detailed royal icing skeleton designs. The combination of a soft cocoa-spiced cookie and smooth, sweet icing makes for an irresistible festive dessert that both kids and adults will love.
Ingredients
Cookie Dough
- 3 cups all-purpose flour
- 1¼ cups unsweetened cocoa powder
- ¼ teaspoon salt
- ½ teaspoon cinnamon
- 1½ cups unsalted butter
- 2½ cups confectioners’ sugar
- 2 large eggs
- 1 teaspoon vanilla extract
Royal Icing
- 2 cups confectioners’ sugar
- 2½ tablespoons meringue powder (or powdered egg whites)
- ¼ cup water
- White sanding sugar (for decoration)
Instructions
- Mix Dry Ingredients: Whisk together the all-purpose flour, unsweetened cocoa powder, salt, and cinnamon in a bowl. Set this mixture aside for later.
- Cream Butter and Sugar: Using an electric mixer, cream unsalted butter and confectioners’ sugar together until the mixture is light and fluffy, which takes about 2 minutes.
- Add Eggs and Vanilla: Beat in the two large eggs and vanilla extract until fully incorporated.
- Combine Dough: Add the flour mixture to the wet ingredients in two batches, mixing just until combined each time. Avoid overmixing to keep cookies tender.
- Chill Dough: Divide the dough in half, wrap each piece in plastic wrap, flatten into disks, and chill in the refrigerator for 1 hour or overnight to firm up.
- Preheat Oven and Roll Dough: Heat oven to 350ºF (175ºC). On a floured surface, roll out the chilled dough to ¼ inch thickness. Use a 5-inch gingerbread man cookie cutter to cut out shapes and transfer them to unlined baking sheets. Reroll scraps once and repeat.
- Bake Cookies: Bake for about 12 minutes, or until cookies spring back slightly when touched. Allow cookies to cool completely on wire racks.
- Prepare Royal Icing: Using an electric mixer, blend confectioners’ sugar, meringue powder, and water on low speed. Scrape down sides as needed and mix until icing reaches the consistency of soft whipped cream, about 10 minutes.
- Decorate Cookies: Transfer the royal icing to a piping bag fitted with a #2 plain tip. Pipe an outline of skulls and circles for eyes and mouths on each cookie, then flood the face area with icing. Optionally, sprinkle some cookies with white sanding sugar for extra sparkle.
- Dry Icing: Allow the decorated cookies to dry completely before serving or storing to ensure the icing hardens properly.
Notes
- Chilling the dough is essential to make rolling and cutting easier and to prevent spreading during baking.
- The cinnamon adds a warm, subtly spicy note that complements the cocoa flavor perfectly.
- Royal icing must be mixed until light and fluffy to pipe detailed skeleton designs accurately.
- Use a piping bag with a fine tip for intricate skeleton bone details.
- Allow icing to dry fully for several hours or overnight for best results.
- Store the decorated cookies in an airtight container at room temperature to maintain crispness.
Nutrition
- Serving Size: 1 cookie
- Calories: 264 kcal
- Sugar: 22 g
- Sodium: 38 mg
- Fat: 13 g
- Saturated Fat: 8 g
- Unsaturated Fat: 4 g
- Trans Fat: 0.5 g
- Carbohydrates: 37 g
- Fiber: 2 g
- Protein: 3 g
- Cholesterol: 44 mg


