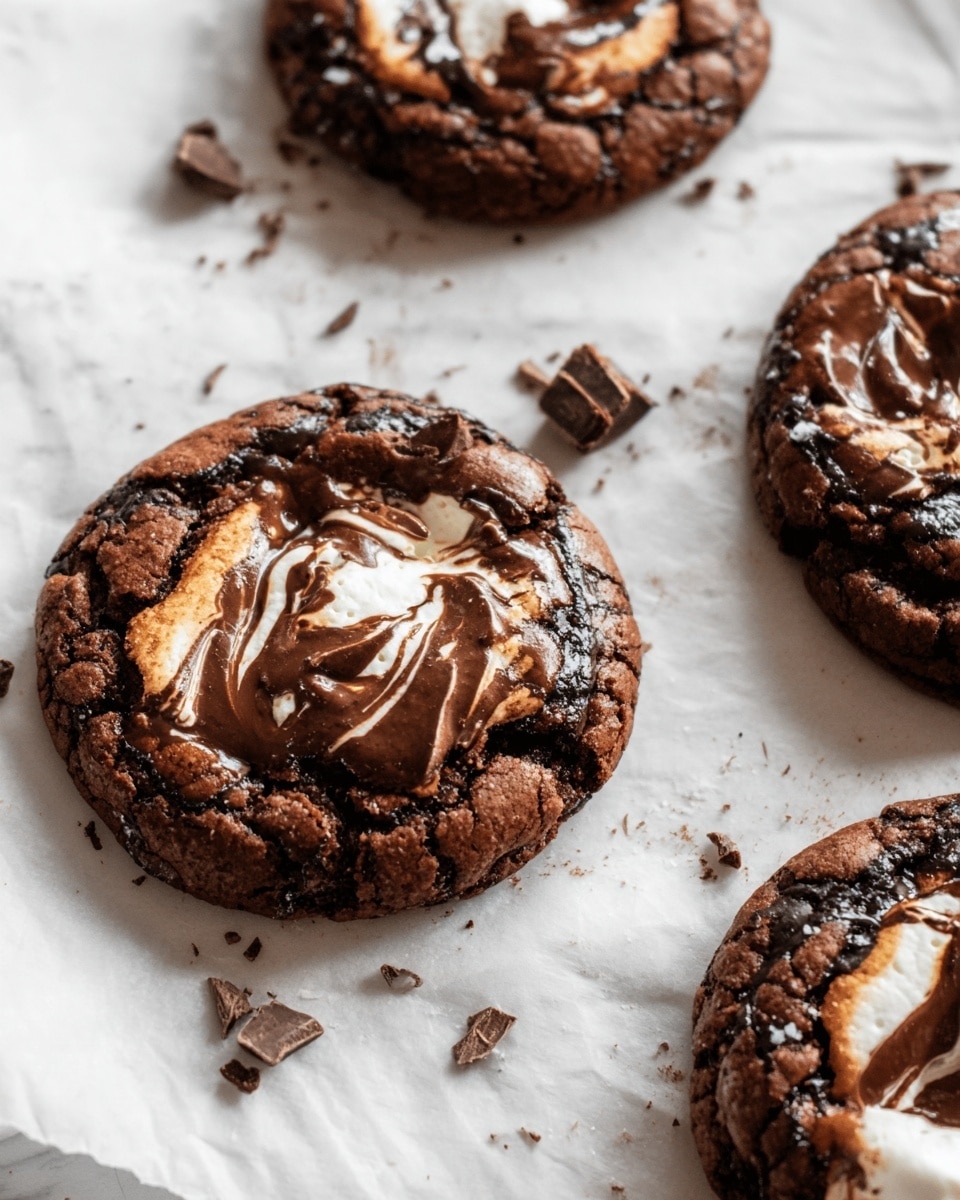
I absolutely love this Chocolate Marshmallow Swirl Cookies Recipe because it brings together the rich, deep flavor of cocoa with the playful, gooey sweetness of marshmallow fluff. These cookies are the perfect treat when you want something comforting but with that fun twist of a marshmallow swirl that melts right into the chocolatey dough. When I first tried this recipe, I was amazed at how simple the steps were yet how impressive the results looked and tasted.
You’ll find that these cookies are perfect for a cozy afternoon snack, a holiday cookie swap, or even just when you want to impress friends without spending hours in the kitchen. What makes this Chocolate Marshmallow Swirl Cookies Recipe stand out is how the marshmallow adds a delightful surprise that keeps everyone coming back for more. Plus, the prep is straightforward, making it a win-win for both newbies and seasoned bakers alike.
Why You’ll Love This Recipe
- Easy to Make: The steps are straightforward, perfect for all skill levels and quick prep.
- Unique Flavor Combo: Combines rich cocoa with sweet, melty marshmallow for a one-of-a-kind cookie experience.
- Perfect Texture: Crispy edges with soft, gooey centers thanks to the marshmallow swirl.
- Great for Sharing: These cookies vanish fast at family gatherings and parties!

Ingredients You’ll Need
The ingredients for this Chocolate Marshmallow Swirl Cookies Recipe come together to create a perfectly balanced treat. I always recommend using room temperature butter and eggs to help everything mix smoothly and get that soft yet chewy texture we crave in a chocolate cookie.
- All-purpose flour: The foundation for structure—use fresh flour for best results.
- Unsweetened cocoa powder: Adds that rich chocolate flavor; I prefer Dutch-processed for deeper color and smoothness.
- Baking soda: Helps the cookies rise slightly and gives them that slight chewiness.
- Salt: Balances the sweetness and enhances chocolate’s flavor.
- Unsalted butter: Room temperature for creaminess, not melted.
- Granulated sugar: Sweetens and contributes to that slight crispiness on the edges.
- Large eggs: Room temperature to help bind and create moisture.
- Vanilla extract: Adds aroma and depth—don’t skip it!
- Marshmallow fluff: The magic swirl that makes these cookies unique and wonderfully gooey.
Variations
I love to tweak this Chocolate Marshmallow Swirl Cookies Recipe depending on the season or mood. Feel free to personalize it by swapping or adding ingredients to make it your own. Don’t hesitate to get creative—that’s part of the fun in baking.
- Use melted marshmallows: For an even gooier swirl, I sometimes melt jumbo marshmallows and gently fold them in instead of fluff—it gives a more pronounced marshmallow stretch.
- Add nuts: Chopped toasted pecans or walnuts add a satisfying crunch and complement the chocolate-marshmallow combo beautifully.
- Make it gluten-free: Substituting the flour with a 1:1 gluten-free baking blend works well, just be sure to chill the dough a bit longer for easier handling.
- Spice it up: A pinch of cinnamon or cayenne pepper adds a subtle warmth that’s unexpectedly delicious.
How to Make Chocolate Marshmallow Swirl Cookies Recipe
Step 1: Mix Dry Ingredients
Start by whisking together the all-purpose flour, unsweetened cocoa powder, baking soda, and salt in a medium bowl. This helps evenly distribute the leavening agent and salt, so your cookies bake perfectly every time. Setting this aside is key so you can add it gradually to your wet ingredients without overmixing later.
Step 2: Cream Butter and Sugar
Using an electric mixer, beat the room temperature butter with granulated sugar until the mixture is light and fluffy—about 3 to 4 minutes. I’ve found that this step makes a huge difference in cookie texture because the air you beat in turns the dough tender and gives those lovely little pockets inside once baked.
Step 3: Add Eggs and Vanilla
Beat in the eggs, one at a time, making sure each is fully incorporated before adding the next. This slow addition keeps the dough smooth and helps with structure. Then stir in the vanilla extract for that warm, inviting flavor we all love in cookies.
Step 4: Combine Wet and Dry Ingredients
Gradually add the dry ingredients to the wet mixture on low speed, just mixing until the dough comes together. Avoid overmixing here—overworked dough means tough cookies, and we want these tender. You can swirl in the marshmallow fluff at this point if you prefer, but I like to wait until after chilling so the swirl stays distinct.
Step 5: Chill the Dough
Cover your dough and pop it in the fridge for at least one hour. This step makes the dough firmer and easier to handle, plus it helps prevent the cookies from spreading too much during baking. Trust me on this — I used to skip chilling, and the cookies just turned into flat discs!
Step 6: Preheat Oven and Prepare Baking Sheets
About 20 minutes before baking, preheat your oven to 350°F (175°C). Line two baking sheets with parchment paper or silicone mats—this prevents sticking and encourages even baking. Having two sheets ready means you can bake in batches without waiting.
Step 7: Form Cookies and Add the Marshmallow Swirl
Using a cookie scoop or tablespoon, scoop out balls of chilled dough and place them about 2 inches apart on your baking sheets. Press a small indent gently into the center of each dough ball and spoon about a teaspoon of marshmallow fluff into the center. Then use a toothpick or skewer to swirl the fluff into the cookie dough for that signature marshmallow swirl effect. This is the part I find so fun—I love watching the marshmallow blend into the chocolate dough creating those gorgeous patterns.
Step 8: Bake and Cool
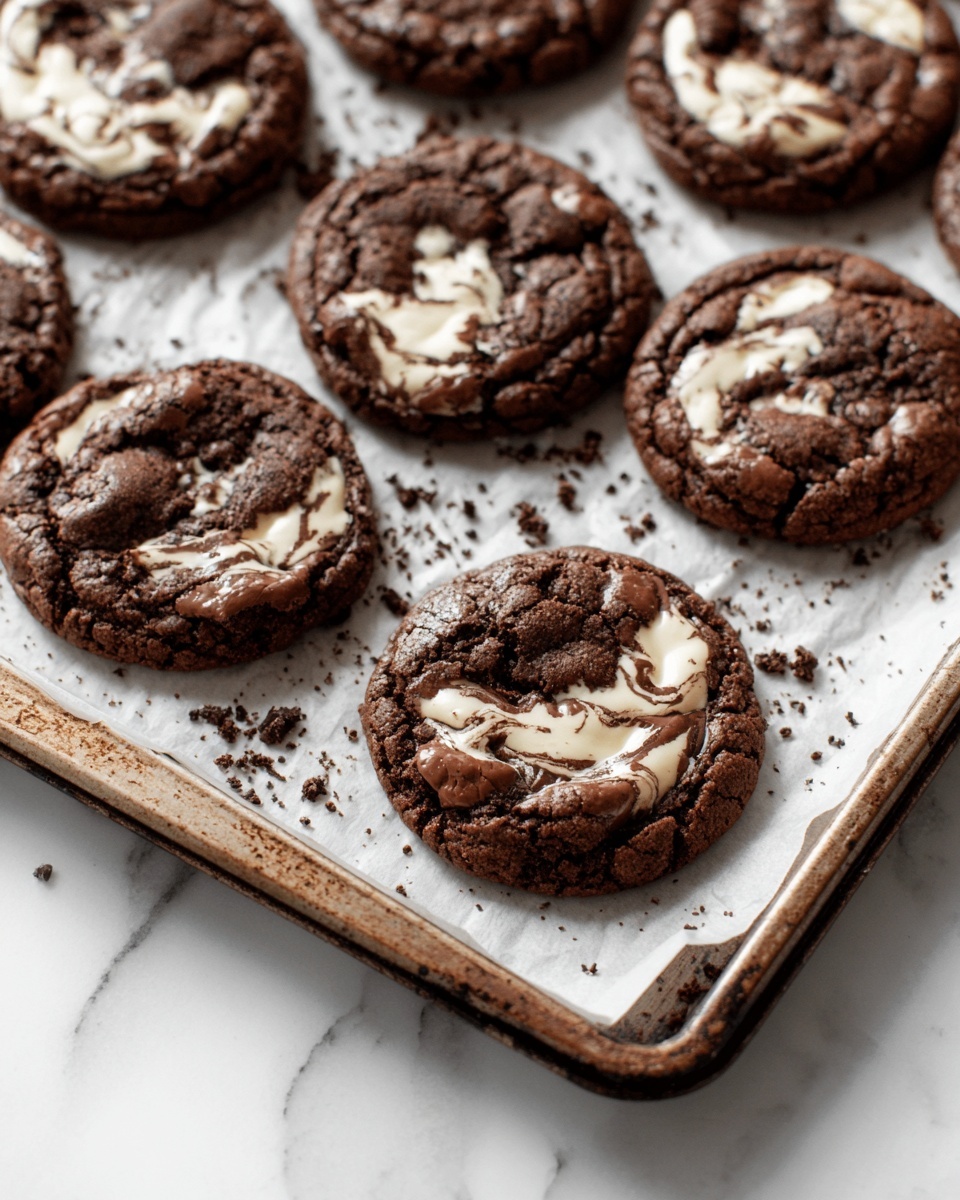
Bake the cookies for 10 to 12 minutes, or until the edges are set but the centers are still soft. If you want extra gooey marshmallow, you can spoon a little more fluff on top halfway through baking, but don’t overdo it or the cookies might spread too much. Let the cookies cool on the baking sheet for 5 minutes so the marshmallow sets slightly, then transfer them to a wire rack to cool completely. This little pause makes them easier to handle and keeps that beautiful swirl intact.
Pro Tips for Making Chocolate Marshmallow Swirl Cookies Recipe
- Chill for Better Texture: I always chill the dough at least an hour—it keeps cookies from spreading and helps develop deeper flavors.
- Room Temperature Ingredients: Using room temp eggs and butter makes mixing smoother and the dough more cohesive.
- Swirl Gently: When swirling marshmallow fluff, be delicate so you keep beautiful patterns and don’t overmix the dough.
- Bake in Batches: Rotating baking sheets halfway prevents uneven cooking and browning.
How to Serve Chocolate Marshmallow Swirl Cookies Recipe
Garnishes
I usually keep the garnishes simple with these cookies. A light dusting of powdered sugar can make them look extra special without overpowering the marshmallow flavor. Sometimes, I sprinkle a few extra mini marshmallows or chocolate chips on top before baking for extra texture and pucker-worthy cuteness.
Side Dishes
These cookies pair wonderfully with a cold glass of milk or a warm cup of coffee or hot cocoa—especially on chilly afternoons. For a fun party, I like serving them alongside fruit or a scoop of vanilla ice cream for an indulgent treat.
Creative Ways to Present
For special occasions, I arrange the cookies on a rustic wooden board and garnish with fresh mint leaves or edible flowers for a whimsical touch. Wrapping them individually in parchment paper tied with twine also makes a great homemade gift idea that always delights friends and family.
Make Ahead and Storage
Storing Leftovers
I store leftover cookies in an airtight container at room temperature for up to 4 days, and they stay surprisingly soft and tasty. If you notice the marshmallow firmness changing, giving them a quick zap of warmth in the microwave softens them right back up.
Freezing
Freezing the shaped cookie dough is a game changer—I prep extra dough balls, freeze them on a tray, then transfer to a freezer bag. When ready to bake, just add a few extra minutes to the baking time. This way, fresh cookies are always just minutes away with zero extra prep.
Reheating
To bring frozen or leftover cookies back to that freshly baked goodness, I pop them in a 300°F oven for about 5 minutes or microwave gently for 15-20 seconds. This softens the marshmallow swirl and warms the chocolate, making each bite feel freshly made.
FAQs
-
Can I use real marshmallows instead of marshmallow fluff in this recipe?
Absolutely! Using melted real marshmallows can create a more textured, fluffier swirl compared to marshmallow fluff, which tends to melt smoothly into the dough. You can melt jumbo marshmallows and swirl them in or even place mini marshmallows inside the cookie before baking for a different texture but equally delicious effect.
-
Why do I need to chill the dough for this Chocolate Marshmallow Swirl Cookies Recipe?
Chilling the dough firms it up, which prevents the cookies from spreading too much in the oven and helps maintain that delightful marshmallow swirl. It also allows flavors to develop better and makes handling the dough much easier, especially when you’re shaping and adding the marshmallow.
-
Can I make these cookies gluten-free?
Yes! You can substitute the all-purpose flour with a gluten-free 1:1 baking flour blend. Just be sure to chill the dough a bit longer to help with texture and handling. The results are still amazing, and the marshmallow swirl adds extra moisture that complements gluten-free cookies nicely.
-
How do I keep the marshmallow swirl from melting too much?
Swirling the marshmallow fluff gently and adding it right before baking after the dough is chilled helps preserve the swirl. Using chilled dough also slows down the marshmallow melting excessively. If you want extra marshmallow on top, add it halfway through the bake to avoid it melting completely into the cookie.
-
Can I freeze the baked cookies?
Yes, you can freeze baked Chocolate Marshmallow Swirl Cookies in an airtight container with layers separated by parchment paper. Thaw at room temperature before serving, then warm them in the oven slightly for that fresh-baked feel.
Final Thoughts
This Chocolate Marshmallow Swirl Cookies Recipe has become one of my absolute favorites because it’s a perfect balance of chocolate decadence and that enticing gooey marshmallow twist we all secretly crave. I love sharing these with friends and family, watching their faces light up when they bite into the soft cookie with the swirl of fluffy marshmallow. If you try this recipe, I’m sure you’ll enjoy not only the flavor but how easy and fun it is to make—there’s really no better way to brighten up your baking routine!
Print
Chocolate Marshmallow Swirl Cookies Recipe
- Prep Time: 20 minutes
- Cook Time: 12 minutes
- Total Time: 1 hour 32 minutes
- Yield: 24 cookies
- Category: Dessert
- Method: Baking
- Cuisine: American
Description
Delight in these rich Chocolate Marshmallow Swirl Cookies that combine deep cocoa flavor with sweet, gooey marshmallow swirls for an irresistible treat perfect for any occasion.
Ingredients
Dry Ingredients
- 2 cups all-purpose flour
- 3/4 cup unsweetened cocoa powder
- 1/2 teaspoon baking soda
- 1/4 teaspoon salt
Wet Ingredients
- 1 cup unsalted butter, room temperature
- 1 1/2 cups granulated sugar
- 2 large eggs, room temperature
- 2 teaspoons vanilla extract
- 1 cup marshmallow fluff
Instructions
- Mix Dry Ingredients: In a medium bowl, whisk together 2 cups all-purpose flour, ¾ cup unsweetened cocoa powder, ½ teaspoon baking soda, and ¼ teaspoon salt. Set aside.
- Cream Butter and Sugar: In a large mixing bowl, use an electric mixer to cream 1 cup room temperature unsalted butter with 1½ cups granulated sugar until light and fluffy, about 3-4 minutes.
- Add Eggs and Vanilla: Beat in 2 large room-temperature eggs one at a time, ensuring each is fully incorporated before adding the next. Stir in 2 teaspoons vanilla extract.
- Combine Wet and Dry: Gradually add the dry ingredients to the wet mixture, mixing on low speed just until the dough comes together. Avoid overmixing. You can lightly swirl the marshmallow fluff at this point or wait until after chilling the dough.
- Chill the Dough: Cover the dough and refrigerate for at least 1 hour to make it easier to handle and to prevent excessive spreading during baking.
- Preheat Oven: About 20 minutes before you’re ready to bake, preheat your oven to 350°F (175°C). Prepare two baking sheets with parchment paper or silicone baking mats.
- Form Cookies: Use a cookie scoop or tablespoon to scoop out chilled dough and roll into balls. Place them on prepared baking sheets, spacing about 2 inches apart. Press a small indent into the center of each dough ball and spoon a teaspoon of marshmallow fluff into each indent. Then, use a toothpick to swirl the marshmallow into the cookie.
- Bake: Bake in the preheated oven for 10-12 minutes, or until the cookies are set around the edges but still soft in the center. Optionally, add a bit more fluff on top halfway through for extra gooeyness.
- Cool on Pan: Allow cookies to cool on the baking sheet for 5 minutes before transferring them to a wire rack to cool completely. This helps the marshmallow set slightly and makes the cookies easier to handle.
Notes
- Chill the Dough: If the dough is too sticky to handle, chilling it for 30 minutes before shaping can make it easier to work with.
- Real Marshmallows: Marshmallow fluff melts much more than real marshmallows, so if you want your marshmallow swirl to be fluffier, try using melted marshmallows.
- Jumbo Marshmallows: Alternatively, you can add one jumbo marshmallow to the center of your cookie if you don’t care much for the swirl.
- Even Cooking: To ensure even baking, rotate the baking sheets halfway through the cooking time.
- Storing Cookies: Keep baked cookies in an airtight container at room temperature to maintain freshness.
- Freezing Dough: You can freeze the shaped dough balls for later use. Just add a couple of minutes to the baking time when ready to bake from frozen.
Nutrition
- Serving Size: 1 cookie
- Calories: 184
- Sugar: 15g
- Sodium: 59mg
- Fat: 8g
- Saturated Fat: 5g
- Unsaturated Fat: 3g
- Trans Fat: 0g
- Carbohydrates: 25g
- Fiber: 1g
- Protein: 2g
- Cholesterol: 36mg

