
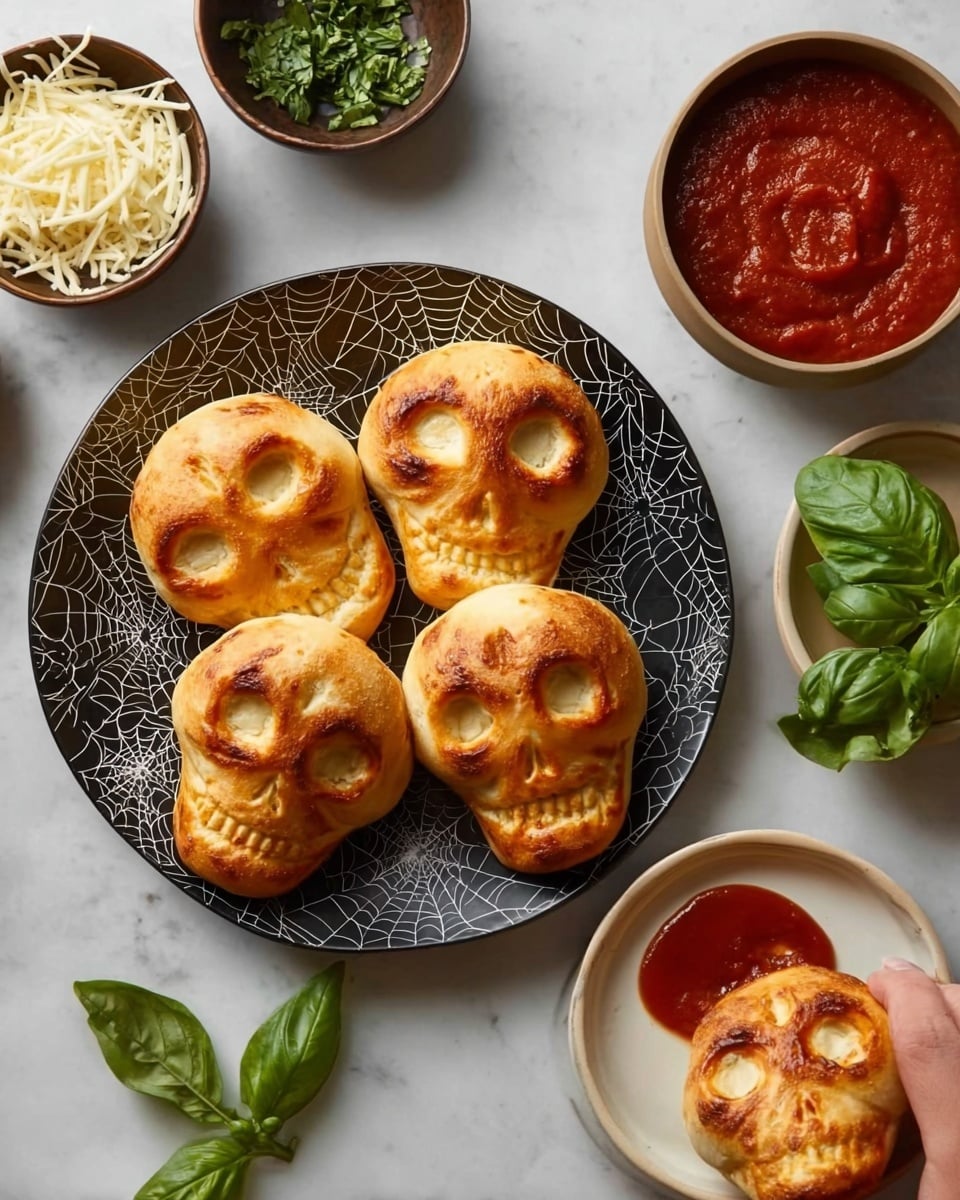
If you’re looking for a spooky twist on your usual pizza night, you’re going to absolutely adore this Cheesy Halloween Pizza Skulls Recipe. I stumbled upon this fun, tasty idea a few years ago and it quickly became a crowd-pleaser at my Halloween parties. These pizza skulls are cheesy, customizable, and perfect for getting everyone in the seasonal spirit without sacrificing flavor. Stick with me and I’ll walk you through exactly how to nail these creepy bites that my family goes crazy for!
Why You’ll Love This Recipe
- Festive & Fun: These pizza skulls instantly level up your Halloween spread, making dinnertime a playful experience.
- Customizable Toppings: Whether your crew loves spicy sausage or a veggie-packed pie, you can tailor each skull to taste.
- Simple to Make: Using pre-made pizza dough and easy steps, you’ll get these on the table in under 30 minutes.
- Kid-Approved: I’ve watched picky eaters devour these cheesy skulls and even ask for seconds — a Halloween win!

Ingredients You’ll Need
I love how the combination of stretchy mozzarella and savory toppings brings life to these pizza skulls — plus, the pre-made pizza dough saves loads of prep time. When you shop, keep an eye out for fresh herbs and quality sausage for that extra oomph.
- Pre-made pizza dough: Saves time but make sure it’s fresh and flexible for easy shaping.
- Pizza sauce: Use your favorite brand or homemade for that perfect tangy base.
- Shredded mozzarella cheese: This melty cheese is the star—freshly shredded gives the best melt.
- Parmesan cheese: Adds a salty punch when sprinkled just right.
- Cooked sausage: Adds hearty flavor; I like Italian sausage for a nice spice balance.
- Mini pepperoni: Perfect bite-sized slices that make skulls look extra fun.
- Black olives (sliced): Great for “eye sockets” and a salty bite.
- Sliced ham (chopped): Adds a savory sweetness that pairs well with cheese.
- Crumbled crispy bacon: Because bacon makes everything better, right?
- Mini Italian meatballs: Fun meat alternative, cut small to fit inside.
- Cooked corn kernels: For a surprising pop of sweetness and color.
- Baby spinach: Sneak in some greens without sacrificing taste.
- Fresh basil: A fresh herbaceous note to brighten the rich flavors.
- Marinara sauce for dipping: This is your finishing touch – tangy and perfect for dunking.
- Chopped parsley or basil: Sprinkle on top for a fresh pop of color and flavor.
Variations
I’m all about making recipes your own, so I encourage you to play around with toppings and dough types. Whether you want to add a veggie twist or turn these into a gluten-free treat, these pizza skulls are so forgiving.
- Vegetarian Variation: I swapped out all meats for roasted veggies and added extra mozzarella—my veggie-loving friends couldn’t tell the difference! You can add mushrooms, bell peppers, or zucchini.
- Spicy Version: Toss in some jalapeños or use spicy sausage. I love a little heat and it pairs amazingly with the creamy cheese.
- Gluten-Free Dough: Tried a store-bought gluten-free crust, and while it was a bit more delicate to handle, the taste was spot on.
- Vegan Adaptation: Use a vegan cheese substitute and load up with veggies—perfect for a plant-based Halloween party.
How to Make Cheesy Halloween Pizza Skulls Recipe
Step 1: Prep Your Skull Molds and Dough
First things first, spray your mini skull baking tin with cooking spray so nothing sticks—this little step saves heartache later! Lightly dust your counter with flour, then roll or stretch out your pizza dough until it’s about a quarter-inch thick. Don’t worry about perfect shapes here; just cut the dough into six rough rectangles big enough to fit into the skull cavities.
Step 2: Fill the Skull Cavities
Lay each dough rectangle into the skull mold, gently pressing it to take shape. Spoon in a little pizza sauce, a generous sprinkle of shredded mozzarella, some Parmesan, and your choice of toppings—sausage, pepperoni, bacon, or even baby spinach. A fun trick I discovered: add just a tiny bit of sauce on top before folding the dough over to seal everything in, so it stays juicy but not soggy.
Step 3: Seal the Skulls and Chill
Fold the dough over your filling like a little calzone and pinch the edges tight. Make sure your seal is good to prevent oozing cheese during baking. Pop the whole skull tray in the fridge while you preheat the oven—it helps the dough keep its shape when it goes in.
Step 4: Bake to Golden Perfection
Bake at 400°F for about 16 to 20 minutes or until the dough is lightly golden and cooked through. I like to keep an eye after 16 minutes since ovens vary—your pizza skulls should have a nice golden crust and bubbly cheese inside.
Step 5: Cool, Unmold, and Serve
Let your pizza skulls rest for about 5 minutes before carefully removing them from the molds. This cooldown helps everything set so none of the delicious fillings leak out when you bite in. Serve with warm marinara sauce and a sprinkle of chopped parsley or basil for a fresh pop of color and flavor.
Pro Tips for Making Cheesy Halloween Pizza Skulls Recipe
- Use Fresh Shredded Cheese: Pre-shredded cheeses often have anti-caking agents that prevent smooth melting. I always shred my mozzarella fresh for the best gooey texture.
- Don’t Overfill: It’s tempting to pile on the fillings, but too much can cause leaks. I learned this the hard way—stick to moderate filling for perfect pockets.
- Chill Before Baking: Refrigerating the dough-filled skulls helps the dough hold its spooky shape and makes unmolding easier.
- Seal Edges Well: Press edges firmly and gently run a fork or your fingers around the seams to prevent cheese explosions in the oven.
How to Serve Cheesy Halloween Pizza Skulls Recipe
Garnishes
I’m a big fan of fresh herbs here—chopped parsley or torn basil leaves sprinkled on top after baking really brighten each bite. A little extra grated Parmesan on top just before serving also adds a lovely salty finish that pairs perfectly with marinara dipping sauce.
Side Dishes
When I serve these cheesy Halloween pizza skulls, I like to keep sides simple and complementary. A crisp Caesar salad or roasted garlic green beans balance out the richness nicely. Some crunchy veggie sticks and ranch dressing round out the plate, especially when serving kids.
Creative Ways to Present
One year, I set the pizza skulls on a black platter lined with faux cobwebs and scattered candy eyeballs around for a seriously fun Halloween charcuterie board vibe. Another great idea is serving each pizza skull on an individual “graveyard” plate with a little bone-shaped breadstick on the side—guaranteed to wow your guests!
Make Ahead and Storage
Storing Leftovers
If you have leftovers (which is rare in my house!), store them in an airtight container in the fridge. They stay surprisingly fresh up to 3 days. Just be sure to cool completely before storing to avoid sogginess.
Freezing
I’ve frozen unbaked stuffed pizza skulls before by wrapping them tightly in plastic wrap and aluminum foil, then baking them straight from frozen when ready. It’s a lifesaver for meal prepping or last-minute parties!
Reheating
To reheat, I like popping leftover pizza skulls in a 350°F oven for about 10 minutes to crisp up the crust again and melt the cheese. Microwaving makes them soggy, so oven reheating works best for keeping that fresh-baked texture.
FAQs
-
Can I use homemade pizza dough for the Cheesy Halloween Pizza Skulls Recipe?
Absolutely! Homemade dough can add even more flavor and control over texture. Just make sure it’s rolled out evenly and not too thin so it can hold the fillings without breaking.
-
What toppings work best for these pizza skulls?
Classic pizza toppings like mozzarella, pepperoni, sausage, and olives work great, but feel free to add veggies like spinach or corn for extra color and flavor. The key is to keep fillings bite-sized and not too wet.
-
How do I avoid the dough sticking to the skull molds?
Lightly spraying the molds with cooking spray and dusting the dough with flour before pressing it into the molds usually does the trick. Also, letting the assembled skulls chill in the fridge helps them release easily.
-
Can I make these ahead of time for a party?
Yes! You can prepare and fill the pizza skulls, refrigerate them for a few hours or overnight, then bake just before serving for fresh, warm treats.
Final Thoughts
This Cheesy Halloween Pizza Skulls Recipe holds a special place in my heart because it combines fun, flavor, and family time all in one. I love how the kids get excited about eating something that looks like a spooky skull but tastes like their favorite cheesy pizza. If you try this, I promise you’ll enjoy not just the delicious results but the smiles and laughs that come with making it. So grab your skull molds and get ready for one of the most delightful spooky eats you’ll make this season!
Print
Cheesy Halloween Pizza Skulls Recipe
- Prep Time: 10 minutes
- Cook Time: 20 minutes
- Total Time: 30 minutes
- Yield: 6 pizza skulls
- Category: Dinner
- Method: Baking
- Cuisine: American
Description
Celebrate Halloween with these fun and delicious Cheesy Halloween Pizza Skulls. Made with pre-made pizza dough filled with classic pizza toppings like mozzarella, Parmesan, sausage, pepperoni, and more, these cute skull-shaped pizza pockets are perfect for a spooky party or a festive family dinner. Easy to customize with your favorite toppings and served with marinara sauce, they’re sure to be a new seasonal favorite.
Ingredients
Pizza Dough and Sauce
- 13 to 16 ounces pre-made pizza dough
- 3/4 to 1 cup pizza sauce
- Marinara sauce for dipping
Cheeses
- 2 cups shredded mozzarella
- About 1/4 cup Parmesan cheese
Meats and Toppings
- About 8 ounces cooked sausage (for 6 pizza skulls)
- About 6 ounces mini pepperoni (for 6 pizza skulls)
- Black olives, sliced
- Sliced ham, chopped
- Crumbled crispy bacon
- Mini Italian meatballs
- Cooked corn kernels
Greens and Garnishes
- Baby spinach
- Fresh basil
- Chopped parsley or basil (for garnish)
Instructions
- Prepare the baking tin: Spray the mini skull baking tin with cooking spray to prevent sticking.
- Prep the dough: Lightly dust your counter with flour to prevent sticking. Roll, pat, or stretch the pizza dough to approximately 1/4 inch thick. Cut the dough into 6 roughly rectangular shapes; perfect uniformity isn’t necessary.
- Fill the dough: Working one piece at a time, place each dough rectangle into a skull-shaped cavity. Add a layer of pizza sauce, followed by shredded mozzarella, a sprinkle of Parmesan cheese, and your choice of toppings such as sausage, pepperoni, olives, ham, bacon, meatballs, corn, spinach, or basil. Top off with a small spoonful of pizza sauce (no more than a tablespoon) before sealing.
- Seal the skulls: Fold the dough over the fillings, pinching edges together carefully to create a sealed mini pizza pocket shaped like a skull. Repeat this process for all six dough pieces.
- Chill before baking: Place the skull-shaped pizza tray in the refrigerator while you preheat your oven.
- Preheat oven and bake: Preheat oven to 400°F (204°C). Remove tray from refrigerator and bake the pizza skulls for 16 to 20 minutes, or until the dough is lightly golden brown. Baking times may vary slightly depending on dough brand.
- Cool and serve: Remove from oven and let the skulls cool for about 5 minutes. Carefully unmold them from the baking tin. Serve warm with marinara sauce for dipping and optionally garnish with chopped parsley or basil.
Notes
- These cheesy Pizza Skulls are a fun and festive Halloween treat perfect for dinner or parties.
- The recipe is highly customizable, so feel free to use your favorite pizza toppings or vegetarian options.
- Using pre-made dough cuts down preparation time and makes the process beginner-friendly.
- Ensure a tight seal on the dough pockets to prevent fillings from leaking during baking.
- Adjust baking time as needed based on your oven and dough thickness.
Nutrition
- Serving Size: 1 pizza skull
- Calories: 270 kcal
- Sugar: 5 g
- Sodium: 839 mg
- Fat: 10 g
- Saturated Fat: 5 g
- Unsaturated Fat: 3 g
- Trans Fat: 0 g
- Carbohydrates: 32 g
- Fiber: 1 g
- Protein: 13 g
- Cholesterol: 29 mg


