If you’re anything like me, there’s something utterly satisfying about homemade pickles, and this Bread and Butter Pickles Recipe really hits the spot. Sweet, tangy, and just the right balance of crunch, these pickles brighten up sandwiches, burgers, or even a simple cheese platter. When I first tried this recipe, I was amazed at how accessible and rewarding it was — no fancy ingredients, just classic flavors that work beautifully together.
This recipe is perfect whether you’re looking to preserve the fresh crunch of market cucumbers or add a burst of flavor to your meals year-round. I love making a batch in the summer and having them ready in the fridge, but if you’re into canning, you can store these long-term too. You’ll find that once you get the hang of it, these pickles become your go-to for quick snacks and homemade gifts alike.
Why You’ll Love This Recipe
- Balanced Sweet and Tangy Flavor: The perfect combination of vinegars, sugar, and spices creates that classic bread and butter pickle taste you’ll crave.
- Simple Ingredients: Easy to find fresh cucumbers and pantry staples make this recipe approachable for any home cook.
- Versatile Storage: Whether you want quick refrigerator pickles or pantry-stored canned jars, this recipe works both ways.
- Quick Prep with Long-lasting Results: After a short chill and simmer, you get pickles that last and impress family and friends.

Ingredients You’ll Need
Every ingredient in this Bread and Butter Pickles Recipe plays a role in creating that iconic sweet and savory flavor. The cucumbers provide the crunch, the pickling salt draws out moisture without bitterness, and the blend of vinegars and spices give the pickles their signature taste. When picking cucumbers, fresh and firm is the way to go for the best crunch.
- Pickling cucumbers: Look for small, firm cucumbers with no soft spots for the best crunch and texture.
- Pickling salt: Coarse salt without additives; it draws out moisture without clouding the brine.
- Onions: White or yellow onions thinly sliced add sweetness and crunch.
- White distilled vinegar: The acidic backbone that helps preserve and flavor these pickles.
- Apple cider vinegar: Adds a subtle fruitiness that deepens the flavor.
- Sugar: Balances the vinegar’s sharpness with just the right sweetness.
- Mustard seeds: Impart a mild heat and a classic pickle tang.
- Crushed red pepper flakes: Just a pinch for a gentle kick, but optional if you prefer milder pickles.
- Celery seeds: Adds a fresh, herbaceous note that complements the cucumbers.
- Cinnamon stick: A little warmth that rounds out the spices.
- Allspice berries and ground allspice: Provide complex depth and a hint of sweetness.
- Whole cloves and ground cloves: Add aromatic warmth but use sparingly.
- Ground turmeric: Adds color and subtle earthiness without overpowering.
Variations
I enjoy experimenting with this Bread and Butter Pickles Recipe by swapping spices or tweaking the sweetness. Feel free to make it your own–that’s part of the fun with pickling! You might find a subtle change that becomes your family’s favorite twist.
- Spicier version: I once added a few sliced fresh jalapeños to kick the heat up; it was a hit at my last barbecue.
- Lower sugar: I’ve cut the sugar by a third when I want a less sweet pickle, and it still balances well with the vinegars.
- Herbal twist: Adding fresh dill or a few sprigs of thyme during simmering gives an herbal fresh note that’s lovely on sandwiches.
- Vinegar swap: Using all apple cider vinegar instead of a mix gives the pickles a fruitier profile, which some guests really enjoyed.
How to Make Bread and Butter Pickles Recipe
Step 1: Rinse and slice your cucumbers
Start by carefully rinsing the cucumbers, scrubbing the ribbed skin under cold water to remove any dirt. I slice off just a thin sliver (about 1/8 inch) from each end to get rid of any bitterness at the tips. Then, slice the cucumbers into 1/4-inch thick rounds — the key is uniform slices so they pickle evenly.
Step 2: Salt, chill, and drain to get that perfect crunch
Mix your sliced onions and the pickling salt into the cucumbers. This step is a game-changer; the salt draws out excess moisture which prevents soggy pickles later. Cover the bowl with a clean tea towel and then some ice on top—this chilling process keeps everything crisp. Pop it in the fridge for at least 4 hours—I usually do this in the morning and finish the pickling in the evening.
Step 3: Rinse well and drain twice
After chilling, rinse the cucumbers and onions thoroughly to wash away the saltiness, then drain well. I find rinsing twice helps prevent overly salty pickles—your taste buds will thank you! You want them ready to soak up that sweet and tangy syrup without being too salty from the get-go.
Step 4: Heat jars if canning, or prep for fridge storage
If you plan to store your pickles outside the fridge, heating your jars in a hot water bath is essential to prevent spoilage. For quick fridge pickles, you can skip this step—just make sure your jars are clean and dry. I learned early on that properly heated jars avoid leaks and keep those pickles fresh for months.
Step 5: Make the pickling syrup and combine
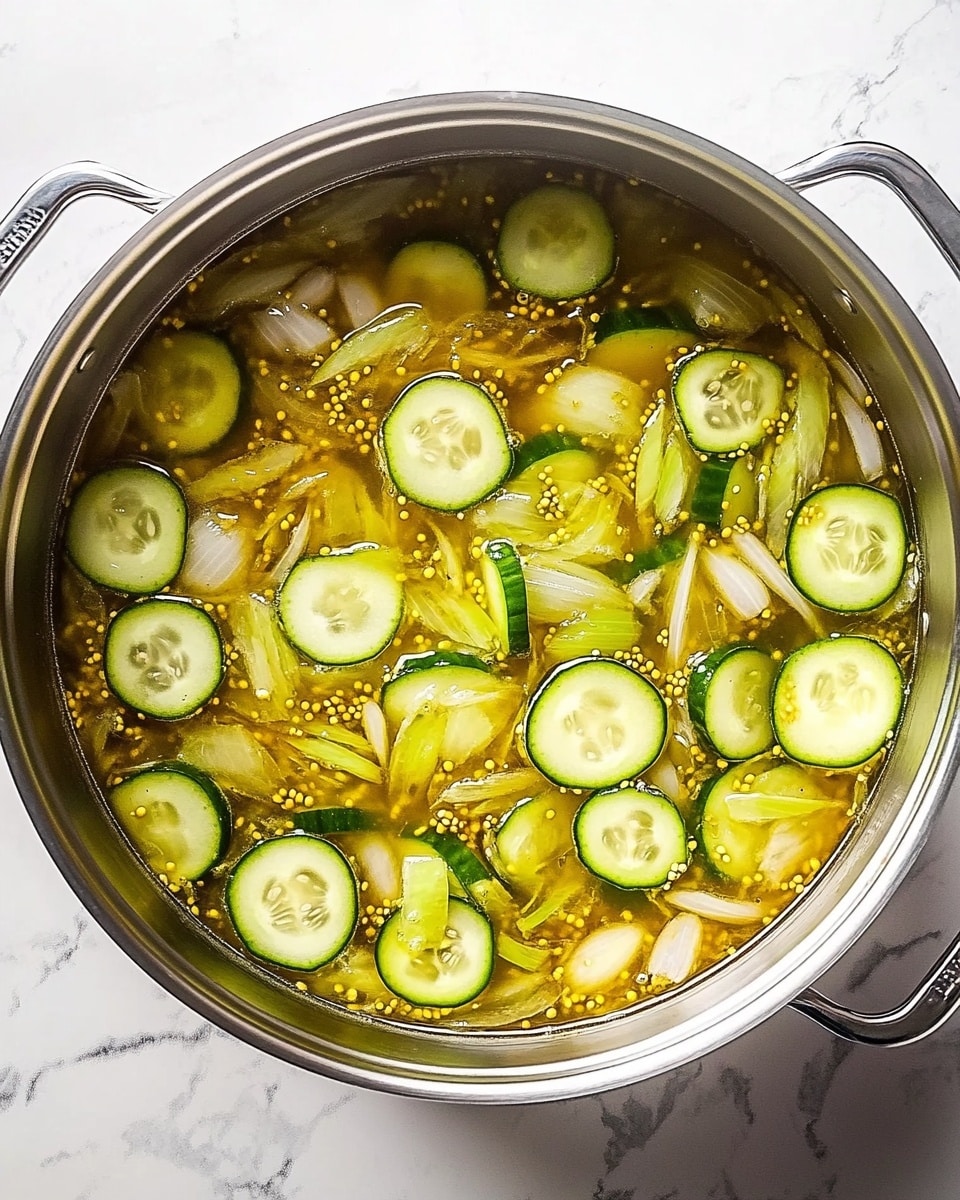
In a large pot, mix both vinegars, sugar, and all the pickling spices except salt, and bring it to a boil. The aroma when the spices hit the hot vinegar-sugar mixture is always the best kitchen smell! When the sugar dissolves and the syrup boils again, add the drained cucumbers and onions. Let it come back to a boil—that reminds me to stir occasionally to keep the veggies well-coated.
Step 6: Pack jars and pour syrup
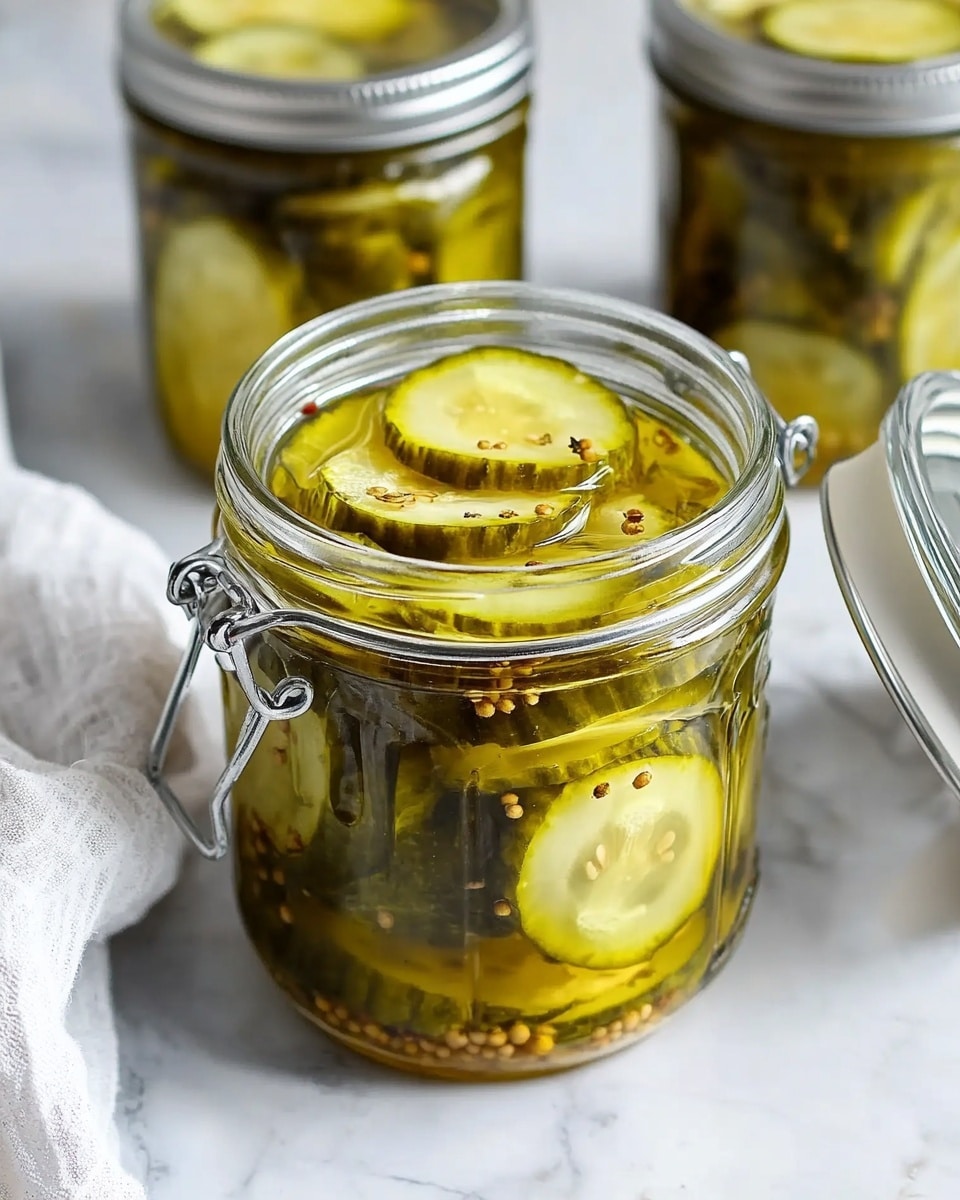
Using a slotted spoon, pack the hot cucumbers and onions tightly into your sterilized jars, leaving about an inch from the rim. Then pour the hot syrup over them to an even 1/2-inch from the rim. To avoid any chance for spoilage, I always wipe the rims clean with a paper towel before sealing with a dry lid and screw band.
Step 7: Process jars in a hot water bath or chill
If you’re storing pickles long-term, place the jars back into boiling water with at least an inch of water above the jars and process them for 15 minutes. This step seals and preserves your pickles safely. When I skip canning, I just transfer the jars to the fridge and eat them within 3 months—still delicious but with a shorter shelf life.
Step 8: Let jars cool and check seals
Set the jars on your countertop to cool completely. You’ll hear satisfying “pops” as the lids seal properly—that’s a good sign! If any lids don’t seal, just store those jars in the fridge and eat them soon. Properly canned bread and butter pickles can keep in a cool, dark place for up to a year.
Pro Tips for Making Bread and Butter Pickles Recipe
- Salting Time Matters: Don’t rush the 4-hour salting process; it’s the key to crisp, flavorful pickles.
- Rinse Twice: I always rinse twice after salting to eliminate excess salt and achieve balanced flavor.
- Uniform Slices: Keeping cucumber slices consistent in thickness ensures they cook evenly in the syrup.
- Use Quality Vinegars: Using vinegars with 5% acidity guarantees safe pickling and bright flavor every time.
How to Serve Bread and Butter Pickles Recipe
Garnishes
I love topping my sandwiches or burgers with a few slices of these bread and butter pickles, sometimes adding a fresh sprig of dill for color and an extra burst of aroma. For casual snacking, you can also sprinkle a pinch of black pepper or a dash of smoked paprika on the pickles to elevate their flavor.
Side Dishes
These pickles pair perfectly with hearty sides like baked beans, coleslaw, and potato salad — especially at summer cookouts or family dinners. They also add a delightful crunch to charcuterie boards and pair wonderfully with sharp cheeses and cured meats.
Creative Ways to Present
For parties, I love presenting these pickles layered in clear glass jars with fresh herbs or thin lemon slices in between for a pretty visual pop. You could also arrange them in small bowls alongside artisan bread and cheese for a charming appetizer spread. The golden color and hint of cinnamon make them a conversation starter!
Make Ahead and Storage
Storing Leftovers
I store opened jars of Bread and Butter Pickles in the fridge and have found they stay crisp and delicious for up to three months. Keeping the cucumbers submerged in their syrup helps maintain flavor and texture. Plus, they’re a safe bet for quick snacking anytime.
Freezing
Freezing bread and butter pickles isn’t something I recommend because the texture changes quite a bit once thawed—it becomes mushy. Instead, I prefer to can or refrigerate fresh batches to keep that satisfying crunch intact.
Reheating
Typically, these pickles are enjoyed cold or at room temperature, so reheating isn’t really needed. However, if you want to warm them slightly for a recipe, I gently heat the syrup in a saucepan and then pour it over fresh cucumber slices to replicate the flavor without sacrificing crunch.
FAQs
-
Can I use regular table salt instead of pickling salt?
Regular table salt often contains anti-caking agents and iodine that can cause cloudiness or alter the flavor and texture of your pickles. Pickling salt is pure and dissolves well, which helps keep your brine clear and your pickles tasting clean. For best results, stick with pickling salt for this recipe.
-
How long do bread and butter pickles last?
Properly canned and sealed jars of bread and butter pickles can be stored in a cool, dark pantry for up to a year. Once opened, or if you skip canning and keep them refrigerated, they’ll stay fresh for about 3 months. Always check for any signs of spoilage before consuming.
-
Do I have to process the pickles in a water bath?
If you plan to eat the pickles within 3 months and keep them refrigerated, you can skip the water bath processing. However, for long-term storage outside the fridge, water bath canning is necessary to create a secure seal and prevent spoilage. I usually do the water bath when I want to gift jars or store beyond 3 months.
-
Can I slice the cucumbers differently?
Absolutely! While this recipe calls for 1/4-inch round slices, you can also cut the cucumbers into spears or thicker slices if you prefer. Just keep the slicing consistent to ensure even pickling and flavor absorption.
Final Thoughts
This Bread and Butter Pickles Recipe has become one of my kitchen staples because it’s both utterly delicious and straightforward. Whether it’s your first time pickling or you’re a seasoned pro, this recipe rewards your effort with that classic sweet and tangy crunch that’s so addictive. Trust me, once you make a batch, you’ll find all kinds of uses for these pickles—from jazzing up sandwiches to delighting guests. I hope you enjoy making and sharing them as much as I do!
Print
Bread and Butter Pickles Recipe
- Prep Time: 20 mins
- Cook Time: 30 mins
- Total Time: 4 hrs 50 mins
- Yield: 3 to 5 Pints (approximately 24 servings)
- Category: Pickles and Preserves
- Method: Hot Water Bath Canning
- Cuisine: American
- Diet: Vegetarian
Description
Classic Bread and Butter Pickles featuring crisp pickling cucumbers, sweet and tangy vinegars, and a flavorful blend of pickling spices. This recipe includes a salting and chilling step to ensure perfect crunch, followed by simmering in a sweet-spiced vinegar syrup, and optional hot water bath canning for long-term storage.
Ingredients
Pickling Cucumbers and Vegetables
- 2 1/2 pounds pickling cucumbers, fresh from the market
- 1 pound white or yellow onions, thinly sliced
- 1/4 cup pickling salt
Pickling Syrup
- 1 1/4 cups white distilled vinegar (5% acidity)
- 1 cup apple cider vinegar (5% acidity)
- 2 1/4 cups sugar
Pickling Spices
- 1 tablespoon mustard seeds
- 1 teaspoon crushed red pepper flakes
- 3/4 teaspoon celery seeds
- 1 inch cinnamon stick
- 6 allspice berries plus a pinch of ground allspice
- 6 whole cloves plus a pinch of ground cloves
- 1/2 teaspoon ground turmeric
Instructions
- Rinse and Slice the Cucumbers: Carefully rinse the cucumbers to clean away any dirt, then slice off 1/8 inch from the ends and discard. Slice the cucumbers into 1/4-inch thick slices and place them in a large bowl.
- Salt, Chill, and Drain: Add the sliced onions and all the pickling salt to the cucumbers and stir well to distribute the salt. Cover with a clean, thin tea towel and a couple of inches of ice. Refrigerate for 4 hours. After chilling, discard the ice, rinse the cucumber and onion slices thoroughly, and drain twice to remove excess salt.
- Heat the Jars (Optional for Canning): If storing outside the refrigerator, prepare canning jars by placing them on a metal rack in a large canning pot filled with warm water, bring to boil, then keep warm. Wash lids in hot, soapy water. If you plan to eat the pickles immediately and refrigerate, you can skip this step.
- Make the Pickling Syrup: In a large pot, combine both vinegars, sugar, and all pickling spices (excluding salt). Bring the mixture to a boil until sugar is dissolved. Add the rinsed cucumbers and onions, bring to a boil again.
- Pack Jars with Vegetables and Syrup: Using a slotted spoon, pack the hot cucumbers and onions into prepared jars, leaving 1 inch from the rim. Pour the hot syrup over the vegetables, leaving 1/2 inch headspace. Wipe rims clean, place dry lids, and secure with metal screw bands.
- Process in Hot Water Bath (Optional): For shelf-stable storage, place jars in the hot water bath ensuring water covers at least 1 inch above jars. Boil vigorously for 15 minutes. Remove jars carefully and allow to cool. You should hear popping sounds as lids seal properly. Unsealed jars must be refrigerated.
- Cool and Store: Let jars cool to room temperature. Properly sealed jars can be stored in a cool, dark pantry for up to one year. Opened jars or those stored without a water bath must be refrigerated and consumed within 3 months.
Notes
- Pickling salt is recommended as it does not contain iodine or anti-caking agents that can cloud the brine.
- The salting and chilling step ensures the cucumbers remain crisp and helps draw out excess moisture.
- If you do not plan to can the pickles, storing them in the refrigerator is safe, but consume within 3 months.
- Jars must be placed on a rack in the canning pot, never directly on the bottom to avoid heat damage.
- Adjust spice levels by reducing crushed red pepper flakes if you prefer less heat.
Nutrition
- Serving Size: 1/24 of recipe
- Calories: 95
- Sugar: 20g
- Sodium: 633mg
- Fat: 0g
- Saturated Fat: 0g
- Unsaturated Fat: 0g
- Trans Fat: 0g
- Carbohydrates: 23g
- Fiber: 1g
- Protein: 1g
- Cholesterol: 0mg
