If you’re looking for a festive, fun treat that’s just as delicious as it is adorable, this BOO! Chocolate Peanut Butter Bars Recipe is right up your alley. I absolutely love how this recipe combines the crunch of corn flakes and rice krispies with creamy peanut butter and rich chocolate, making it the perfect spooky snack for fall gatherings or Halloween parties. It’s quick to whip up and always a hit with kids and adults alike!
When I first tried this BOO! Chocolate Peanut Butter Bars Recipe, I was amazed at how easy it was to make something so cute and tasty. You’ll find that the ghost shapes don’t have to be perfect to be charming — that rustic look makes them even more fun. Whether you’re prepping for a classroom party or just want a sweet treat to share with your family, these bars are totally worth the effort.
Why You’ll Love This Recipe
- Festive and Fun: Charming ghost shapes that add spooky flair without complicated decorating.
- Easy to Make: Few ingredients and simple steps means you’ll have these on the table in no time.
- Perfect Texture: Crunchy cereals mixed with creamy peanut butter and smooth chocolate layers make every bite delightful.
- Kid-Approved: My family goes crazy for these, and I bet yours will, too!

Ingredients You’ll Need
The magic of BOO! Chocolate Peanut Butter Bars Recipe really comes from the simple, wholesome ingredients working in harmony. When shopping, look for creamy peanut butter without added sugar or salt for that perfect balance, and get good quality chocolate — it really makes a difference here.
- Honey: I love using raw or local honey for natural sweetness and a slight floral note.
- Maple syrup: This adds a rich depth of sweetness and complements the honey beautifully.
- Creamy peanut butter: Smooth texture helps the bars bind while giving that classic peanut butter flavor.
- Corn flakes cereal: Use plain corn flakes for crunch without extra sweetness.
- Brown rice krispies: These give a lighter crunch and a bit of variety in texture to the mix.
- Semi-sweet or dark chocolate: Choose quality chocolate to melt — it creates a luscious, glossy layer on top.
- White chocolate: Perfect for those spooky ghost shapes — melt gently so it stays smooth.
- Candy eyes and black sprinkles: Fun decorations that bring your ghostly bars to life. You can find candy eyes in baking aisles or online!
Variations
I’ve played around with this recipe in a few ways, and it’s really easy to customize based on your preferences, dietary needs, or what’s on hand. Don’t hesitate to tweak the mix-ins or decoration to make it your own — that’s half the fun!
- Nut-free alternative: Swap the peanut butter with sunflower seed butter; I did this once for my nephew and it turned out just as delicious.
- Chocolate variations: Using dark chocolate adds a bit more sophistication, while milk chocolate makes these sweeter and creamier.
- Festive toppings: I sometimes add crushed Halloween-themed candies or edible glitter for extra flair at parties.
How to Make BOO! Chocolate Peanut Butter Bars Recipe
Step 1: Prep your pan and cereals
Start by lining a 9×13 inch baking dish with parchment paper — this makes removing the bars super easy and keeps everything neat. Next, combine the corn flakes, brown rice krispies, and 1 cup of creamy peanut butter in a large bowl. I like gently folding them together so the peanut butter coats the cereal without breaking the flakes too much.
Step 2: Cook your sweet syrup and mix it in
In a small pot, bring the honey and maple syrup to a boil over medium heat. Let it cook for 2 minutes — this helps thicken the mixture so it binds your cereal crispies better. Pour this hot syrup over your cereal and peanut butter mix, stirring quickly but carefully to coat everything evenly. Then, transfer the mix to your prepared pan, packing it down tightly with the back of a spatula or your hands (I always use a piece of parchment to avoid sticky fingers!). Chill this in the fridge for 15 minutes so it firms up.
Step 3: Melt the chocolate and peanut butter topping
While your base chills, melt together the semi-sweet or dark chocolate and ¼ cup peanut butter in the microwave in short bursts, stirring between each until smooth. Spread this luscious chocolate peanut butter blend evenly over the chilled cereal base. This rich layer is what makes these bars irresistible.
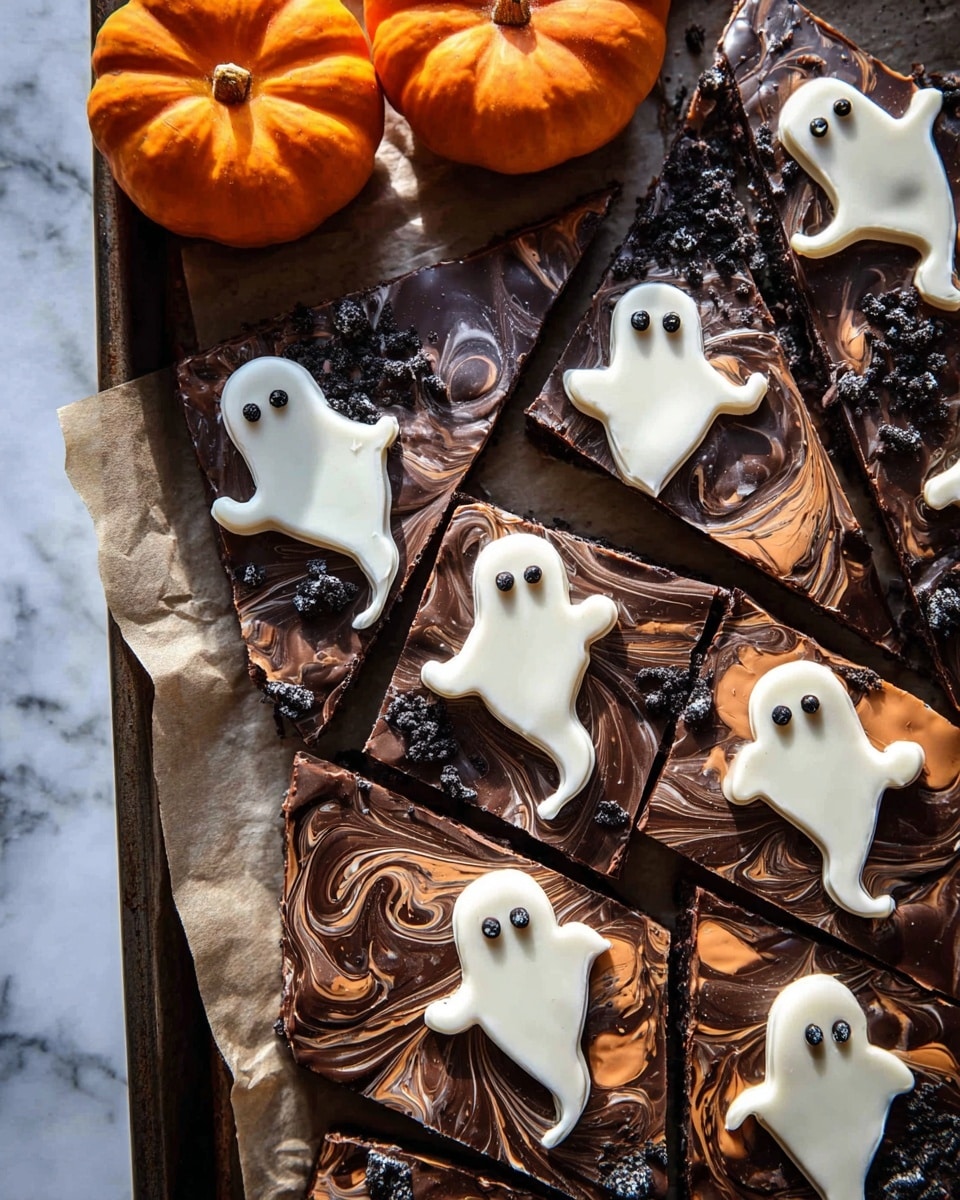
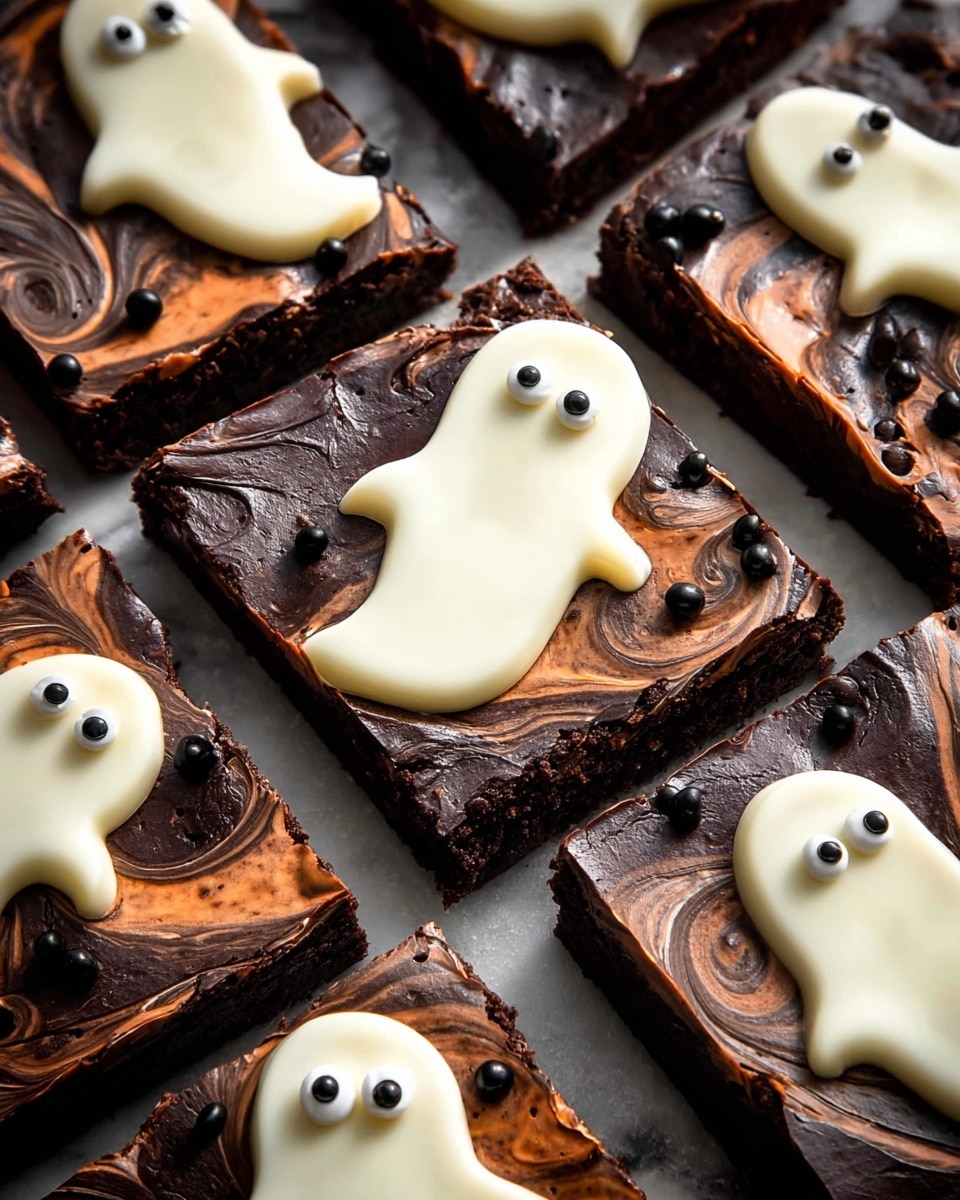
Step 4: Create spooky ghost shapes with white chocolate
Melt the white chocolate gently — you want it smooth but not too hot. Now, spoon small dollops (about a teaspoon for small ghosts or a tablespoon for larger ones) onto the chocolate layer, making sure to space them about an inch apart. Using a wooden skewer or the rounded end of a spoon, drag the white chocolate dollops out into ghostly shapes. Don’t stress about perfection; I found the imperfect ghosts look way more charming and fun. Add two mini candy eyes to each ghost to give them personality, then pop the whole pan back in the fridge for another 15 minutes to set.
Step 5: Cut and serve with a spooky surprise
Once chilled, carefully cut around each ghost shape to create irregular, spooky bars. I like to keep these refrigerated until serving to keep their shape and texture perfect. BOO! Enjoy watching your family and guests marvel over these cute and delicious bars.
Pro Tips for Making BOO! Chocolate Peanut Butter Bars Recipe
- Gentle Mixing: Fold cereals in gently to keep flakes whole for that perfect crunch and appearance.
- Chocolate Melting: Use short microwave bursts (20–30 seconds) stirring in between to avoid burning your chocolate.
- Ghost Shapes: Don’t worry about perfect ghosts; the more unique they are, the more character your bars have.
- Cutting Bars: Chill fully before cutting to avoid smashing the ghost shapes—patience pays off here!
How to Serve BOO! Chocolate Peanut Butter Bars Recipe
Garnishes
I love adding a sprinkle of black sanding sugar or tiny edible glitter dots around the ghosts to give them a little extra sparkle. Sometimes I toss a few extra candy eyes across the tray for a playful surprise before serving — it’s little touches like these that bring the whole presentation alive!
Side Dishes
These bars pair wonderfully with a cold glass of milk or a cozy cup of hot cocoa. For a party, I like to serve them alongside some fresh fruit or a light salad to balance out the sweetness.
Creative Ways to Present
For Halloween gatherings, I’ve laid the bars out on a black slate board with fake spider webs stretched around for ambiance — it’s super easy but looks super cool. You can also serve the bars in small mini cupcake liners for portion control and easy grab-and-go treats.
Make Ahead and Storage
Storing Leftovers
I keep leftover BOO! Chocolate Peanut Butter Bars in an airtight container in the fridge. They stay fresh and delicious for up to 5 days. Because of the chocolate top, refrigeration really helps keep them firm and prevents melting.
Freezing
If you ever want to make these in advance, I’ve had great luck freezing the bars individually wrapped in plastic wrap and then stored in a freezer-safe container. When properly wrapped, they freeze well for up to a month. Just thaw in the fridge overnight before serving.
Reheating
I don’t recommend reheating these bars because you want to preserve that crisp crunch and the shape of the ghosts. But if they get a little too cold and hard from the fridge, just let them sit at room temperature for 10 minutes before digging in—they soften slightly without losing their charm.
FAQs
-
Can I use crunchy peanut butter instead of creamy?
You can, but I recommend creamy peanut butter for the smoothest texture and best binding. Crunchy peanut butter might make it harder to evenly coat the cereals and could affect the bars’ consistency.
-
What if I don’t have candy eyes for decoration?
No problem! You can use mini chocolate chips, tiny dots of melted chocolate, or even small edible black pearls to create eyes. Alternatively, skip eyes and add black sprinkles or edible markers for spooky faces.
-
Can I make these bars gluten-free?
Absolutely! Make sure to use gluten-free corn flakes and rice krispies. Always check your labels to confirm no hidden gluten ingredients.
-
How do I prevent the white chocolate ghosts from melting?
Work quickly when shaping the ghosts and chill the bars right after decorating. Keeping the bars cool during and after assembling helps the white chocolate keep its shape and avoid melting.
Final Thoughts
I love recommending this BOO! Chocolate Peanut Butter Bars Recipe because it’s a sweet, simple way to add some spooky spirit to your kitchen without stress. The combination of flavors and textures, paired with those adorable ghost shapes, never fails to bring smiles. Give it a try — I promise you’ll be glad you did, and your friends and family might even ask you to make it again next Halloween!
Print
BOO! Chocolate Peanut Butter Bars Recipe
- Prep Time: 20 minutes
- Cook Time: 5 minutes
- Total Time: 55 minutes
- Yield: 24 bars
- Category: Dessert
- Method: No-Cook
- Cuisine: American
Description
BOO! Chocolate Peanut Butter Bars are a fun and festive no-bake treat perfect for Halloween. Combining crunchy corn flakes and brown rice krispies with smooth peanut butter and a sweet honey-maple syrup glaze, these bars are topped with creamy melted chocolate and decorated with spooky white chocolate ghost shapes and candy eyes. They’re easy to make, require minimal baking skills, and are ideal for parties or as a seasonal snack.
Ingredients
For the Base
- 3/4 cup honey
- 1/4 cup maple syrup
- 1 1/4 cups creamy peanut butter (divided)
- 3 cups corn flakes cereal
- 2 cups brown rice krispies
For the Topping
- 8-12 ounces semi-sweet or dark chocolate, melted
- 6 ounces white chocolate, melted
- Candy eyes and black sprinkles, for decorating
Instructions
- Prepare the Pan: Line a 9×13 inch baking dish with parchment paper to prevent sticking and make it easy to remove the bars once set.
- Mix the Dry Ingredients: In a large bowl, combine the corn flakes, brown rice krispies, and 1 cup of creamy peanut butter. Stir gently to distribute the peanut butter evenly among the cereals.
- Make the Syrup: In a small pot over medium heat, combine the honey and maple syrup. Bring the mixture to a boil, then cook for 2 minutes to thicken slightly. Remove from heat immediately to avoid burning.
- Combine Syrup with Cereal Mix: Pour the hot honey-maple syrup over the cereal and peanut butter mixture. Stir well to coat all the cereal evenly with the syrup.
- Press into Pan and Chill: Spread the sticky mixture into the prepared pan, pressing down firmly to compact it. Place the pan in the refrigerator for 15 minutes to set and firm up.
- Melt Chocolate Topping: In a microwave-safe bowl, melt together the semi-sweet or dark chocolate with 1/4 cup of peanut butter in short bursts, stirring until smooth and creamy.
- Spread Chocolate Layer: Remove the pan from the fridge and spread the melted chocolate and peanut butter mixture evenly over the cereal base.
- Create White Chocolate Ghosts: Melt the white chocolate separately. Spoon small dollops (1 teaspoon for small ghosts, 1 tablespoon for large ghosts) spaced about 1 inch apart over the chocolate layer. Use a wooden skewer or the end of a skinny spoon to drag the white chocolate, forming ghost-like shapes with irregular edges for a fun, imperfect look.
- Decorate: Place two mini candy eyes on each ghost. Optionally, add black sprinkles for extra spookiness.
- Chill and Serve: Return the pan to the fridge for about 15 minutes to allow the chocolate to fully set. Once firm, cut around each ghost to create irregularly shaped bars and store in the fridge until ready to serve. Enjoy your spooky treats!
Notes
- For best results, use creamy peanut butter for easy mixing and smooth texture.
- If you prefer a sweeter topping, increase the amount of semi-sweet chocolate up to 12 ounces.
- The irregular ghost shapes add to the spooky appeal, so don’t worry about perfection.
- Keep the bars refrigerated to prevent melting and ensure they stay firm.
- You can substitute candy eyes with small chocolate chips or edible markers if preferred.
Nutrition
- Serving Size: 1 bar (approx. 1/24th of recipe)
- Calories: 180
- Sugar: 14g
- Sodium: 80mg
- Fat: 10g
- Saturated Fat: 4g
- Unsaturated Fat: 5g
- Trans Fat: 0g
- Carbohydrates: 20g
- Fiber: 1g
- Protein: 4g
- Cholesterol: 0mg

