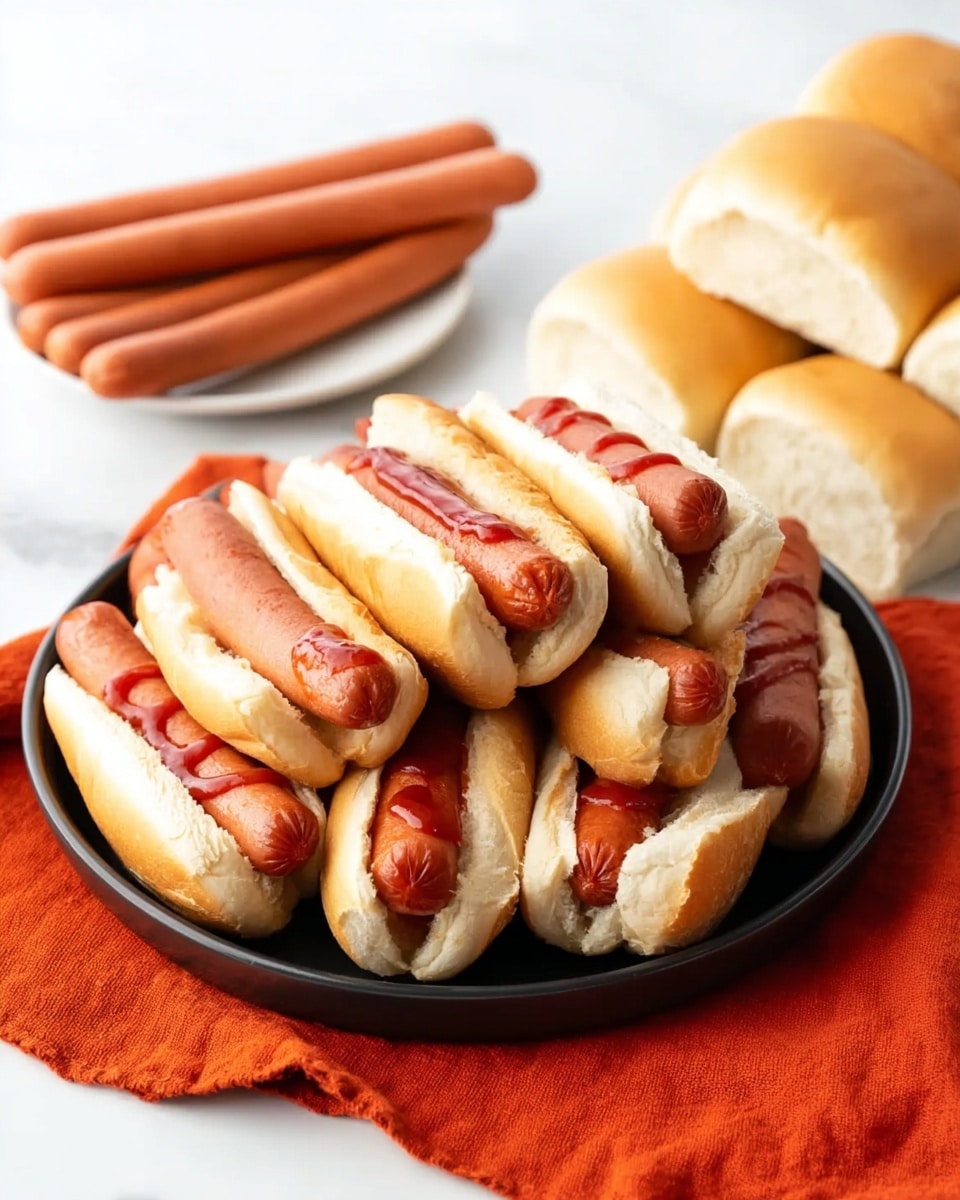
If you’re hunting for a spooky, fun, and absolutely irresistible Halloween snack, you’ve got to try my Bloody Finger Hot Dogs for Halloween Recipe. I first made these for a party, and let me tell you, they were an absolute hit—everyone kept commenting on how creepy and creative they looked, but then couldn’t wait to gobble them up! They’re easy to put together, and I’ll walk you through the little tricks that make these creepy fingers look so realistic and bloody. Stick with me and you’ll be the snack-time star of your Halloween festivities!
Why You’ll Love This Recipe
- Super Simple Ingredients: You probably already have everything on hand, which means no last-minute store runs!
- Creepy Realism: The clever cuts on the hot dogs make them look eerily like severed fingers, gross but fun.
- Kid-Approved & Party-Ready: My family absolutely goes crazy for these, and they’re always a party conversation starter.
- Quick to Make: From start to finish, you’re looking at about 20 minutes without any complicated steps.

Ingredients You’ll Need
These ingredients come together perfectly to create the gruesome effect without fuss. Pick good-quality hot dogs since they’re the star of the show! And if you want to up the game with onion fingernails, grab the freshest white onion you can find.
- Hot dogs: Choose your favorite kind—regular, beef, or even plant-based works well. The shape is key here, so slimmer hot dogs give a more finger-like look.
- Hot dog buns: Soft buns hold the “finger” just right and make it easy to add that bloody ketchup.
- Ketchup: This is your “blood,” and spreading it inside the bun and on the fingers amps up the gore factor.
- Water: For boiling the hot dogs perfectly—don’t skip this step!
- Optional thinly sliced onion: This adds a creepy “fingernail” detail if you want to get fancy, but it’s totally optional.
Variations
I love switching things up with these Bloody Finger Hot Dogs for Halloween Recipe depending on the crowd. Don’t hesitate to make it your own—whether that’s going plant-based or adding extra creepy details, personalization makes it even more fun.
- Vegetarian Variation: I once used veggie dogs instead of regular hot dogs, and my vegetarian friends were thrilled. The finger effect was just as convincing!
- Spicy Kick: Adding a little hot sauce mixed in with the ketchup turns up the heat and gives a nice zing that some older kids and adults really appreciate.
- Extra Nails: For a more realistic look, I sometimes carefully carve little “knuckle” lines deeper or add baby carrot tips painted with a bit of ketchup for colorful nails.
How to Make Bloody Finger Hot Dogs for Halloween Recipe
Step 1: Boil the Hot Dogs Just Right
Start with a large pot of water boiling on the stove. Once it’s at a rolling boil, add your hot dogs and let them cook for about 4-5 minutes. This cooks them through but keeps them firm enough for the carving stage without splitting or falling apart. I found that overcooking makes the “fingers” lose their shape, so keep a close eye on the timer.
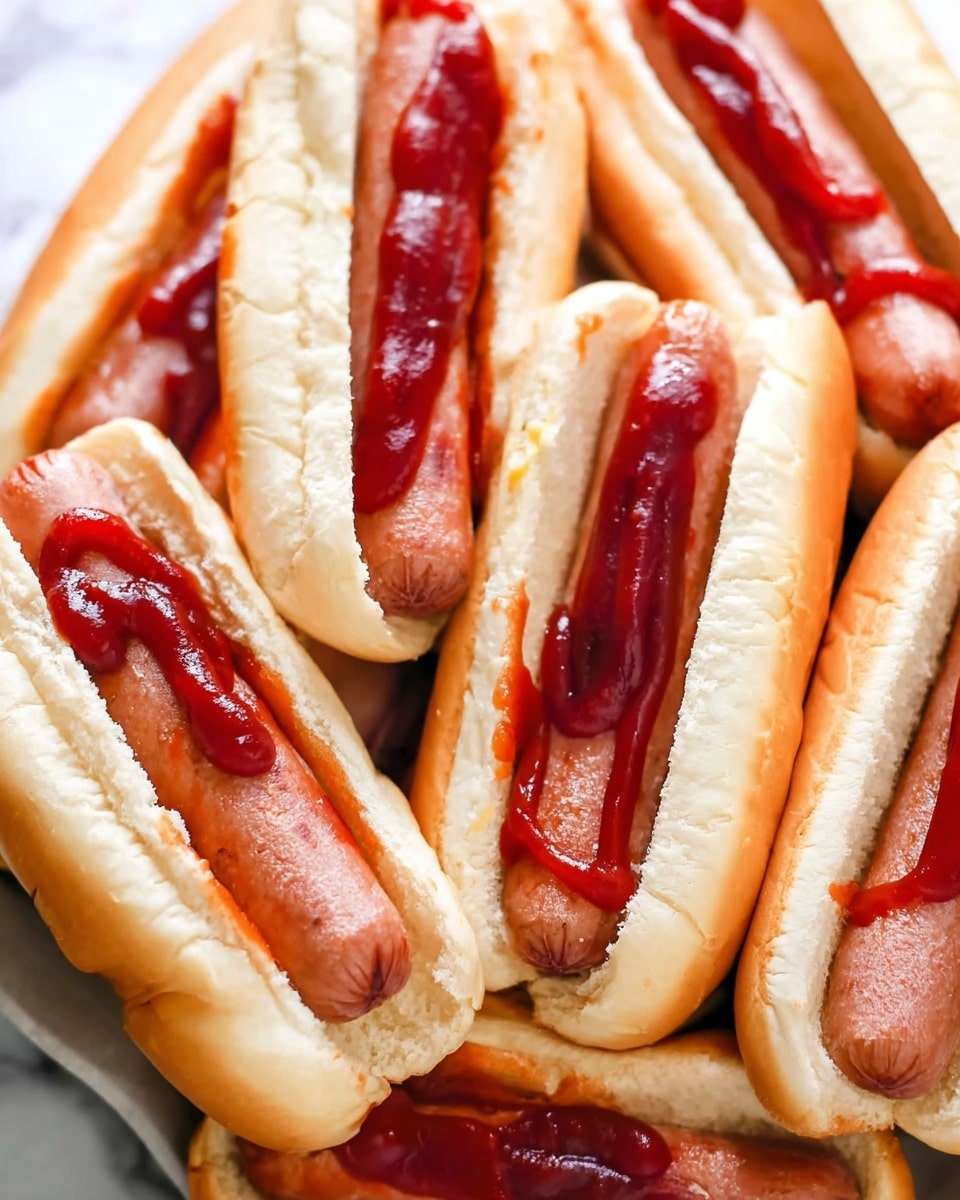
Step 2: Carve the Fingernail
This step is where the magic happens! To craft the fingernail, carefully make two slices down the sides of the “nail” area on the hot dog. Then slice straight across the top. Next, for realism, make a slight curved slice for the bottom nail bed. Finally, slice the fingernail piece off the top—you want a nail about the right size to look believable (check the photo reference below in the blog if you want a visual guide). If you want to go the extra mile, add a thin square of white onion here for the nail—it looks creepy and cool but is totally optional.
Step 3: Add Knuckle Details
Now for the knuckles! Make one slit down the middle of the hot dog finger, then add two crescent-shaped slits directly above and below this middle cut. Next, halfway between the knuckle and the nail, slice two more crescent slits, and add another two crescent slits at the very bottom near the “cut” end. This sets the knuckles and adds the realistic texture that fools your guests into thinking these might be real fingers. Just take your time and use a sharp knife to get clean cuts.
Step 4: Assemble and Get Bloody
Place each “finger” hot dog into a bun. Now, load the bun with ketchup—you want ketchup smeared on the bottom of the finger (so it looks like it’s fresh off the bone) and a little ketchup at the top of the bun to ooze out. This is what makes your fingers look so bloody and gross—in the best way. Serve immediately for best effect, and watch your guests react!
Pro Tips for Making Bloody Finger Hot Dogs for Halloween Recipe
- Use a Sharp Knife: Trust me, a sharp paring knife makes carving the nails and knuckles so much easier and safer.
- Don’t Overboil: Keeping the hot dogs firm is key; overboiling makes them too soft to cut well.
- Layer the Ketchup: Smear ketchup inside the bun before placing the hot dog, then add more on top of the finger for the freshest bloody effect.
- Serve Fresh: For best presentation, put together the fingers last minute—these are meant to be visually shocking AND tasty!
How to Serve Bloody Finger Hot Dogs for Halloween Recipe
Garnishes
I like to keep garnishes simple here since the fingers are the star. A thin slice of white onion for the fingernails is a neat touch, and sometimes I add a small sprinkle of paprika on top of the ketchup to give it a darker, more dried blood look. A few fresh parsley leaves on the side can add a creepy contrast, like they’re just freshly severed from a garden.
Side Dishes
These finger hot dogs pair beautifully with crunchy sides like celery sticks or cheesy chips. I also love offering a simple bowl of mustard or a tangy BBQ sauce for dipping. Some sweet potato fries tossed with a bit of smoked paprika can add a warm Halloween vibe to the plate.
Creative Ways to Present
I once served these on a black platter lined with fake spider webs and plastic spiders for a full spooky effect at a party—and it was a total showstopper! You could also arrange the fingers in a circle like a severed hand or in a coffin-shaped serving tray for maximum impact. Fun napkins and themed plates never hurt either.
Make Ahead and Storage
Storing Leftovers
If you have leftovers (which is rare in my house), wrap them tightly in plastic wrap or store in an airtight container. Refrigerate within two hours of cooking to keep freshness. Keep the buns separate from the hot dogs if you can, to avoid sogginess.
Freezing
I usually don’t freeze these because the texture of hot dogs changes, and the detailed carving can get lost. But if you want to prep the hot dogs ahead, you can boil and carve them, then freeze them in a single layer on a baking sheet before transferring to a freezer bag. Just be sure to thaw in the fridge and reheat gently.
Reheating
To reheat, I gently microwave the hot dogs for about 30-45 seconds or warm them in a pan over low heat. Avoid overheating to prevent splitting. Add fresh ketchup and assemble just before serving to keep that bloody look fresh and inviting.
FAQs
-
Can I make Bloody Finger Hot Dogs ahead of time?
You can boil and carve the hot dogs earlier in the day, but I recommend assembling and adding the ketchup just before serving to keep everything looking fresh and prevent the buns from getting soggy.
-
Are there good vegetarian alternatives for this recipe?
Absolutely! Plant-based hot dogs work great and hold up well to the carving and boiling process. Just choose a firm variety so the “fingers” don’t fall apart.
-
How do I make the fingernails look more realistic?
Adding a thin square of white onion as a nail on top of the carved area adds realism. Alternatively, a dab of cream cheese or a small piece of mozzarella can also work as a nail.
-
What if the hot dogs split during carving?
Using a very sharp knife and not overcooking the hot dogs keeps them firm and easier to carve. If they start to split, chill them in the fridge to firm up before carving again.
Final Thoughts
Honestly, this Bloody Finger Hot Dogs for Halloween Recipe has become one of my go-to spooky snacks every October. It’s playful, a little gross (in a great way), and surprisingly simple to nail perfectly every time. Trust me, once you make these, your Halloween party won’t be the same—and your guests will be talking about your creativity for years to come. So grab those hot dogs, channel your inner mad scientist, and make some tasty fingers to scare and delight!
Print
Bloody Finger Hot Dogs for Halloween Recipe
- Prep Time: 10 minutes
- Cook Time: 10 minutes
- Total Time: 20 minutes
- Yield: 4 servings
- Category: Snack
- Method: Boiling
- Cuisine: American
Description
Get ready for a spooky Halloween treat with these Bloody Finger Hot Dogs. Perfectly shaped to resemble severed fingers, these hot dogs are boiled, slitted to create knuckles and fingernails, then served in buns smothered with ketchup for a bloody effect. Optionally, you can add thinly sliced onion pieces for realistic fingernails. This fun and easy recipe is sure to be a hit at any Halloween party or pre-trick-or-treat snack.
Ingredients
Main Ingredients
- 4 hot dogs
- 4 hot dog buns
- Ketchup, as needed for ‘blood’
- Water, for boiling
Optional
- Thinly sliced white onion pieces, for fingernails
Instructions
- Boil Water: Start by bringing a large pot of water to a rolling boil on the stove.
- Create Fingernails: Carefully slice the two sides of the fingernail area on each hot dog, then make a straight cut across the top. Next, carve a slight curved slice for the bottom nail bed and carefully remove the fingernail piece from the top. Refer to photos for accurate sizing if needed.
- Make Knuckle Slits: To make the knuckles, cut a single slit along the middle of the hot dog finger. Then, add two crescent-shaped slits directly above and below this central slit. Halfway between the knuckle and the nail, make two more crescent-shaped cuts. Finish by adding two additional crescent slits near the bottom of the hot dog.
- Boil Hot Dogs: Place the prepared hot dogs into the boiling water and cook for 4-5 minutes until heated through and the cuts open slightly to create a finger-like appearance.
- Assemble: Place each ‘finger’ hot dog into a bun. Smear ketchup on the bottom of the ‘finger’ and spread some ketchup at the top of the bun to mimic blood dripping.
- Add Optional Fingernails: If desired, place a thinly sliced square piece of white onion on top of where the nail would be to act as a realistic fingernail.
Notes
- These Bloody Severed Finger Hot Dogs take ‘finger food’ to an extreme and are perfect for Halloween parties or a fun pre-trick-or-treat snack.
- Adding onion fingernails is optional and adds extra realism but takes additional prep time.
- Ensure careful knife handling when making the cuts to avoid accidents.
- Use plenty of ketchup to create the best bloody effect.
Nutrition
- Serving Size: 1 hot dog with bun
- Calories: 250
- Sugar: 4g
- Sodium: 650mg
- Fat: 14g
- Saturated Fat: 5g
- Unsaturated Fat: 8g
- Trans Fat: 0g
- Carbohydrates: 22g
- Fiber: 1g
- Protein: 9g
- Cholesterol: 30mg

