
If you’re craving sushi but want something a little easier and more hands-on, you’ll absolutely fall for this Baked Salmon Sushi Cups Recipe. It’s a genius way to enjoy all those great flavors in a super approachable, bite-sized format that’s perfect for sharing or meal prepping. Plus, the baked topping brings a warm, comforting twist you don’t often get with traditional sushi. Stick around—I’ve got some neat tips and tweaks to make these sushi cups your new favorite go-to!
Why You’ll Love This Recipe
- Easy to Make: No sushi rolling skills needed—you just press and bake!
- Flavor Packed: A delicious mix of creamy, spicy, and savory flavors that hit every note.
- Kid-Friendly: My family goes crazy for these sushi cups, and kids love the handheld size.
- Perfect for Entertaining: They look fancy but are surprisingly straightforward to whip up for guests.

Ingredients You’ll Need
Each ingredient in this Baked Salmon Sushi Cups Recipe plays a special role—from the sticky sushi rice that acts as the perfect base to the spicy mayo-infused salmon that steals the show. I always go for sushi-grade salmon and fresh nori sheets for the best results.
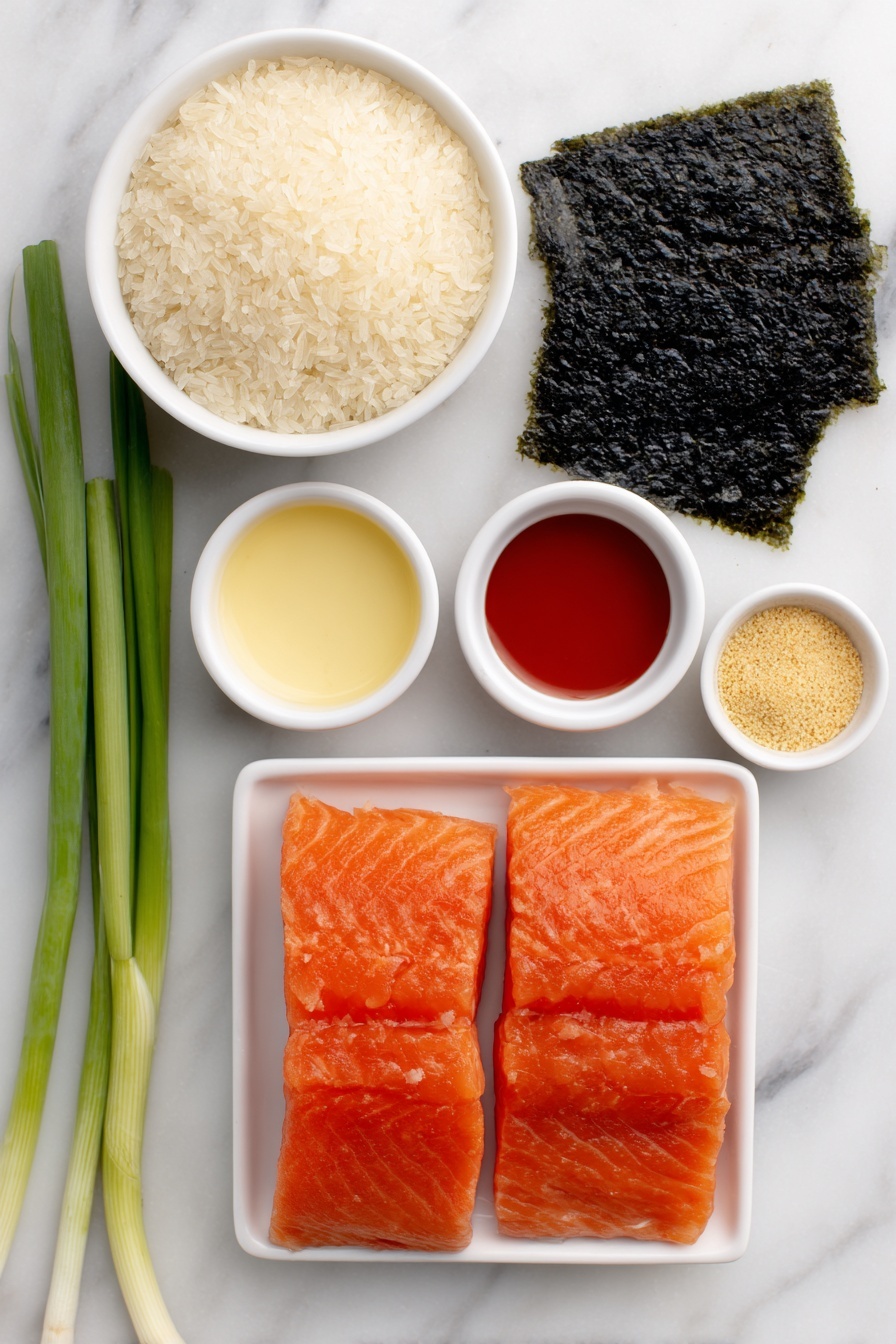
- Salmon: Fresh, sushi-grade salmon cubes deliver amazing texture and flavor after baking.
- Light soy sauce: Adds a salty umami kick without overwhelming the fish.
- Kewpie Mayo: This Japanese mayo has a richer, creamier texture that balances the spice beautifully.
- Sriracha: Brings just the right amount of heat; adjust this to your spice tolerance.
- Sesame oil: A few drops add depth and that unmistakable nutty aroma.
- Sushi rice: Make sure to rinse it well and cook according to package instructions for the perfect sticky texture.
- Rice vinegar and sugar: A quick vinegar-sugar bath for the rice creates that classic sushi tang.
- Nori sheets: Cut into squares, they act as the sushi cup walls—choose sturdy, fresh sheets.
- Furikake: A sprinkling of this Japanese seasoning takes every bite up a notch.
- Green onion: Adds a fresh, mild bite and vibrant green color for garnish.
- Cooking spray: Keeps your muffin tin slick for easy release of sushi cups.
Variations
I love tweaking this Baked Salmon Sushi Cups Recipe depending on what mood I’m in or what I have in the fridge. Feel free to swap out ingredients or add your own twist—it’ll never disappoint!
- Spicy Tuna Cups: Substitute the salmon for chopped tuna mixed with the same spicy mayo blend—I’ve done this, and it’s just as addictive!
- Vegetarian Option: Try filling the sushi cups with a mix of avocado, cucumber, and pickled radish with a drizzle of soy sauce.
- Gluten-Free: Use gluten-free tamari instead of soy sauce to accommodate dietary needs.
- Crunch Factor: Add crispy tempura flakes on top before baking for a delightful crunch that my kids especially love.
How to Make Baked Salmon Sushi Cups Recipe
Step 1: Perfect your sushi rice base
Start by cooking your sushi rice exactly according to the package instructions—it’s key to get that sticky but fluffy texture. While it’s still hot, mix the rice vinegar and sugar (I microwave this mixture until the sugar dissolves) and fold it into the rice gently. Set aside to cool to room temperature. This tangy rice is what will hold everything together and give you that classic sushi flavor.
Step 2: Mix the salmon topping
While your rice cools, grab a bowl and toss together the cubed salmon, light soy sauce, Kewpie mayo, sriracha, and a teaspoon of sesame oil. This mixture is seriously where the magic happens—creamy, spicy, and a little nutty all at once. Set it aside to let those flavors marry while you prep the nori.
Step 3: Prep your sushi cups
Spray your muffin tin lightly with cooking spray to prevent sticking. Cut the nori sheets into quarters—each piece should be large enough to line a muffin cup. Press each nori piece into the tin, then add a spoonful of the vinegared sushi rice, pressing it down gently to form the base. Don’t make it too thick or it will overpower the salmon topping in the next step.
Step 4: Assemble and bake
Top each rice “cup” with a generous spoonful of that salmon mixture. Pop the whole tray into a preheated 400℉ oven. Bake for about 15 minutes until the salmon is cooked through and the tops are just starting to brown nicely. You’ll know they’re done when the kitchen starts smelling amazing!
Step 5: Garnish and enjoy
Let your sushi cups cool for a few minutes—you don’t want to burn your tongue! Drizzle a little extra sriracha or spicy mayo on top for an extra kick. Then sprinkle with furikake and chopped green onions to finish. These little bites pack so much flavor, it’s hard to stop at just one.
Pro Tips for Making Baked Salmon Sushi Cups Recipe
- Use Sushi-Grade Salmon: I learned the hard way that using lower-quality salmon makes a huge difference in taste and texture.
- Don’t Overpack the Rice: Press it gently in the nori; too much rice can make the cups hard to bite and overpower the topping.
- Adjust Spice Levels: Start with less sriracha and add more after baking if you want more heat—it’s easier than fixing spice overload.
- Cool Rice Before Assembling: Hot rice can tear the nori, so give it some time to cool down before pressing it into the cups.
How to Serve Baked Salmon Sushi Cups Recipe

Garnishes
I love using a sprinkle of furikake and finely chopped green onions for that fresh, umami-packed finish. Sometimes, I drizzle a bit of extra Kewpie mayo mixed with sriracha for a creamy contrast that makes every bite sing.
Side Dishes
Pair these sushi cups with a crisp cucumber salad or a simple seaweed salad to keep the meal light and refreshing. Miso soup on the side is another comforting touch that my family really enjoys alongside these cups.
Creative Ways to Present
For parties, I like arranging these sushi cups on a platter with some pickled ginger and wasabi dots on the side. Adding edible flowers or microgreens on top gives them an elegant look that’s sure to impress your guests.
Make Ahead and Storage
Storing Leftovers
Store leftover sushi cups in an airtight container in the fridge for up to 2 days. I recommend placing parchment paper between layers to prevent sticking. The nori will soften over time, so these are best enjoyed within the first day for optimal crispness.
Freezing
I haven’t frozen these sushi cups myself because the texture of the nori and rice changes a bit after freezing, but if you try it, freeze them on a baking sheet first before transferring to a container to keep their shape.
Reheating
To reheat, pop the sushi cups in a 350℉ oven for about 5-7 minutes just to warm through without drying them out. Avoid microwaving if you want to keep the nori from getting too soggy.
FAQs
-
Can I use canned salmon in the Baked Salmon Sushi Cups Recipe?
While canned salmon might work in a pinch, it won’t have the same texture or flavor depth as fresh sushi-grade salmon. I recommend fresh or frozen sashimi-grade salmon for the best taste and safe eating experience.
-
How do I make this recipe gluten-free?
Simply swap out regular soy sauce for gluten-free tamari or coconut aminos, and double-check any added condiments to ensure they don’t have gluten. This way, you can still enjoy all the flavors without worry.
-
Can I prepare the rice and salmon mixture ahead of time?
Yes! You can prepare the rice and salmon mixture a few hours ahead. Keep the rice covered at room temperature if serving the same day or in the fridge if preparing earlier. Assemble just before baking for best texture.
-
What can I use instead of furikake as a garnish?
If you don’t have furikake on hand, toasted sesame seeds mixed with a pinch of sea salt make a great alternative to add crunch and flavor.
Final Thoughts
This Baked Salmon Sushi Cups Recipe has become one of my absolute favorites for its simplicity and bold flavors. It’s such a fun way to enjoy sushi at home without the fuss, and the whole family loves how approachable and tasty it is. If you want to serve something impressive without spending hours in the kitchen, give these a try—I promise you won’t be disappointed. Let me know how yours turn out, and feel free to get creative with your own spin!
Print
Baked Salmon Sushi Cups Recipe
- Prep Time: 15 minutes
- Cook Time: 15 minutes
- Total Time: 30 minutes
- Yield: 12 sushi cups
- Category: Appetizer
- Method: Baking
- Cuisine: Japanese
Description
These Easy Baked Salmon Sushi Cups offer a creative and delicious twist on traditional sushi. Using simple ingredients like fresh salmon, sushi rice, and nori sheets, this recipe combines savory, spicy, and tangy flavors in a convenient baked muffin-tin format perfect for entertaining or a fun family meal.
Ingredients
Salmon Mixture
- 1 lb salmon, cubed
- 1 tbsp light soy sauce
- 1 tbsp Kewpie Mayo
- 1 tbsp Sriracha
- 1 tsp sesame oil
Sushi Rice
- 1 1/2 cup uncooked sushi rice
- 1 tablespoon rice vinegar
- 2 teaspoon white sugar
Assembly & Garnish
- 3 large nori sheets
- Furikake, for garnish
- 1 green onion, chopped, for garnish
- Cooking spray
Instructions
- Cook the sushi rice: Prepare the sushi rice according to the package instructions, ensuring it is fully cooked and sticky enough to hold together.
- Season the rice: In a microwave-safe bowl, combine the rice vinegar and white sugar. Heat in the microwave for about 30 seconds until the sugar dissolves. Pour this seasoned vinegar over the hot sushi rice and gently mix until evenly combined. Set aside.
- Preheat the oven: Set your oven temperature to 400℉ (200℃) to prepare for baking the sushi cups.
- Prepare the salmon mixture: In a mixing bowl, combine the cubed salmon with light soy sauce, Kewpie mayo, Sriracha, and sesame oil. Stir well until all ingredients are evenly incorporated. Set aside.
- Prepare nori sheets: Cut each large nori sheet into 4 rectangles or squares sized to fit inside muffin tin cups.
- Assemble the sushi cups: Lightly grease the muffin tin with cooking spray. Place a nori square in each muffin cup. Add a spoonful of the seasoned sushi rice onto each nori square and gently press down to form a compact base. Repeat until all cups have rice. Then, spoon the salmon mixture evenly on top of each rice base.
- Bake the sushi cups: Place the muffin tin in the preheated oven and bake at 400℉ for 15 minutes, until the salmon is cooked through and the tops are slightly golden brown.
- Garnish and serve: Remove the baked sushi cups from the oven and allow them to cool for a few minutes. Drizzle additional Sriracha or spicy mayo as desired. Garnish with furikake and chopped green onions. Serve immediately and enjoy!
Notes
- Use fresh, sushi-grade salmon to ensure safety and quality.
- You can adjust the amount of Sriracha for a milder or spicier taste.
- Furikake adds extra umami and texture but can be omitted for a simpler flavor.
- Press the rice gently but firmly to help the sushi cup hold its shape during baking.
- These sushi cups are best enjoyed fresh and slightly warm.
Nutrition
- Serving Size: 1 sushi cup
- Calories: 120
- Sugar: 2g
- Sodium: 220mg
- Fat: 5g
- Saturated Fat: 1g
- Unsaturated Fat: 3g
- Trans Fat: 0g
- Carbohydrates: 12g
- Fiber: 1g
- Protein: 9g
- Cholesterol: 35mg


