
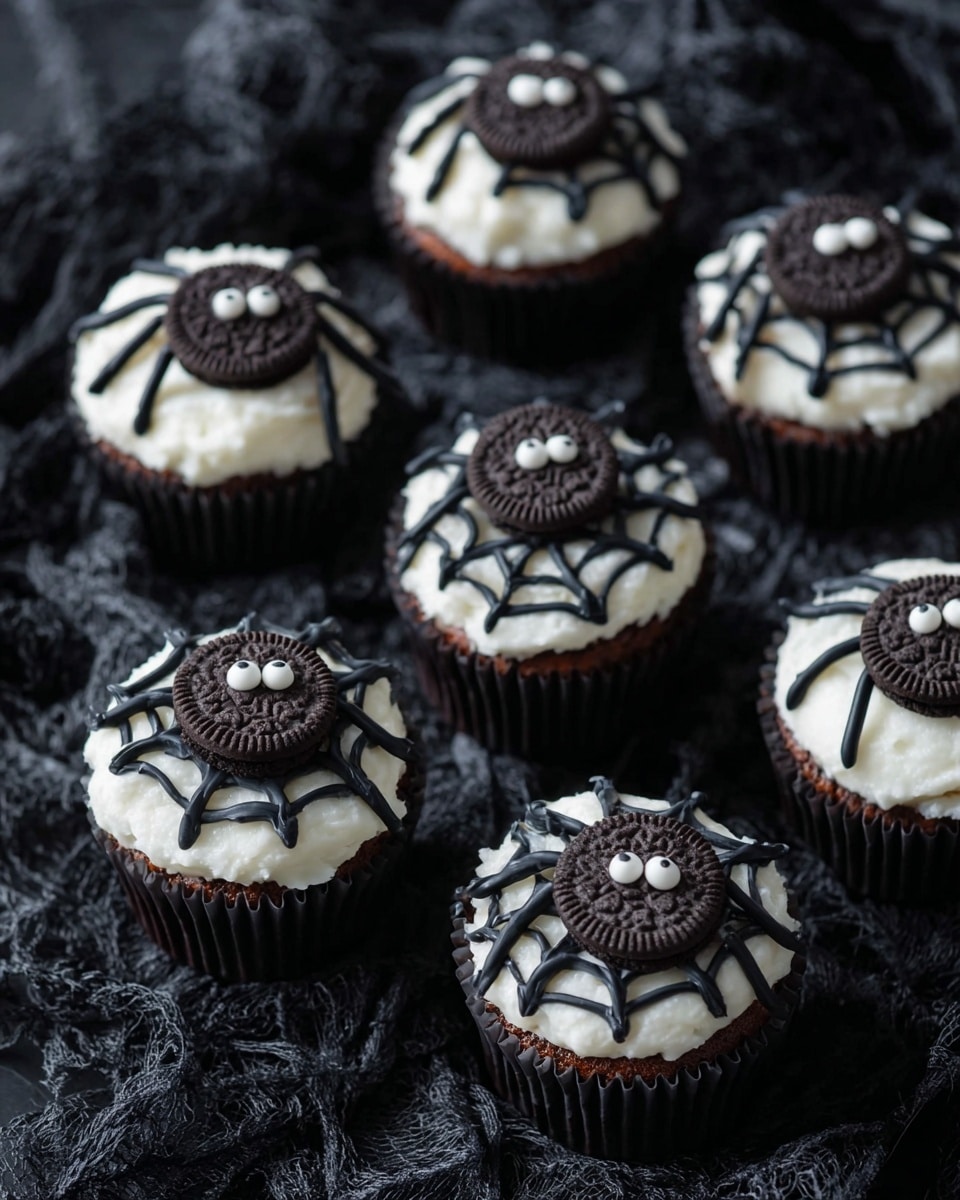
If you’re looking for a spooky yet scrumptious Halloween treat, you’re in the right place! This Spider Web Cupcakes Recipe delivers perfectly moist chocolate cupcakes with a stunning spider web design that’s sure to impress. I absolutely love how these cupcakes turn out — rich, tender, and decorated with cute candy eyeballs and mini Oreos that make the whole thing pop. Trust me, once you try this recipe, you’ll want to make it every October (or really any time you want to wow guests with a little festive fun!).
Why You’ll Love This Recipe
- Crowd-Pleasing Presentation: The spider web design is fun and festive, perfect for Halloween parties or themed gatherings.
- Moist & Chocolatey: These cupcakes strike the perfect balance of light, moist crumb and deep chocolate flavor.
- Beginner Friendly: Even if you’re not a pro baker, the step-by-step approach makes this recipe totally doable.
- Versatile Decorations: Use candy eyeballs and mini Oreos to customize your spooky critters exactly how you like!

Ingredients You’ll Need
To get that perfect spider web cupcake, you’ll want ingredients that create a rich chocolate cake alongside a silky smooth buttercream that pipes beautifully. I highly recommend using good quality cocoa powder and fresh buttermilk to get the best flavor and texture.
- All-purpose flour: Gives the cupcake structure without being too dense.
- Cocoa powder: Natural unsweetened or Dutch processed—both work wonderfully for that deep chocolate taste.
- Instant coffee granules (optional): Just a touch to boost the chocolate flavor without making it taste like coffee.
- Baking soda & baking powder: Combine to give your cupcakes a nice rise and tender crumb.
- Salt: Enhances all the flavors, balancing the sweetness.
- Unsalted butter: For both cupcake batter and frosting, use room temperature butter for the smoothest results.
- Granulated sugar: Sweetens the cupcakes without overpowering the chocolate.
- Eggs: Bind everything together and add moisture.
- Buttermilk: Provides tang and richness while keeping the crumb tender.
- Hot tap water: Helps bloom the cocoa for a more intense chocolate flavor.
- Vanilla extract: Adds warmth and complexity to your frosting.
- Powdered sugar: Key for that luscious, creamy buttercream.
- Milk or heavy cream: To thin frosting if it gets too thick and help with piping.
- Candy eyeballs: These little touches make all the spooky difference.
- Mini Oreos: Perfect to create spider bodies or add extra fun
- Piping bag and Wilton 4 tip: For that perfect spider web piping design.
- Black gel food coloring: Needed to tint your frosting black for the web effect.
Variations
I love that this Spider Web Cupcakes Recipe is super adaptable. Whether you want to tweak the flavors for a dairy-free option or make them extra chocolaty, the base recipe is your playground. Here are a couple of ideas that have worked well for me:
- Dairy-Free Version: Swap the butter for coconut oil and use almond or oat milk instead of buttermilk, with a splash of lemon juice to mimic tang.
- Extra Decadent: Add chocolate chips to the batter or swirl in a ribbon of salted caramel sauce before baking.
- Spice it Up: For a fall twist, sprinkle a bit of cinnamon and nutmeg into the batter—I promise it gives just the right warmth without overpowering the chocolate.
- Color Play: Instead of black frosting, try orange or purple tinted webs for a more vibrant Halloween display.
How to Make Spider Web Cupcakes Recipe
Step 1: Whisk Together the Dry Ingredients
Start by sifting or whisking your flour, cocoa powder, instant coffee granules (if using), baking soda, baking powder, and salt in a large bowl. This helps eliminate lumps and ensures even distribution of your leavening agents. When I first tried this, mixing the dry ingredients well made a big difference in the cupcakes rising evenly—definitely don’t skip this!
Step 2: Cream Butter and Sugar
In a separate bowl, use a mixer to beat your unsalted butter and granulated sugar together until light and fluffy—about 3-4 minutes. This step is key for a tender crumb and adds a bit of air to the batter. If your butter isn’t at room temperature, you might struggle here, so plan ahead.
Step 3: Add Eggs and Buttermilk
Beat in the eggs one at a time, making sure each is fully incorporated before adding the next. Then mix in the buttermilk until just combined. I learned that overmixing here can make the cupcakes tough, so stop as soon as you don’t see dry spots.
Step 4: Combine with Dry Ingredients and Water
Gradually add the dry ingredients into the wet mixture, alternating with the hot tap water. The hot water helps intensify that rich chocolate flavor by blooming the cocoa, which I discovered makes such a noticeable difference. Mixing gently until just combined keeps the crumb light and airy.
Step 5: Bake and Cool
Spoon the batter into lined or greased muffin tins about 2/3 full. Bake at 350°F (175°C) for around 18-20 minutes or until a toothpick inserted comes out clean. When you pull them out, I like to let them cool in the pan for 5 minutes before transferring to a wire rack. This helps them set without getting soggy underneath.
Step 6: Make the Black Buttercream Frosting
For the frosting, beat unsalted butter until creamy, then add vanilla extract and gradually sift in powdered sugar. Add a dash of milk or heavy cream if the frosting feels too thick. Finally, tint the frosting black with gel food coloring—go slow here, a little goes a long way! The key is to keep that frosting smooth and pipeable for your spider web design.
Step 7: Pipe the Spider Web Design
Fill your piping bag fitted with a Wilton 4 tip with the black buttercream. Starting from the center of each cupcake, pipe a small dot, then make concentric circles around that center dot. Using a toothpick or a sharp tip, drag lines from the center outward at regular intervals to create the spider web effect. It took me a few tries to get consistent spacing, but once you nail it, it’s such a fun finishing touch!
Step 8: Add Candy Eyeballs and Mini Oreos
Place candy eyeballs in pairs around the cupcakes and add mini Oreos to mimic spider bodies. This final detail brings the whole spider web cupcake to life. My family goes crazy for this step every time—they love spotting the “spiders”!
Pro Tips for Making Spider Web Cupcakes Recipe
- Room Temperature Ingredients: Always use room temperature butter and eggs for smooth mixing and even texture.
- Piping Practice: Before piping on cupcakes, practice your spider web design on parchment paper to build confidence.
- Use Gel Food Coloring: Liquid dyes can thin frosting; gel colors give vibrant black without ruining texture.
- Don’t Overbake: Check cupcakes early to avoid dryness—take them out the moment a toothpick is mostly clean.
How to Serve Spider Web Cupcakes Recipe
Garnishes
I love using candy eyeballs because they’re so simple yet instantly spooky. Mini Oreos not only add a fun crunch but also double as creepy crawlers when paired with the web design. You could also try edible glitter for some shimmery cobweb magic or small plastic spiders for a dramatic Halloween display (just remind your guests to remove them before eating!).
Side Dishes
These cupcakes go beautifully with a warm cup of spiced apple cider or a rich hot chocolate—something to complement their rich flavor without overwhelming. For a party, I like to pair them with light, crisp fruit platters or veggie trays to balance out the sweetness.
Creative Ways to Present
For Halloween parties, I’ve presented these cupcakes on a tiered cake stand surrounded by plastic spiders and faux cobwebs for a spooky vibe. You can also arrange them in “spider nests” on shredded black paper or use cupcake liners that glow in the dark for extra fun. These little touches take your Spider Web Cupcakes Recipe from tasty treat to full-on centerpiece status!
Make Ahead and Storage
Storing Leftovers
Once decorated, store your cupcakes in an airtight container at room temperature if you plan to eat them within 1-2 days. Keeping them away from direct sunlight helps preserve the frosting color and texture. If your kitchen is warm, refrigeration is best, but bring them back to room temp before serving for the best taste.
Freezing
I’ve frozen cupcakes both before and after frosting with good results. To freeze, place unfrosted cupcakes on a tray until firm and then store in a freezer-safe container or bag. For frosted ones, freeze individually on a tray, then wrap tightly in plastic wrap and foil. Defrost in the fridge overnight to avoid sogginess.
Reheating
For the best flavor, let frozen cupcakes thaw fully in the fridge and then come to room temperature before eating. To refresh slightly stale cupcakes, I warm them gently in a microwave for about 10 seconds, but avoid heating the frosting directly or it may melt.
FAQs
-
Can I make Spider Web Cupcakes Recipe ahead of time?
Yes! You can bake the cupcakes a day or two in advance and store them in an airtight container. It’s best to pipe the frosting and add decorations the day you plan to serve for freshness and peak appearance.
-
What if I don’t have a piping tip or bag?
If you don’t have a Wilton 4 tip or piping bag, you can create a DIY piping bag with a zip-top plastic bag and snip a tiny corner off. A small round tip is ideal to get clean spider web lines, but this quick hack works well in a pinch.
-
Can I use a different frosting color?
Absolutely! While black frosting creates a classic spider web look, you could use orange, purple, or even white frosting for a different Halloween vibe. Just adjust your gel food coloring accordingly.
-
What makes the cupcakes so moist?
The combination of buttermilk and hot water in the batter really helps keep these cupcakes moist and tender. Plus, creaming the butter and sugar well also contributes to a soft crumb.
Final Thoughts
This Spider Web Cupcakes Recipe has become one of my favorite Halloween baking traditions because it marries fun and flavor so well. I love how easy it is to make these cupcakes look stunning with just a little effort and simple decorations. Whether you’re baking for family, friends, or a party crowd, I promise these cupcakes will get tons of “oohs” and “aahs.” So go ahead, try this recipe and have fun bringing some spooky sweetness to your kitchen!
Print
Spider Web Cupcakes Recipe
- Prep Time: 35 minutes
- Cook Time: 19 minutes
- Total Time: 54 minutes
- Yield: 24 cupcakes
- Category: Dessert
- Method: Baking
- Cuisine: American
Description
These Spider Web Cupcakes are a moist and delicious chocolate treat perfect for Halloween celebrations. Featuring rich cocoa-flavored cupcakes topped with creamy vanilla buttercream and decorated with spooky spider web designs and candy eyeballs, they offer a fun and festive way to impress friends and family at any fall gathering or Halloween party.
Ingredients
Cupcakes
- 2 cups (240g) all purpose flour
- 3/4 cup (63g) cocoa powder (natural unsweetened or dutch processed)
- 1 tsp instant coffee granules (optional)
- 1/2 tsp baking soda
- 1 tsp baking powder
- 1 tsp salt
- 1/2 cup (113g) unsalted butter (1 stick, room temperature)
- 1 1/2 cups (297g) granulated sugar
- 2 large eggs
- 1 cup (236ml) buttermilk
- 1/2 cup (118ml) hot tap water
Frosting
- 1 1/2 cups (339g) unsalted butter (3 sticks, room temperature)
- 1 tsp vanilla extract
- 2-3 cups (227-339g) powdered sugar
- Dash of milk or heavy cream (if frosting becomes too thick)
Decoration
- Candy eyeballs
- Mini Oreos
- Black gel food coloring
- Piping bag
- Wilton #4 piping tip
Instructions
- Preheat and prepare pans: Preheat your oven to 350°F (175°C). Line 24 cupcake pans with liners and set aside.
- Mix dry ingredients: In a large bowl, sift together the all purpose flour, cocoa powder, instant coffee granules (if using), baking soda, baking powder, and salt. Whisk to combine evenly.
- Cream butter and sugar: In another large bowl, using an electric mixer, cream the 1/2 cup of softened unsalted butter with the granulated sugar until the mixture is light and fluffy, about 3-4 minutes.
- Add eggs: Beat in the eggs one at a time, making sure each is fully incorporated before adding the next.
- Combine wet and dry ingredients: Alternately add the dry ingredient mixture and buttermilk to the creamed butter mixture, starting and ending with the dry ingredients. Mix until just combined; do not overmix.
- Add hot water: Slowly pour in the hot tap water and mix until the batter is smooth. The batter will be thin, which is expected.
- Fill cupcake liners: Divide the batter evenly among the cupcake liners, filling each about two-thirds full.
- Bake: Bake in the preheated oven for 18-20 minutes or until a toothpick inserted into the center of a cupcake comes out clean.
- Cool: Remove from the oven and cool cupcakes in the pan for 5 minutes before transferring to a wire rack to cool completely.
- Prepare buttercream frosting: In a large bowl, beat the 1 1/2 cups softened unsalted butter until creamy. Add vanilla extract and gradually add powdered sugar, mixing well after each addition. Add a dash of milk or heavy cream if the frosting is too thick. Beat until light and fluffy.
- Color and fill piping bag: Mix black gel food coloring into a small amount of frosting to create black frosting for decorating. Fill a piping bag fitted with a Wilton #4 tip with the remaining white frosting and a separate piping bag or section with the black frosting.
- Frost cupcakes: Spread or pipe a smooth layer of white frosting over each cupcake.
- Create spider web design: Pipe concentric circles with the black frosting starting from the center to the outer edge of the cupcake. Using a toothpick or skewer, drag lines from the center outwards to create a spider web effect.
- Add spider decorations: Place candy eyeballs on top of the cupcakes. Use mini Oreos to form spider bodies by aligning halves or placing as needed to create spooky spiders on the web.
- Serve and enjoy: Allow frosting to set slightly before serving. These festive cupcakes are perfect for Halloween parties and fun gatherings.
Notes
- These cupcakes are moist and richly chocolatey, thanks to the combination of cocoa and buttermilk.
- The instant coffee granules enhance the chocolate flavor but are optional.
- Use black gel food coloring to achieve the vibrant color without watering down the frosting.
- Allow cupcakes to cool completely before frosting to prevent melting.
- If frosting becomes too thick, add milk or heavy cream a teaspoon at a time until desired consistency is reached.
- Decorations can be customized with other Halloween-themed candies if desired.
Nutrition
- Serving Size: 1 cupcake
- Calories: 320
- Sugar: 28g
- Sodium: 220mg
- Fat: 18g
- Saturated Fat: 10g
- Unsaturated Fat: 6g
- Trans Fat: 0.2g
- Carbohydrates: 38g
- Fiber: 3g
- Protein: 4g
- Cholesterol: 55mg


