
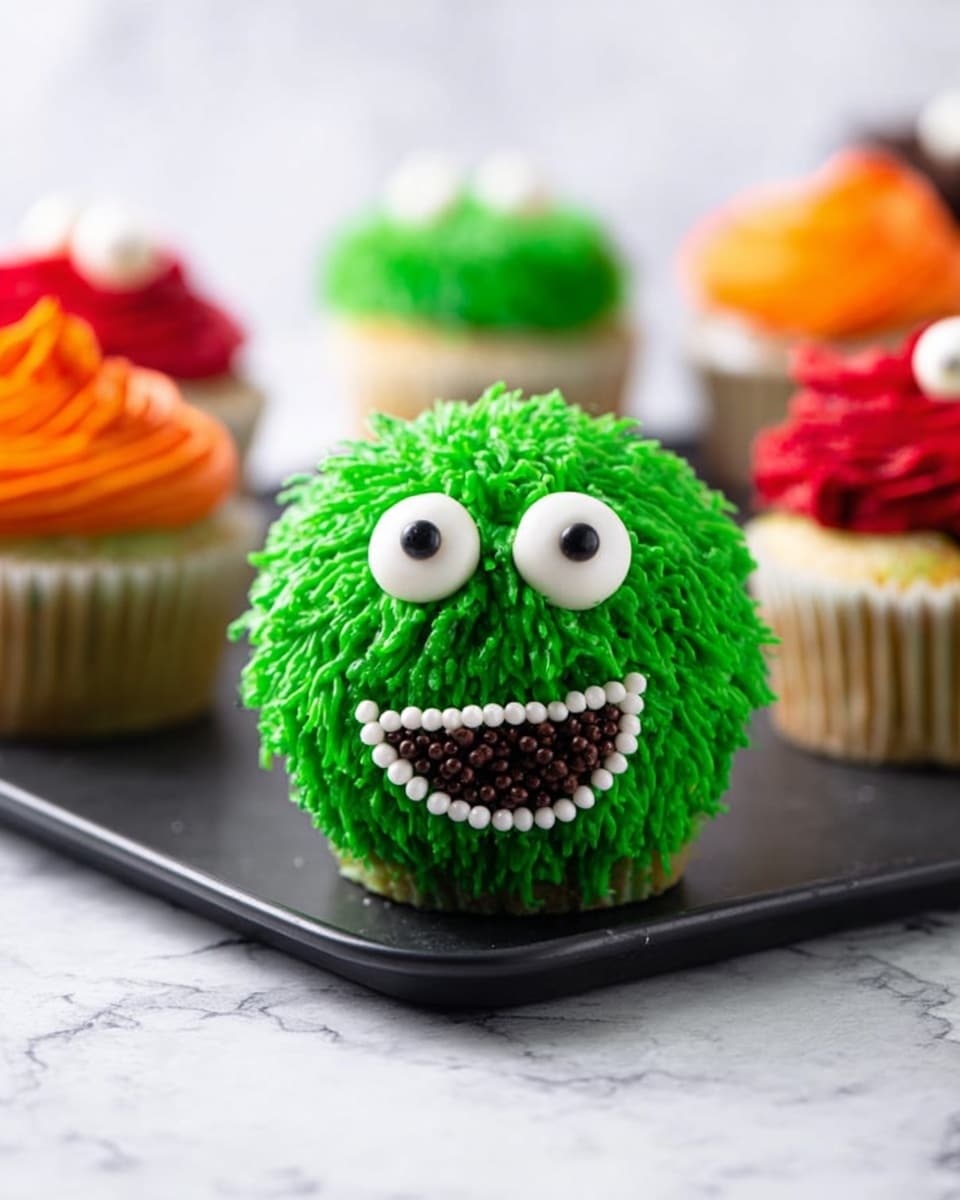
If you’re on the hunt for a treat that’s as fun to make as it is to eat, you’ve got to try this Monster Cupcakes Recipe. I absolutely love how these cupcakes come alive with colorful, fuzzy frosting and playful candy eyes—perfect for Halloween, birthday parties, or anytime you want to make people smile. When I first made these, my family went crazy for them, and I’m confident you’ll enjoy the delightful mix of moist cupcake and whimsical monster decorations just as much as I do.
Why You’ll Love This Recipe
- Fun and Creative: Decorating these cupcakes is a playful activity that’ll bring out your inner kid.
- Moist and Fluffy Cupcakes: Thanks to buttermilk and proper mixing, the cake is tender every single time.
- Customizable Colors and Designs: Use your favorite gel food colors and candies to match any theme or party.
- Perfect for All Skill Levels: Easy to follow with tips from a home baker who’s been there, making it foolproof.

Ingredients You’ll Need
The ingredients for this Monster Cupcakes Recipe come together to create a tender, rich cupcake with creamy, colorful frosting that stands up well to decorating. When shopping, be sure to pick fresh eggs and good-quality butter for the best flavor.
- All-purpose flour: This is your base and gives the cupcakes structure without being too heavy.
- Baking powder and baking soda: These leavening agents work together to give your cupcakes a perfect rise.
- Kosher salt: Just a pinch enhances all the flavors beautifully.
- Buttermilk: Adds tang and moisture, helping keep cupcakes soft.
- Large egg: Provides richness and helps bind everything.
- Unsalted butter (melted and softened): You’ll use it twice—once melted in the batter, once softened for the frosting.
- Granulated sugar: Sweetens the cupcake perfectly without overpowering.
- Pure vanilla extract: Adds warmth and depth to both batter and frosting.
- Powdered sugar: Critical for a smooth, fluffy buttercream.
- Gel food colors: I’ve always preferred gels over liquids since the colors come out vibrant without thinning the frosting.
- Oreos: Essential for crafting adorable monster mouths and adding a crunchy surprise.
- Candy eyes: The pièce de résistance for those spooky, silly monster faces.
Variations
One of the things I enjoy most about this Monster Cupcakes Recipe is how easy it is to make your own. Over the years, I’ve tried different spins, and I encourage you to get creative too!
- Flavor twists: Try swapping vanilla extract for almond or orange for a unique flavor profile that still keeps the monsters charming.
- Dietary swaps: I once made a version with gluten-free flour blend and coconut milk, and it turned out wonderfully moist.
- Color themes: I love using seasonal colors—think icy blues and whites for winter monsters or neon hues for a fun summer party.
- Toppings upgrades: Experiment with different candies like gummy worms or mini marshmallows for extra personality.
How to Make Monster Cupcakes Recipe
Step 1: Prep Your Space and Ingredients
Start by preheating your oven to 350°F and line your cupcake tray with liners. This helps with even baking and easy cleanup later on. Next, mix your dry ingredients—flour, baking powder, baking soda, and salt—in a large bowl. This step is crucial to avoid clumps and ensure consistent texture.
Step 2: Mix Wet Ingredients Until Silky
In a separate bowl, beat together the buttermilk, egg, melted cooled butter, sugar, and vanilla extract. When I first tried this recipe, I learned that making sure the butter isn’t hot prevents cooking the egg early and keeps the mix smooth.
Step 3: Combine Wet and Dry Gently
Add your dry mixture to the wet ingredients in batches, stirring just until everything comes together. Don’t overmix here—overdoing it makes cupcakes dense and tough. You want to see a smooth batter, not overworked dough.
Step 4: Fill Cupcake Liners and Bake
I like using an ice cream scoop to fill cupcake liners about three-quarters full. This ensures they bake evenly and develop a nice dome. Bake for 18-20 minutes or until a toothpick comes out clean. I always let mine cool for a few minutes in the pan before moving to a rack—this keeps them from breaking apart.
Step 5: Make the Buttercream and Color It
Beat softened butter until creamy and light. Gradually add powdered sugar and vanilla, beating 5-6 minutes until fluffy. This step makes a difference in texture, believe me. Split the frosting into four parts—one stays white, and the other three get tinted your choice of colors (I usually pick green, orange, and red for monster effect).
Step 6: Assemble Your Monsters
Carefully separate Oreos, scrape off the filling, and cut them as needed to create mouths. Fill piping bags fitted with grass tips with your colored frostings and pipe “fur” by starting at the edges and moving inward. Then, place candy eyes with tweezers (a tip I discovered after many sticky fingers!). Finish by adding the Oreo mouths and pipe white frosting dollops as teeth around them. Voilà—you’ve got monster cupcakes that are adorably spooky!
Pro Tips for Making Monster Cupcakes Recipe
- Use Gel Food Coloring: It keeps your frosting thick and vibrant, perfect for those “fur” details on monsters.
- Cool Cupcakes Completely: Frosting melts easily on warm cakes, so don’t rush this part.
- Tweezers Are Your Friend: I quickly realized candy eyes stick better and placement is easier with tweezers.
- Don’t Overfill Liners: Leaving room prevents cupcakes from flooding over and helps keep an even shape.
How to Serve Monster Cupcakes Recipe
Garnishes
I stick with candy eyes and Oreo pieces because they create such a fun monster look that’s hard to beat. Sometimes, I add gummy worms or small sprinkles for extra texture and color—kids love getting creative with these too!
Side Dishes
When serving these cupcakes, I like simple sides like fresh fruit or a light punch, especially if this is a party setting. A cold glass of milk is classic and helps balance out the sweetness perfectly.
Creative Ways to Present
For Halloween, I’ve arranged these cupcakes on a platter with fake spider webs and scattered plastic spiders for spooky fun. At birthday parties, I’ve placed them inside a “monster lair” box decorated with colorful tissue paper. Presentation is half the joy!
Make Ahead and Storage
Storing Leftovers
I store leftover Monster Cupcakes in an airtight container in the fridge. They stay fresh for about 2-3 days and the frosting keeps its texture really well. I always make sure to let them come to room temp before serving again so you get that soft cake and creamy frosting experience.
Freezing
If I’m prepping ahead, I sometimes freeze the cupcakes without frosting. They freeze beautifully for up to a month. When ready, thaw them overnight in the fridge and frost right before serving to keep cupcakes fresh and frosting perfect.
Reheating
For cupcakes that were frozen or refrigerated, I pop them in the microwave for about 10 seconds to soften the cake before serving. Just be sure to remove any frosting or decoration that might not hold up to heat. I’ve found this keeps the texture delightful every time.
FAQs
-
Can I use regular milk instead of buttermilk in this Monster Cupcakes Recipe?
Yes! If you don’t have buttermilk on hand, you can make a simple substitute by adding 1 tablespoon of lemon juice or white vinegar to 1/2 cup of milk and letting it sit for 5 minutes. This provides the acidity needed for tender crumb without changing the flavor too much.
-
How can I make the frosting less sweet?
One trick I’ve used is reducing the powdered sugar slightly or adding a bit more butter to balance sweetness. You could also mix in a small amount of cream cheese for tang and cut the sugar intensity without losing that fluffy texture.
-
Can I make these cupcakes vegan or dairy-free?
Absolutely! Swap the butter for a plant-based alternative and use a dairy-free milk like almond or oat with a splash of vinegar for buttermilk substitute. For the frosting, vegan butter and powdered sugar work well, although piping “fur” might be slightly less stiff but still adorable.
-
What if I don’t have an ice cream scoop?
No worries! A couple of tablespoons or a standard spoon works fine—just try to keep the cupcake portions even for consistent baking.
-
How many cupcakes does this recipe make?
This Monster Cupcakes Recipe yields about 12 standard cupcakes, perfect for a small gathering or family treat.
Final Thoughts
Making these Monster Cupcakes has become one of my favorite baking traditions because they combine delicious flavor with so much room for creativity. I promise, once you try this recipe, you’ll find yourself making monsters for every party or get-together. So grab your frosting bags and candy eyes, and have the best time bringing these little creatures to life—your friends and family will thank you!
Print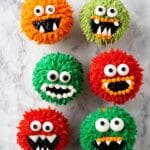
Monster Cupcakes Recipe
- Prep Time: 40 min
- Cook Time: 20 min
- Total Time: 1 hr 20 min
- Yield: 12 cupcakes
- Category: Dessert
- Method: Baking
- Cuisine: American
Description
These Monster Cupcakes are a fun and festive treat perfect for Halloween parties. Featuring moist vanilla cupcakes topped with colorful, fluffy buttercream frosting shaped like monster fur, decorated with candy eyes and Oreo cookies to create spooky monster faces. Easy to bake and decorate, these cupcakes are sure to delight kids and adults alike with their playful presentation and delicious taste.
Ingredients
Dry Ingredients
- 1 1/4 cups all-purpose flour
- 1/2 teaspoon baking powder
- 1/2 teaspoon baking soda
- 1/4 teaspoon kosher salt
Wet Ingredients
- 1/2 cup buttermilk
- 1 large egg
- 1/4 cup unsalted butter, melted and cooled
- 1/2 cup granulated sugar
- 1 teaspoon pure vanilla extract
Frosting
- 1 cup (2 sticks) unsalted butter, softened
- 2 1/2 cups powdered sugar
- 1 teaspoon pure vanilla extract
- Gel food colors (red, orange, and green)
Decoration
- Oreos for decoration – 7-8 (large and small)
- Candy eyes – 30-35 pieces
Instructions
- Preheat and Prepare: Preheat your oven to 350 degrees F and line a baking tray with cupcake liners; set aside.
- Mix Dry Ingredients: In a large bowl, combine the flour, baking powder, baking soda, and kosher salt; mix well to distribute evenly.
- Mix Wet Ingredients: In a separate bowl, beat together the buttermilk, egg, melted and cooled butter, granulated sugar, and vanilla extract until smooth and combined.
- Combine Mixtures: Gradually add the dry ingredients to the wet ingredients in batches, stirring gently until everything just comes together; be careful not to overmix to keep the cupcakes tender.
- Fill Cupcake Liners: Using an ice cream scoop or spoon, fill each cupcake liner about 3/4 full with batter.
- Bake: Place the tray in the preheated oven and bake for 18-20 minutes, or until a toothpick inserted into the center of a cupcake comes out clean.
- Cool Cupcakes: Allow the cupcakes to cool in the tray for 5 minutes, then transfer them to a wire rack to cool completely before frosting.
- Prepare Frosting: Using a stand or hand mixer, cream the softened butter until light and fluffy. Add vanilla extract, then gradually beat in the powdered sugar in batches until smooth and fluffy (about 5-6 minutes).
- Color Frosting: Divide the frosting evenly into four bowls. Tint three bowls with gel food colors red, orange, and green respectively, leaving one bowl white.
- Prepare Oreos: Gently separate Oreos in half, scraping off the filling to get two cookie halves from each Oreo. Cut single Oreo halves in half again as needed and keep smaller Oreo pieces intact for decoration.
- Pipe Fur: Fit piping bags with grass icing tips and fill with each colored frosting. Pipe the monster fur starting from the edges of the cupcakes working toward the center, creating a shaggy texture.
- Add Eyes: Using tweezers, carefully place candy eyes onto the frosted cupcakes; add as many as you like per cupcake for a spooky effect.
- Create Mouths and Teeth: Position Oreo cookie halves to form monster mouths on the frosting. Pipe small dollops of white frosting along the edges of the Oreos to mimic teeth.
- Serve and Enjoy: Serve the decorated Monster Cupcakes immediately and delight in the Halloween fun!
Notes
- Ensure butter for frosting is softened but not melted to achieve the best fluffy texture.
- Do not overmix the cupcake batter to keep the cupcakes light and tender.
- Gel food colors give vibrant color without thinning the frosting; avoid liquid food coloring.
- Using tweezers to place candy eyes helps with precision and safety.
- Oreos can be substituted with other cookie types if desired.
- Store cupcakes in an airtight container at room temperature for up to 2 days.
Nutrition
- Serving Size: 1 cupcake
- Calories: 314
- Sugar: 44g
- Sodium: 165mg
- Fat: 7g
- Saturated Fat: 4g
- Unsaturated Fat: 2g
- Trans Fat: 0g
- Carbohydrates: 61g
- Fiber: 1g
- Protein: 2g
- Cholesterol: 29mg

