
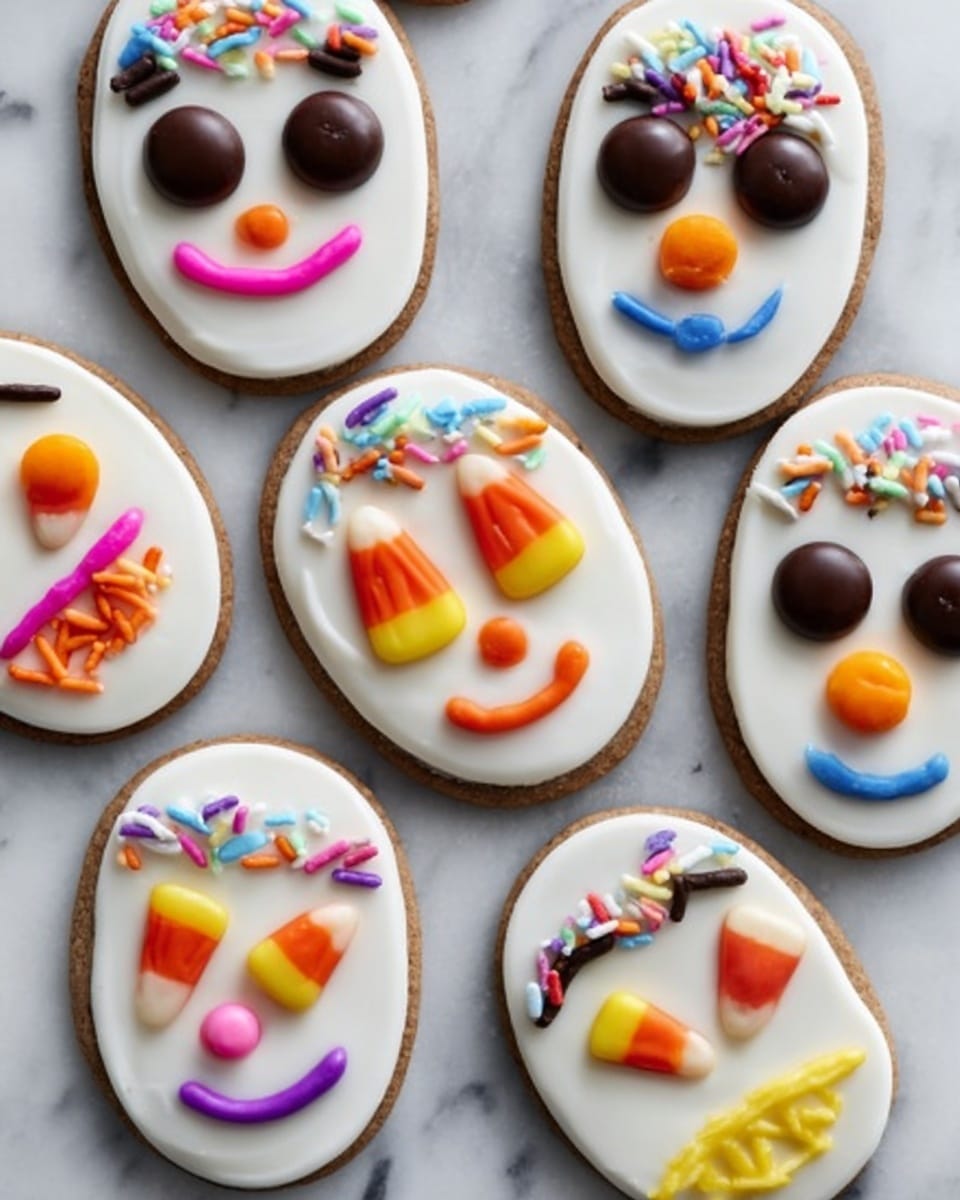
If you’re looking to bring a festive flair to your kitchen with a treat that’s as fun to decorate as it is delicious, you’ve got to try this Day of the Dead Cookies Recipe. These rich chocolate sugar cookies capture the spirit of the celebration perfectly, with just the right amount of spice and a rainbow of candy decorations that make them totally irresistible. Trust me, once you make these, you’ll want to bake them for every holiday and special occasion!
Why You’ll Love This Recipe
- Festive and Flavorful: The combination of cocoa and cinnamon gives these cookies a warm, rich taste that’s perfect for the Day of the Dead celebrations.
- Fun to Decorate: You can get creative with your candy choices and make each cookie uniquely vibrant—my family loves gathering around the table for this part!
- Easy to Make Ahead: The dough chills well, and the cookies keep their shape during baking, so you can prep ahead without any stress.
- Kid-Friendly Activity: Decorating these cookies is a fantastic way to include kids in the kitchen, making memories as you celebrate tradition together.

Ingredients You’ll Need
For this Day of the Dead Cookies Recipe, the ingredients are pretty straightforward, but every one plays an important part in the final flavor and texture. I like to use good-quality unsweetened cocoa powder to get that deep chocolate note without extra sweetness.
- All-purpose flour: Helps create the structure of the cookie – make sure to measure properly for the best texture.
- Unsweetened cocoa powder: Adds rich chocolate flavor while keeping the cookie from being too sweet.
- Ground cinnamon: Brings a warm, subtle spice that’s perfect for Day of the Dead treats.
- Salt: Just a pinch to balance out the sweetness and enhance all the flavors.
- Unsalted butter: Softened for easy creaming, it gives the cookies a tender, melt-in-your-mouth quality.
- Powdered sugar: Adds smooth sweetness and helps create a light, fluffy dough when creamed with butter.
- Egg: Binds everything together and adds richness.
- Vanilla extract: Enhances the cookie’s flavor with a lovely aromatic note.
- Milk: Used in the icing to give it the perfect consistency for decorating.
- Candies and decorations: Think Skittles, sprinkles, candy corn, M&Ms, cinnamon hearts, candy-coated sunflower seeds, licorice, and more—you really can’t go wrong!
Variations
I love how versatile this Day of the Dead Cookies Recipe is—you can tailor it to suit your taste or dietary needs without losing the celebratory vibe. Here are some ways I’ve experimented and loved:
- Gluten-Free Version: I swapped the all-purpose flour for a gluten-free baking blend once, and it worked surprisingly well—just keep an eye on dough hydration.
- Spice It Up: A pinch of cayenne pepper added a nice kick when I wanted a spicier cookie for adult gatherings.
- Different Icing Flavors: Sometimes I add a little orange zest or a drop of almond extract to the icing for fun flavor twists.
- Vegan Adaptation: Using vegan butter and a flax egg gave me a tasty dairy-free option that didn’t miss out on richness.
How to Make Day of the Dead Cookies Recipe
Step 1: Whisk Your Dry Ingredients
Start by whisking together the flour, cocoa powder, cinnamon, and a pinch of salt in a medium bowl. I like to do this early so everything is evenly combined, which really helps the cookies bake evenly and taste perfectly spiced. It also prevents clumps in the dough.
Step 2: Cream Butter and Sugar
In a large bowl, beat the softened butter with the powdered sugar on medium speed. This might seem simple, but giving it a full minute until it’s pale and fluffy is key to light, tender cookies. Then add the egg and vanilla extract and beat until fully incorporated.
Step 3: Combine Wet and Dry
Stir in the flour mixture by hand until just combined. Don’t over-mix here—this helps keep the cookies from becoming tough. Once your dough magically comes together, shape it into a disc and wrap it tightly with plastic wrap.
Step 4: Chill the Dough
Refrigerate the dough for at least one hour. This step is a game-changer; it firms up the dough, making it easier to roll out and cut shapes cleanly. Plus, chilling helps the flavors meld beautifully.
Step 5: Roll and Cut
Preheat your oven to 350°F. Lightly flour your surface and roll out the chilled dough to about 1/8-inch thickness. Using themed cookie cutters—like skulls, ovals, or eggs—cut out your shapes. Place them about 2 inches apart on parchment-lined baking sheets. I like to pop my trays back in the fridge for 15 minutes at this point; it helps cookies keep their shape during baking.
Step 6: Bake and Cool
Bake for 8 to 10 minutes, until the edges are crisp and cookies feel set but aren’t burnt. Transfer to a wire rack to cool completely before decorating. This pause is critical—you really want the icing to set beautifully without melting away.
Step 7: Make the Icing and Decorate
Whisk powdered sugar and milk together until smooth, then fill a small baggie and snip off one corner to pipe. I like to outline the cookie edges first, leaving a small border, then flood the center with icing, using a toothpick to gently spread it out. Then, the best part—decorate with your favorite candies and sprinkles. This is where the Day of the Dead theme really shines! Kids and adults alike will have a blast here.
Pro Tips for Making Day of the Dead Cookies Recipe
- Chill Twice: Refrigerate the dough once before rolling and once after cutting—this keeps your cookie shapes sharp and prevents spreading.
- Use Parchment Paper: It makes cleanup a breeze and ensures your cookies don’t stick or burn on the bottom.
- Thin Icing for Flooding: Adjust milk quantity to get a smooth, easy-to-spread icing that won’t be too runny.
- Decorate While Icing Is Wet: Add candy toppings immediately, so they stick well and don’t slide off when drying.
How to Serve Day of the Dead Cookies Recipe
Garnishes
I tend to keep the garnishes colorful and playful—things like bright Skittles, rainbow sprinkles, and candy corn really bring these cookies to life against the dark chocolate base. Sometimes I add tiny cinnamon hearts or licorice pieces for an extra pop. The key is to use a mix of shapes and colors that celebrate the Day of the Dead spirit.
Side Dishes
While these cookies can definitely be enjoyed on their own, I like to pair them with a hot cup of Mexican hot chocolate or café de olla—both have rich flavors that complement the cinnamon and cocoa in the cookies beautifully. A fresh fruit platter with oranges and pomegranate seeds also brightens up the table nicely.
Creative Ways to Present
For parties, I arrange these cookies on a decorated tray surrounded by marigold flowers and colorful papel picado. Another fun idea I tried was setting up a “decorate your own cookie” station with different candies, icing colors, and edible glitter—always a hit with kids and adults alike. You could even add mini skull-shaped cookie cutters as party favors to extend the fun beyond the kitchen.
Make Ahead and Storage
Storing Leftovers
I store these cookies in an airtight container layered with parchment paper between them to keep their decorations intact. They stay fresh for about 4-5 days at room temperature, which is typically perfect since they often disappear faster!
Freezing
If I’m making a big batch ahead of time, I freeze the baked cookies (before icing) on a tray in a single layer, then transfer them to a freezer-safe bag once solid. When you’re ready, just thaw completely before decorating. I’ve found this saves a ton of time on busy holiday prep!
Reheating
While these cookies are best enjoyed at room temperature, if you want to warm them up slightly, I recommend a quick 10-second zap in the microwave or a few minutes in a low oven (around 250°F). This gently refreshes their softness without melting your pretty decorations.
FAQs
-
Can I substitute other spices for cinnamon in this Day of the Dead Cookies Recipe?
Absolutely! While cinnamon adds a classic warm note, you can experiment with ground nutmeg, allspice, or even a pinch of chili powder for a subtle heat—just keep spices light so they don’t overpower the chocolate base.
-
How do I get my cookie icing smooth without air bubbles?
To avoid air bubbles, stir your icing gently and strain it through a fine sieve if needed. Also, let the icing sit for a few minutes before using to help any bubbles rise and pop on their own.
-
Can I make the dough in advance and freeze it?
Yes! Wrap the dough disk tightly in plastic wrap and freeze for up to 3 months. Thaw overnight in the fridge before rolling and cutting shapes for baking.
-
What’s the best way to keep my decorations from sliding off the icing?
Decorate immediately after spreading the icing while it’s still wet. Also, use candies with a flat or slightly textured bottom that grip better. Let the decorated cookies dry completely on a flat surface before stacking or storing.
Final Thoughts
Making this Day of the Dead Cookies Recipe has become one of my favorite ways to celebrate the holiday with a delicious, hands-on activity that brings friends and family together. The balance of chocolate and cinnamon flavors with the colorful, playful decorations always makes everyone smile. I hope you’ll enjoy baking and decorating these cookies as much as I do—it’s a sweet tradition made for sharing and creating joyful memories. Give it a try, and let the vibrant spirit of the Day of the Dead fill your kitchen!
Print
Day of the Dead Cookies Recipe
- Prep Time: 1 hour 15 minutes
- Cook Time: 8 to 10 minutes
- Total Time: 1 hour 23 minutes
- Yield: 24 cookies
- Category: Dessert
- Method: Baking
- Cuisine: Mexican
- Diet: Vegetarian
Description
Delight in these festive Day of the Dead Cookies, rich chocolate sugar cookies spiced with cinnamon and beautifully decorated with colorful icing and candies. Perfect for celebrating the holiday with a sweet and visually appealing treat.
Ingredients
Dry Ingredients
- 1 ½ cups all-purpose flour (plus more for rolling dough)
- ½ cup unsweetened cocoa powder
- ¼ cup ground cinnamon
- Pinch of salt
Wet Ingredients
- 12 tablespoons unsalted butter, softened
- 1 ¼ cups powdered sugar
- 1 egg
- ½ teaspoon vanilla extract
Icing
- 2 cups powdered sugar
- 3 tablespoons milk
Decorations
- Skittles, sprinkles, candy corn, M&Ms, cinnamon hearts, candy-coated sunflower seeds, licorice, or assorted candies
Instructions
- Mix Dry Ingredients: In a medium bowl, whisk together the all-purpose flour, unsweetened cocoa powder, ground cinnamon, and a pinch of salt until well combined. This forms the spiced chocolate base for the cookies.
- Cream Butter and Sugar: In a large bowl, beat the softened unsalted butter and powdered sugar on medium speed for about 1 minute until pale and fluffy, creating a smooth and creamy mixture.
- Add Egg and Vanilla: Beat in the egg and vanilla extract until fully incorporated, contributing to the dough’s moisture and flavor.
- Combine with Dry Mix: Stir the flour mixture into the butter mixture until just combined, forming the cookie dough without overmixing to ensure tender cookies.
- Chill Dough: Shape the dough into a disc, wrap it tightly in plastic wrap, and refrigerate for at least 1 hour to firm up the dough for easier rolling and cutting.
- Preheat and Roll: Preheat the oven to 350°F (175°C). On a lightly floured surface, roll out the chilled dough to 1/8-inch thickness for delicate, crisp cookies.
- Cut Shapes: Use oval, egg, or skull-shaped cookie cutters to cut the dough into festive shapes. Place cookies 2 inches apart on parchment paper-lined baking sheets to allow for spreading.
- Chill Cut Cookies: Refrigerate the cut-out cookies on the baking sheet until firm, about 15 minutes. This helps maintain shape during baking.
- Bake Cookies: Bake the cookies in the preheated oven for 8 to 10 minutes until crisp and set. Avoid overbaking to keep them tender yet firm.
- Cool: Transfer cookies to a cooling rack and let them cool completely before decorating to ensure icing adheres properly.
- Prepare Icing: In a small bowl, stir together powdered sugar and milk until smooth. Transfer the icing to a quart-size resealable plastic bag and snip off one corner to create a piping bag.
- Decorate: Outline the cookie edges with icing, leaving a small border. Fill in the center with more icing and use a toothpick to evenly spread the icing. Top with assorted candies, sprinkles, or decorations of choice for a festive finish.
Notes
- This recipe produces decorated chocolate sugar cookies perfect for Day of the Dead celebrations.
- Use a variety of colorful candies and sprinkles to personalize your cookies.
- Ensure cookies are completely cool before decorating to prevent icing from melting.
- Chilling both the dough and cut cookies helps maintain shape and texture during baking.
Nutrition
- Serving Size: 1 cookie
- Calories: 156
- Sugar: 16 g
- Sodium: 5 mg
- Fat: 6.25 g
- Saturated Fat: 3.8 g
- Unsaturated Fat: 2 g
- Trans Fat: 0.25 g
- Carbohydrates: 25.3 g
- Fiber: 2.1 g
- Protein: 1.6 g
- Cholesterol: 22 mg


