
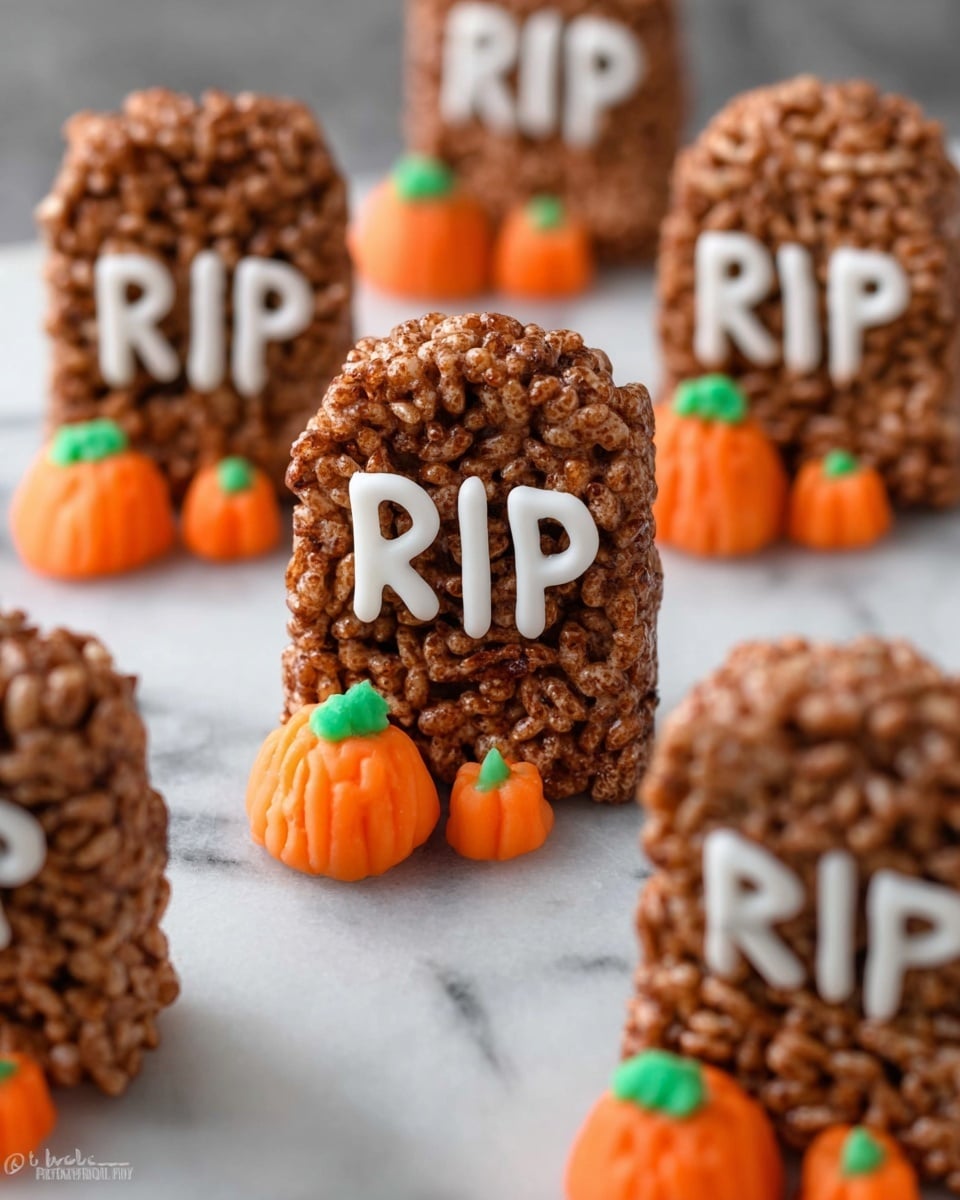
If you’re looking for a fun, spooky treat to whip up for Halloween or any time you want to impress with a twist on a classic, you’ve got to try this Tombstone Rice Krispies Recipe. I absolutely love how it combines the nostalgic crunch of Rice Krispies with rich Nutella and cocoa, all shaped into adorable (and slightly eerie) tombstones that stand up perfectly for a festive vibe. Stick around because this recipe is as easy as it is show-stopping, and I’m sharing all my best tips so you can nail it on your first try!
Why You’ll Love This Recipe
- Super Simple: It takes just a handful of ingredients and no baking, making it perfect for last-minute treats.
- Decadently Delicious: The Nutella and cocoa Rice Krispies combo takes classic cereal treats to a whole new level of yum.
- Great for Kids and Parties: Shaping them into tombstones is a fun activity, and they’re great as spooky bite-sized snacks.
- Customizable Decoration: You can personalize each tombstone with white chocolate or frosting notes—super cute and creative.

Ingredients You’ll Need
The magic in this Tombstone Rice Krispies Recipe really comes down to quality ingredients that work harmoniously: creamy Nutella adds richness, while butter and mini marshmallows provide the perfect gooey texture. Plus, cocoa Rice Krispies give that rich chocolaty crunch you won’t stop munching on.
- Mini marshmallows: Using minis helps everything melt evenly and creates that classic chewy texture you want.
- Butter: It adds richness and helps the marshmallows melt smoothly without burning.
- Nutella: This adds a luscious hazelnut-chocolate flavor—feel free to substitute with any chocolate-hazelnut spread you love.
- Cocoa Rice Krispies: This twists the original Rice Krispies flavor into something chocolaty and perfect for a Halloween vibe.
- Melted white chocolate or white frosting: For writing your RIP messages—it’s all about that contrast and fun decoration.
Variations
I like to keep the core of this Tombstone Rice Krispies Recipe pretty classic, but I’ve definitely played around with some fun tweaks depending on the mood or occasion. Feel free to make it your own!
- Add Peppermint: My family goes crazy for a little peppermint extract stirred in during colder months—it adds a festive kick.
- Dairy-Free Version: Use coconut oil instead of butter and a dairy-free chocolate spread instead of Nutella to make it vegan-friendly.
- Colorful Decorations: Swap white chocolate for colored melts or candy melts to personalize tombstones for different themes.
- Crunch Boost: Toss in some chopped toasted nuts or pretzels for extra texture that surprised me in a good way!
How to Make Tombstone Rice Krispies Recipe
Step 1: Melt Marshmallows and Butter Smoothly
Start by putting your mini marshmallows and butter in a large microwave-proof bowl. Pop it in the microwave for 1 minute, then give it a good stir. You’ll notice it begins to melt nicely but might need a little more time. Continue microwaving in 30-second bursts, stirring between each, until everything is melted smooth and beautifully glossy. This method helps prevent burning, which I once learned the hard way by rushing it!
Step 2: Stir in Nutella for That Irresistible Flavor
Next, add your Nutella to the melted marshmallow and butter mixture. Stir it in thoroughly while it’s still warm—that way it melts nicely and blends into a silky, chocolate-hazelnut swirl. Watching this step is my favorite because the aroma already sets the Halloween vibe in the air!
Step 3: Add Cocoa Rice Krispies and Mix Thoroughly
Now for the crunch—pour in your cocoa Rice Krispies and fold them gently but thoroughly into the chocolatey marshmallow mixture. You’ll want them evenly coated but be careful not to mash the cereal. I like to use a sturdy spoon or spatula for this part to make sure every bite is perfectly crispy and chocolate-coated.
Step 4: Shape Your Tombstones with Care
This is where the fun begins! Grab small handfuls of the mixture and start forming tombstone shapes. They can be all the same size or varied — I usually do a mix! Here’s a tip: butter or slightly grease your fingers beforehand; otherwise, things get super sticky fast. I use parchment paper underneath to keep them from sticking to the surface. Make sure the bottom of your tombstone is flat — this helps them stand upright after they cool, which is great for presentation.
Step 5: Let Cool, Then Decorate with White Chocolate or Frosting
Once they’re shaped, give your tombstones some time to cool and set—about 20-30 minutes should do it. Then, it’s time to get creative! Melt your white chocolate or prepare white frosting to write your “RIP” messages. I discovered the easiest way to pipe is to create a mini piping bag from a small ziplock bag—you just snip a tiny corner and voilà, control and precision! It’s such a fun finishing touch that really makes these treats stand out.
Pro Tips for Making Tombstone Rice Krispies Recipe
- Butter Your Hands: This hands-down saved me from wrestling sticky dough—don’t skip it!
- Microwave in Intervals: Melting marshmallows slowly prevents scorching, which I learned after one smoky kitchen mishap.
- Flat Bottoms Are Key: Making sure your tombstones stand up is all about a sturdy, level base.
- Mini Piping Bag Hack: Using a ziplock bag for piping details avoids mess and makes decorating way easier.
How to Serve Tombstone Rice Krispies Recipe
Garnishes
I like to keep the garnishes simple—white chocolate or white frosting messages are all you really need to make them look festive and spooky. But for extra flare, a light dusting of edible glitter or popping candy on top can add fun texture and sparkle that kids absolutely love.
Side Dishes
These tombstone treats pair beautifully with a big bowl of mulled apple cider or a creamy hot chocolate—both balance the crunch and sweetness perfectly. If it’s a party, I also like to set up a candy apple station nearby to keep the autumn vibes strong.
Creative Ways to Present
For Halloween parties, I arranged the tombstones upright in a “graveyard” scene on a black tray with some edible dirt (crushed Oreos) and gummy worms peeking out—it was a hit! You could also use small flowerpots lined with parchment to place your tombstones like little garden graves. Totally fun and super Instagrammable.
Make Ahead and Storage
Storing Leftovers
I store leftover Tombstone Rice Krispies in an airtight container at room temperature. They stay fresh and chewy for about 2-3 days. If they start to feel a bit too firm, letting them sit out for a bit softens them up perfectly.
Freezing
I’ve had great luck freezing these treats individually wrapped in plastic wrap and then placed in a freezer bag. When you’re ready to enjoy them, just thaw at room temperature for 30 minutes and they come back tender and delicious.
Reheating
I usually don’t reheat these treats since they’re best enjoyed fresh or room temperature, but if you want to warm them slightly, a 5-10 second zap in the microwave helps soften them without melting the chocolate decoration.
FAQs
-
Can I use regular Rice Krispies instead of cocoa-flavored ones?
Absolutely! Regular Rice Krispies will work fine and make the treats a bit lighter in chocolate flavor. If you want that cocoa taste, you can always add a tablespoon of cocoa powder to the marshmallow mixture to compensate.
-
What if I don’t have Nutella—any substitutes?
You can swap Nutella for any chocolate-hazelnut spread or even melted chocolate chips mixed with a bit of hazelnut butter if you want to get creative. Just keep the quantity the same and adjust sweetness to taste.
-
How do I keep my tombstones from sticking when shaping them?
Butter or lightly grease your fingers before shaping each tombstone, and use parchment paper under them to prevent sticking. You can also lightly grease the surface you’re working on to make this easier.
-
Can I prepare these ahead of time for a party?
Yes! Make the tombstones a day or two ahead, store them airtight at room temperature, and decorate with white chocolate or frosting on the day you’ll serve them for the freshest look.
-
Is there a way to make these gluten-free?
If you use gluten-free Rice Krispies and check that your marshmallows and chocolate spreads are gluten-free, this recipe can definitely be gluten-free-friendly. Always double-check ingredient labels just to be sure.
Final Thoughts
When I first tried this Tombstone Rice Krispies Recipe, it instantly became a Halloween staple in my house — the perfect mix of nostalgic, chocolaty, and festive. I love how easy it is to make, and how the little tombstones bring a smile to everyone’s face. If you want a fun project that impresses and satisfies, give this recipe a whirl—you’ll enjoy every sticky, chocolaty bite just as much as I do!
Print
Tombstone Rice Krispies Recipe
- Prep Time: 10 minutes
- Cook Time: 3 minutes
- Total Time: 13 minutes
- Yield: 20 small tombstones
- Category: Dessert
- Method: Microwaving
- Cuisine: American
Description
These spooky Tombstone Rice Krispies treats are a fun and festive Halloween treat. Made with mini marshmallows, Nutella, and cocoa-flavored Rice Krispies cereal, they are shaped into tombstone forms and decorated with melted white chocolate or white frosting for a tasty and visually striking snack perfect for Halloween parties or themed celebrations.
Ingredients
Main Ingredients
- 4 cups mini marshmallows
- 3 Tbsp. butter
- 1/2 cup Nutella
- 4 cups cocoa Rice Krispies
- 1/3 cup melted white chocolate or white frosting (for decorating)
Instructions
- Melt Marshmallows and Butter: Add mini marshmallows and butter to a large microwave-safe bowl. Microwave for 1 minute, then stir. Continue microwaving in 30-second increments, stirring each time until fully melted and smooth.
- Add Nutella: Stir in Nutella with the melted marshmallow mixture until well combined and smooth.
- Mix in Cocoa Rice Krispies: Fold in the cocoa Rice Krispies cereal, mixing until evenly coated.
- Form Tombstones: Butter your fingers lightly to avoid stickiness. Take small amounts of the mixture and shape into tombstone forms of various sizes. Place on parchment paper so they don’t stick. Press the bottoms flat to ensure they stand upright.
- Cool and Decorate: Let the tombstones cool completely. Use melted white chocolate or white frosting in a piping bag or small ziplock bag to write “RIP” or other decorations on each tombstone.
- Serve and Enjoy: Let the decorated tombstones set, then serve as a fun Halloween treat!
Notes
- Butter your fingers or wear gloves when shaping to prevent sticking.
- You can make different sizes of tombstones for variety.
- Use parchment paper to cool the treats and prevent sticking.
- If you don’t have cocoa Rice Krispies, you can use regular Rice Krispies and add cocoa powder to taste, but the flavor and color will differ.
- Melted white chocolate works well for decorating but white frosting is a good alternative if preferred.
- Store treats in an airtight container to keep fresh for up to 3 days.
Nutrition
- Serving Size: 1 tombstone (approx. 1/20th of recipe)
- Calories: 140
- Sugar: 12g
- Sodium: 70mg
- Fat: 7g
- Saturated Fat: 5g
- Unsaturated Fat: 2g
- Trans Fat: 0g
- Carbohydrates: 18g
- Fiber: 1g
- Protein: 1g
- Cholesterol: 15mg


