
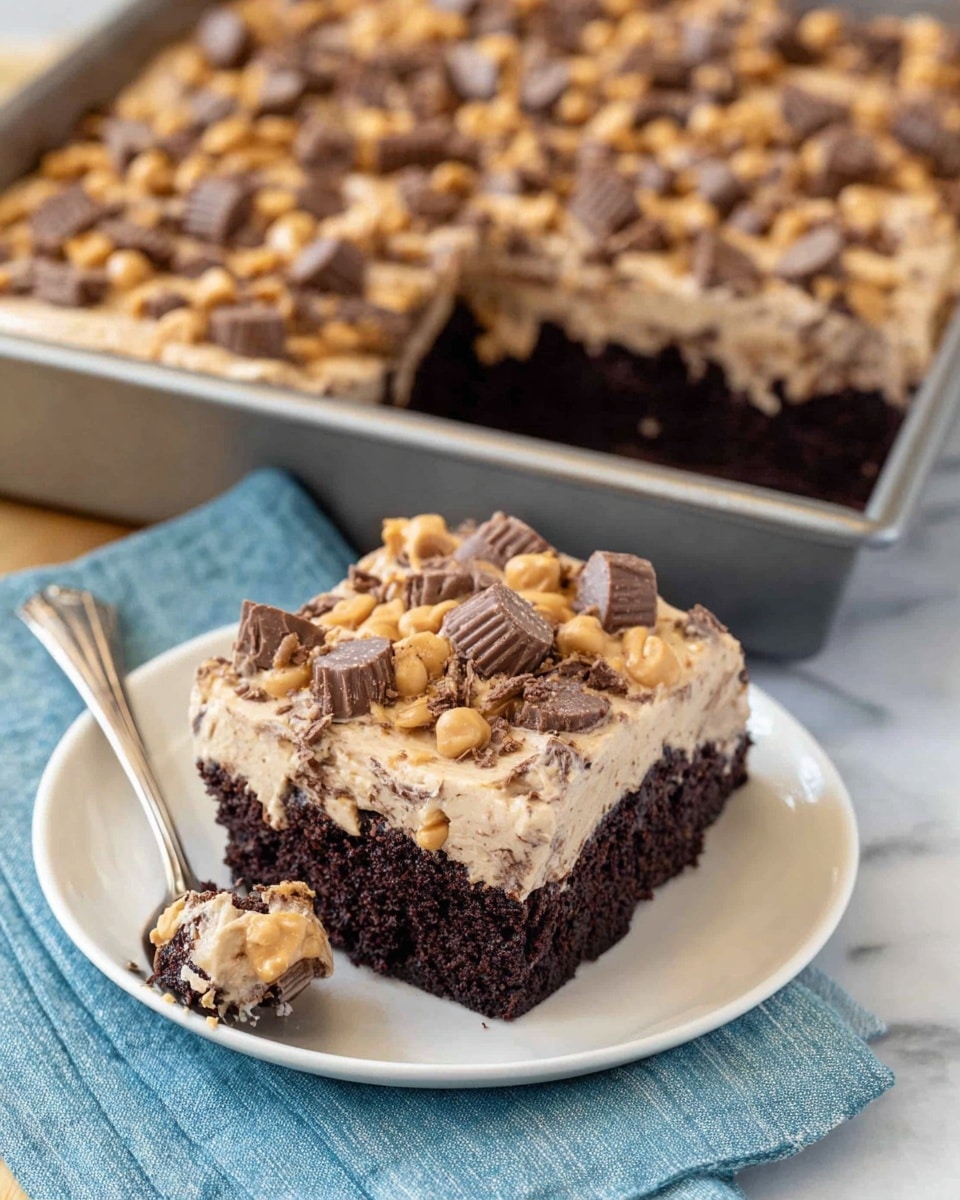
If you’re a peanut butter and chocolate fanatic like me, then you’re about to fall head over heels with this Reese’s Peanut Butter and Chocolate Poke Cake Recipe. It’s one of those desserts that’s ridiculously easy to make but tastes like you spent hours perfecting it. The combination of rich chocolate cake, creamy peanut butter pudding, and those iconic mini Reese’s cups sprinkled on top? Pure magic. Trust me, once you try this, it’ll instantly become your go-to for birthdays, potlucks, or any day that deserves a little indulgence.
Why You’ll Love This Recipe
- Effortless Yet Impressive: You get all the wow factor with simple steps and easy-to-find ingredients.
- Peanut Butter & Chocolate Heaven: It’s the perfect balance of smooth peanut butter and rich chocolate that everyone adores.
- Great for Any Occasion: Whether it’s a casual weekend dessert or a party showstopper, this cake fits right in.
- Customizable and Crowd-Pleasing: You can tweak it easily to fit dietary needs or personal tastes.

Ingredients You’ll Need
Let’s talk ingredients — I like how this recipe uses a cake mix to keep things simple, but then jazzes it up with pudding, peanut butter, and those beloved Reese’s cups. It’s a perfect blend that’s accessible for most home bakers, and the ingredients play beautifully together.
- Chocolate cake mix: Pick your favorite boxed brand; it’s the base that saves time and tastes great.
- Vanilla instant pudding mix: Adds creamy texture and balances the chocolate flavor.
- Cold milk: Essential for the pudding to set perfectly.
- Creamy peanut butter: Divided use ensures you get pockets of peanut buttery goodness plus a fluffy topping.
- Chocolate frosting: I usually go with classic chocolate fudge for that smooth drizzle.
- Frozen whipped topping: Thaw it completely for the best texture in your peanut butter topping.
- Mini Peanut Butter Cups: Use chopped, unwrapped ones for that lovely crunchy bite on top.
Variations
I love experimenting with this Reese’s Peanut Butter and Chocolate Poke Cake Recipe, and honestly, the recipe is forgiving enough that you can make it your own without stress. Don’t hesitate to mix things up!
- Gluten-Free Alternative: I swapped the cake mix for a gluten-free version one time and nobody could tell — still wonderfully moist and tasty.
- Crunch Factor: Adding chopped peanuts beneath the peanut butter topping gives a great textural surprise if you’re craving some crunch.
- Peanut Butter Swap: I’ve tried natural peanut butter but found creamy regular peanut butter works best for smooth mixing and topping consistency.
- Chocolate Type: Want it less sweet? Try a semi-sweet or dark chocolate frosting instead of standard chocolate.
How to Make Reese’s Peanut Butter and Chocolate Poke Cake Recipe
Step 1: Bake Your Chocolate Cake Base
Start by preparing your chocolate cake mix according to the package instructions — I always grease my 13 x 9-inch pan well to make sure the cake comes out cleanly. After baking, allow it to cool for about 15 to 20 minutes; this rest time helps the cake hold together nicely when you poke holes into it, so your pudding filling won’t turn it into mush.
Step 2: Poke Those Holes and Prepare the Pudding
Using the round end of a wooden spoon, poke holes every half to one inch across the entire cake. This is the trick that locks in the pudding, so you get pockets of creamy peanut butter goodness throughout. Next, whisk the vanilla instant pudding mix with cold milk until everything dissolves smoothly — this usually takes about two minutes. Then stir in half a cup of peanut butter to the mix and whisk until it’s silky.
Step 3: Pour, Drizzle, and Chill
Pour the peanut butter pudding over the cake, making sure you fill those holes well. This step is what makes the poke cake so special! Microwave your chocolate frosting for 15 to 20 seconds until it’s pourable, then drizzle and spread it evenly over the pudding layer. Once set, let the cake cool completely before adding the next layers.
Step 4: Top It Off with Peanut Butter Whipped Cream and Reese’s Cups
Whisk together the remaining peanut butter and thawed whipped topping until fluffy and combined. Spread this heavenly layer over the cooled cake, then generously sprinkle with chopped mini Reese’s Peanut Butter Cups. Pop it in the fridge for at least 4 hours — I usually make this the night before to let all those flavors meld together fabulously.
Pro Tips for Making Reese’s Peanut Butter and Chocolate Poke Cake Recipe
- Cool Before Poking: I learned the hard way that poking holes too soon can crumble the cake, so a warm but slightly cooled cake is perfect.
- Microwave Frosting Just Right: Don’t overheat your frosting; 15 seconds usually softens it enough to drizzle smoothly without melting.
- Whip Peanut Butter with Topping: Whisking peanut butter with whipped topping gives you that light and fluffy texture that’s not too heavy.
- Plan Ahead: This recipe shines after chilling, so make it a few hours ahead (or the day before) for best results.
How to Serve Reese’s Peanut Butter and Chocolate Poke Cake Recipe
Garnishes
I usually stick with chopped mini Reese’s cups on top because they add that perfect crunchy peanut butter pop. Sometimes, I sprinkle a little sea salt atop to balance the sweetness — it’s a game changer if you like that salty-sweet combo!
Side Dishes
This poke cake is rich enough to be the star of the show, so I like to pair it with simple things like fresh berries or a dollop of plain vanilla ice cream to cut through the richness. It works effortlessly as a dessert after hearty meals.
Creative Ways to Present
For birthdays or special occasions, I’ve made single-serve poke cake cups using cupcake liners and mini Reese’s cups on top for garnish — guests love it! You can also serve slices with a sprinkle of crushed peanut brittle or a drizzle of caramel sauce if you want to get fancy.
Make Ahead and Storage
Storing Leftovers
I always keep the leftover poke cake tightly covered in the fridge, and it stays moist and flavorful for about 3-4 days. The peanut butter and whipped topping layers hold up beautifully, so you’re never wasting any of this deliciousness.
Freezing
Freezing this cake can be a bit tricky because of the whipped topping. I’ve had good luck freezing the chocolate cake itself (before adding the toppings), then thawing and adding the peanut butter layer fresh. This keeps the texture nice without sogginess.
Reheating
Since this dessert is best chilled, I usually serve leftovers cold or at room temperature. If you want to warm a slice, a few seconds in the microwave works, but be careful not to melt the frosting too much.
FAQs
-
Can I make this Reese’s Peanut Butter and Chocolate Poke Cake Recipe dairy-free?
Absolutely! Swap out the milk for almond or oat milk, use dairy-free chocolate frosting, and replace the whipped topping with a coconut-based alternative. Just make sure the instant pudding mix is also dairy-free or use a homemade substitute.
-
What’s the best way to poke the holes in the cake?
I prefer using the rounded handle of a wooden spoon because it creates even, shallow holes that hold the pudding perfectly without breaking the cake apart.
-
Can I use homemade chocolate cake instead of cake mix?
Yes! A moist homemade chocolate cake works just as well. Just be sure it’s baked in a 13 x 9-inch pan and cooled properly before poking and filling.
-
How far in advance can I make this cake?
I recommend making it up to a day ahead, especially because it needs at least 4 hours to chill and set completely. This makes it super convenient for parties or weekend treats.
-
Can I double this recipe for a bigger crowd?
You sure can! Just double your ingredients and use two 13 x 9-inch pans or a larger baking dish with a deeper bake time. Keep an eye on baking times, as it might take a bit longer.
Final Thoughts
This Reese’s Peanut Butter and Chocolate Poke Cake Recipe has become one of my absolute favorites because it combines comfort, indulgence, and ease all in one. It’s a dessert you can rely on to impress guests or just satisfy your own peanut butter cravings without fuss. I hope you enjoy making and sharing it as much as my family and I do — truly a dessert worth coming back to time and again!
Print
Reese’s Peanut Butter and Chocolate Poke Cake Recipe
- Prep Time: 10 min
- Cook Time: 35 min
- Total Time: 4 hr 45 min
- Yield: 24 servings
- Category: Dessert
- Method: Baking
- Cuisine: American
Description
Indulge in this irresistible Reese’s Poke Cake featuring a moist chocolate cake base filled with creamy peanut butter pudding, topped with a luscious chocolate frosting, whipped peanut butter topping, and chopped mini peanut butter cups. Perfect for parties and potlucks, this dessert offers the ultimate combination of chocolate and peanut butter flavors with an easy-to-follow recipe.
Ingredients
For the Cake
- 15.25 oz chocolate cake mix (plus ingredients to prepare the cake as per package instructions)
For the Pudding Filling
- 3.4 oz vanilla instant pudding mix
- 2 cups cold milk
- 1/2 cup creamy peanut butter
For the Topping
- 16 oz chocolate frosting
- 8 oz frozen whipped topping (thawed)
- 1 cup creamy peanut butter
- 25 mini Peanut Butter Cups (unwrapped and roughly chopped)
Instructions
- Prepare and Bake the Cake: Follow the cake mix package instructions to prepare the chocolate cake batter. Pour it into a greased 13 x 9-inch cake pan and bake as directed, usually about 35 minutes. Once baked, let it cool for 15-20 minutes.
- Poke Holes in the Cake: Using the round end of a wooden spoon, poke holes evenly across the cake every 1/2 to 1 inch. This will allow the pudding filling to seep into the cake, adding moisture and flavor.
- Make the Pudding Mixture: In a medium bowl, combine the vanilla instant pudding mix and cold milk. Whisk briskly for about 2 minutes until the pudding mix is fully dissolved and the mixture thickens slightly. Stir in 1/2 cup of creamy peanut butter until smooth and well combined.
- Add Pudding to Cake: Pour the pudding mixture evenly over the cake, making sure to fill the holes with the pudding for maximum flavor infusion.
- Apply Chocolate Frosting: Warm the chocolate frosting in the microwave for 15-20 seconds so it’s pourable. Drizzle the frosting over the cake and spread it evenly with the back of a spoon or an offset spatula.
- Cool the Cake Completely: Allow the cake to cool fully to room temperature, letting the pudding and frosting set properly.
- Prepare Peanut Butter Whipped Topping: In a large bowl, whisk together the remaining 1 cup of creamy peanut butter with the thawed whipped topping until the mixture is smooth and fluffy.
- Top the Cake: Spread the peanut butter whipped topping evenly over the cooled cake. Sprinkle the chopped mini peanut butter cups on top as a decorative and flavorful garnish.
- Chill Before Serving: Refrigerate the cake for at least 4 hours to allow the flavors to meld and the cake to firm up. Keep the cake covered and store it in the refrigerator until ready to serve.
Notes
- This cake is a peanut butter lover’s dream with a perfect balance of chocolate and peanut butter flavors, ideal for potlucks and parties.
- To make this recipe gluten-free, use a gluten-free chocolate cake mix and ensure all other ingredients are gluten-free certified.
- Make sure the whipped topping is fully thawed for easy mixing with peanut butter.
- Chilling the cake for several hours or overnight enhances the flavor and texture.
Nutrition
- Serving Size: 1 slice
- Calories: 333 kcal
- Sugar: 29 g
- Sodium: 324 mg
- Fat: 18 g
- Saturated Fat: 6 g
- Unsaturated Fat: 11 g
- Trans Fat: 0 g
- Carbohydrates: 39 g
- Fiber: 2 g
- Protein: 7 g
- Cholesterol: 3 mg


