
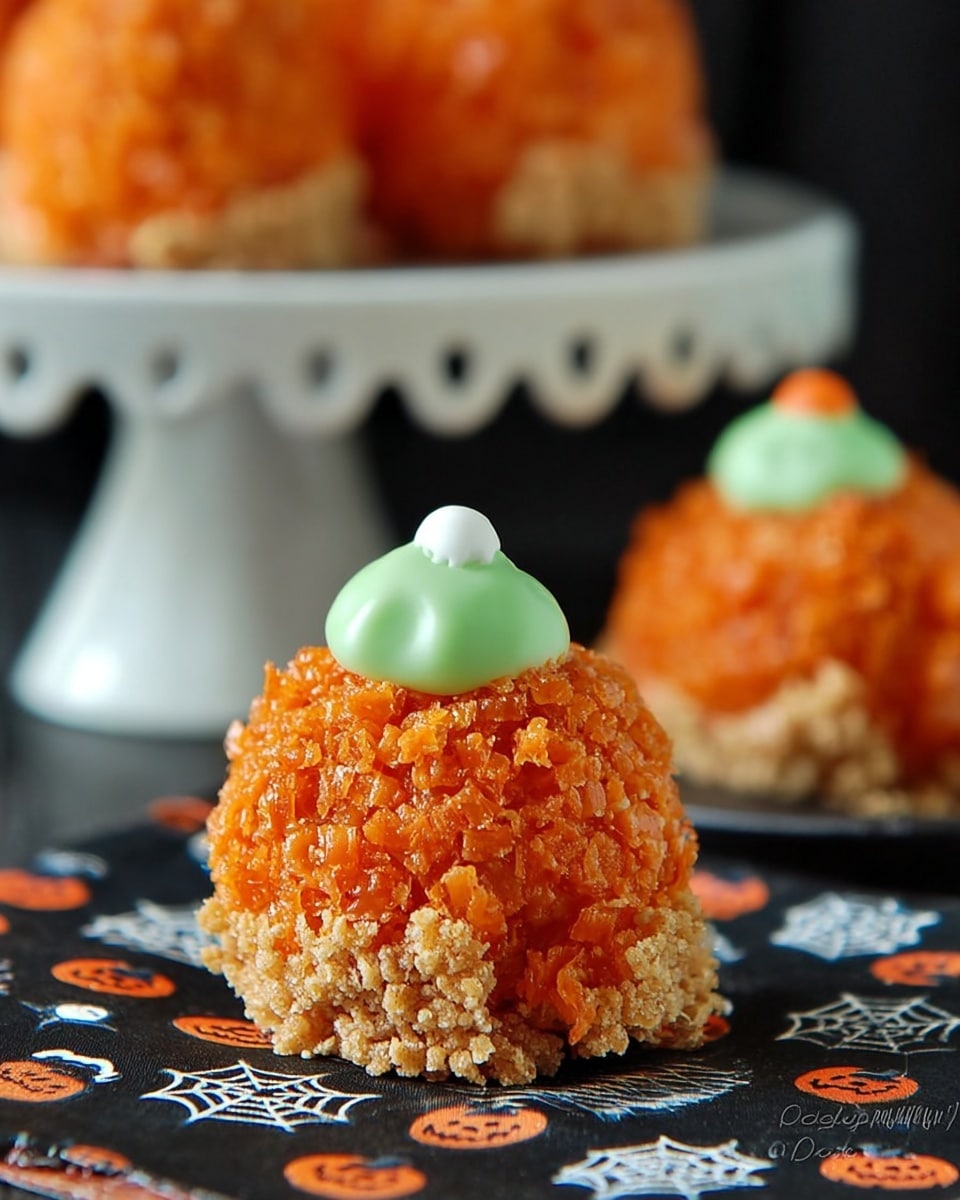
If you’re looking for a fun, festive treat that’s perfect for fall and Halloween, you’re going to absolutely love this Rice Krispie Pumpkins Recipe. It’s simple, adorable, and packs a delightful surprise inside each pumpkin with a candy center. I’ve made these at home so many times, and trust me—whether you’re making them with kids or for a party, they always bring smiles and a little wow factor. Let me walk you through everything you need to know to nail this recipe perfectly!
Why You’ll Love This Recipe
- Fun and Festive: These pumpkins make a perfect Halloween or fall party snack that’s as cute as it is tasty.
- Surprise Center: The candy inside each pumpkin adds an exciting hidden treat that kids and adults adore.
- Easy to Make: This recipe uses classic Rice Krispies treats with a colorful twist—nothing complicated or fancy needed.
- Customizable: You can switch out candies and decorate the pumpkins to suit your style or taste preferences.

Ingredients You’ll Need
These ingredients all work together to create that soft, chewy Rice Krispies base colored just right for pumpkins with a fun candy surprise inside and a frosting “stem” on top. I always advise picking candies you love since they become the heart of each pumpkin.
- Butter: Adds rich flavor and helps melt marshmallows smoothly; if unsalted, add a pinch of salt for balance.
- Mini Marshmallows: Key for that classic sticky texture; I like to save a few whole ones for the pumpkin stems.
- Rice Crispy Cereal: The crunchy base that holds everything together; make sure it’s fresh for the best texture.
- Orange and Green Liquid Food Coloring: Orange colors the pumpkins perfectly, and green gives the stems a natural look.
- Fun-Sized Candy Pieces: Choose chocolates or peanut butter cups that your family loves—they’re the delightful surprise inside each pumpkin.
- Small Batch Buttercream Frosting: This helps to attach stems and pipe vines, adding that extra charm and sweetness.
Variations
I love how flexible this Rice Krispie Pumpkins Recipe is. You can really make it your own depending on what candies you like or even how much detail you want to put into decorating. Don’t be afraid to experiment a bit!
- Vegan Variation: I once swapped mini marshmallows for a vegan brand and used coconut oil instead of butter — the texture was still great, and it pleased my vegan friends.
- Different Candy Centers: I’ve tried stuffing these pumpkins with gummy bears or caramel squares, and each one surprises the family differently.
- Frosting Colors: Playing with different food coloring shades in your buttercream makes the pumpkins even more festive — think gold or deep orange!
- Add Spices: For a grown-up twist, sprinkle a bit of cinnamon or pumpkin pie spice into the marshmallow mix; it adds subtle warmth and scent.
How to Make Rice Krispie Pumpkins Recipe
Step 1: Melt Butter and Marshmallows Gently
Start by melting the butter in a Dutch oven or large pot over low heat. Once melted, add your mini marshmallows and stir with a wooden spoon until about 90% melted. This is key—you want the marshmallows to be soft and stretchy, not fully liquified or burnt, which can make your treats hard instead of chewy. I always keep the heat low and stir patiently here to get the perfect texture.
Step 2: Add Orange Food Coloring and Cereal
Turn off the heat and carefully stir in your orange food coloring. This is what transforms the classic mix into those pumpkin-perfect hues. Then, add your Rice Krispy cereal and fold everything together until all the cereal is coated in that sticky orange marshmallow goodness. Don’t overmix or you might crush the cereal too much, though—you want nice, fluffy texture in the finished pumpkins.
Step 3: Shape Around Candy Centers
Using a ½ cup measuring cup, scoop out the mixture and press it around a fun-sized candy piece, forming a round pumpkin shape. This is where kids can get involved and have fun! If the mixture gets sticky on your hands, don’t hesitate to use a piece of greased parchment paper to handle them—that trick keeps everything less messy and easier to shape.
Step 4: Make the Stem and Add Vines
Add green food coloring to your prepared buttercream frosting, then toss your reserved mini marshmallows in it until they’re nicely coated. Gently press one marshmallow onto the top of each pumpkin to create a stem. I like to transfer the rest of my green buttercream into a piping bag to draw curly vines around the pumpkins, which adds that final charming touch.
Step 5: Serve and Enjoy
These treats are best eaten the same day you make them to enjoy the perfect texture, but if you need to store them, keep them airtight for up to three days. I’ve found they stay fresh enough that way, though the frosting can start to soften a bit after a day.
Pro Tips for Making Rice Krispie Pumpkins Recipe
- Use Low Heat for Melting: Rushing this step with high heat can burn marshmallows and ruin the texture—patience here pays off.
- Grease Your Hands or Parchment: Sticky Rice Krispie mixture is easier to shape if you lightly grease your hands or use parchment paper as a barrier.
- Customize Candy Centers: Pick candy that melts slowly so it doesn’t ooze out before serving—peanut butter cups or chocolates work perfectly.
- Pipe Vines While Slightly Warm: If your buttercream is too cold or stiff, it’s harder to pipe vines nicely—let it soften a bit for smoother piping.
How to Serve Rice Krispie Pumpkins Recipe
Garnishes
I tend to keep garnishes simple since the pumpkins themselves are a centerpiece. The green buttercream with marshmallow stems is enough to make them look irresistible, but sometimes I sprinkle a little edible glitter or chopped nuts around for extra flair when serving at parties. It adds a fun texture and sparkle kids get excited about.
Side Dishes
When I serve these for fall gatherings, I like to pair them with comforting warm drinks—think hot apple cider or a creamy pumpkin spice latte. The cozy drinks complement the sweetness of the treats perfectly, making it a delightful seasonal snack combo everyone enjoys.
Creative Ways to Present
One year, I placed them in mini orange-colored paper cups and arranged them on a rustic wooden tray with small hay bales and fallen leaves scattered around. It made a charming autumn display for a kids’ party. You can also use hollowed-out mini pumpkins as serving bowls to amplify the pumpkin vibe—guests loved the quirky presentation!
Make Ahead and Storage
Storing Leftovers
I always store any leftovers in an airtight container at room temperature to keep them from drying out. Wrapped tightly, they stay soft and delicious for about three days. Just avoid the fridge—it tends to dry them out faster.
Freezing
I’ve frozen these a couple of times, especially when making double batches ahead of time. Wrap each pumpkin individually in plastic wrap and then place them in a freezer-safe container. When you thaw them overnight at room temp, they hold up pretty well, though the texture softens slightly.
Reheating
If leftovers feel a bit hard or stale, I pop them in the microwave for about 10 seconds wrapped in a slightly damp paper towel—this helps bring back some softness without melting the candy inside.
FAQs
-
Can I use regular marshmallows instead of mini marshmallows for this recipe?
Yes, you can use regular marshmallows; just cut them into smaller pieces so they melt evenly and blend smoothly with the cereal. Mini marshmallows tend to melt faster and create a creamier texture, but regular marshmallows work fine if you don’t have minis on hand.
-
What’s the best way to get the orange food coloring to look vibrant?
Using liquid food coloring works well, but I found adding it after the marshmallows melt off the heat helps the color distribute evenly without affecting the texture. It may take a little folding to fully coat all the cereal, so be patient and gentle to keep the fluffiness.
-
Can I make the buttercream frosting ahead of time?
Absolutely! Buttercream frosting stores well in an airtight container in the fridge for up to a week. Just bring it to room temperature before using and re-whip it briefly for the best consistency to pipe stems and vines.
-
How do I avoid my Rice Krispie pumpkins sticking to my hands?
Greasing your hands lightly with butter or using a piece of parchment paper to handle and shape the mixture prevents stickiness. I learned this trick the hard way after many sticky fingers in the kitchen!
Final Thoughts
This Rice Krispie Pumpkins Recipe has become a fall staple in my kitchen because it’s not only pretty and festive but also genuinely delicious and fun to make. I love how it brings a little whimsy to the classic childhood treat with that hidden candy surprise inside. If you’re craving a cheerful, easy, and shareable snack this season, I wholeheartedly recommend giving these pumpkins a try—you’ll delight both kids and adults alike!
Print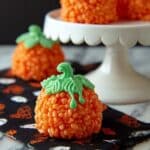
Rice Krispie Pumpkins Recipe
- Prep Time: 30 minutes
- Cook Time: 10 minutes
- Total Time: 40 minutes
- Yield: 8 pumpkin treats
- Category: Dessert
- Method: Stovetop
- Cuisine: American
- Diet: Vegetarian
Description
Rice Krispie Pumpkins are a fun and festive Halloween treat featuring orange-colored rice crispy cereal treats shaped like pumpkins with a surprise candy center and green buttercream stems and vines. These kid-friendly sweets are easy to make, combining melted marshmallows and crispy cereal with colorful touches and a delicious candy-filled center for a playful seasonal snack.
Ingredients
Base Ingredients
- 2 tablespoons butter (add 1/4 teaspoon salt if unsalted)
- 5 ounces mini marshmallows (roughly 3 cups) + 8 mini marshmallows reserved for stems
- 3 cups rice crispy cereal
- Orange liquid food coloring
- Green liquid food coloring
Fillings
- 8 fun-sized candy pieces such as chocolate kisses, peanut butter cups, Snickers, or Milky Way, unwrapped
Frosting
- 1 recipe Small Batch Buttercream Frosting
Instructions
- Melt Butter: In a Dutch oven or large wide pot over low heat, melt the butter. If using unsalted butter, add 1/4 teaspoon of salt during melting.
- Incorporate Marshmallows: Once the butter is melted, add the mini marshmallows and stir constantly with a wooden spoon until about 90% of the marshmallows have melted completely. Avoid overheating to prevent hard treats.
- Add Coloring and Cereal: Turn off the heat and stir in orange liquid food coloring until the marshmallow mixture is uniformly orange. Then, quickly fold in the rice crispy cereal until coated evenly.
- Shape Pumpkin Treats: Using a 1/2 cup measuring cup, scoop out the cereal mixture and shape it around one piece of unwrapped candy into a ball. If the mixture sticks to your hands, handle it with a greased piece of parchment paper. Repeat this process to make a total of 8 pumpkin treats.
- Prepare Pumpkin Stems: Add green food coloring to the small batch buttercream frosting. Fold in the reserved mini marshmallows to coat them with the green frosting. Attach one coated mini marshmallow to the top of each pumpkin as a stem.
- Pipe Vines: Transfer the remaining green buttercream frosting into a piping bag and pipe decorative vines around the pumpkins to complete the look.
- Serving and Storage: These treats are best served the same day they are made but can be stored in an airtight container for up to 3 days.
Notes
- Rice Krispie Pumpkins make a festive, kid-friendly Halloween treat that’s fun to make and delicious to eat.
- Be careful not to overheat the marshmallows to avoid hard rice crispy treats.
- If the mixture sticks to your hands when shaping, use greased parchment paper for easier handling.
- You can customize the candy filling based on preference for peanut butter cups, chocolates, or caramel-filled candies.
- Best eaten fresh but can be stored airtight for up to 3 days.
Nutrition
- Serving Size: 1 pumpkin treat
- Calories: 180
- Sugar: 16g
- Sodium: 85mg
- Fat: 6g
- Saturated Fat: 4g
- Unsaturated Fat: 2g
- Trans Fat: 0g
- Carbohydrates: 29g
- Fiber: 0.5g
- Protein: 2g
- Cholesterol: 15mg
